
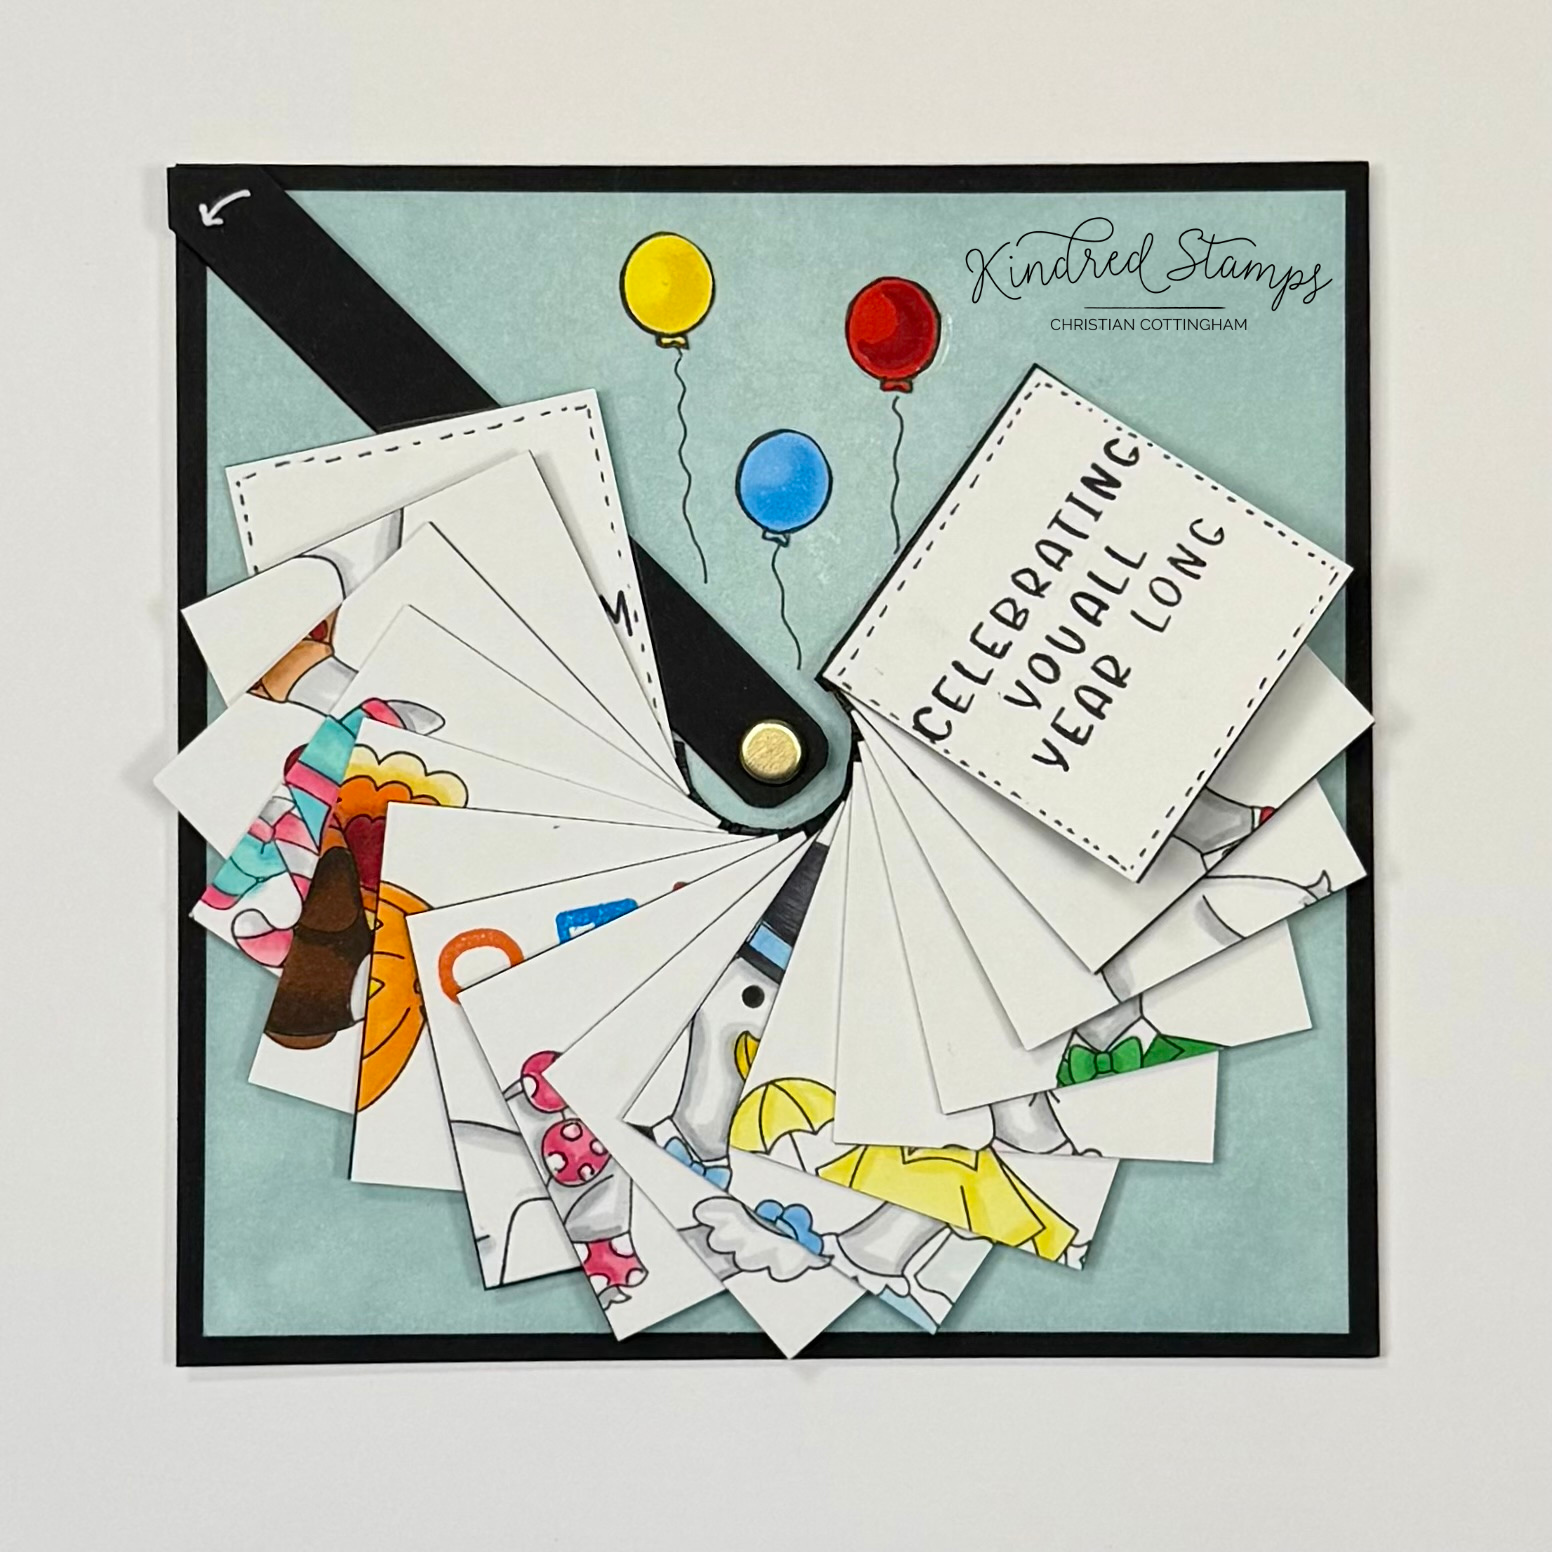
Celebrating You All Year Long: Silly Geese Waterfall Card
Let’s make a circular waterfall card with some Silly Geese to celebrate all year long!
Let’s celebrate you all year long! This video will walk you though how to make a circular waterfall card featuring the Silly Geese stamp set from Kindred Stamps. There are so many images and a lot of the images can be used for all the seasonal references.
Silly Geese, Kindred Stamps
YouTube Video: https://youtu.be/Im0xQrwfdvg
You can access the Kindred Stamps website by clicking on the affiliate links below:
Silly Geese: https://www.kindredstamps.com/products/silly-geese?_pos=1&_sid=8e73d7978&_ss=r&aff=97
Kindred Stamps Website: https://www.kindredstamps.com?aff=97
Color Guide (colored with Olo Markers):
All Geese: NG3/ NG; Y2.3/ Y2.2
All Gold elements: YO2.5/ YO2.3
Valentines: R0.5/ R0.4
Bunny: RV0.1; O7.3/ O7.1
Rainy: Y1.2/ Y1.1
Summer: RV0.4/ RV0.2; RV0.2/ RV0.1
Bride & Groom: B0.3/ B0.2/ B0.1; NG9/ NG7
Turkey: OR3.8/ OR3.7; YO0.2/ YO0.1; O2.5/ O2.4; R1.7/ R1.4
Christmas: BG1.4/ BG1.2; R2.3/ R2.2; NG1
Reindeer: OR3.4/ OR3.2/ OR3.0; R0.6/ R0.5
New Years: NG9/NG7; R1.5
4th of July: B0.7/ B0.6; R0.5/ R0.4; YO2.3/ YO2.2
Halloween: G1.5/ G1.7; Y2.3/ O1.4/ O1.3
Birthday: R0.5/ R0.4; OR1.3/ OR1.2; Y2.3/ Y1.2; YG1.6/ YG1.4; B2.6/ B2.4
Thank you for Kindred Stamps for providing the Silly Geese stamp set for the making of this video.

Night And Day: Kindred Stamps May 2026 Release
Night and Day, no matter what, their love never faltered. You can check out the Night and Day stamp set from Kindred Stamps on my blog!
Night or Day, their love will find a way, don’t worry this stamp doesn’t come with a funky sound track, but it does come with 3 images and 2 sentiments. The Night or Day set from Kindred Stamps May release tells an epic love story that defies the bonds of love.
This blog utilizes affiliate links. If you choose to click on the links provided to purchase, you are supporting me as I receive compensation for your purchase. If purchasing is not in your books, no worries, I hope you find inspiration for projects you design. By clicking on the links, you are letting Kindred Stamps know that you like my content and to keep bringing me back. Thanks for your time and let’s transition from night to day!
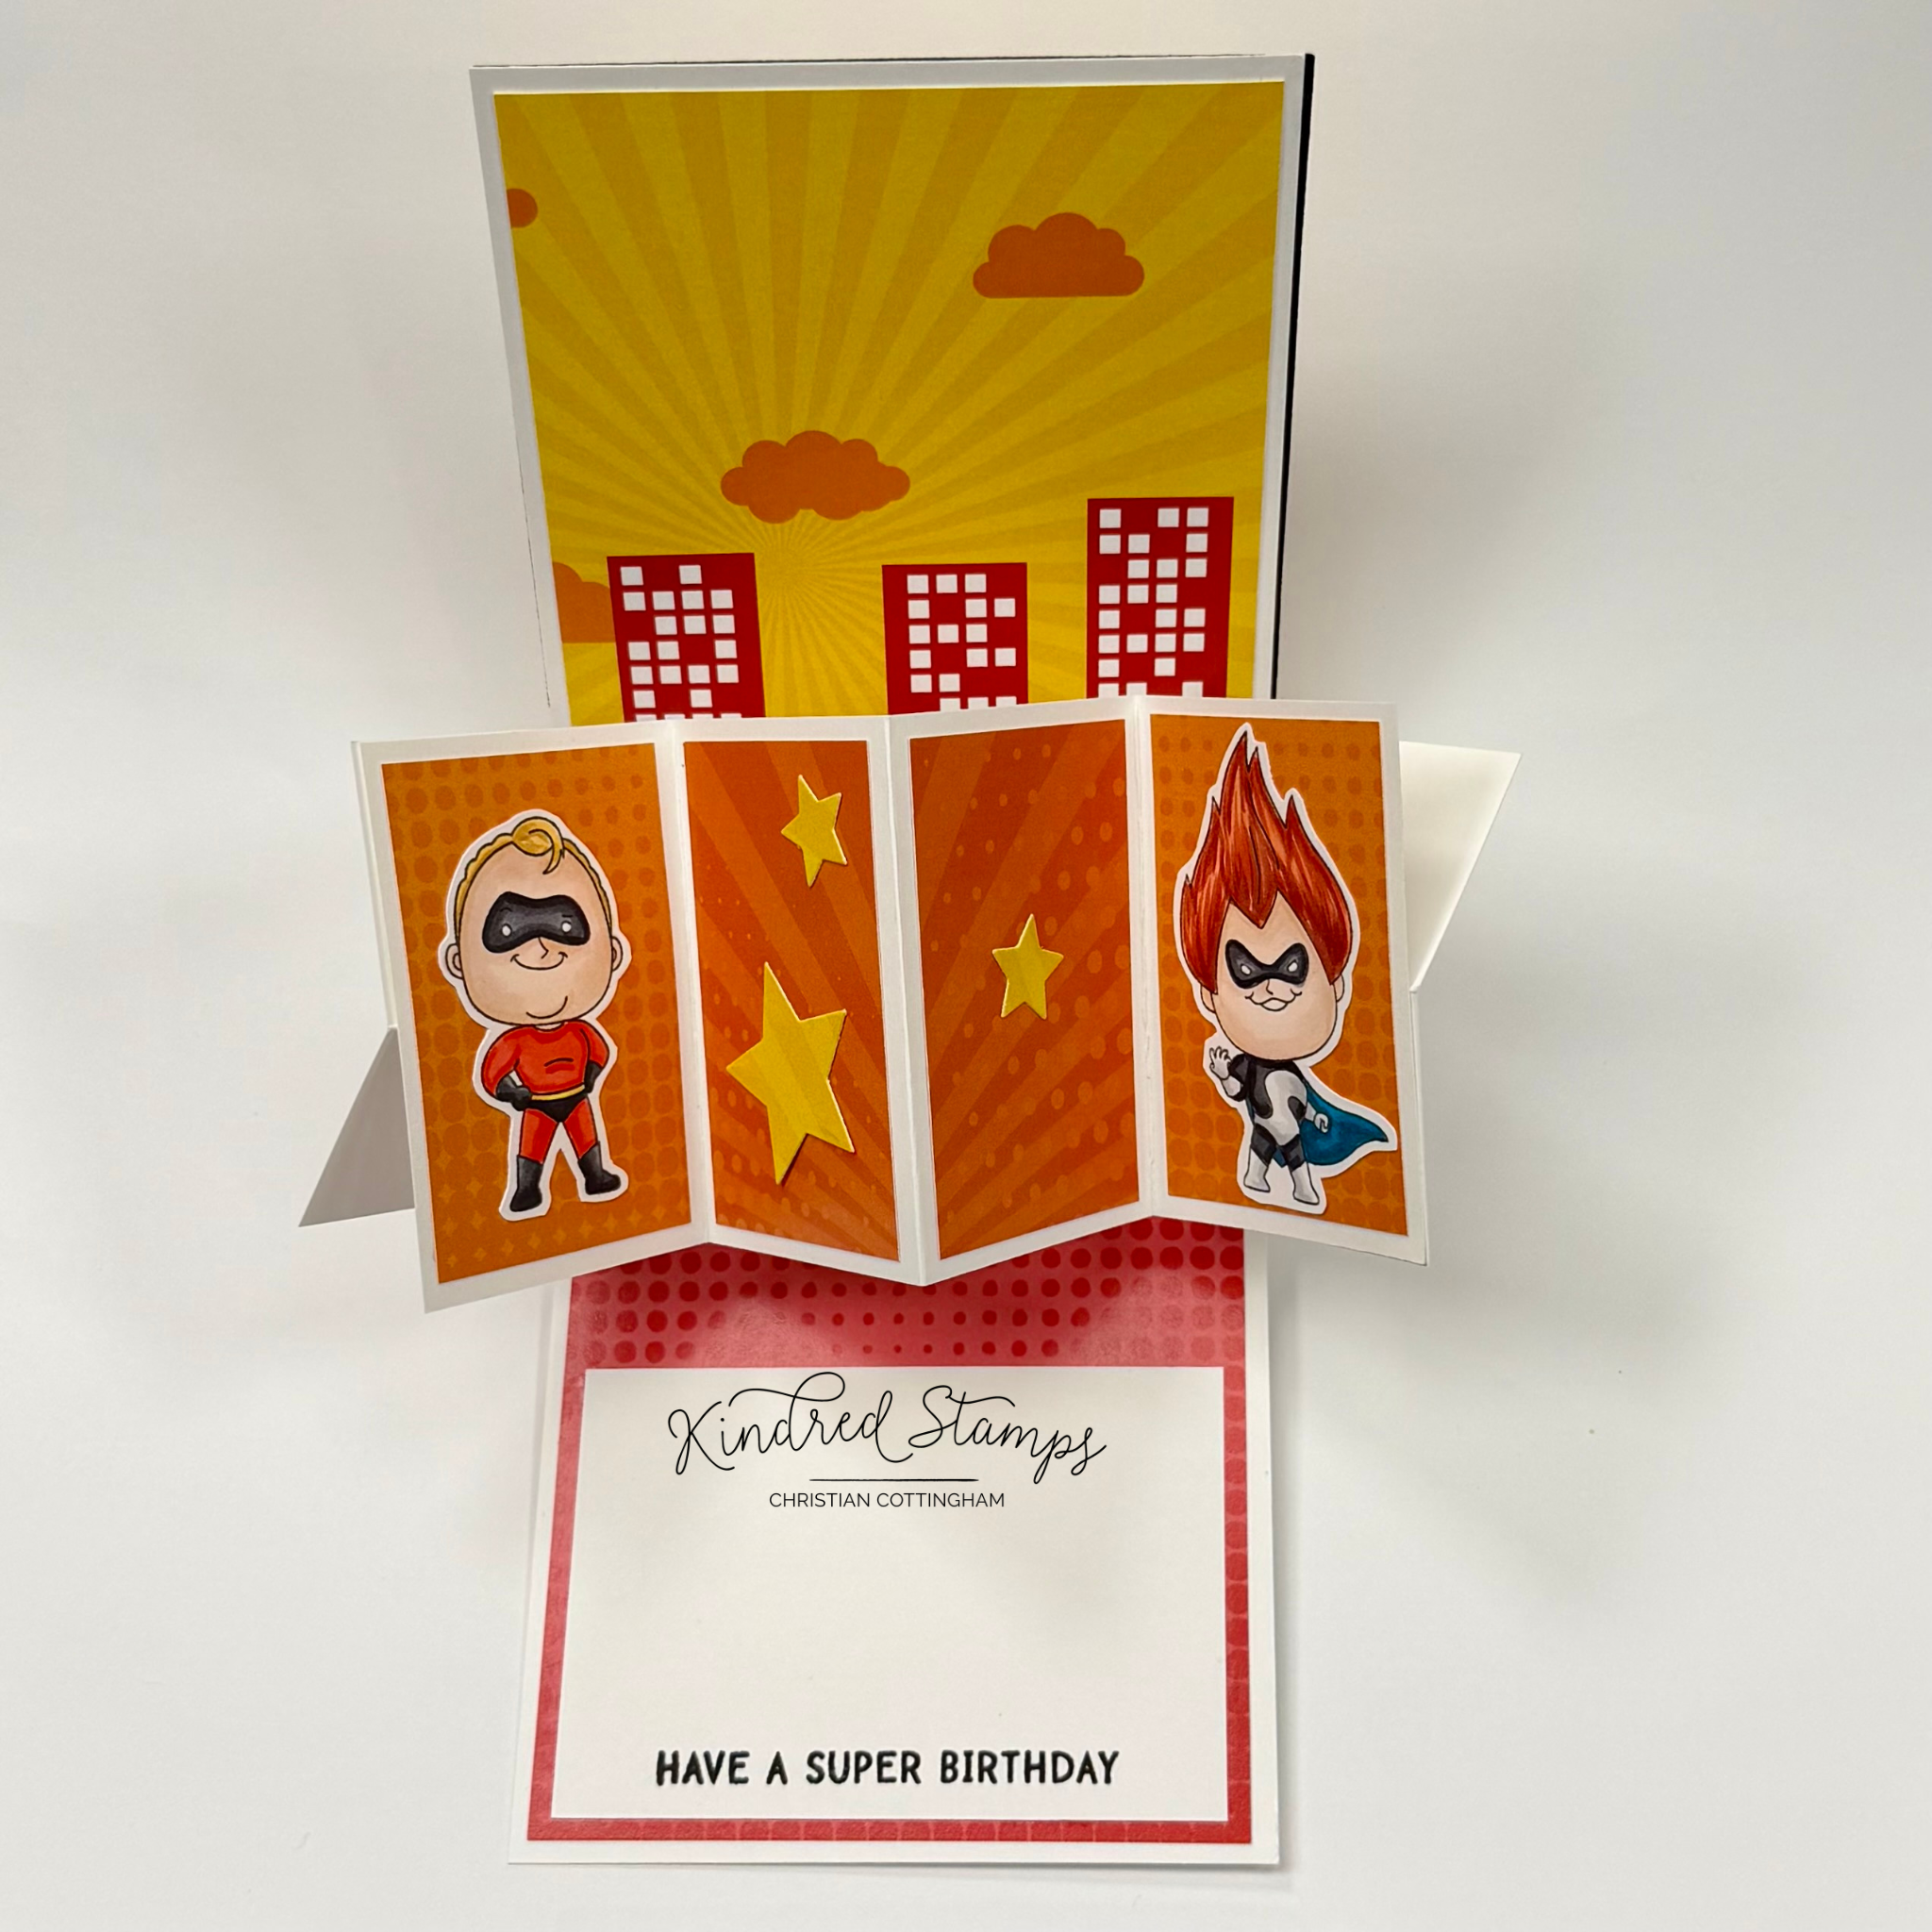
Project One: Trio
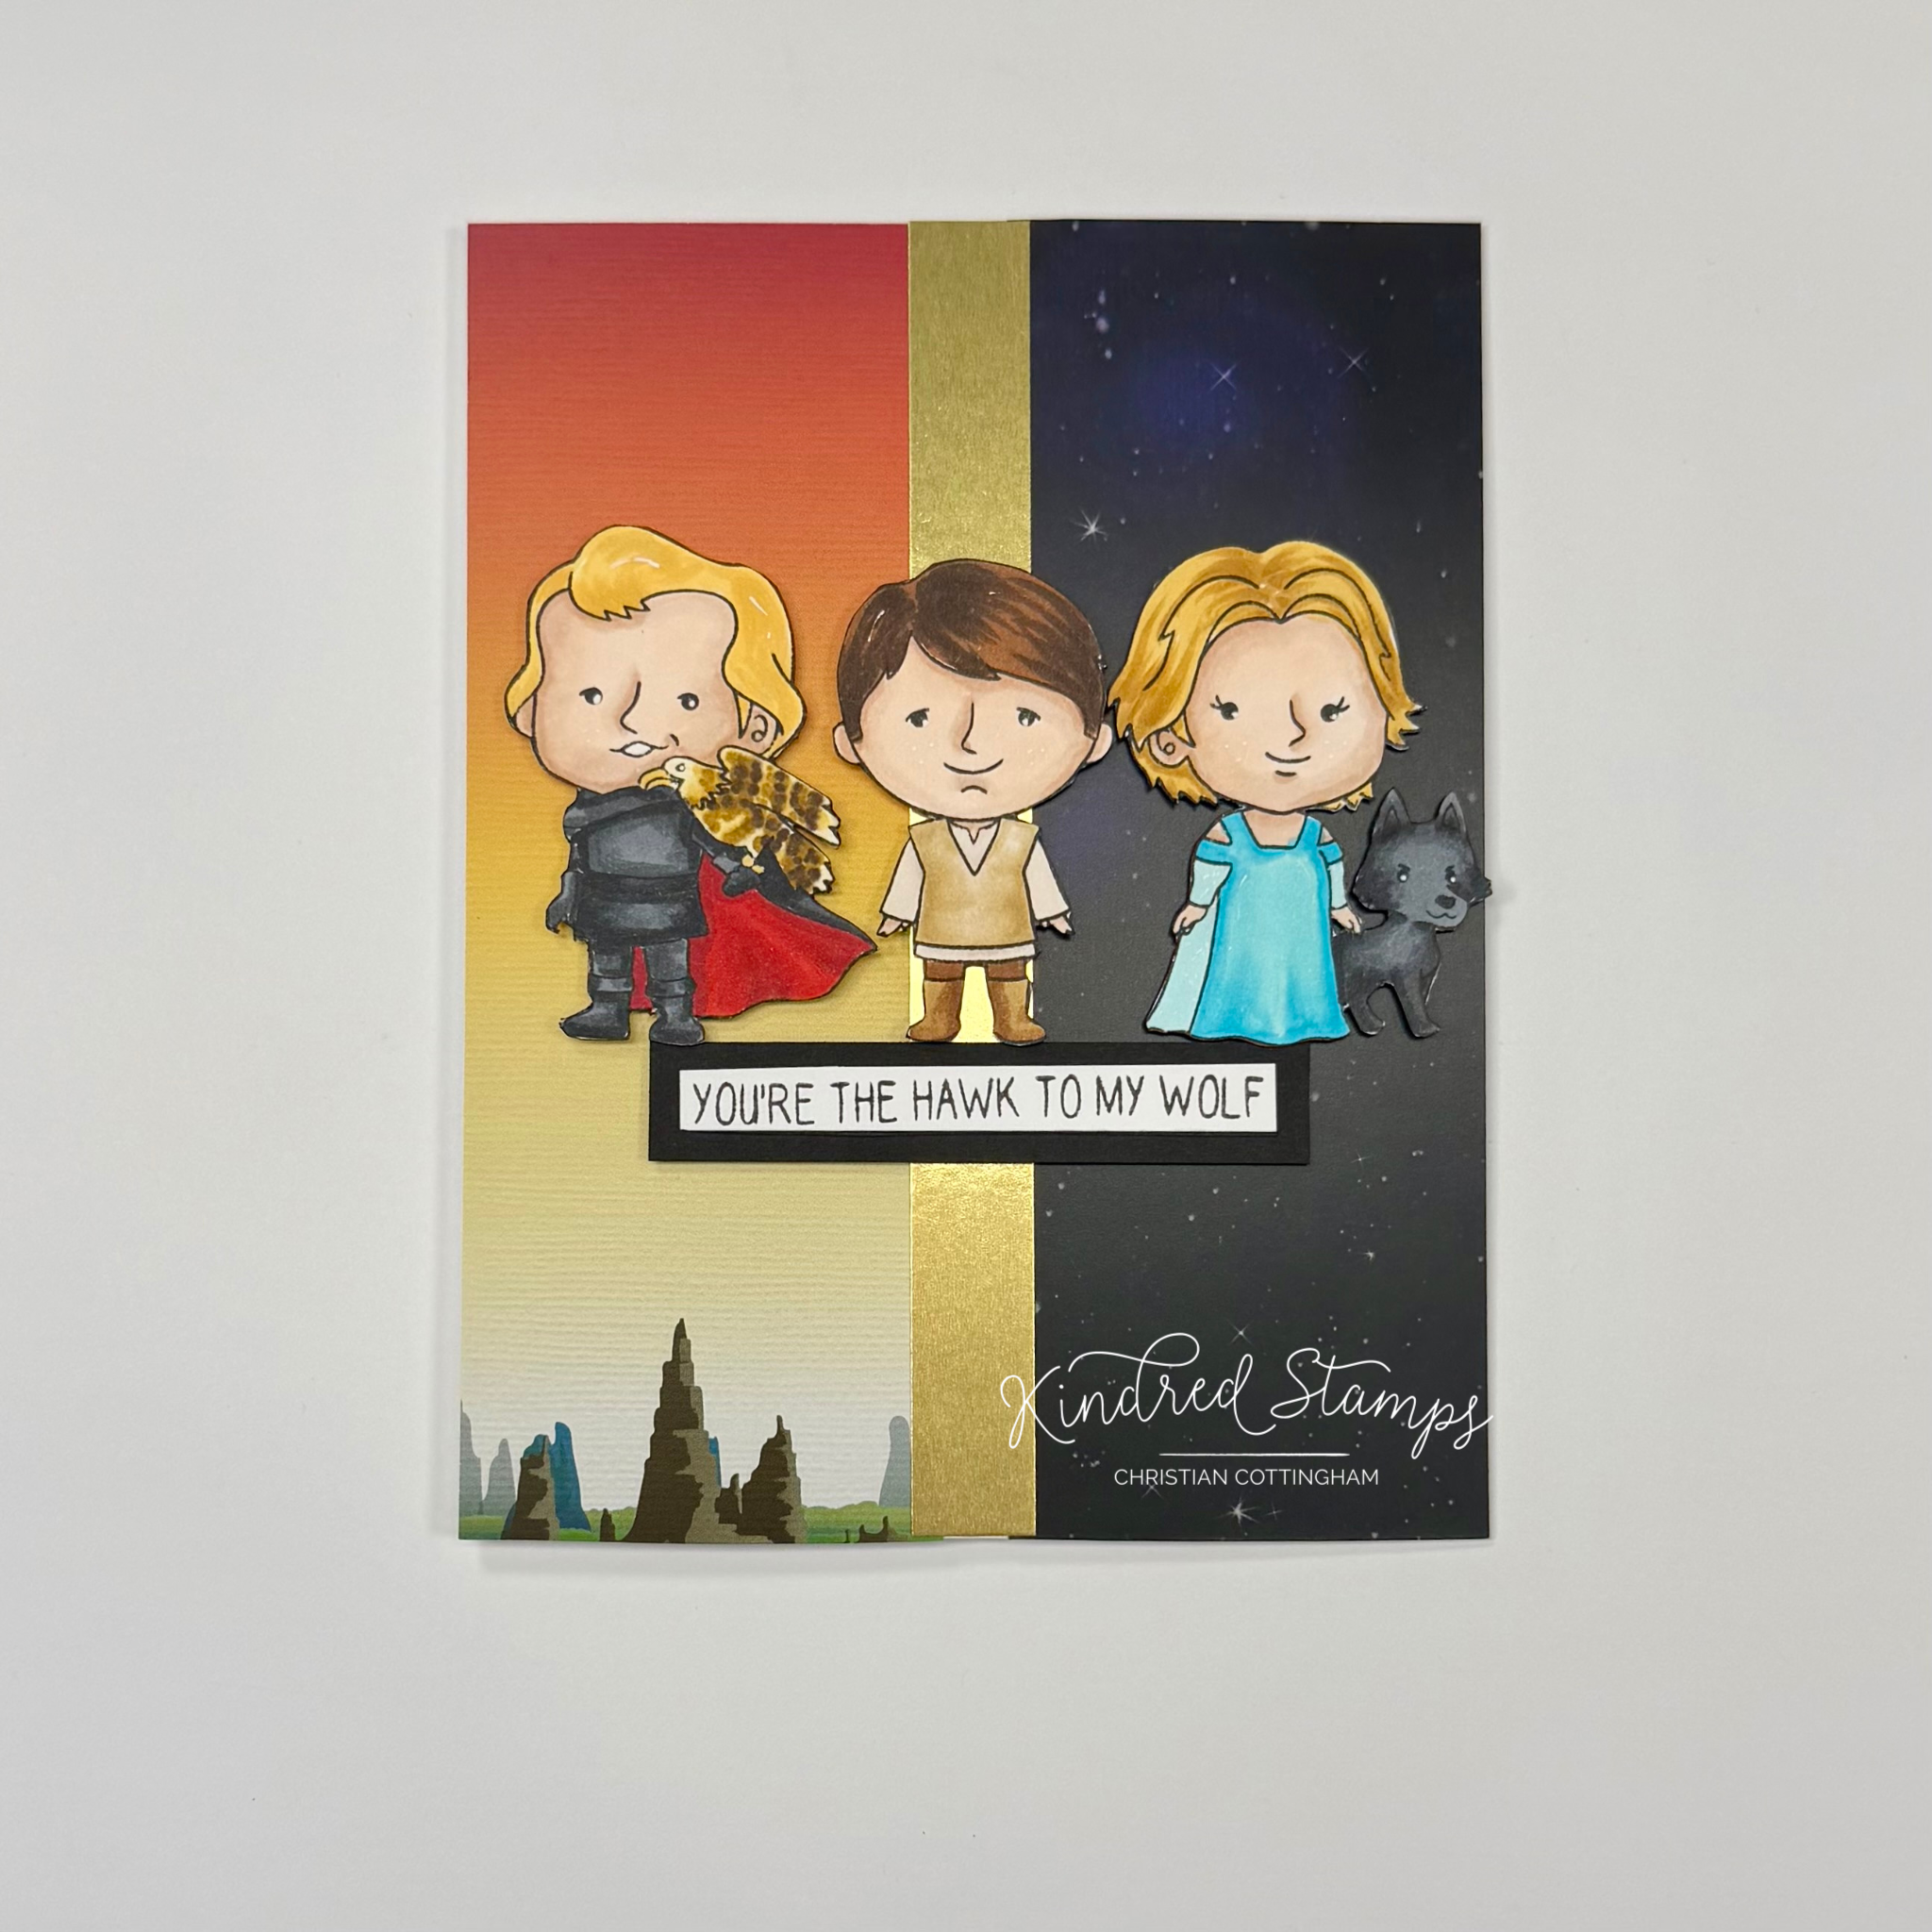
Night and Day, Kindred Stamps
When you have a friend with you both Night and Day, you are always with someone how trusts you. This simple cards features all three of the images from the Night and Day stamp set with pattern paper to signify both worlds they each live in.
The three images were colored with Olo Markers (See Color Guide) and fussy cut out on the line. With a black fine liner, the images were edged to hide any cutting mishaps. The images were backed with thin foam tape and set aside.
The sentiment was stamped in black ink and trimmed to a thin strip. A piece of scrap black cardstock was trimmed to be the mat to the sentiment. The sentiment was adhered to the mat and then a thin foam tape strip was applied.
The Galactic Pattern Paper makes this card come together in a breeze. The sunrise scene pattern paper and the galaxy pattern paper were trimmed down to 2 1/8 inches by 5.5 inches. A piece of gold cardstock was trimmed to 0.5 inch by 5.5 inch strip.
To assemble, an A2 card base (4.25 inches by 5.5 inches) was prepped. The sunrise scene was glued to the left side of the card base and the galaxy on the right. To hide any cutting variants and to signify the transition of night and day, the gold cardstock strip was adhered in the center. The Thief was centered first on the card panel. Then the Knight and the Woman respectively. Finally, the sentiment was centered and adhered.
This simple card showcases the worlds that they live in and was a breeze to make.
Card Size: 5.5 inches by 4.25 inches (A2)
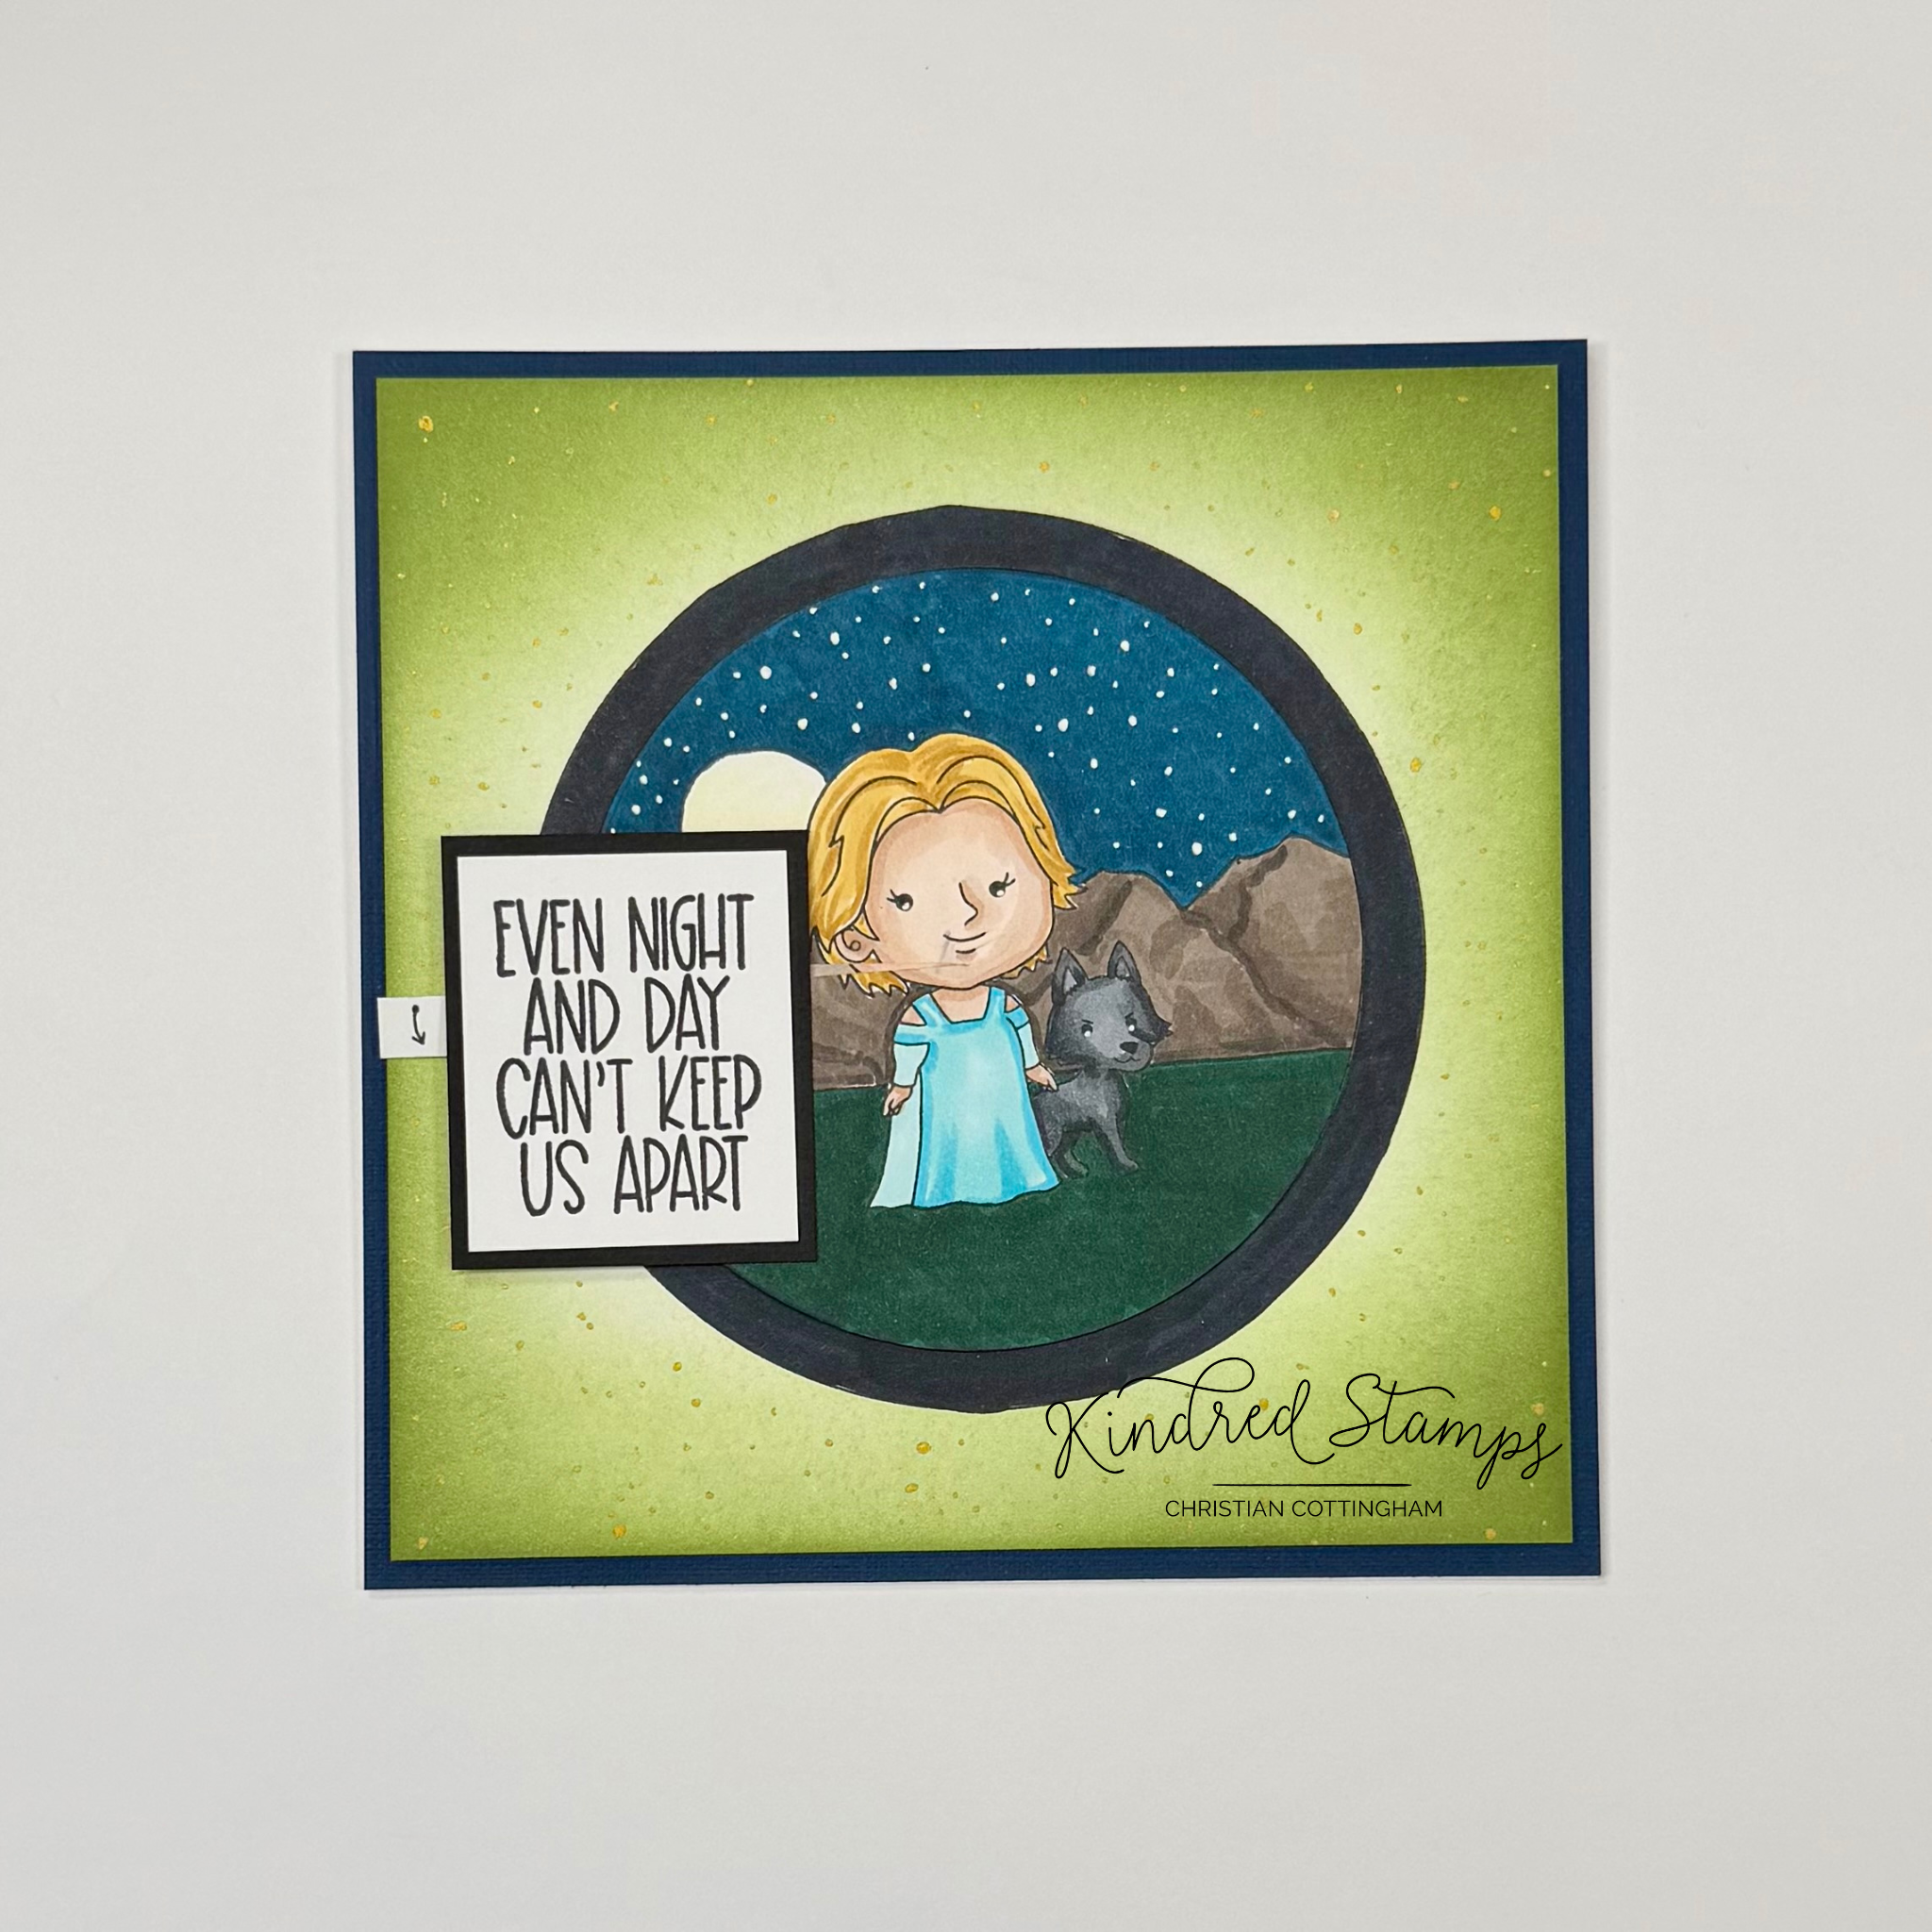
Project Two: Total Eclipse

Night and Day, Kindred Stamps
A total eclipse is not only a sight to see but also the way to break the curse! So this card had to be made for the love that couldn’t be separated even if they are in different familial classes.
A 5 inch by 7 inches piece of smooth white cardstock will be the base for the scene. With a pencil, the sword and floor were sketched. The negative moon/ sun from the Desert Scene Stencil was traced at the top of the card. The lines were traced with a black fine liner pen and pencil markings erased.
A piece of masking paper was trimmed to 2 inches by 8 inches. The sword and sun were also traced onto a piece of masking paper and then cut out. The masks were applied to the card to allow for ink blending. The area just outside the sun was inked with Sweet Corn (Gina K Designs) whereas the remainder of the background was inked from outer edge to center with In the Navy (Gina K Designs). Before the mask were removed, the inked panel was spattered with Perfect Pearls, in the color Perfect Pearl. The masks were removed and the card panel was allowed to dry.
The Knight and Woman from the Night and Day set were stamped with alcohol safe ink and colored with Olo Markers (See Color Guide). The images were fussy cut our leaving a thin white boarder so the images had contrast on the dark panel. The sentiment was stamped in black ink and trimmed into a thin strip. A piece of black cardstock was adhered as a mat. Thin foam tape was applied to the images and the sentiment.
The remainder of the image was colored with Olo Markers. The church floor was colored with NG3/ NG1/ and NG0. The sun was colored with WG9/ WG7/ WG5 with darkest in the center. Finally, the sword was colored with CG3/ CG1 on the blade and CG7/ CG5/ CG3 on the handle.
The card panel was adhered to an A7 card base. The Knight and the Woman were adhered on each side of the sword. The sentiment was placed across the blade. The total eclipse turned our so much better than my brain thought it would. I was different coloring a sun with dark grey but it was worth it!
Card Size: 5 inches by 7 inches (A7)
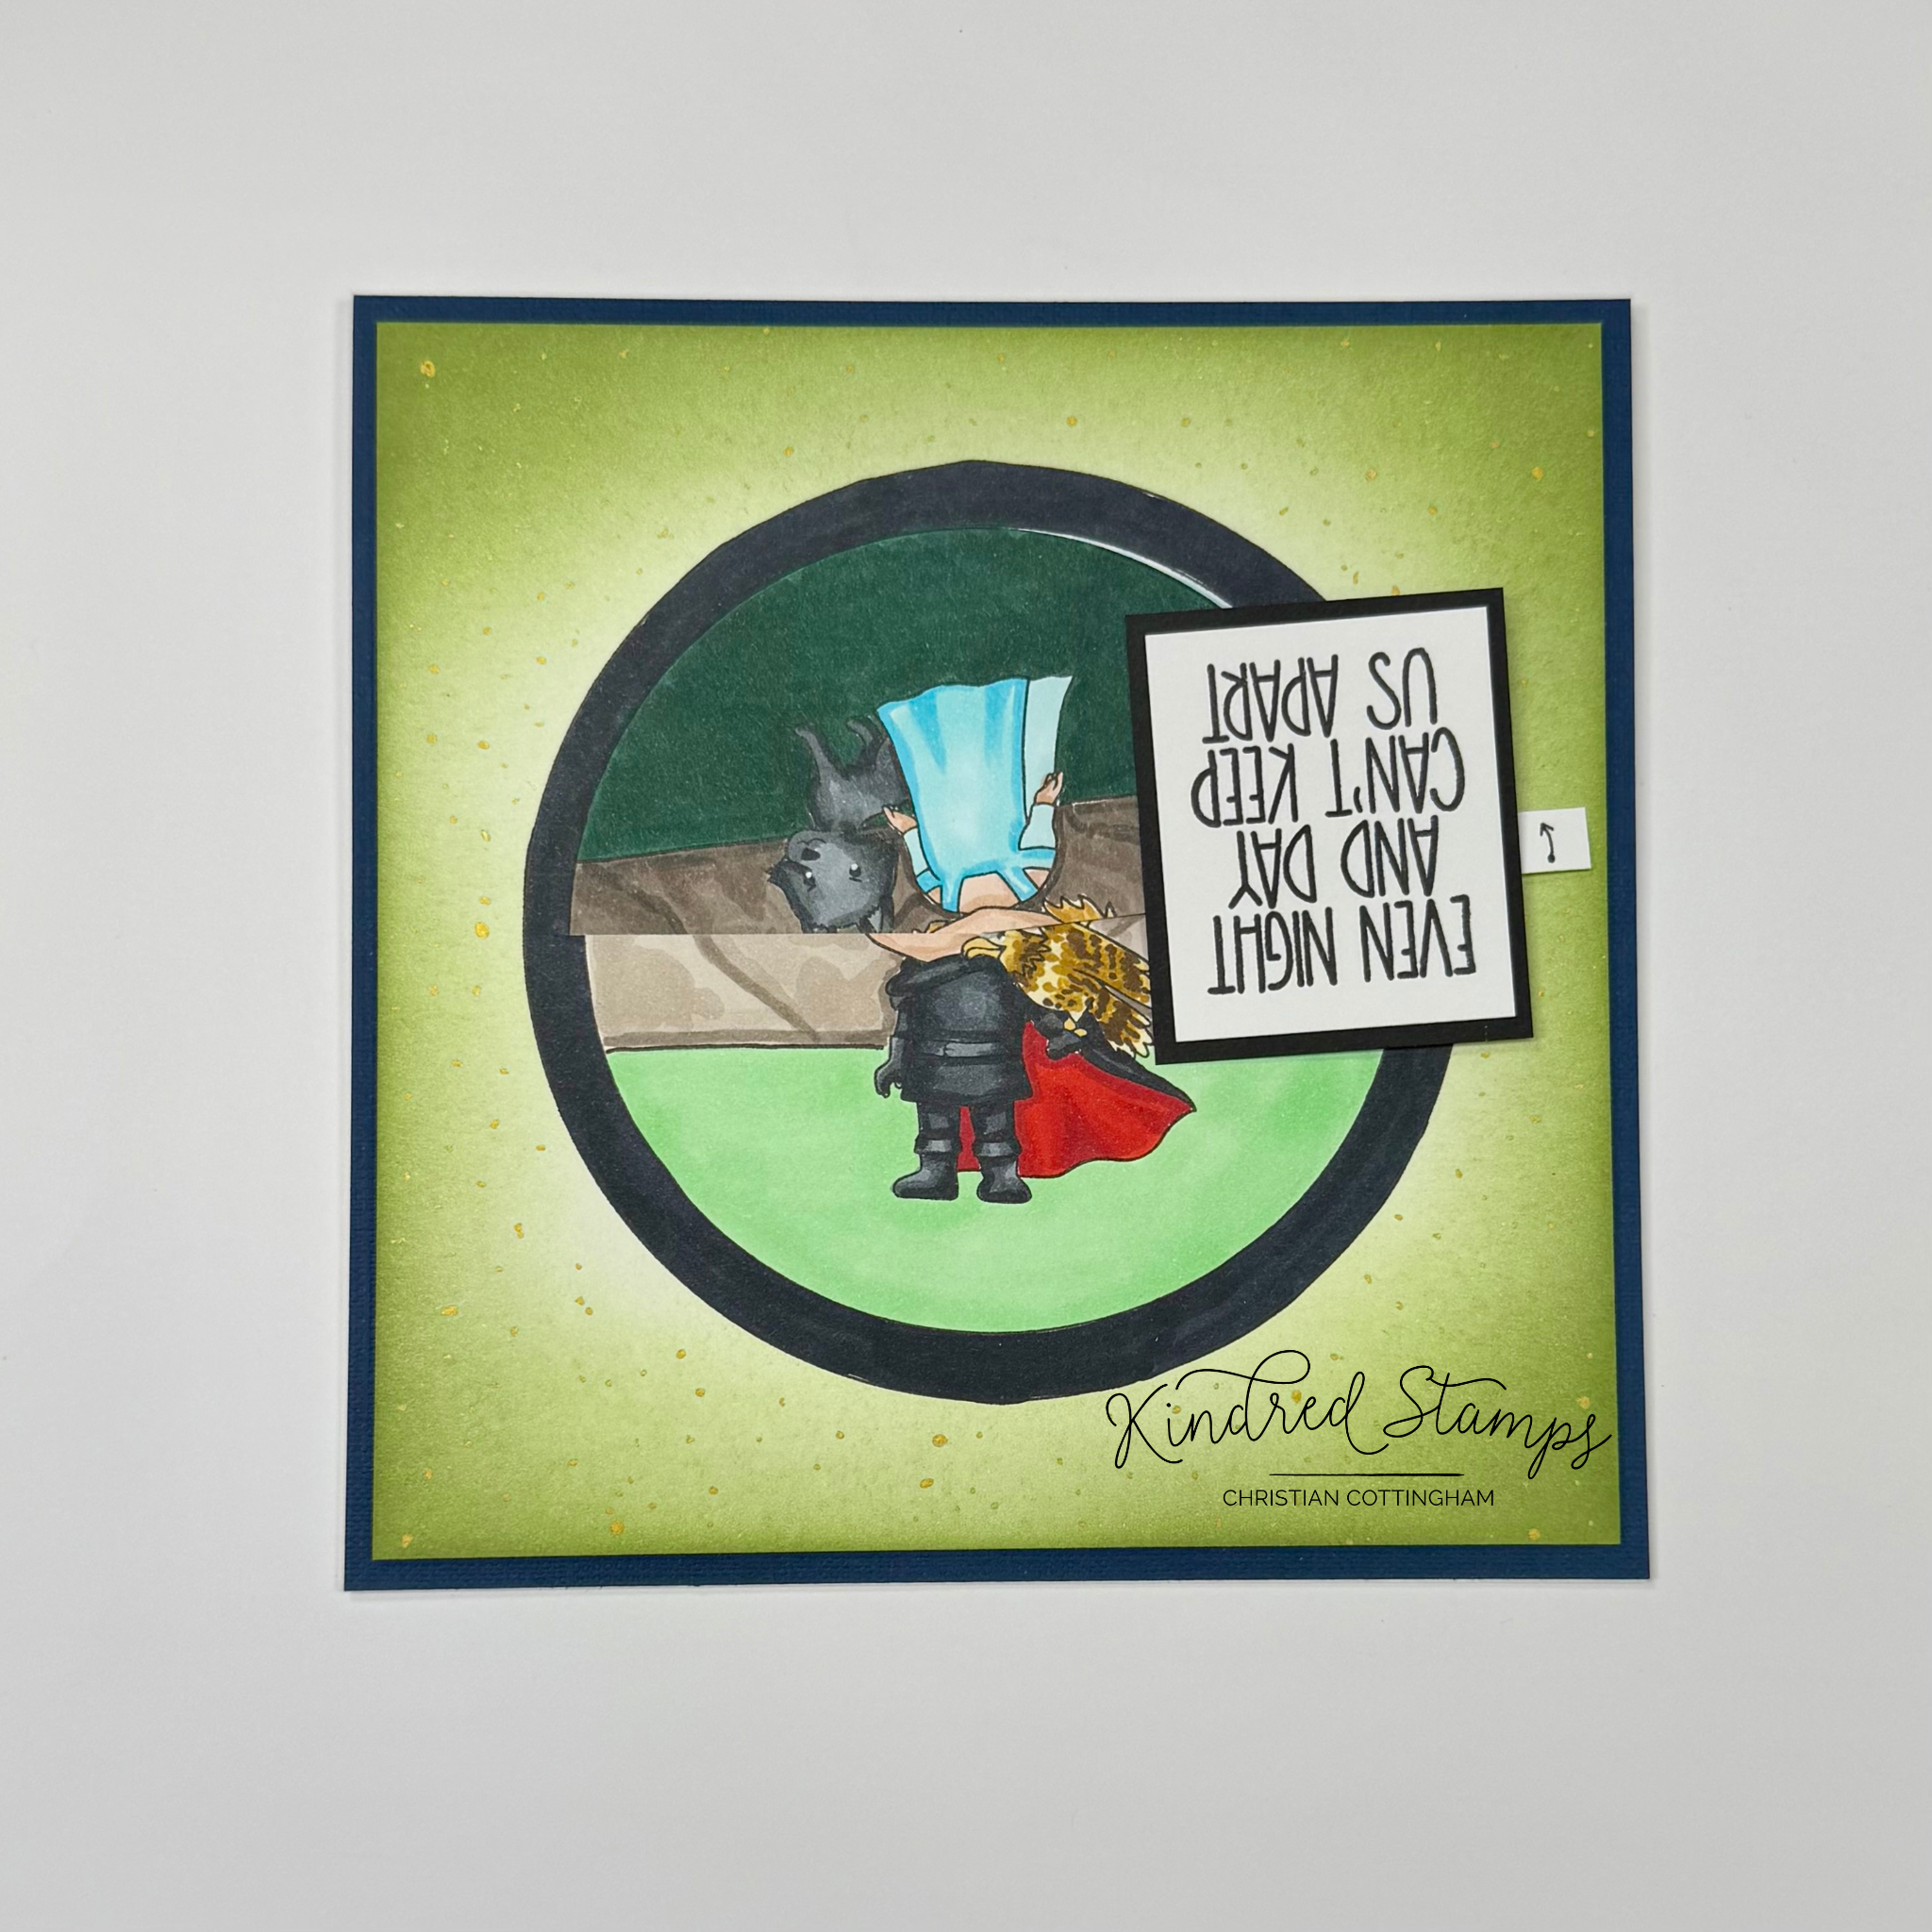
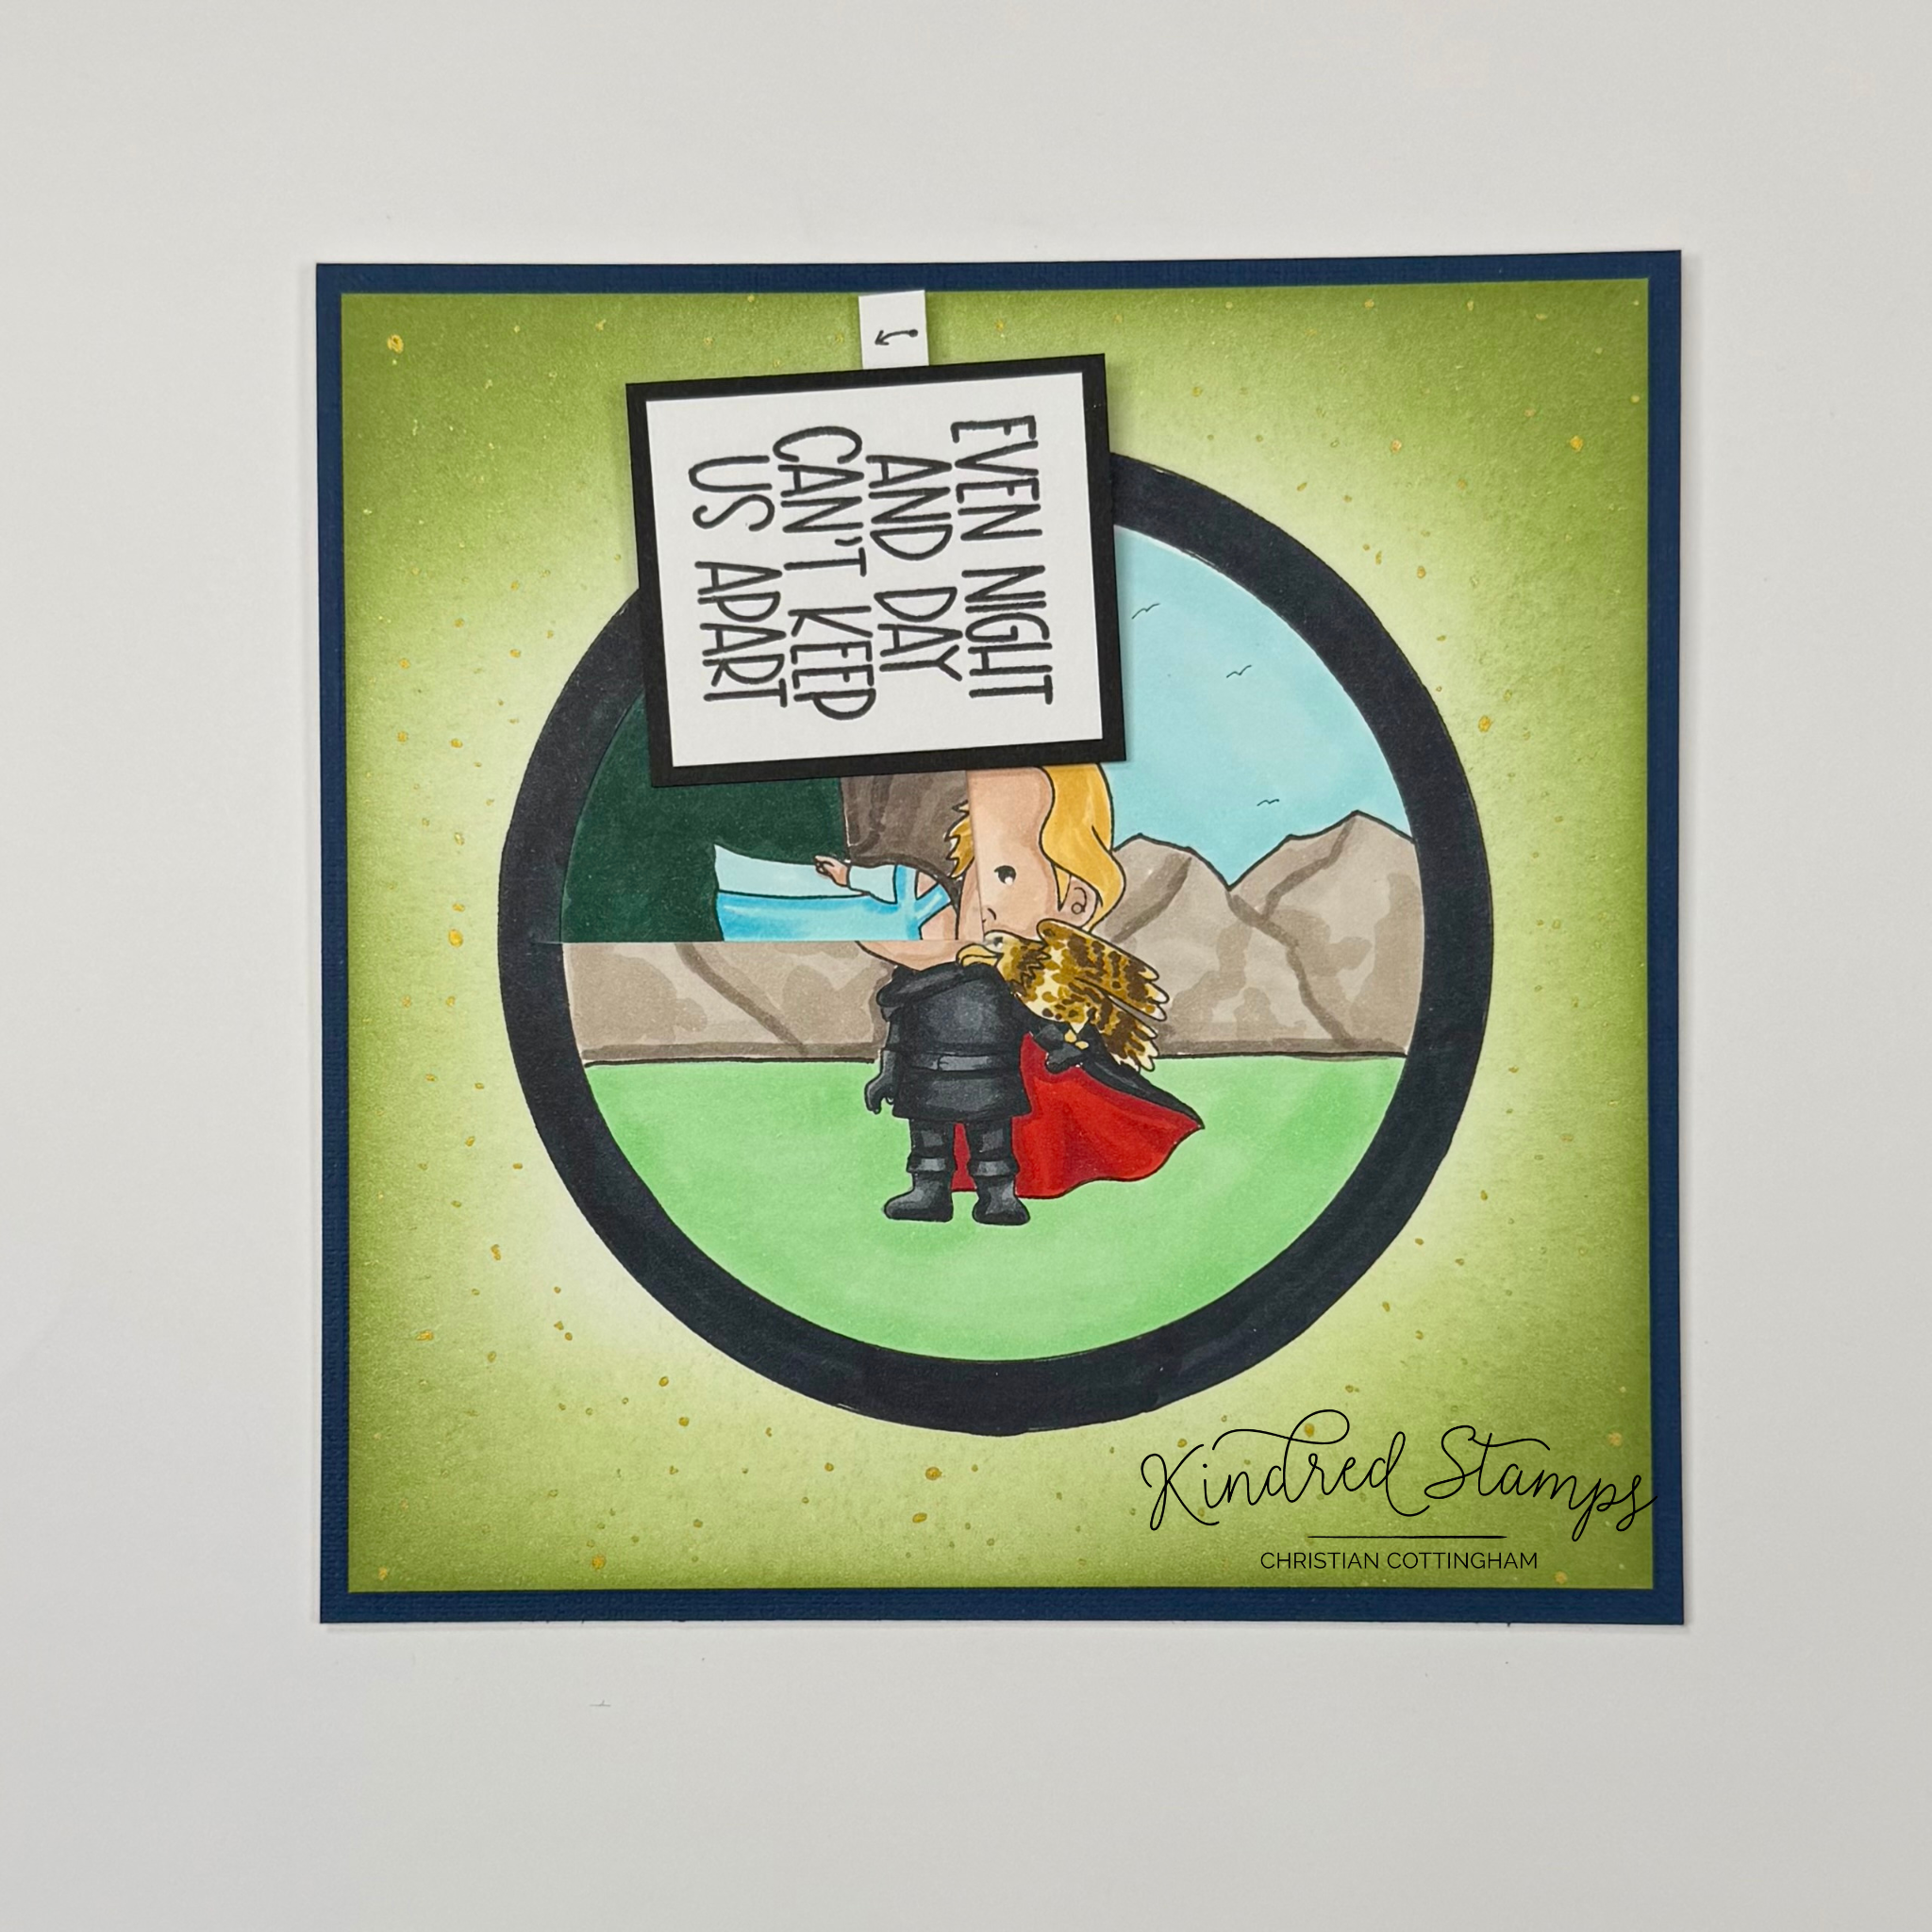
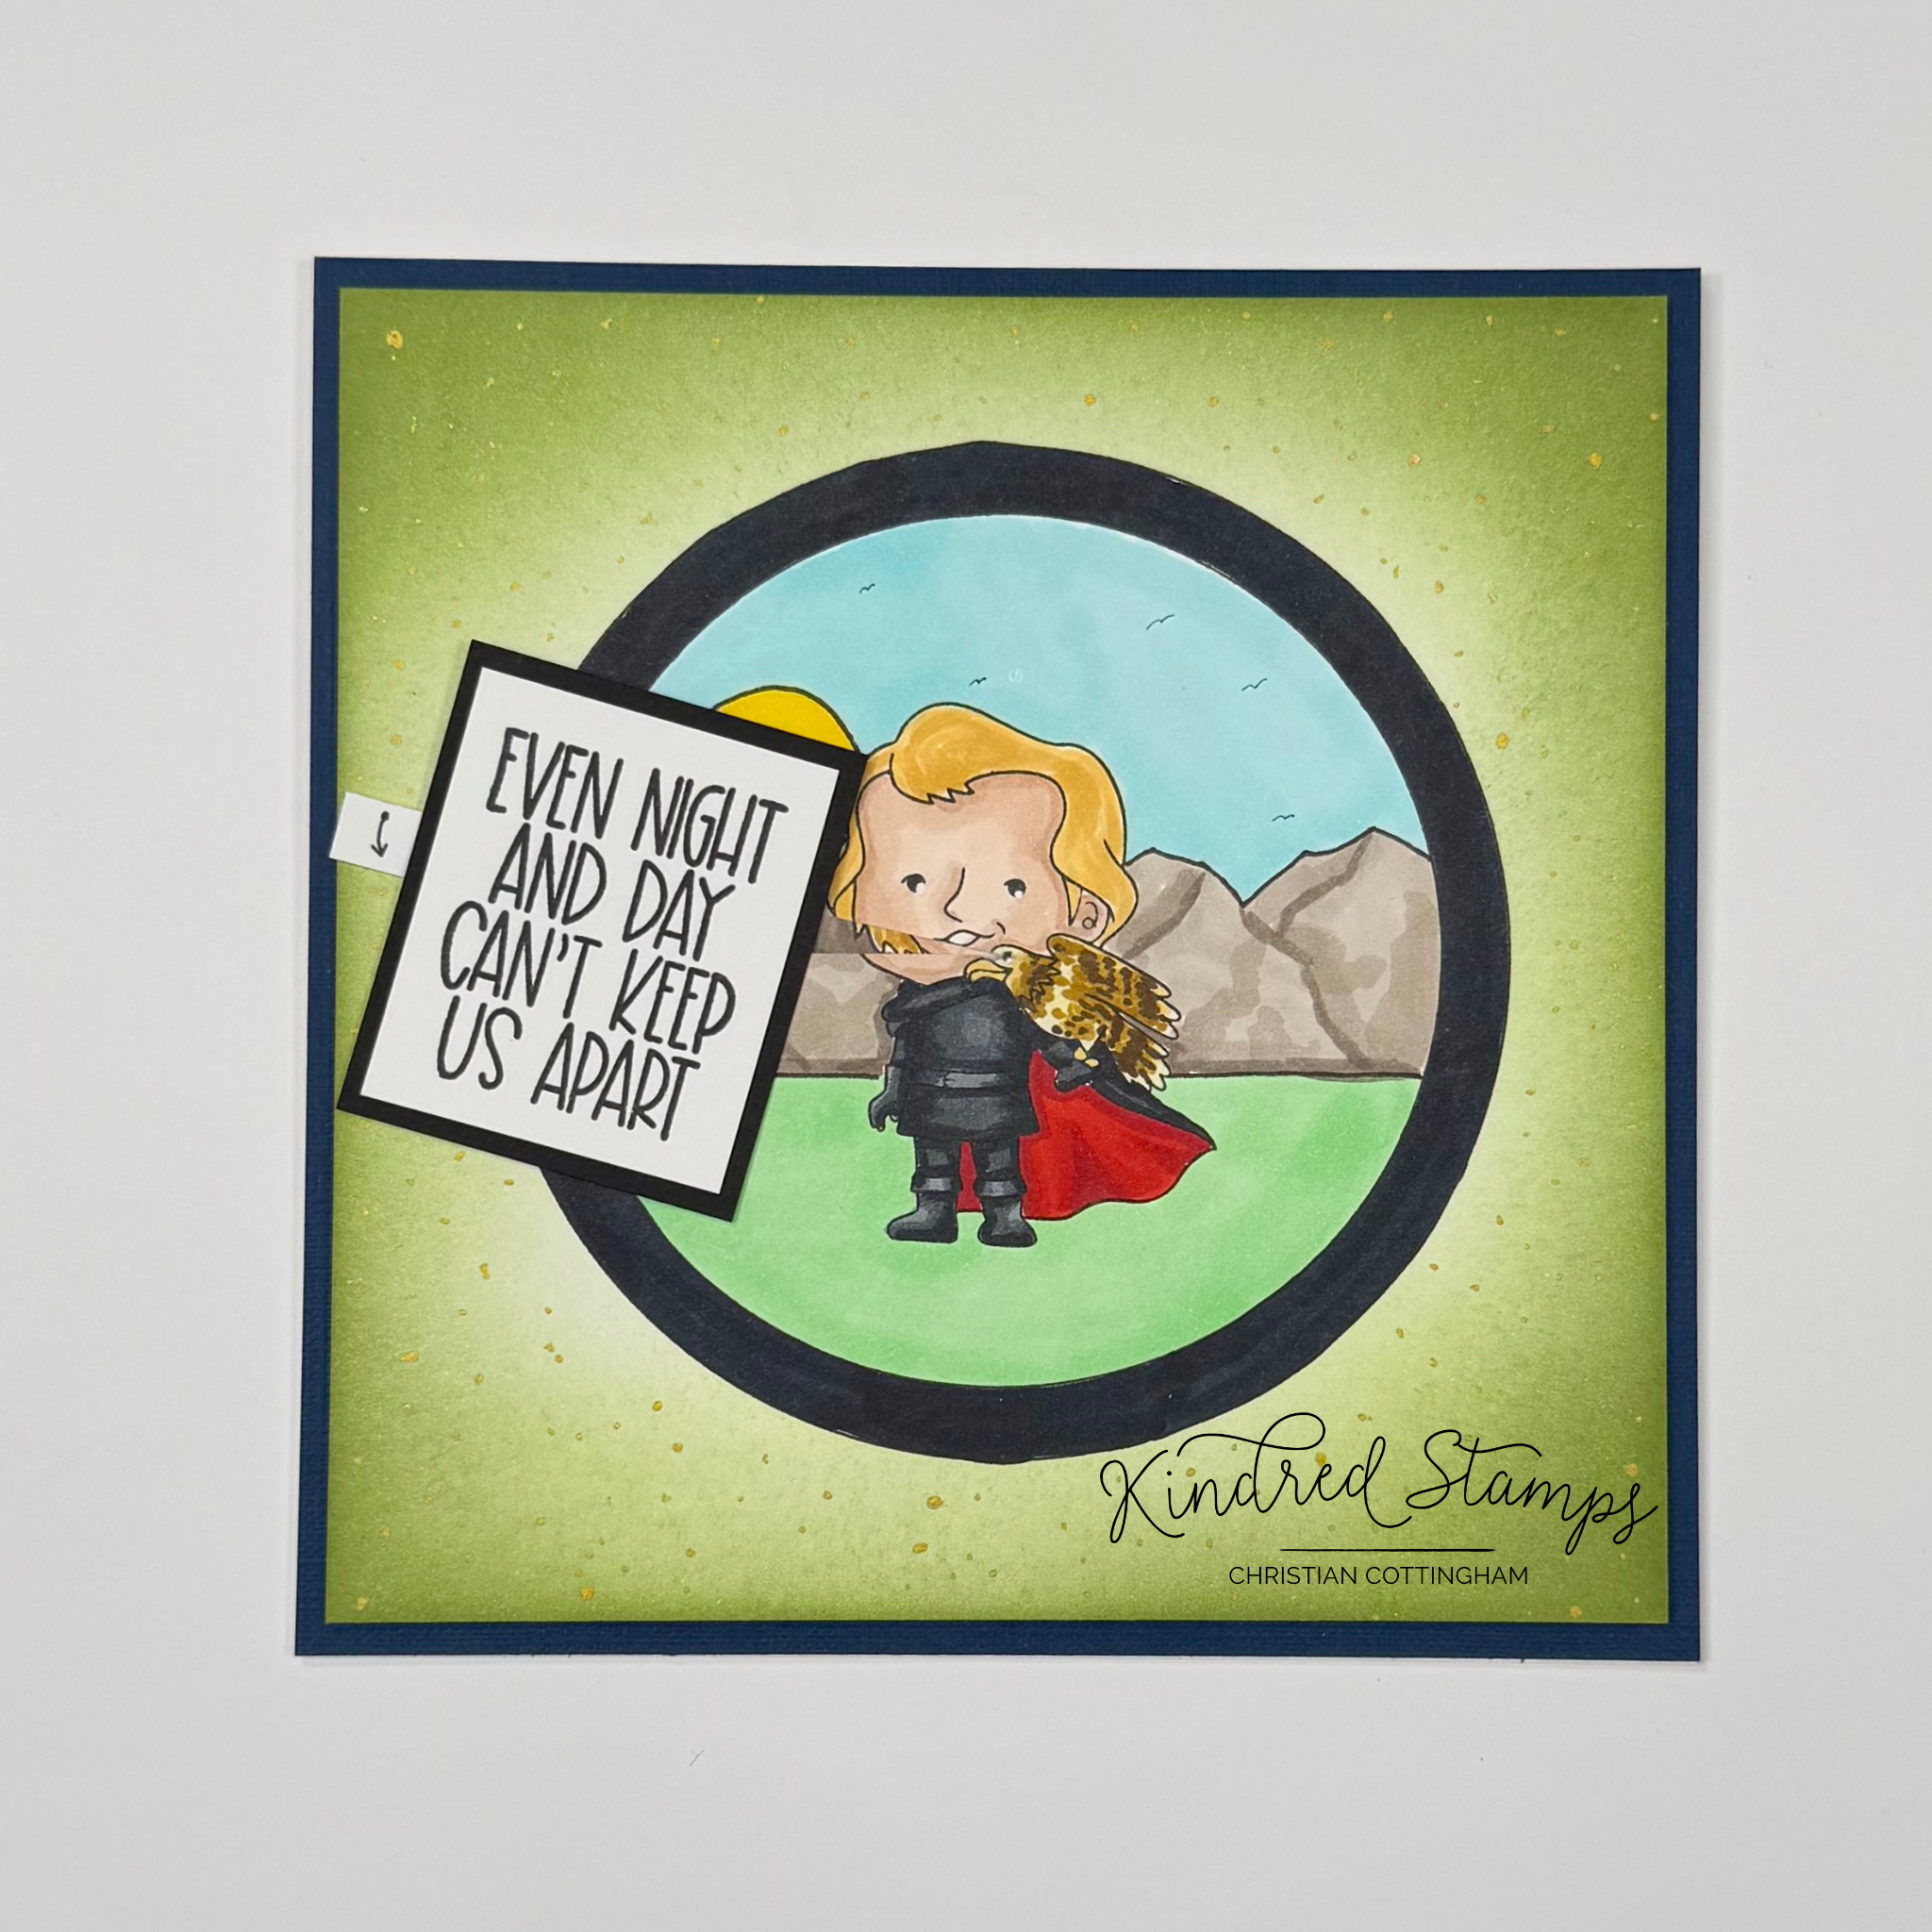
Project Three: Spinning Love
Night or Day they are never alone. This reveal card shows how day becomes night and night becomes day. Lets break down this card.
Night and Day, Kindred Stamps
A card base was prepped to 5.5 inches by 5.5 inches. This was set aside for assembly later. A piece of smooth cardstock was cut to 5.25 inches by 5.25 inches. Using circle dies, the 4 inch diameter circle was die cut out of masking paper. A second circle, 3.5 inch diameter, was die cut out of smooth white cardstock.
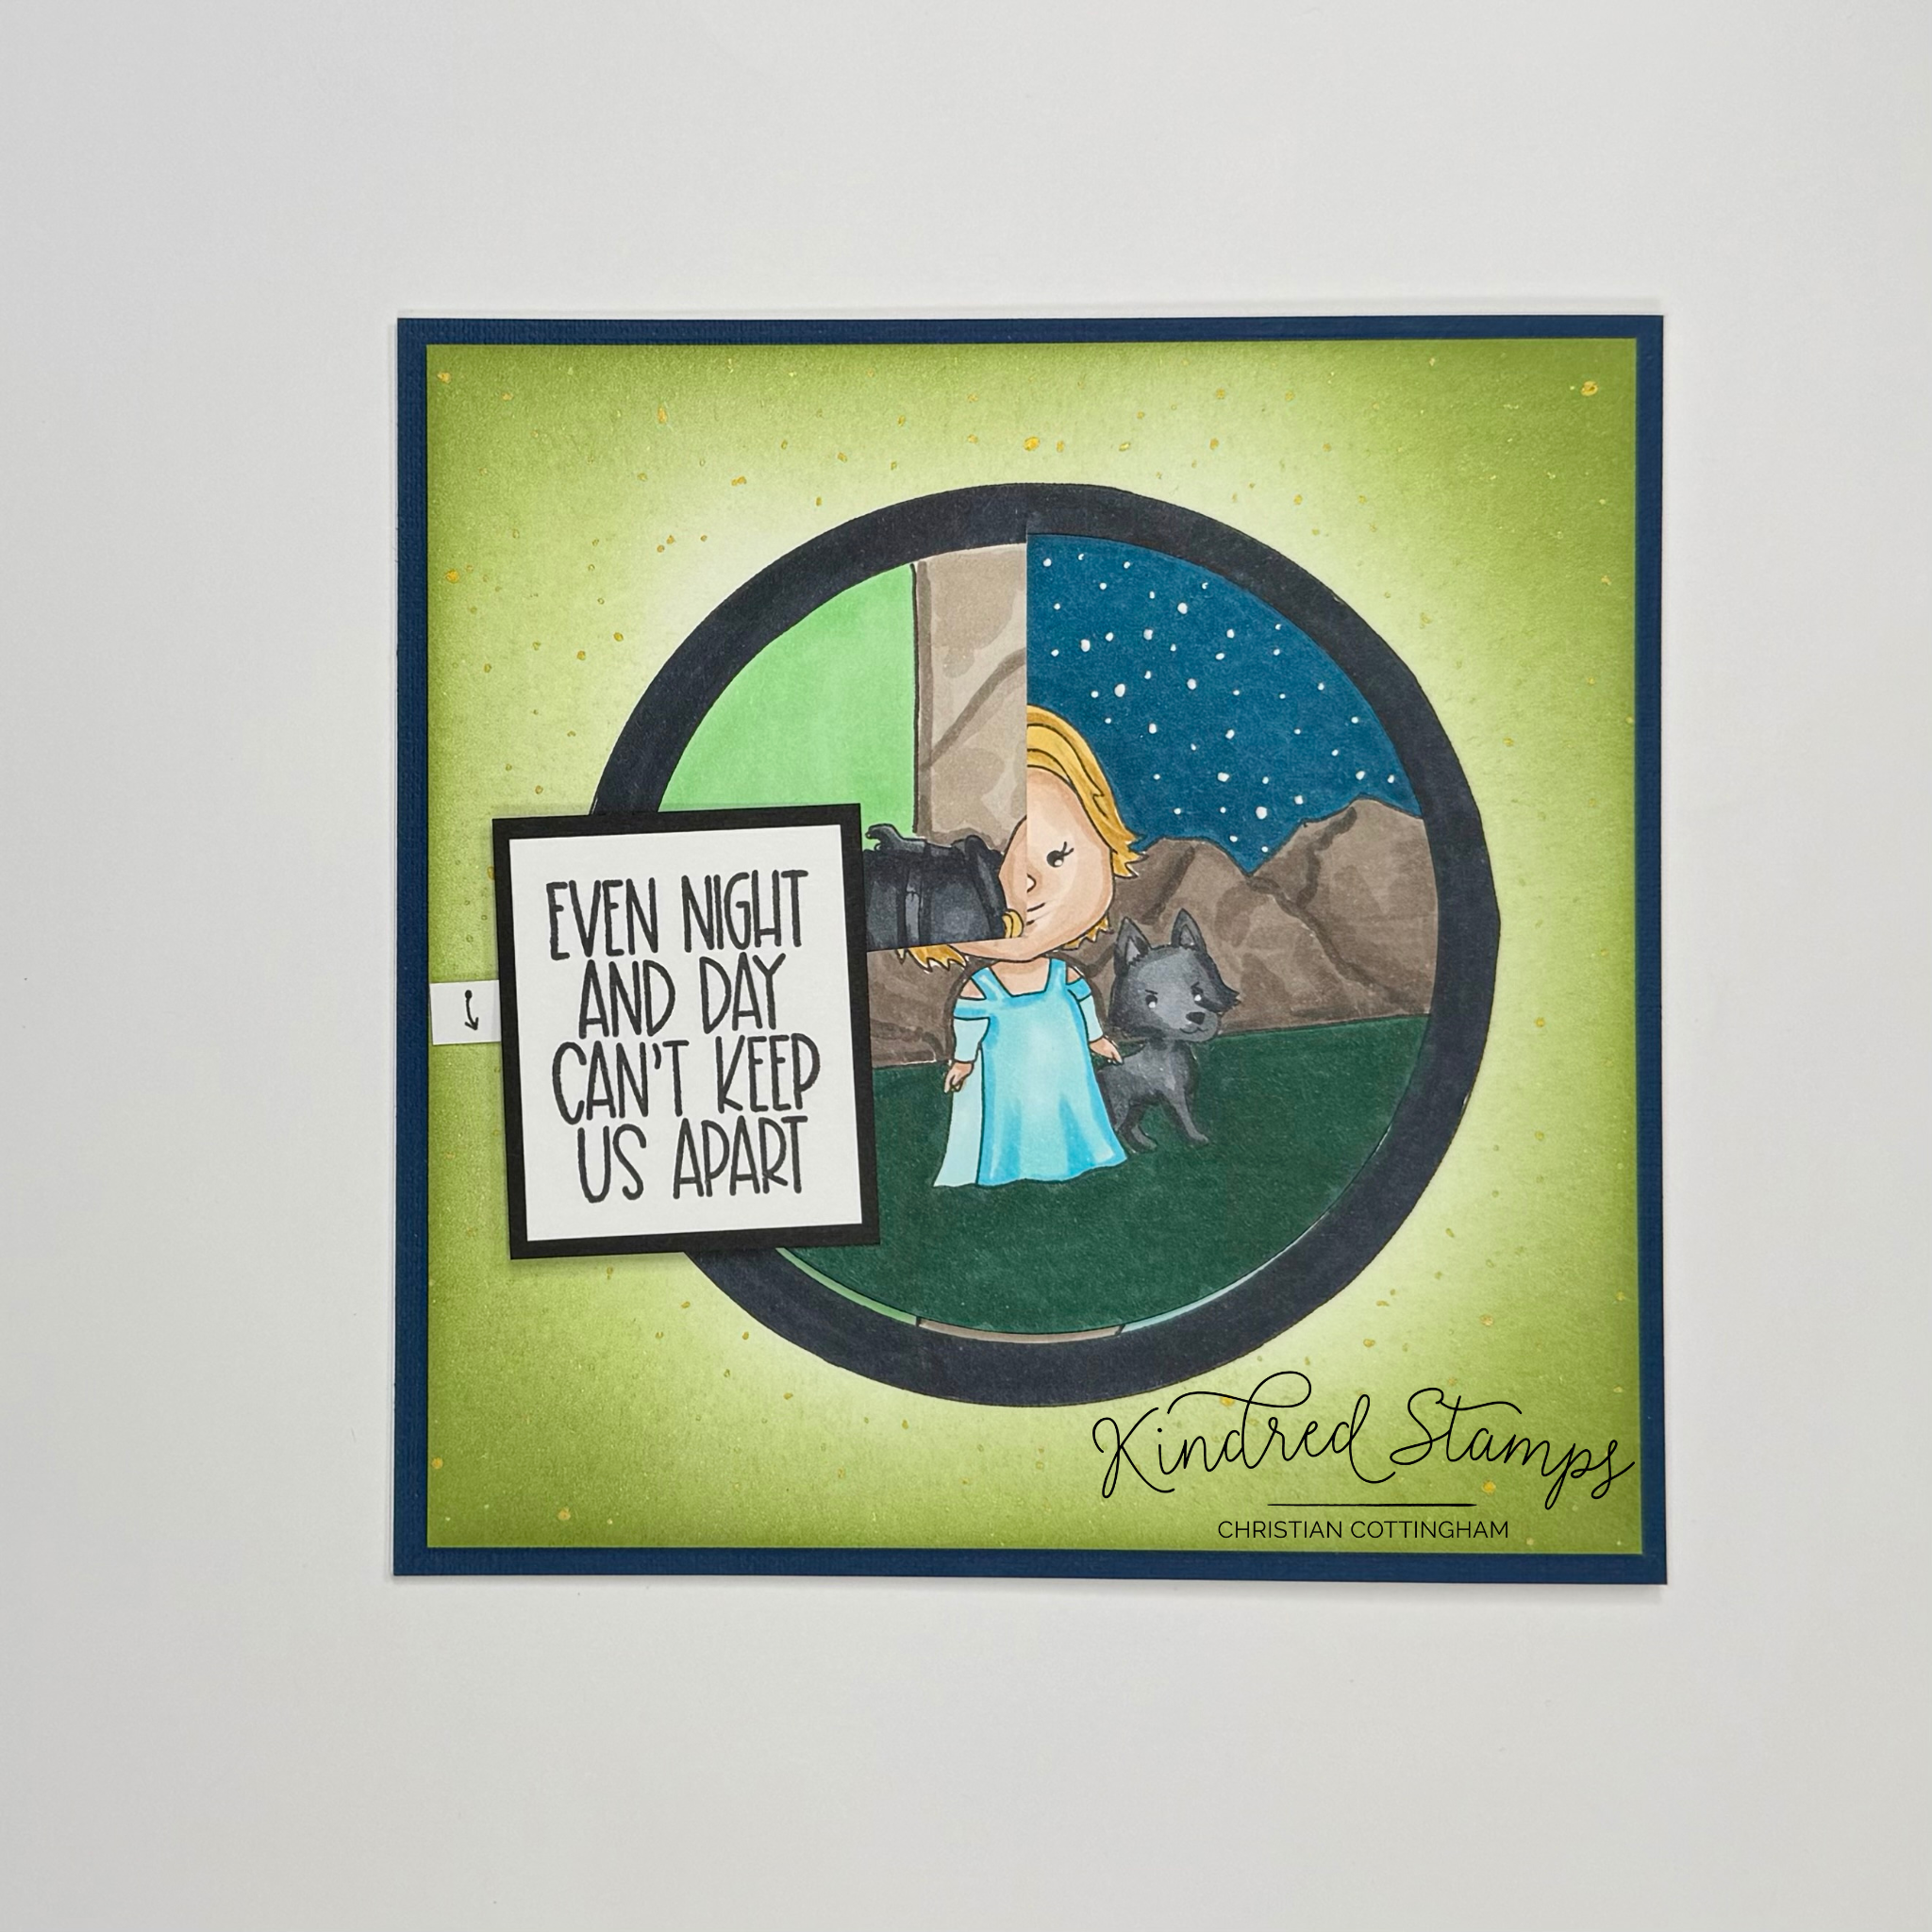
Night and Day, Kindred Stamps
The larger circle mask was centered on the square 5.25inch by 5.25 inch piece of cardstock. Using a black fine liner pen the circle was traced. The masked panel was then ink blended with Jelly Bean Green and Fresh Asparagus ink (Gina K Designs). Gold spatter was applied. The mask was removed and the panel was set to dry.
Night and Day, Kindred Stamps
The 3.5 inch circle scene was designed first. The Woman and Wolf were stamped with alcohol safe ink. With the Desert Scene Stencil, the mountains were traced onto the circle. A horizon line was also sketched. Finally, using a small circle, the moon was sketched. All lines were then traced with an alcohol safe marker. The Woman and Wolf were colored with Olo Markers (See Color Guide). The remainder of the scene was colored with Olo Markers (Moon: Y2.0/ Sky: BG0.8/ Grass: 1.8/ Mountain: WG7/ WG5).
Night and Day, Kindred Stamps
This colored scene was centered on the inked blended panel leaving an equal boarder exposed. The colored scene circle was traced with pencil, including the location of the horizon line. The circle was traced with a black fine liner pen. The colored scene was removed for the design of the daylight scene. The Knight was stamped in alcohol safe ink, and the exact same scene was drawn. The Knight was colored with Olo Markers (See Color Guide). The remainder of the scene was colored with Olo Markers (Sun: Y2.3/ Sky BG0.2/ Grass: G1.2/ Mountain: WG5/ WG3). Some birds were were drawn in with a fine liner pen. Finally, the frame around the small circled scene was colored with the K Olo Marker.
Night and Day, Kindred Stamps
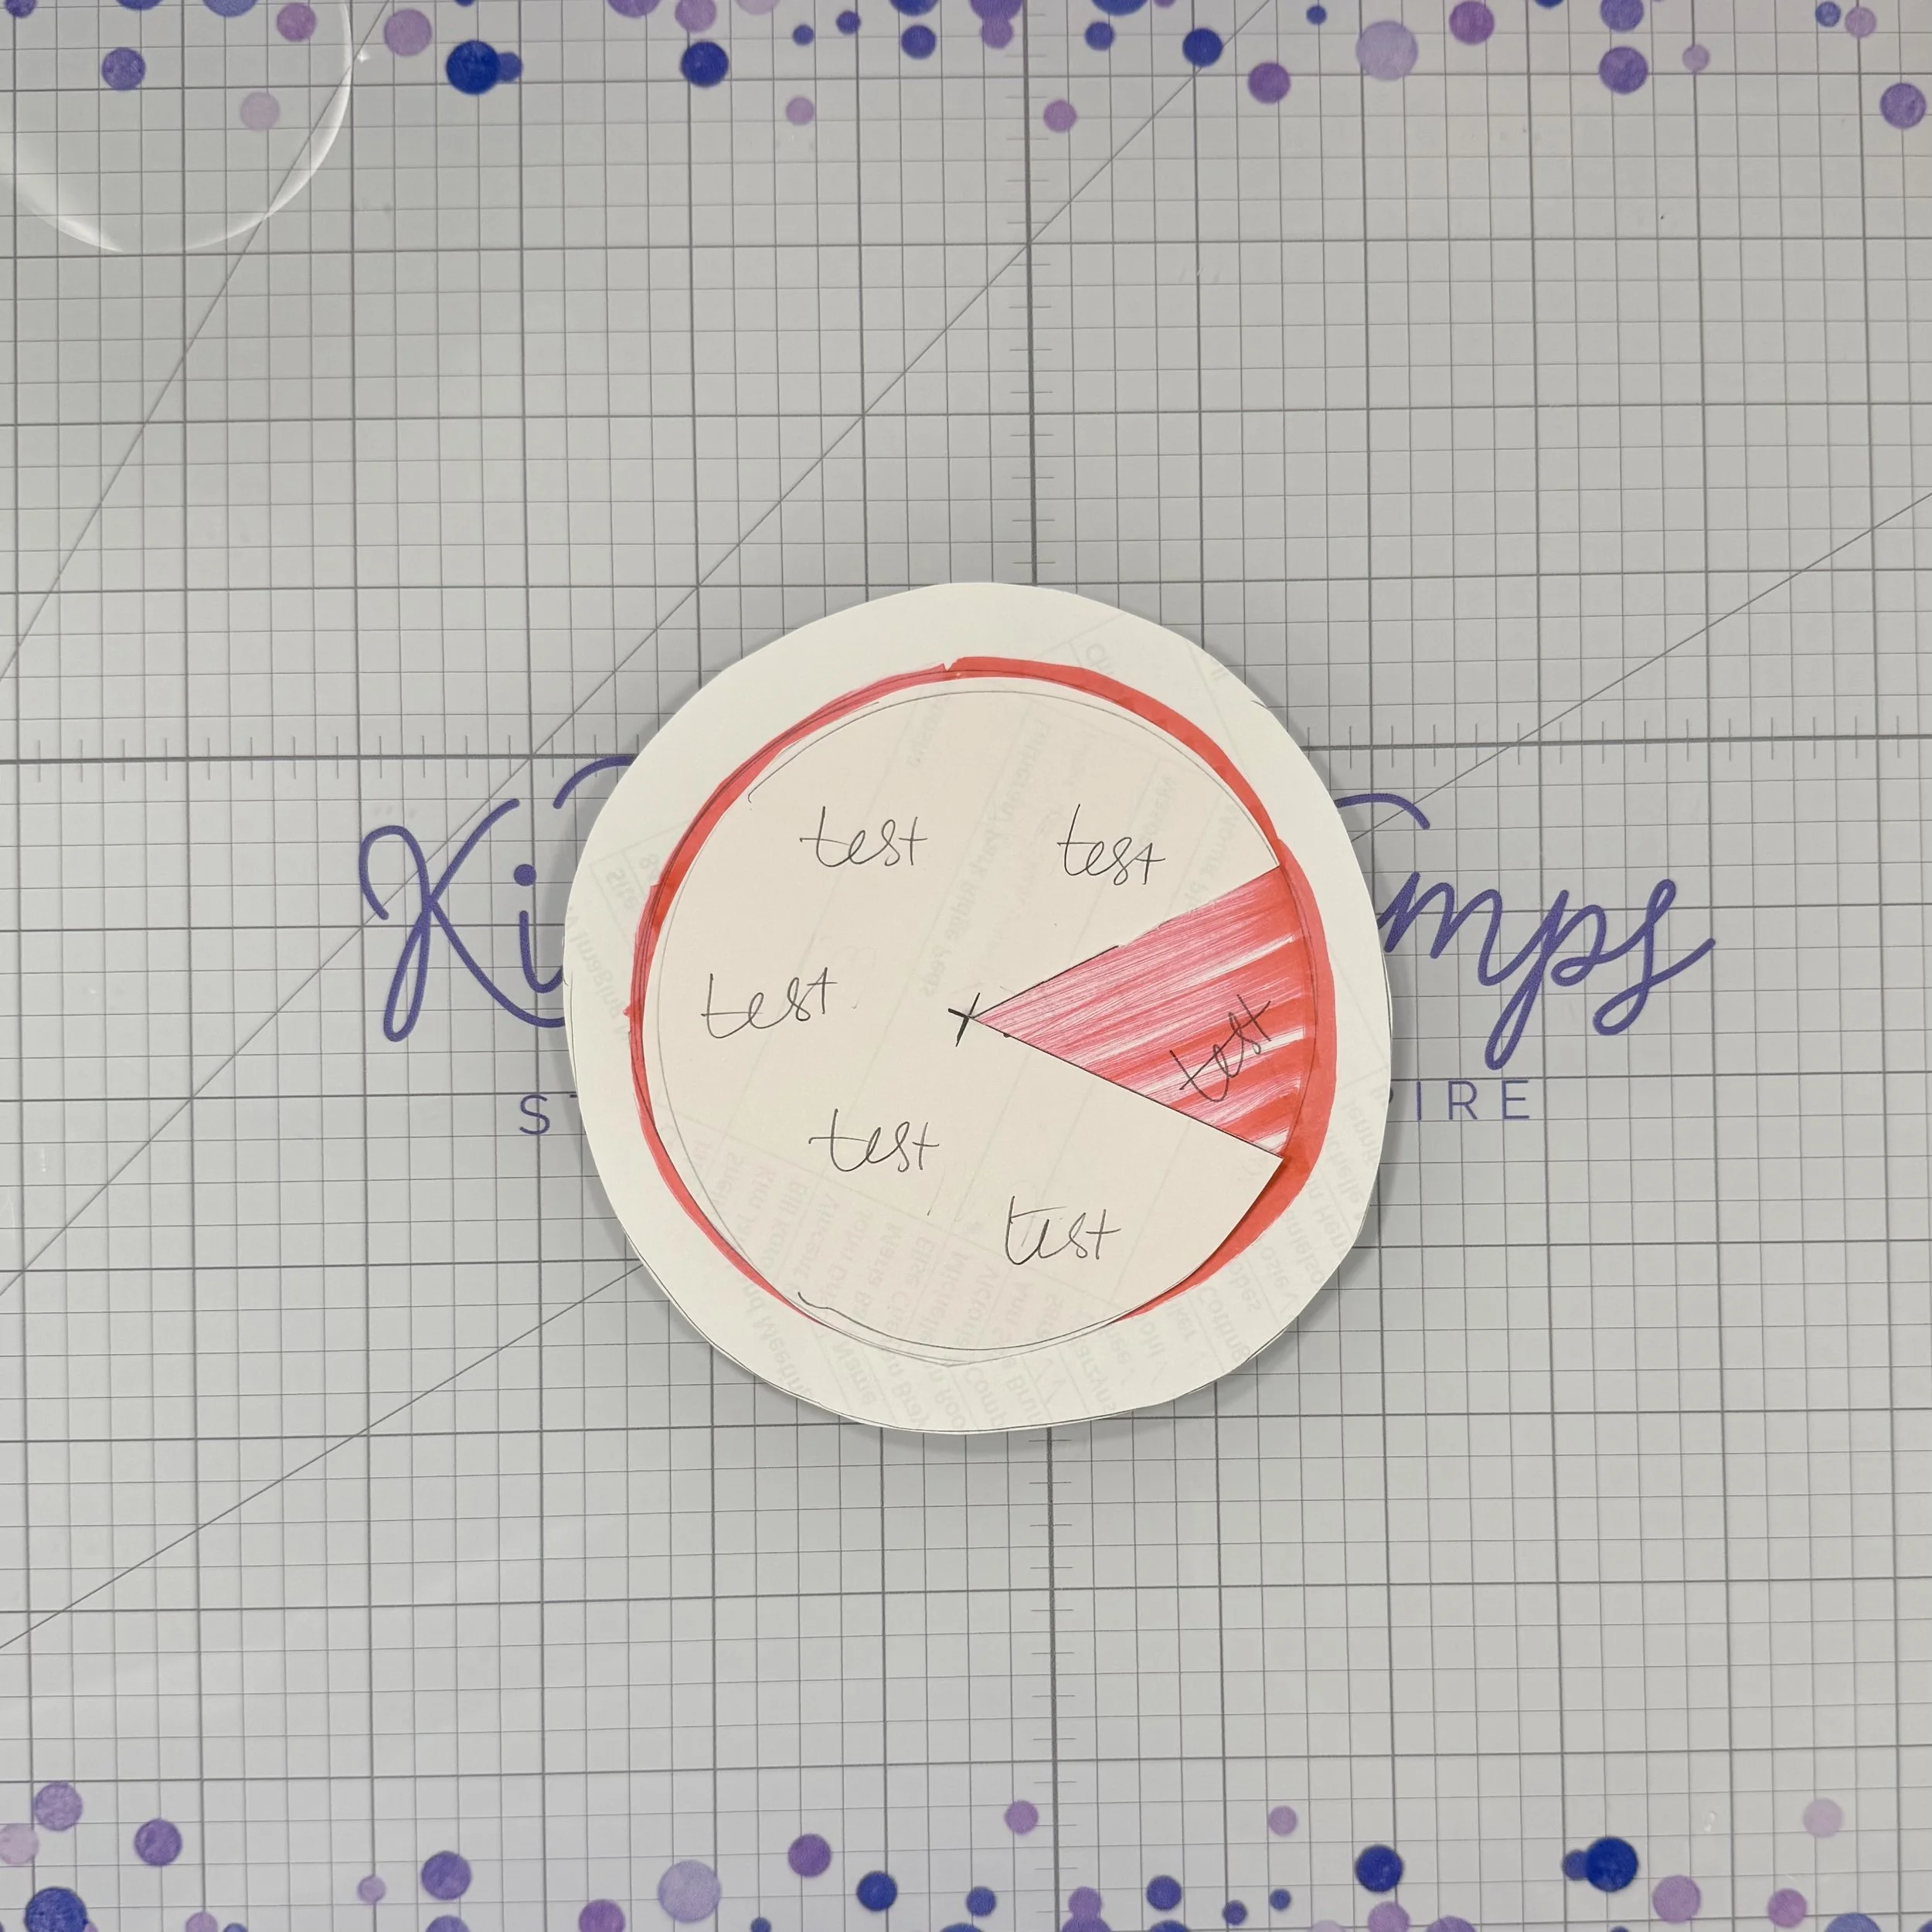
The colored scene panels were ready to become an interactive element. With a pencil the center point of both small circle scenes marked. Using a ruler and a craft knife, the scenes were cut on the same side in the same spot. When cutting the panel with the knight, caution was taken to not cut into the black frame. The stand-alone circle was thread through the large panel. A small piece of card stock was glued to the back (not to the large panel) to act as a stopper. This will prevent the circle from being twisted completely out. A second thin strip of cardstock was applied to the back of the small circle on large panel to act as the handle.
Test run of the interactive element
The sentiment was stamped and matted on a piece of black cardstock and adhered to the thin cardstock handle. This was allowed to dry before playing with the mechanism. A little arrow was penned onto the handle and the handle was trimmed to fit the card front.
A piece of black cardstock was trimmed to 5.5 inches by 5.5 inches and adhered to the white card base. The completed interactive card panel was popped up with thin foam tape only around the edges and corners to allow the circle mechanism to rotate.
This two lovers transition at evening and morning and in this card you can watch them transform!
Card Size: 5.5 inches by 5.5 inches
The entire Kindred Stamps release will be available this Friday at 8am PST/11am EST. Be sure to subscribe to the Kindred Stamps blog to see a daily line up of sneak peeks from our amazing Design Team! Come join the Fan Club and release event to be part of the release fun, and you may just win some Kindred Stamps credit!!
Coloring Guide:
Woman:
Flesh> OR7.2/ OR7.1/ OR2.0
Hair> YO2.5/ YO2.3
Dress> BG0.4/ BG0.2
Wolf:
Fur> NG9/ NG7/ NG5
Knight:
Flesh> OR7.2/ OR7.1/ OR2.0
Hair> YO2.3/ YO2.2
Cloak> R0.6/ R0.5; NG9/ NG7
Outfit> NG9/ NG7/ NG5
Hawk:
Body> YO0.1/ YO2.3/ YO2.7/ OR3.8
Beak> YO2.3
Claw> YO2.3
Thief:
Flesh> OR7.2/ OR7.1/ OR2.0
Hair> OR3.8/ OR3.7
Tunic> O4.3/ O4.0
Boots> OR3.7/ O4.3
Pants> OR3.7
Shirt> O4.0
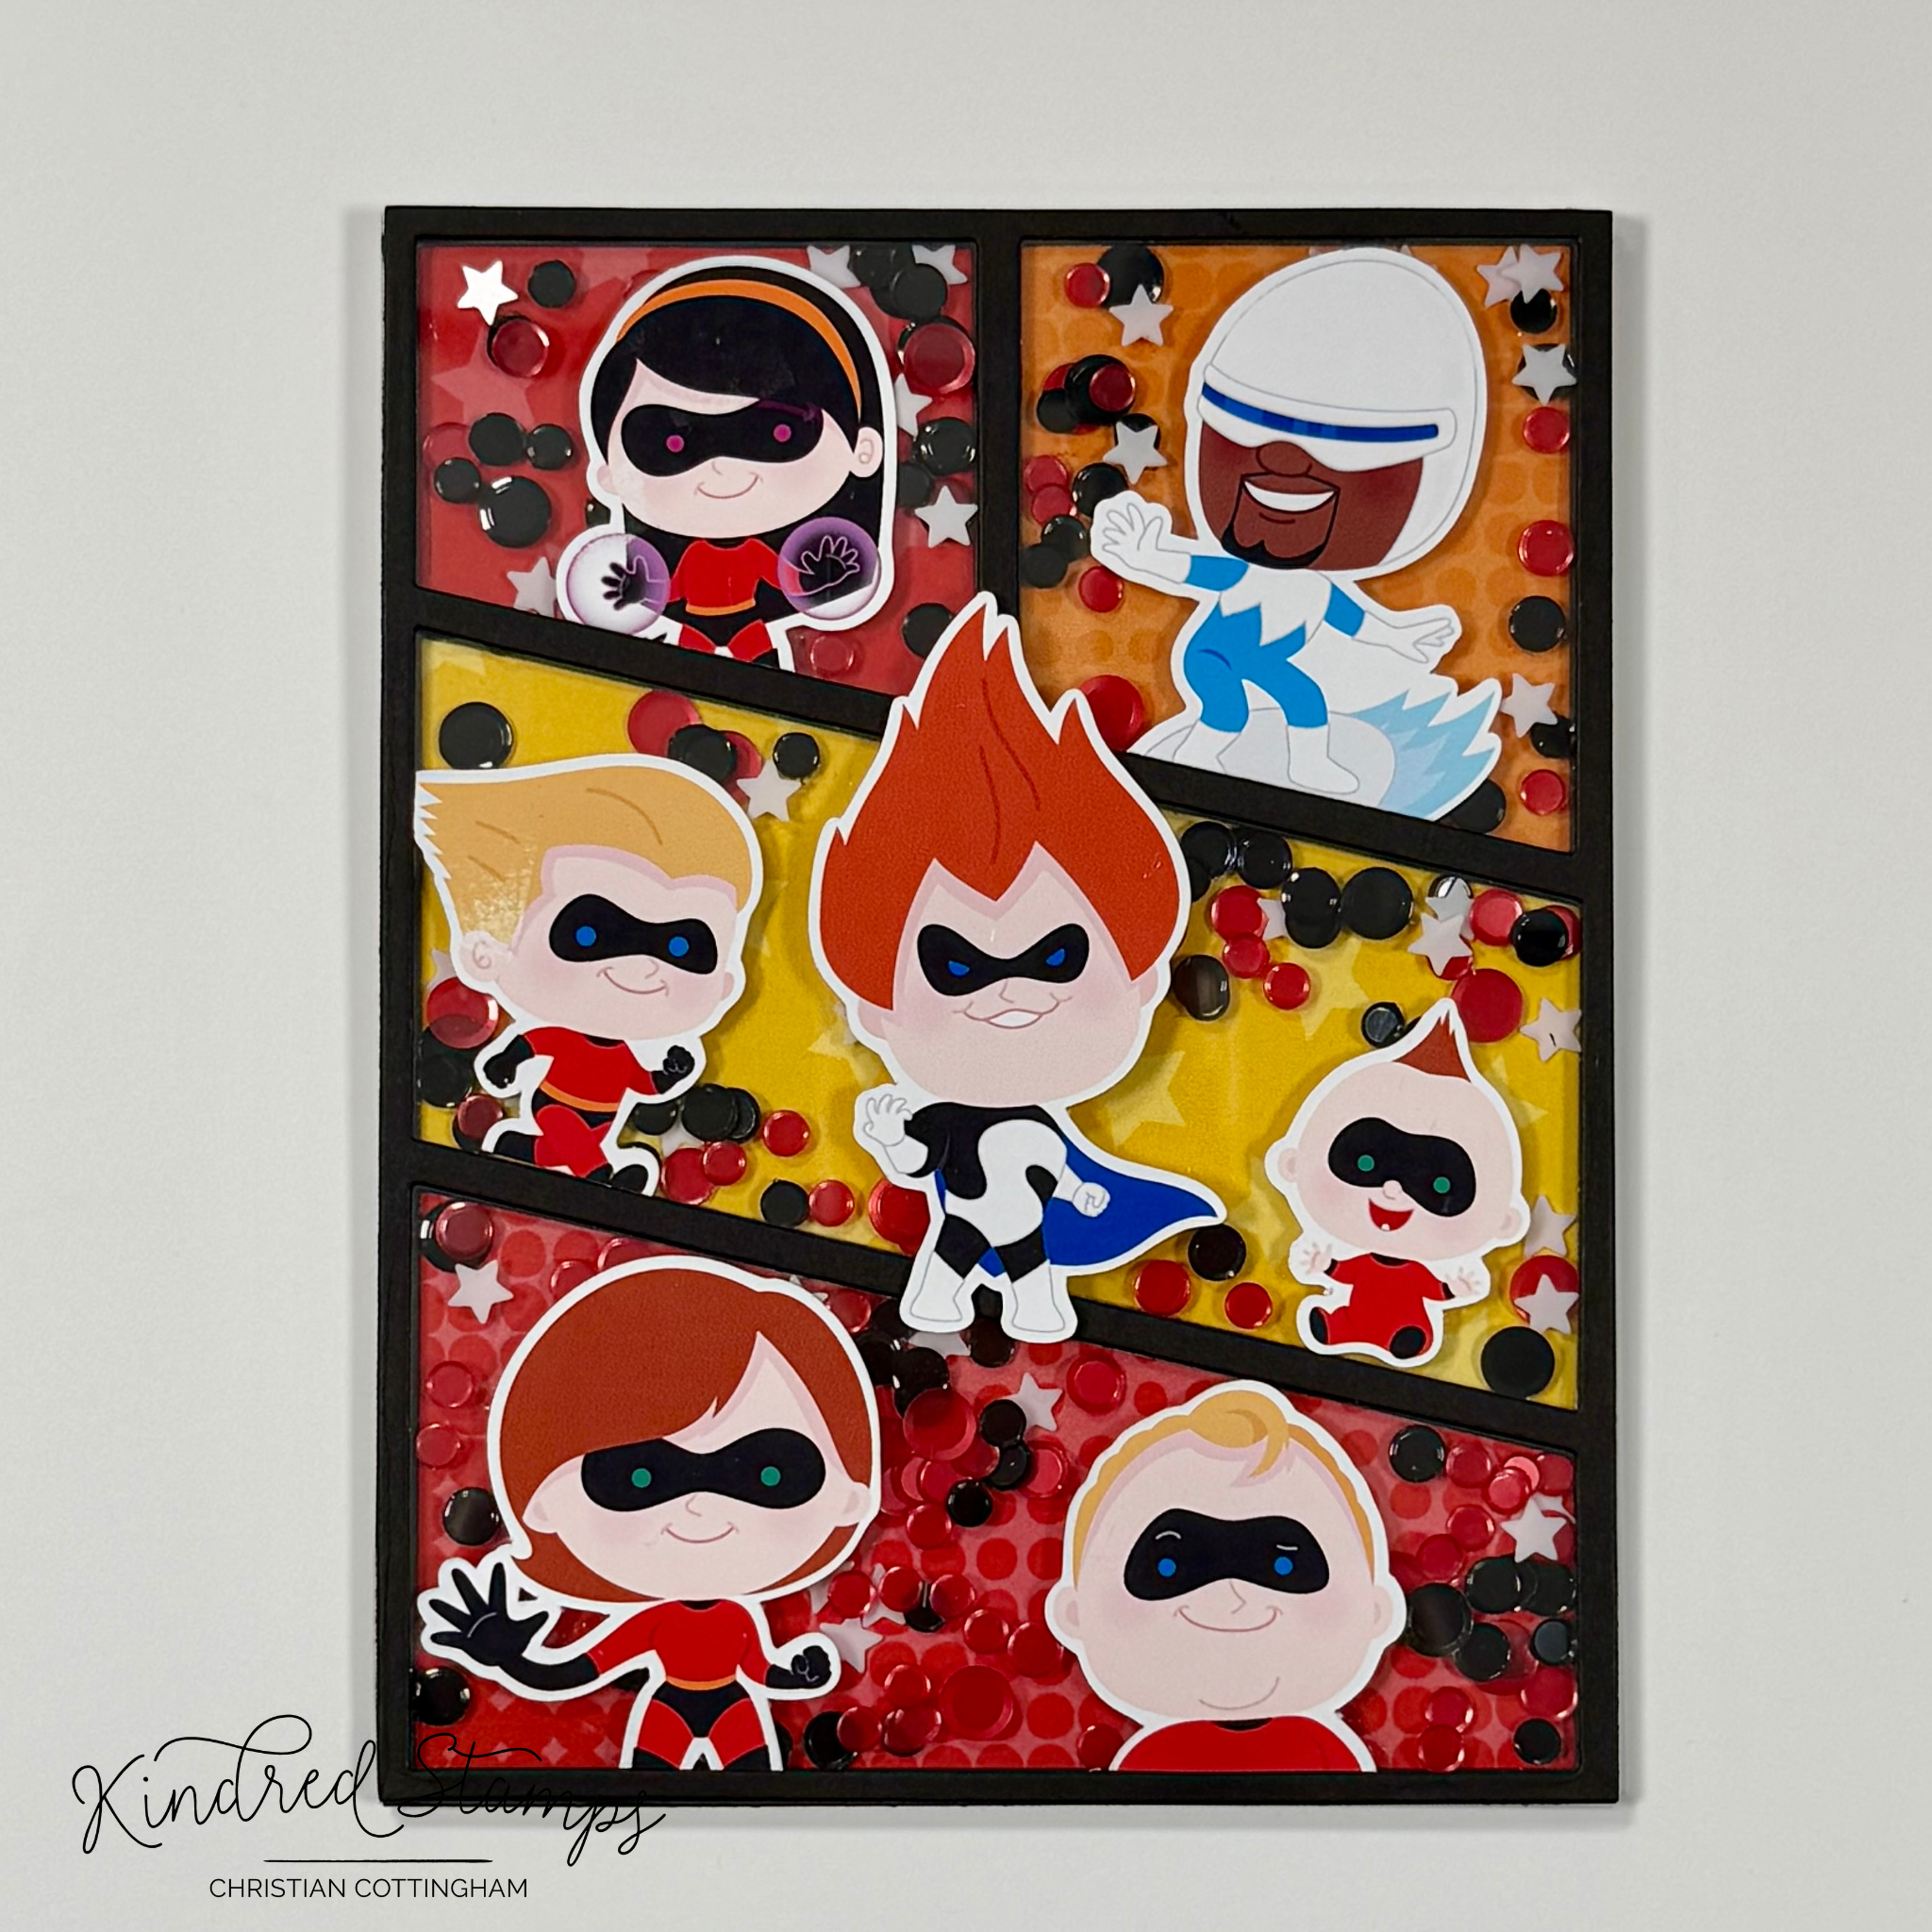
Super Family & Super SideKicks: Kindred May Kit
Need a family full of super heroes?? Look no further than the amazing cards that were made with the Super Family Kit from Kindred Stamps.
Nothing screams family time like a little family style crime fighting! The limited edition Super Family kit is available now and soon your crime fighting super hero hearts can be making your projects too! The limited edition kit can be ordered from the Kindred Stamps Website.
Now we interrupt this super kit with a PSA…This blog utilizes affiliate links. If you choose to click on the links provided to purchase, you are supporting me as I receive compensation for your purchase. If purchasing is not in your books, no worries, I hope you find inspiration for projects you design. By clicking on the links, you are letting Kindred Stamps know that you like my content and to keep bringing me back. Thanks for your time now lets show off some super powers!
Project One: Baby Bubble
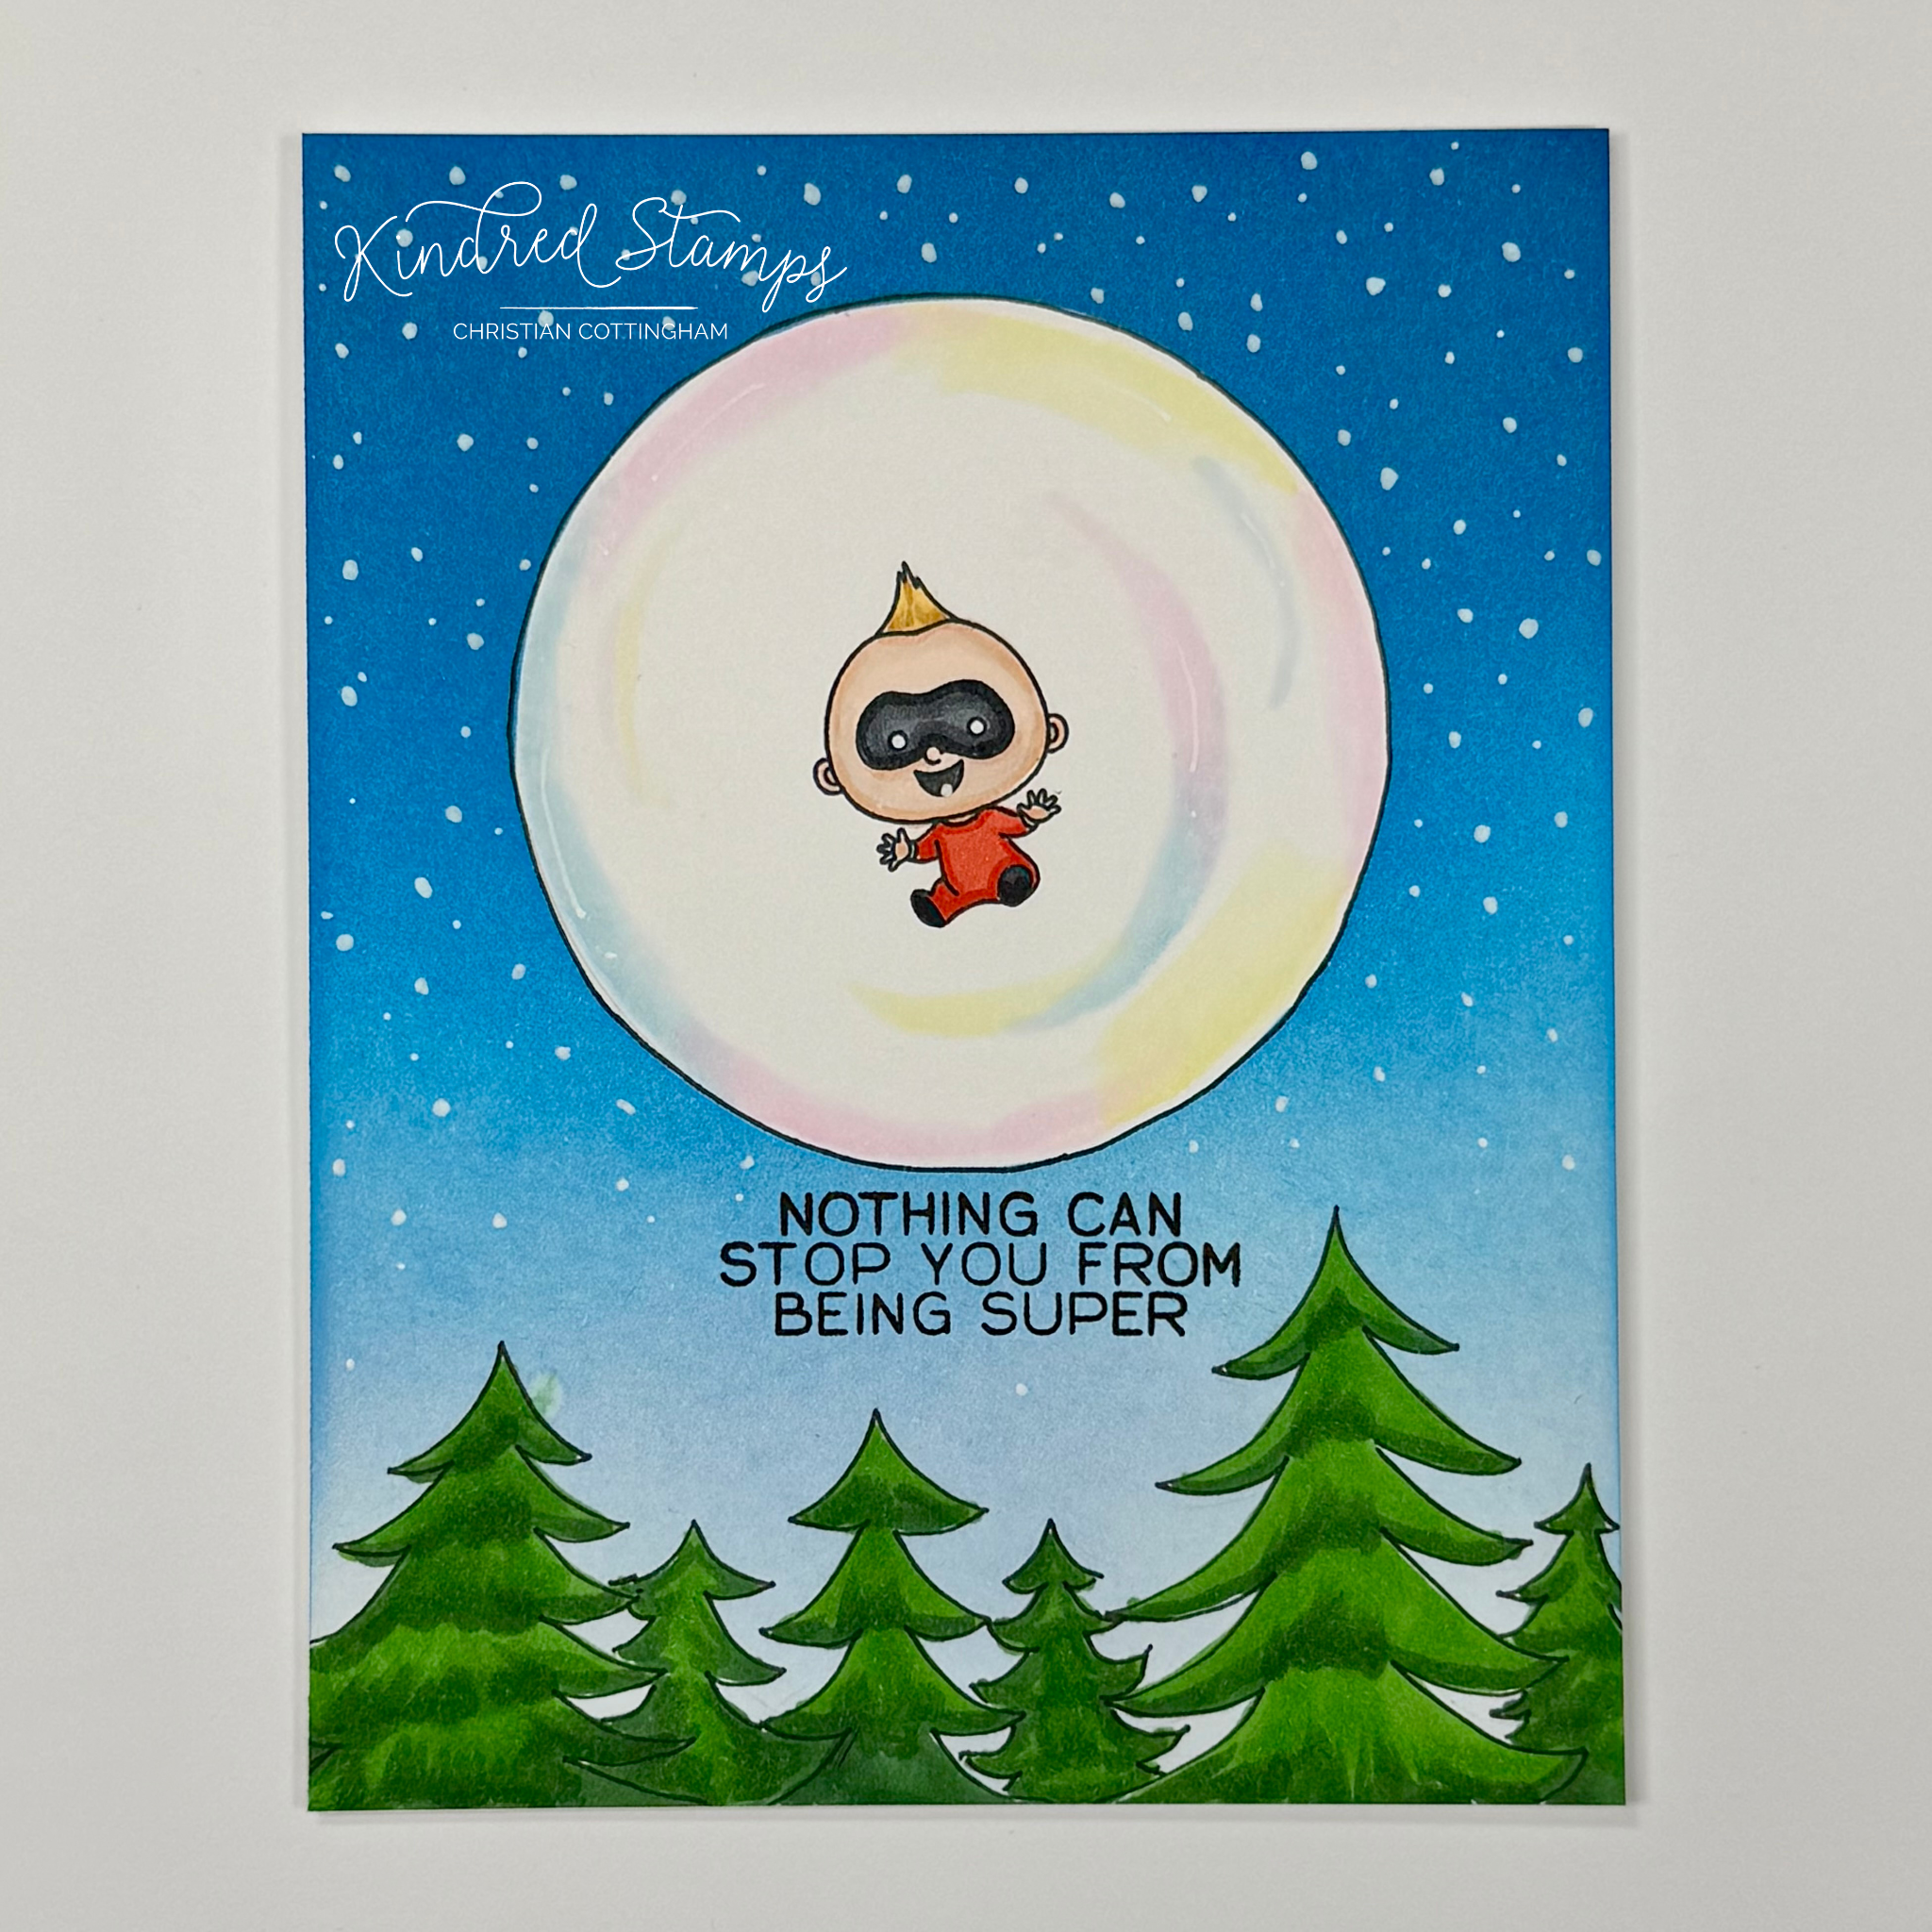
When I saw this little guy in the stamp set I knew instantly that he needed to fly and the means of lift off had to be a bubble! I also wanted the card to be a single panel card. So let’s break it down.
An A2 panel was placed into my stamping platform. The Super Baby was centered in the top-ish middle of the card (technical math there…). He was stamped in alcohol marker safe ink. It was now time to sketch the rest of the card. With the circle from the Card Basic Dies, I traced the outer edge of the die with a pencil. Then I sketched some simple pine trees on the lower portion of the card. These pencil lines were then traced with a fine liner pen and all pencil lines were erased.
On a piece of masking paper, I traced the same circle from the Card Basic Die. The circle was fussy cut out on the line and then applied over the corresponding circle with the Super Baby. The trees were not masked because I knew my sky color was going to be blue. Blue and green are friends on the color wheel so I was not concerned if some of my blending got into the whites of my trees. The panel was inked from top to bottom with the concentration of color being on the top of the card and lighter on the tree line. Using three blues, the ink was blended from top to bottom with each color change stopping before the other ended. Meaning, the first color (Gina K Designs Blue Sky) was blended heaviest at the top and lightest to the tree line. The second blue (Gina K Designs Blue Raspberry) was blended heaviest at the top of the card and lightest to just below the masked circle. Finally, the third blue (Gina K Designs Blue Denim) was applied heaviest at the top and then lightest to the top third of the circle mask. This was repeated again to even out any blemishes.
The circle mask was removed and it was time to do some coloring. The bubble was colored with Olo Markers (B0.2/ RV0.1/ Y0.1/ Zero). The Super Baby was then colored with Olo Markers (See Color Guide Below). Finally, the trees were colored with Olo Markers (YG1.7/ YG1.6).
The sentiment was then stamped in black ink. I debated if I wanted white heat embossing, but decided on the black ink because my bubble, trees, and stamped image had a black line. To finish the card panel, the white gel pen got a workout. Lots of stars were dotted and highlights applied to the bubble and the Super Baby’s tooth.
With everything in place, it was time to adhere my finished panel to an A2 card base. My Super Baby was flying the sky’s in his own bubble and I couldn’t adore it more!
Card Size: 5.5 inches by 4.25 inches (A2)
Project Two: Super Shaker
How can you not make a shaker card when you instantly see a frame?? To boot, the card comes together so quickly because of the Super Family Die Cuts that come in the kit… NO COLORING!! Let’s break it down…
The cover plate die from the kit was die cut 5 times from black cardstock. Four of the die cuts were glued together and set aside to dry. This will be the walls for the shaker cards. The fifth die cut will be used as a guide and then later used as the top to the shaker. But I am ahead of my self…
The cover plate die was then cut three pieces of pattern paper from the Power Paper Pack. The negatives from the cover plate will be put to use for this card. The die cuts were saved for another project. An A2 card base was prepped and the sentiment “Hope your birthday is super- cape or no cape” was stamped inside the card base.
Using the fifth black frame as a guide, the pattern paper negatives were paper pieced into the sections of the die cut frame. The die cut was then removed leave the pattern paper in the perfect positioning on the card base. The stacked cover plate die cuts were then adhered to the card base by centering over the pattern paper pieces. This method was used because of the sheer thickness of the walls of the shaker. Less chance I would get sticky stuff on the shaker walls.
A piece of acetate was cut down to an A2 size. The final black cover plate die cut was glued to one side of the acetate and set aside to dry while picking out the die cuts and layout that fit almost all of the characters. The pre-colored die cuts were trimmed to fit in the windows and adhered with liquid glue with the exception of the villain who had thin foam tape applied to his backside.
It was time to fill the shaker. The sequin pack from the kit was then sprinkled into each window of the cover plate die on the prepared card base. Glue was then applied to the die cut shaker wells and the acetate decorated topper was centered over the base. This was allowed to dry completely before the villain was adhered.
This shaker took no time at all by using the pre-colored die cuts! If you wanted to mass produce this card, you don’t have to make a shaker. Utilize the all the negative die cut pattern paper in different arrangements and add the colored die cuts and accents in each of the windows with some sequences. This would be cheaper for mailing and still will look super!
Card Size: 5.5 inches by 4.25 inches (A2)
Project Three: Father’s Day
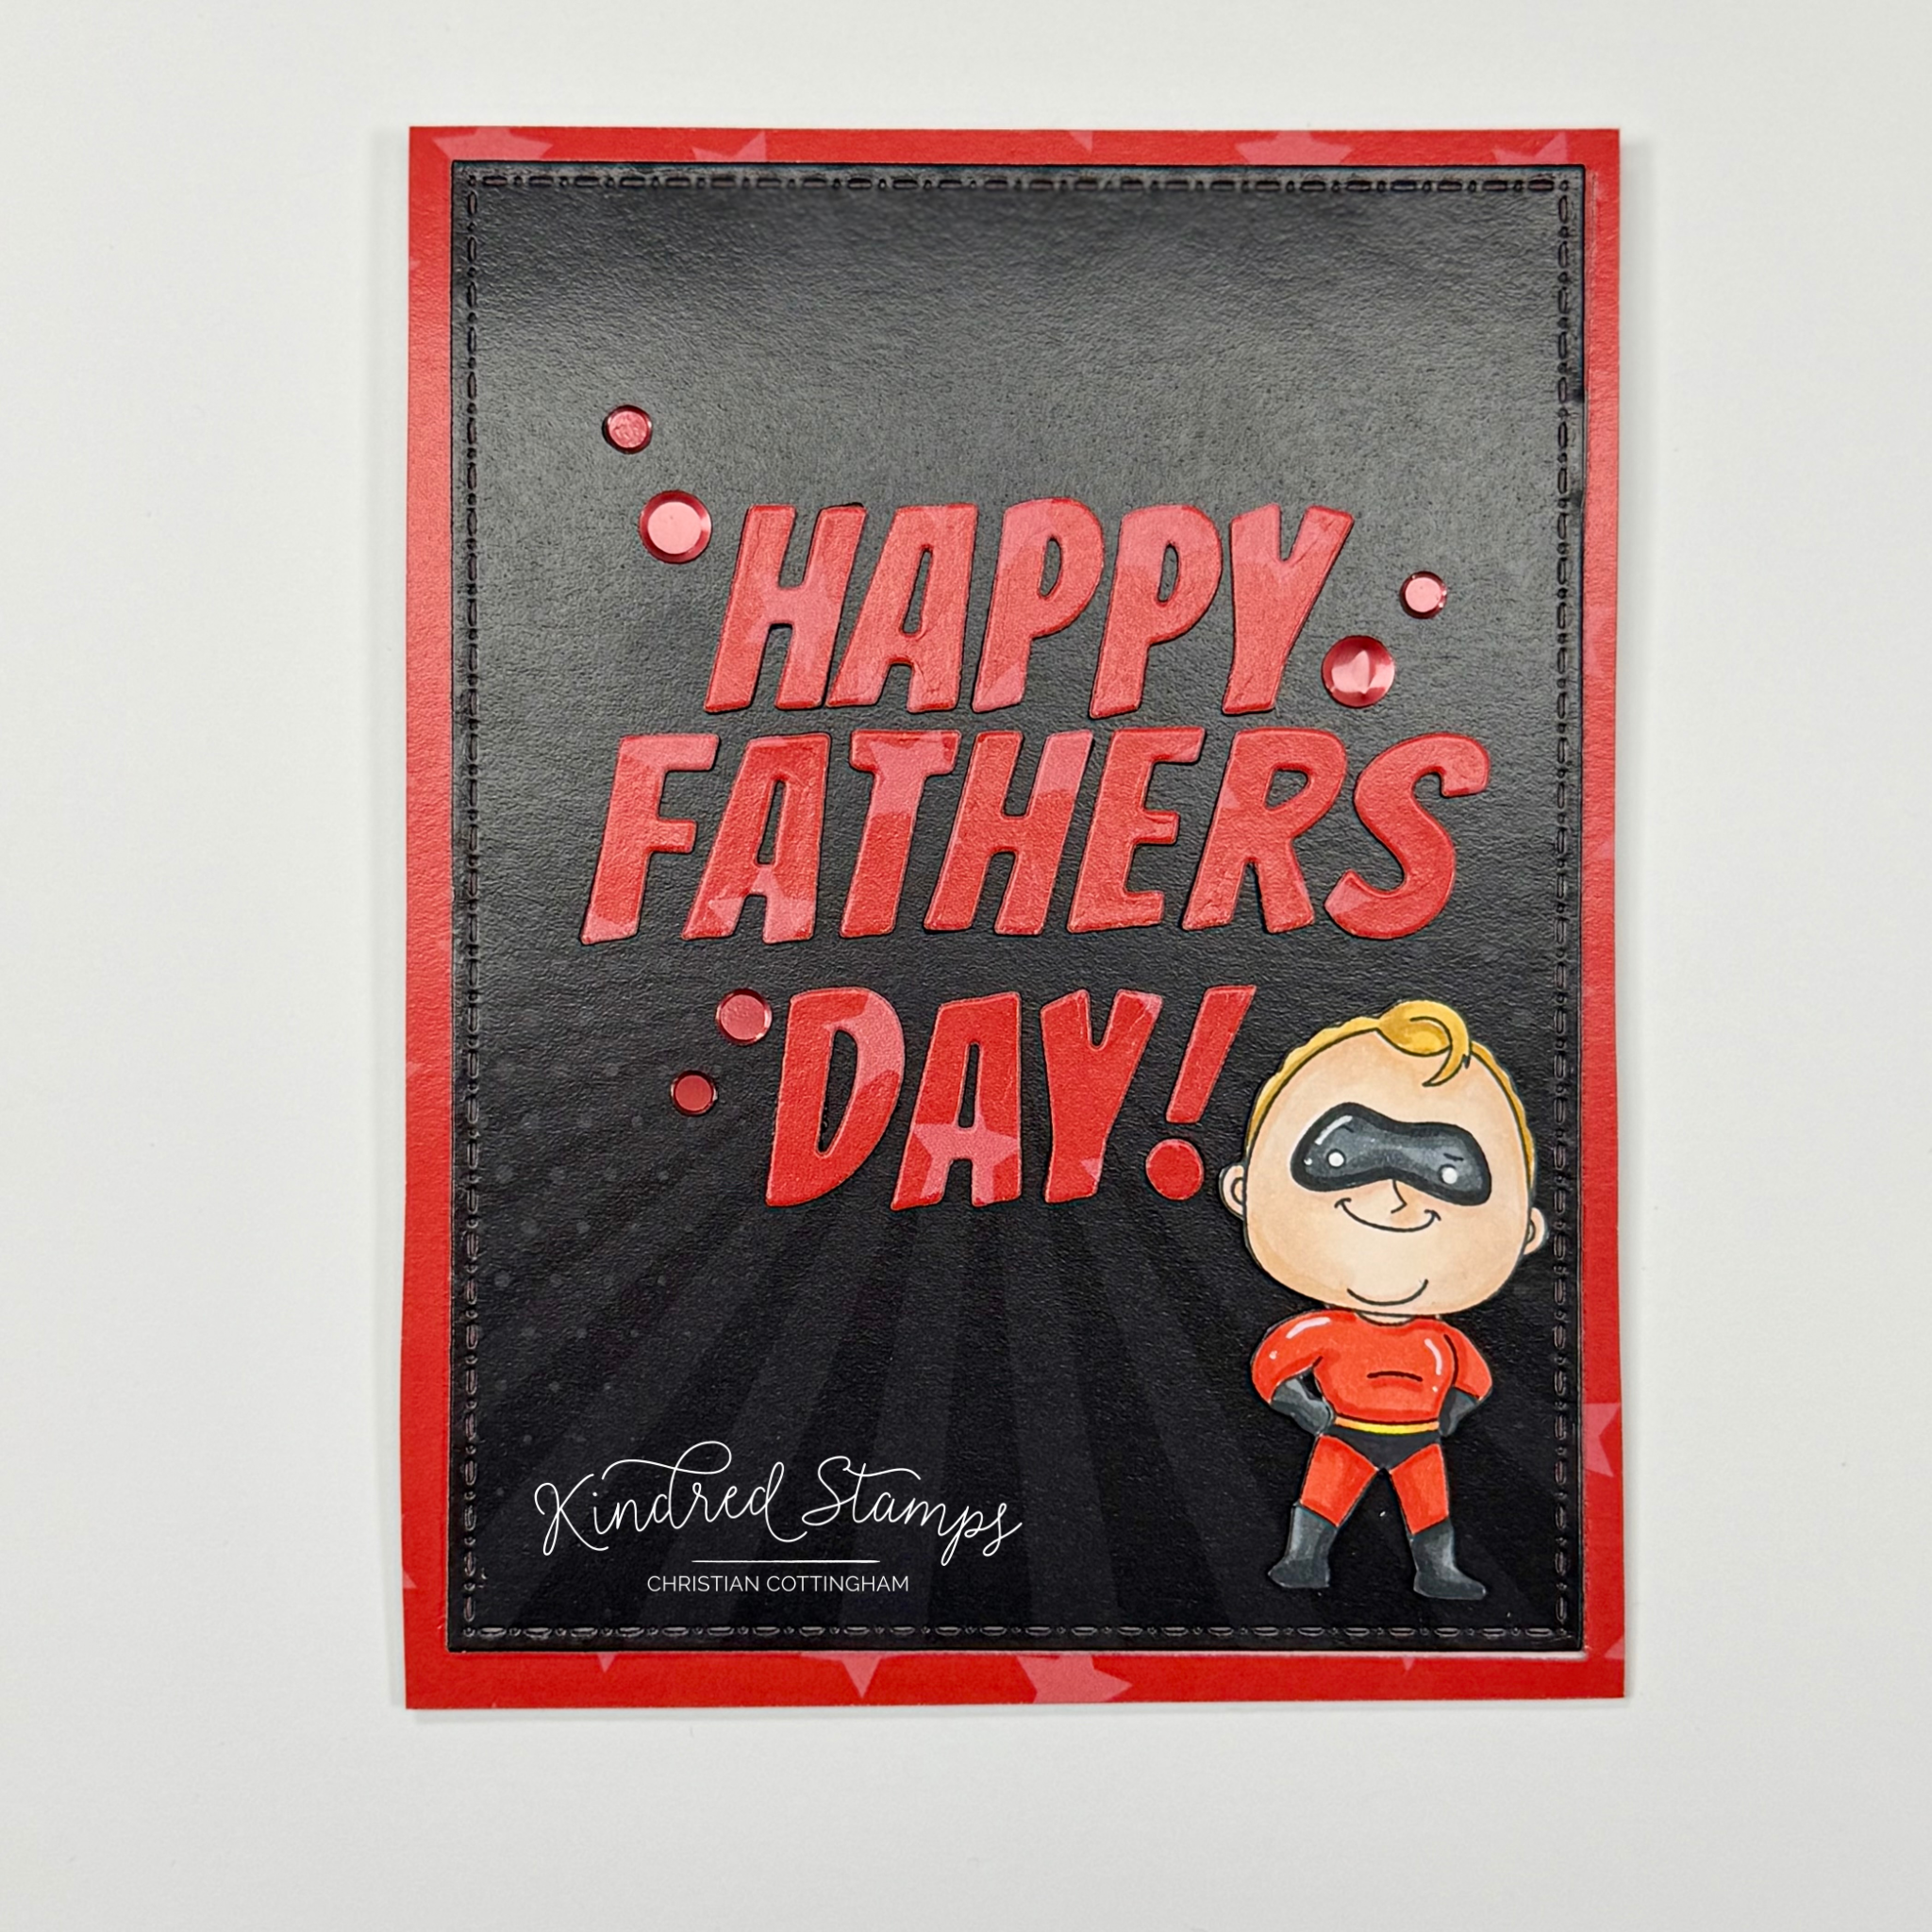
What a great way to wish a happy father's day to a super dad! This card was a breeze to come together with the supplies from the kit and one other staple die. Let’s break it down!
The Super Dad was stamped in alcohol safe ink and colored with Olo Markers (See Color Guide). He was then cut out on the line and edged with a black fine liner brush marker. A piece of thin foam tape was applied to the back and the dad was set aside.
A piece of pattern paper from the Power Paper was selected for both the front and the backside properties. Knowing that I wanted the burst to come from the center of the soon to be sentiment, the piece had to be cut first. Using the Card Basic Dies large rectangle, I cut from the center of the pattern paper. Thin foam tape was applied to the back of this panel. The remaining pattern cardstock was then flipped so the red side was facing up. The pattern paper was centered and adhered to a prepared A2 card base (5.5 inches by 4.25 inches). The excess paper was then trimmed off with scissors. These scraps were saved for something I am sure. The foam taped rectangle panel was centered over the big white empty spot on the card base and smooshed down. The panel was set aside to do some die cutting.
Pulling out the super alphabet dies, the word Happy Fathers Day was die cut from black cardstock three times, and from a piece of same pattern paper as the background. These letters were all stacked and glued together. Using the grid on my Glass Craft Mat, the letters were lined up and a piece of low tack tape was applied to the top of the letters as a group. Liquid glue was applied to each letter. The entire letter unit was then centered on the card base and the low tack tape was pressed onto the card base until the glue had dried.
Once dry, the low tack tape was removed and the Super Dad was adhered to the lower left hand side of the card. Using the sequence from the kit, the red sequins were placed in a grouping around the sentiment to give an accent to draw the eye in.
Finally, the sentiment, “You don’t need a super suit to be my hero” was stamped in the inside of the finished card. Perfect sentiment to celebrate the dad/ father- figures in your life.
Card Size: 5.5 inches by 4.25 inches (A2)
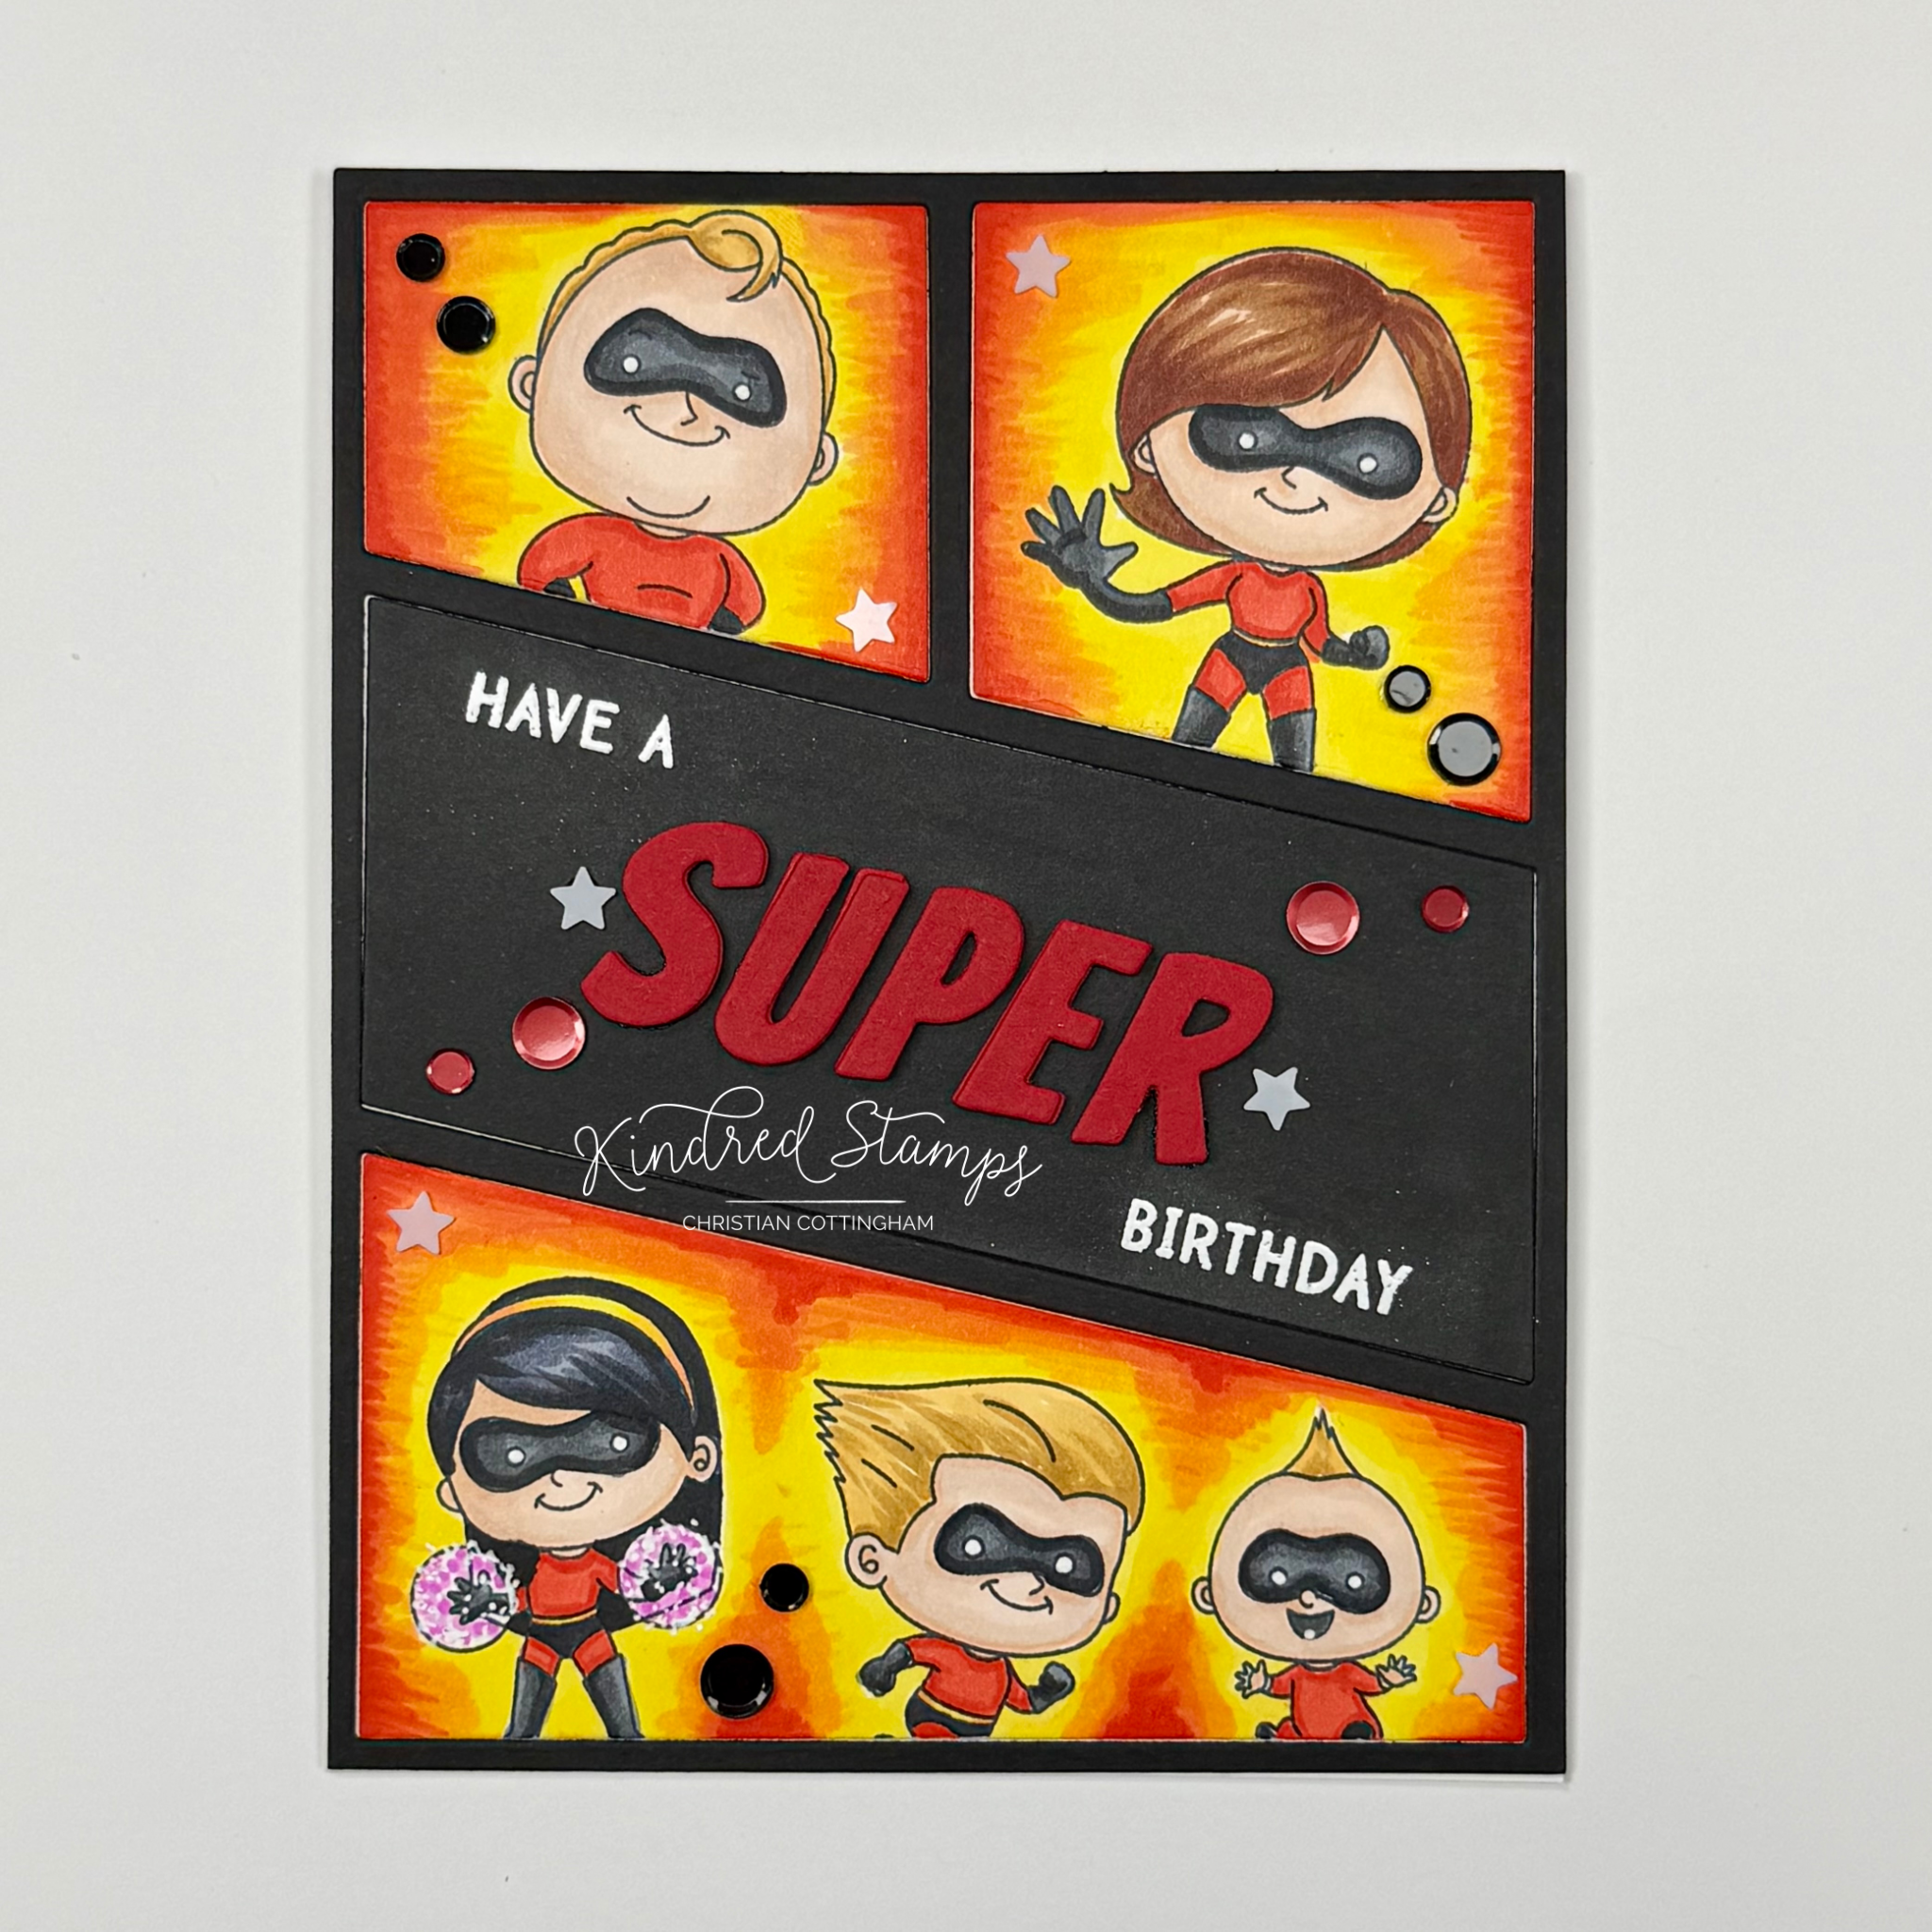
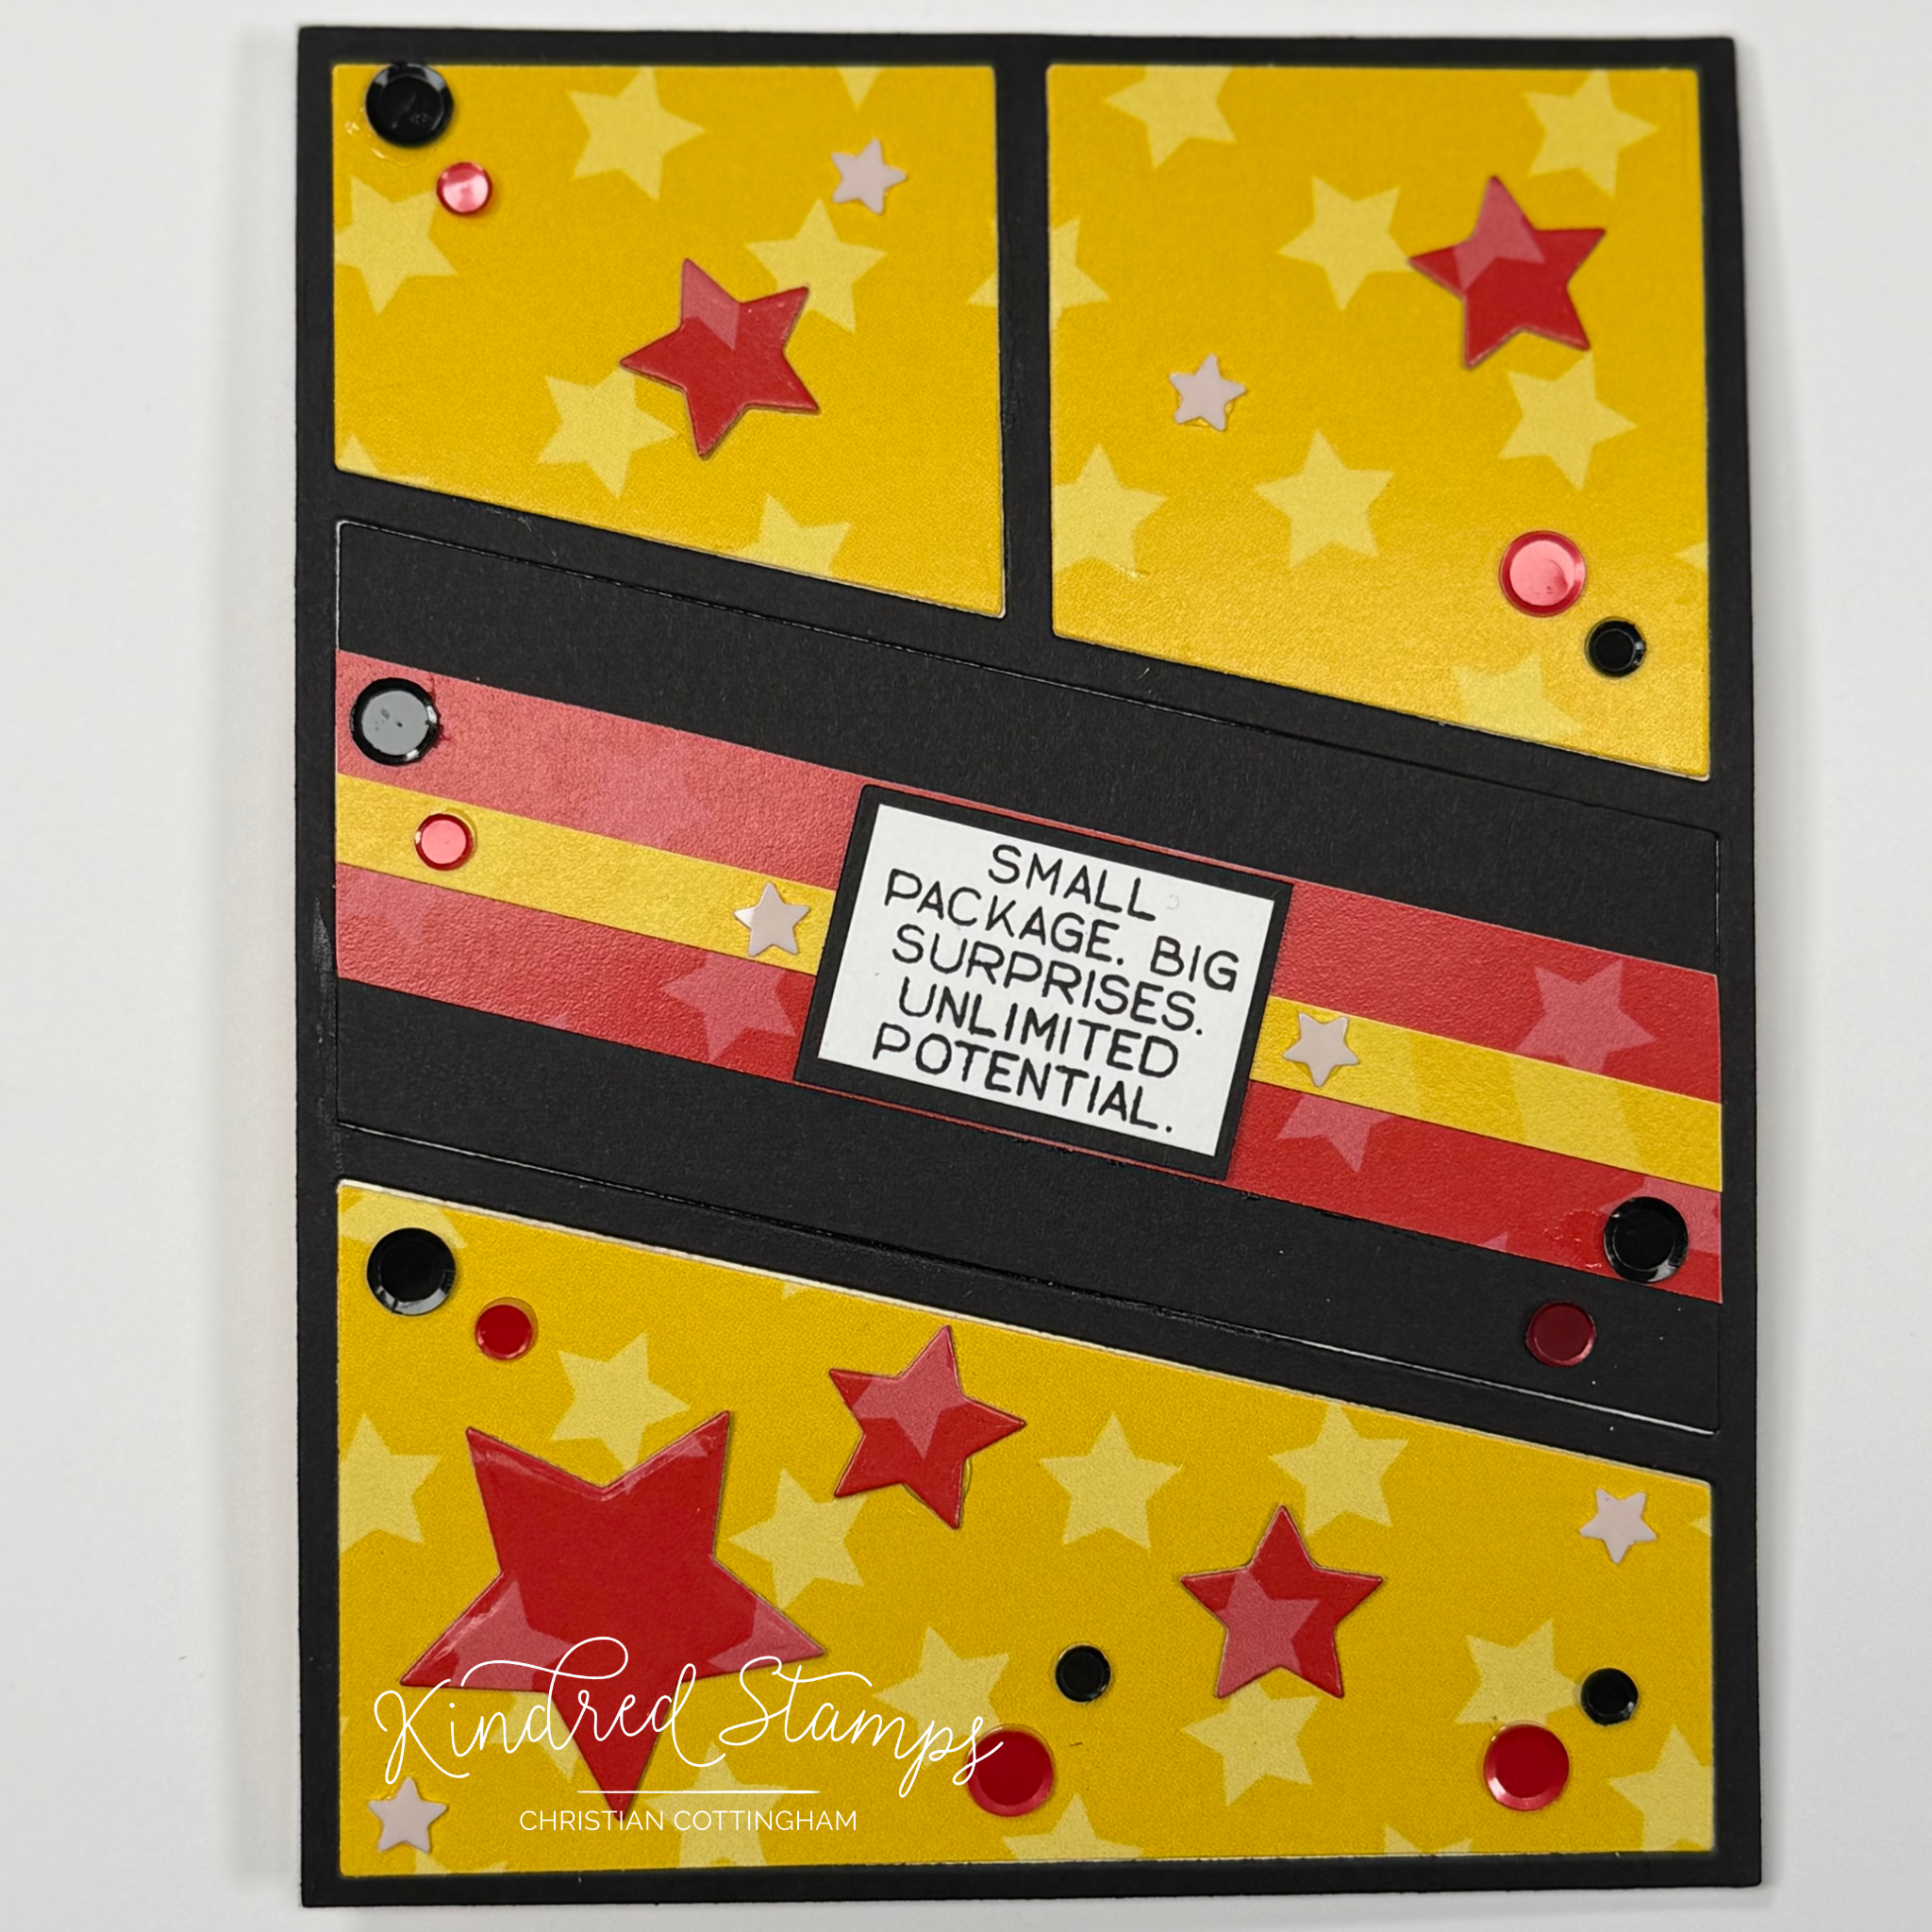
Project Four: Super Birthday

The Super Family has their signature color so why not show it off?? This birthday card shows each family member in a fun graphic design! Let’s break it down.
The cover plate die provides all the geometrical pieces needed for this card. The cover plate die was cut from black card stock, and white card stock. The negative pieces will be inlaid into the cover plate die cut. Keep the center black panel, and the two top and the bottom panels from the white cardstock. On the white negative pieces, the Super Dad was stamped on the smallest top panel and the Super Mom on the larger panel. The Super Daughter, Super Son, and Super Baby were stamped on the bottom white panel.
Since I was stamping, the pulled the sentiment “ Have a super birthday” and positioned it on the top left angle of the black cardstock negative. The panel was prepared with an antistatic tool, and the sentiment was partially masked to only have “have a” exposed. This was inked with embossing ink. The sentiment stamp was cleaned and then placed on the lower right side of the panel. Partial mask was again applied and “birthday” was inked with embossing ink. The panel then was sprinkled with Snowfall embossing powder and heat set. The antistatic powder was buffed when he panel was cooled.
The word “SUPER” was die cut three times from red cardstock utilizing the alphabet dies in the kit. These were stacked and glued together. Using the grid on my Craft Glass Mat, the sentiment was lined up and with low tack tape, the letters were picked up and glue applied to the back of the letters. Finally, the word super was applied to the black panel and this was set aside to dry.
The white stamped panels were up next for coloring. The backgrounds were colored first on each of the panels. This was a conscious choice because I wanted the yellow to stay vibrant and did not want to risk touching the red from the suits and dragging it into the yellow. For the backgrounds, Olo Markers were blended from yellow to red with Y1.2/ OR1.3/ R0.4/ and R0.5. With the backgrounds complete, each of the images were then colored with Olo Markers and white gel pen accents (See Color Guide Below).
It was now time to assemble the card. An A2 card base was prepped. The black cover plate die cut was glued to the card base. Each panel was then glued into the respective gap. The sequins from the kit was placed on the contrasting colored areas (red on the black… black on the red). This family signature colors show off each member perfectly!
Card Size: 5.5 inches by 4.25 inches (A2)
Project Five: Save the Cake
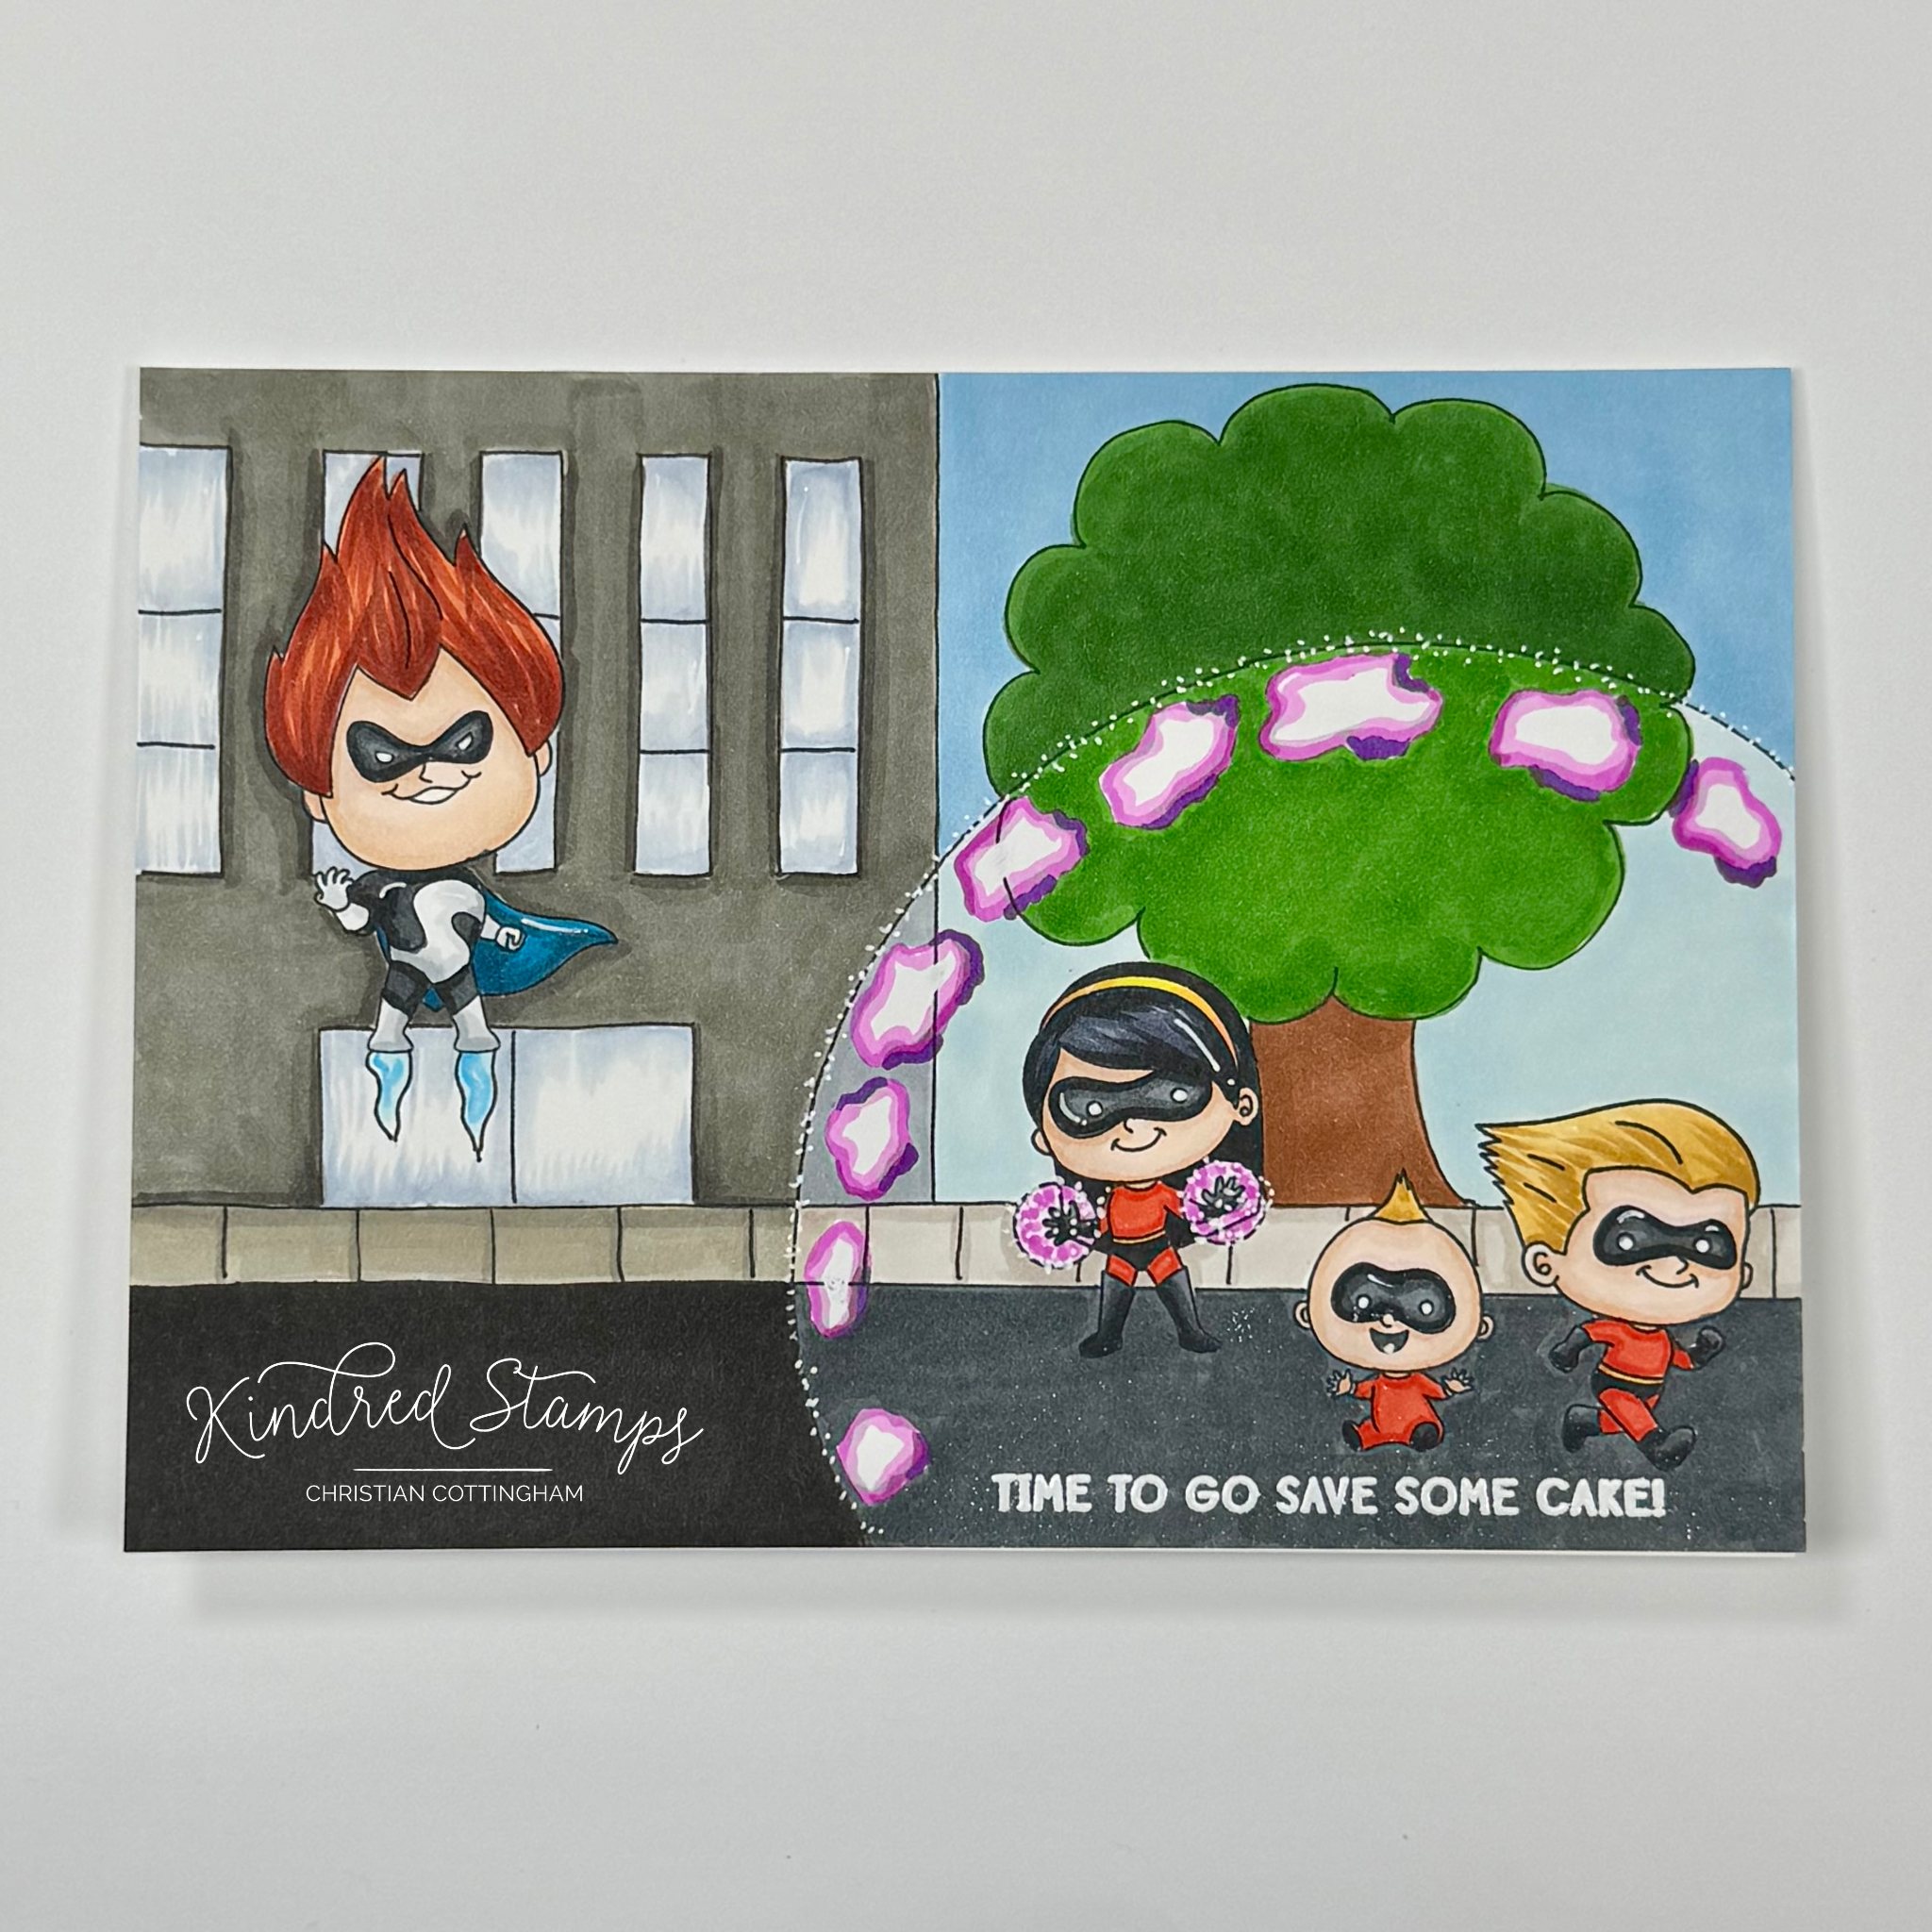
If you have super powers one must have priorities…SAVE THE CAKE!! This card showcases the Villain and the three super kids in an epic battle. Let’s breakdown how this single layer card was made.
On a piece of cardstock was trimmed to 5 by 7 inches (A7) panel. The Villain and the three siblings were stamped in alcohol marker safe ink. With a pencil the remaining scene was sketched and then outlined in a fine liner marker. All pencil lines were then erased.
With the card panel now looking like a color book page, it was time to color in the scene. The coloring was done in two different tones to give the illusion of the force field. The Villain, Super Daughter, Super Son, and Super Baby were colored with Olo Markers (See Color Guide below). The steam on the Villain’s feet were colored with Olo Markers B1.5/ B1.1/ Zero.
The scene outside the force field was colored with Altenew Artist Markers: Sky (B001); Tree (G245); Building (CG01/ Zero/ TG03/ TG05); Sidewalk (TG02/ TG03); Road (TG08/ TG07). Whereas the force field scene was colored with Olo Markers: Blobs (V2.6/ V0.6/ V0.3); Sidewalk (WG3/ WG1); Road (NG7); Tree (OR7.6/ YG1.6); Sky (B4.1).
The alcohol marker coloring was allowed to dry completely. The panel was then prepped with an antistatic tool and the sentiment was stamped with embossing ink. Snowfall Embossing Powder was applied and heat set. The colored panel was then adhered flat to an A7 card base. The white gel pen was the last hero on this card. To give the illusion of shimmer and warping, the white gel pen was stippled around and on the drawn black line of the force field.
The card was finally complete and fingers crossed the cake was saved!
Card Size: 5 inches by 7 inches (A7)
Project Six: Twist Pop Birthday
Just because the card is small doesn't mean it’s not full of surprises, especially when it comes to birthdays! This interactive twist and pop card is easy to make and you don’t need any special dies. Let’s break it down.
The front card panel was first up. The cover plate die was cut out of black cardstock and then out of a piece of yellow pattern paper from the Power Paper pack. A second piece of pattern paper was trimmed to create a red banner that will spread across the center panel of the cover plate. A thin strip of leftover yellow pattern paper was trimmed down. Utilizing the Card Basic Dies, a few red stars were cut from the pattern paper. Finally the sentiment was stamped in black on a scrap of white cardstock and matted on a small piece of black card stock.
To assemble the front of the card an A2 top-folding card base was prepped. The cover plate die cut was glued to the front of the card. The top and lower panels were paper pieced with the patterned paper. The center panel utilized a negative piece from the black cardstock. The pattern papers were layered and adhered to the black negative piece and the sides were trimmed. This panel was then adhered to the middle of the card front. The sentiment was adhered to the center of the card. Sequins from the kit were adhered in each section.
The inside was up next! The city scene paper and contrasting red pattern paper were trimmed to 5.25 inches by 4 inches and glued to the inside of the card. The card was set aside to dry while the remainder of the card was prepped.
The mechanism was up next! A piece of white cardstock was cut to 8 inches by 3 inches. On the short side, score at 1.5 inches (lengthwise down the center). With a ruler and a pencil, place a small mark at 2.5 inches and 5.5 inches measuring across the 8 inch side. You will need to mark on both the top and bottom of the front side of this strip. Score connecting the lines diagonally across from each other (it will look like an X). Fold on the score lines. The mechanism will fold in on itself when you make valley folds along the length of the strip. The mechanism will look like an arrow with a triangle and to flappy folded barrels.
The triangles on the mechanism are centered on the card base and adhered with both strong double-sided and liquid adhesive. This was set aside to dry. A panel of white cardstock was trimmed to 8 inches by 3 inches. This strip was scored at 2 inches, 4 inches, and 6 inches. The panel was folded in valley, mountain valley fold. This was set aside. Four pieces of patterned cardstock were trimmed to 1.75 inches by 2.75 inches. These panels were adhered to the scored panel.
The Super Dad and Villain were stamped in alcohol marker safe ink and colored with Olo markers (See Color Guide). The images were cut out leaving a thing white boarder and they were adhered to the outer panels of scored panel. Using the same star dies from the Card Basics Dies were cut out of a contrasting paper and arranged on the inner panels of the scored section.
A piece of cardstock was trimmed to fit inside the red pattern paper and stamped with the sentiment. This will allow for a place to write a note to the recipient. This panel was glued to the panel.
Finally, it was time to make the pop-out part of the twist and pop. The panel was glued to only the top left on one side of the mechanism, and then the bottom right on the opposite side. This was allow to dry before opening and closing, and opening and closing, and opening and closing… nope, you can’t stop once you start! This card maybe small, but it has a big surprise inside!
Card Size: 5.5 inches by 4.25 inches
Coloring Guide:
All images:
Flesh> OR2.0/ OR7.1/ OR3.2
Family Suits> R0.5/ R0.4; OR1.3/ Y1.2
Family Boots/ Masks/ Gloves> NG9/ NG7/ NG5
Super Dad:
Hair>YO2.5/ YO2.3/ YO2.2
Super Mom:
Hair> OR3.7/ OR4.7/ OR4.2
Super Daughter:
Hair> CG9/ CG7/ CG5
Force Field> V0.3/ V0.4
Super Son:
Hair> YO2.5/ YO2.3/ YO2.2
Super Baby:
YO2.5/ YO2.3/ YO2.2
Villain:
Hair> OR2.7/ OR2.6/ OR2.3
Cape> BG0.8/ BG0.7
Suit> NG9/ NG7/ NG5; NG1/ NG3

Pocket Notebook Just For Me
Let’s make a notebook just for you! You are worth it!
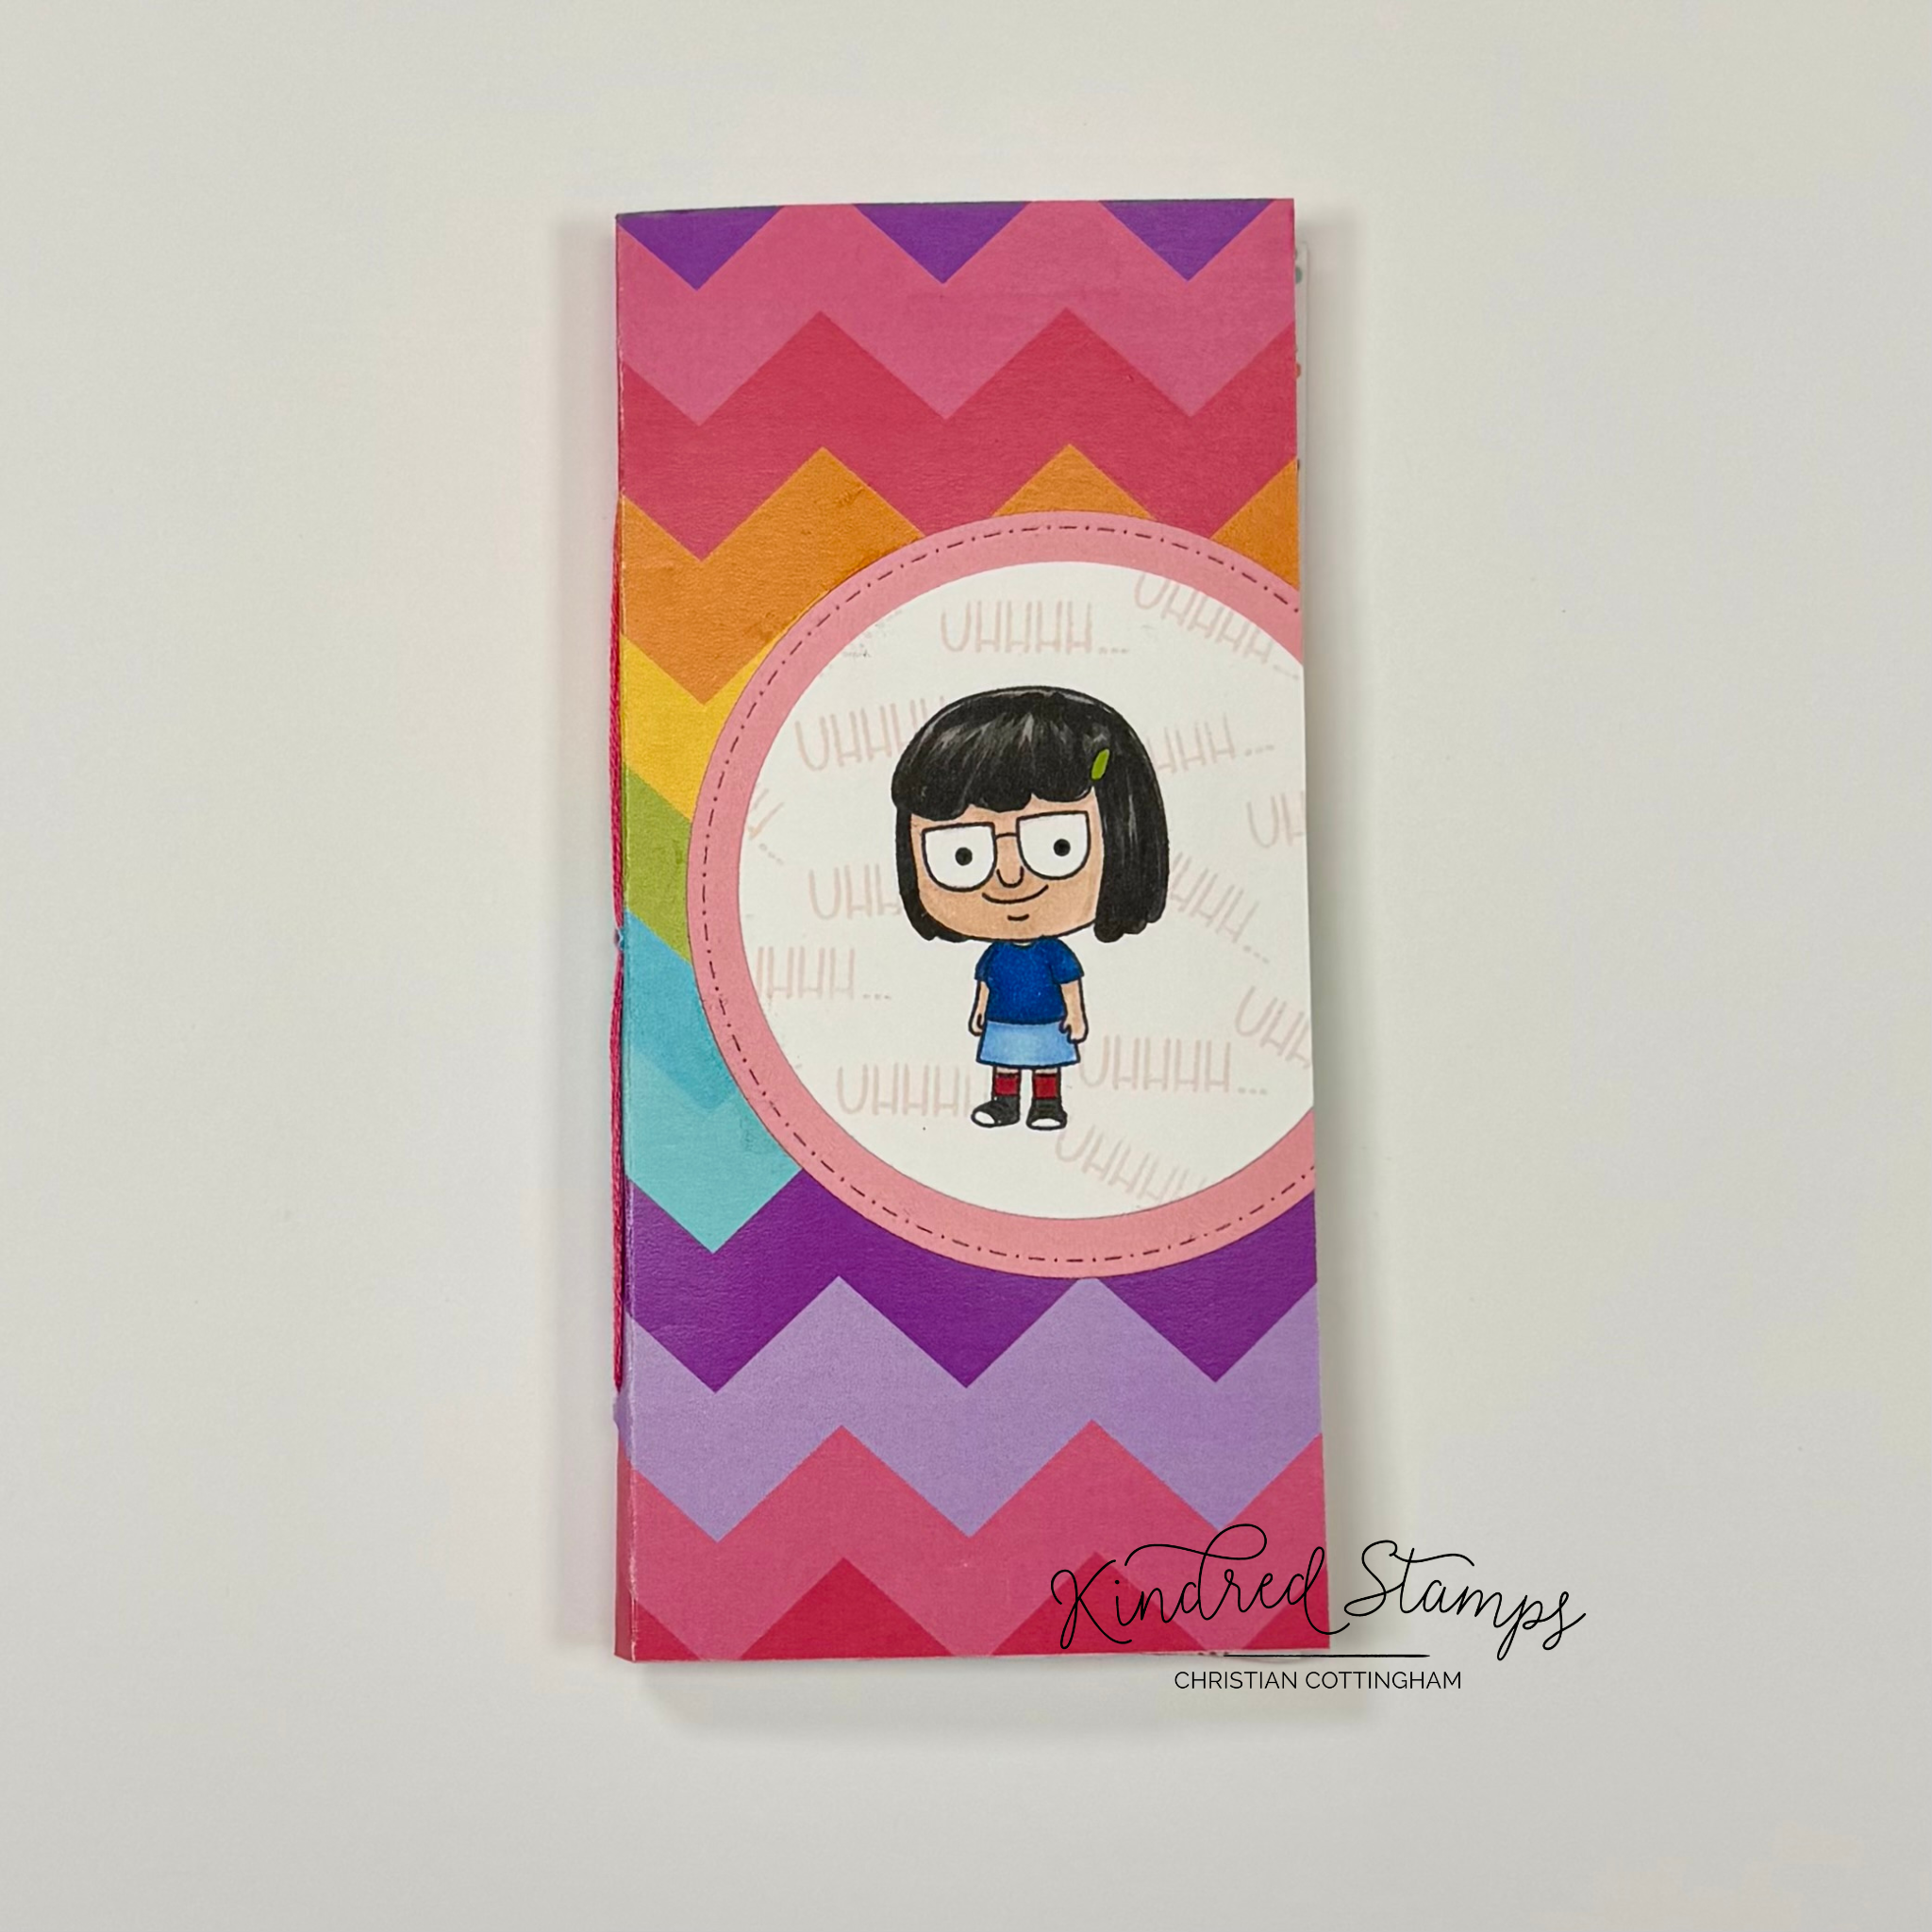
Ever searching in your tote or purse for a notebook to jot down something quick and coming up empty handed?? Well, let solve that problem and make a notebook just for you by you. You are worth it! Head over to my YouTube Channel to check it out!
This simple notebook utilizes the following supplies (affiliate links below):
Burger Family, Kindred Stamps: https://www.kindredstamps.com/products/burger-family?_pos=1&_sid=22d0dde36&_ss=r&aff=97
Sweets Paper Pack, Kindred Stamps: https://www.kindredstamps.com/products/sweets-paper-pack?_pos=3&_sid=cc44fcccf&_ss=r&aff=97
Card Basic Dies: https://www.kindredstamps.com/products/card-builder-basics-die?_pos=1&_sid=0be568523&_ss=r&aff=97
Scrap paper or copy paper
Embroidery floss
Needle
Pokey tool of your choice
Coloring Guide:
Olo Markers: OR7.1/ OR7.2
Altenew Artist Markers: G715; B001/ B003; B027/ C015; TG08/C026/C017; C026/ R218
Concord & 9th: Ballet Slippers Ink
Diagram Templates:


Sparkle Friends: Kindred Stamps April Release
Need some happiness in your life?? Check out how the Sparkle Friends by Kindred Stamps was put to use!
Sparkle Friends, Kindred Stamps
Are you searching for happiness? The Sparkle Friends, Sparkle Friends Die Cuts, and Sparkle Dot Stencil are a perfect way to find and share your happiness. I just couldn’t stop making with the set! I had so much joy making everything. A memory game, a gift set, and some overall fun cards. I hope you find happiness in these projects!
This blog utilizes affiliate links. If you choose to click on the links provided to purchase, you are supporting me as I receive compensation for your purchase. If purchasing is not in your books, no worries, I hope you find inspiration for projects you design. By clicking on the links, you are letting Kindred Stamps know that you like my content and to keep bringing me back. Thanks for your time and let’s get sparkly!
Project One: Sparkle Pizza
Sparkle Friends, Kindred Stamps
Was your first date in pizzeria? The Rainbow Girl and King Boy from the Sparkle Friends stamp set found happiness devouring some ‘za and so can you. Let’s break down this single layer card.

A piece of 80 pound white card stock was trimmed down to 4.25 inches by 5.5 inches. The scene was sketched in pencil. The couch was first, the wood beams, light, and stones second, and finally the table with the pizza on it. The two images were stamped with an alcohol safe ink on the sketched panel. With a fine liner alcohol safe pen, the solid lines were traced making sure I did not draw through the King Boy or the Rainbow Girl. All pencil lines were erased which left a page like from a color book to fill in.
Sparkle Friends, Kindred Stamps
The Sparkle Friends were colored with Olo Markers (See Color Guide). The scene was then colored in with Altenew Artist Markers (See Color Guide). The colored panel was glued to a card base to hide the bleed through of the alcohol markers. The sentiment was stamped in the inside of the card. White gel pan and black fine liner pen were utilized to add some accents to the images.
Card Size: 5.5 by 4.25 inches (A2 Card)
Project Two: Sparkle Shaker
Sparkle Friends, Kindred Stamps
Nothing scream confidence more than a shaker and the Rainbow Girl from Sparkle Friends is beaming on this bright shaker cards. Let’s break it down!
The Rainbow Girl was stamped in alcohol safe ink and colored in Olo Markers (See Color Guide). She was fussy cut out on the line and then edged with a fine liner pen. The sentiment was stamped in a black pigment ink and fussy cut out. These images were set aside to make the shaker components.
The Strawberry House Die is the supporting element in the shaker pocket. An unexpected floral pop that will shake up the happiness is a great way to use small dies from supplies you already have. The strawberry flowers were die cut from 80 pound card stock. The flowers were placed on a stamping sticky mat and Wild Dandelion (Gina K Designs) ink was blended in the center only. The center of the flower also go a deeper dot of color with the Maple Yellow (Y207 Altenew Artist Marker). These were set aside to finish the prep.
The Sweets Paper Pack will provide the color pops for this card. The rainbow striped card piece was cut down to 4.25 by 5.5 card panel. Then the rainbow polka dot paper was trimmed down to 5 inches by 3.75 inches. Finally, a piece of acetate packaging was trimmed down to 6 inches by 4.75 inches.
The striped card panel was glued to the front an A2 top-folding card base. The shaker was assembled next. A strong double-sided adhesive was applied to the back side of the polka dot cardstock panel. This panel was centered on the piece of acetate. The acetate was adhered to three sides of the shaker, leaving a pocket for placement of the shaker elements. Iridescent confetti, iridescent glitter, and the colored florals (pretty side up) were placed into the pocket. The pocket was sealed shut. The now contained shaker packet was adhered to the center of the card base.
Finally, The Rainbow Girl and sentiment were adhered with liquid glue to the front of the shaker element. The card panel was allowed to dry completely before gel pen accents were applied. Nothing screams happy like this bright playful card that comes together super fast.
Card Size: 4.25 inches by 5.5 inches
Project Three: Sparkle Rainbow
How could you not have a Sparkle Friends rainbow?? This fun rainbow card covers all the standard rainbow colors with lots of bling, including a decorated inside panel. Let’s break it down!
Sparkle Friends, Kindred Stamps
A Slim Line card base was prepped and the score line enforced. The front panel of the card base was trimmed down by 0.5 inches. The card base was set aside while the remain prep was completed.
The Silver Guy from the Sparkle Friends was stamped with alcohol safe ink on Ranger Silver Sparkle Alcohol Ink Paper. When dry the images were colored with Olo Markers in a light tone on the body, and a dark tone in the same color way on the hair and nose (See Color Guide). These were set aside to dry completely.
A piece of water color paper was trimmed to 8.5 inches by 3 inches. Using a wet-to-wet technique a rainbow swatch was painted across the paper with thicker concentration on the base of the swatch and skinner on the top of the swatch. Altenew Cherry Blossom/ Red Cosmos/ Fiery Sun Set/ Pocket Full of Sunshine/ Green Hills/ Crystal Water/ and Shades of Purple watercolors were diluted to achieve the color intensity that I wanted. The panel was set aside to dry.
The colored images were fussy cut on the line and set aside. Finally, a piece of silver glitter cardstock was cut to 0.5 inches by 8.5 inches. It was time to assemble. The glitter cardstock was adhered to the inside panel of the card base. The sentiment was stamped and the teal colored character was glued flat to the base.
The water color panel was glued flat to the front panel of the card base. Using the grid on my Glass Mat, the Silver Boys were arranged in rainbow order in a straight line the width of the card. The Silver Boys were picked up with a piece of low tack tape to keep them in line. Liquid glue was applied to the head and hair only. The Silver Boys were adhered to the front card base with their feet lining up with the bottom card base. This will allow the card to stand propped open and give the card a little unexpected design flair. To finish the card some rainbow gems were placed above the images in corresponding rainbow colors.
Card Size: 3.5 inches by 8.5 inches (Slim Line)
Project Four: Sparkle Rave
Ready for a party? This card is ready and is gender neutral and comes together in no time at all!
Sparkle Friends, Kindred Stamps
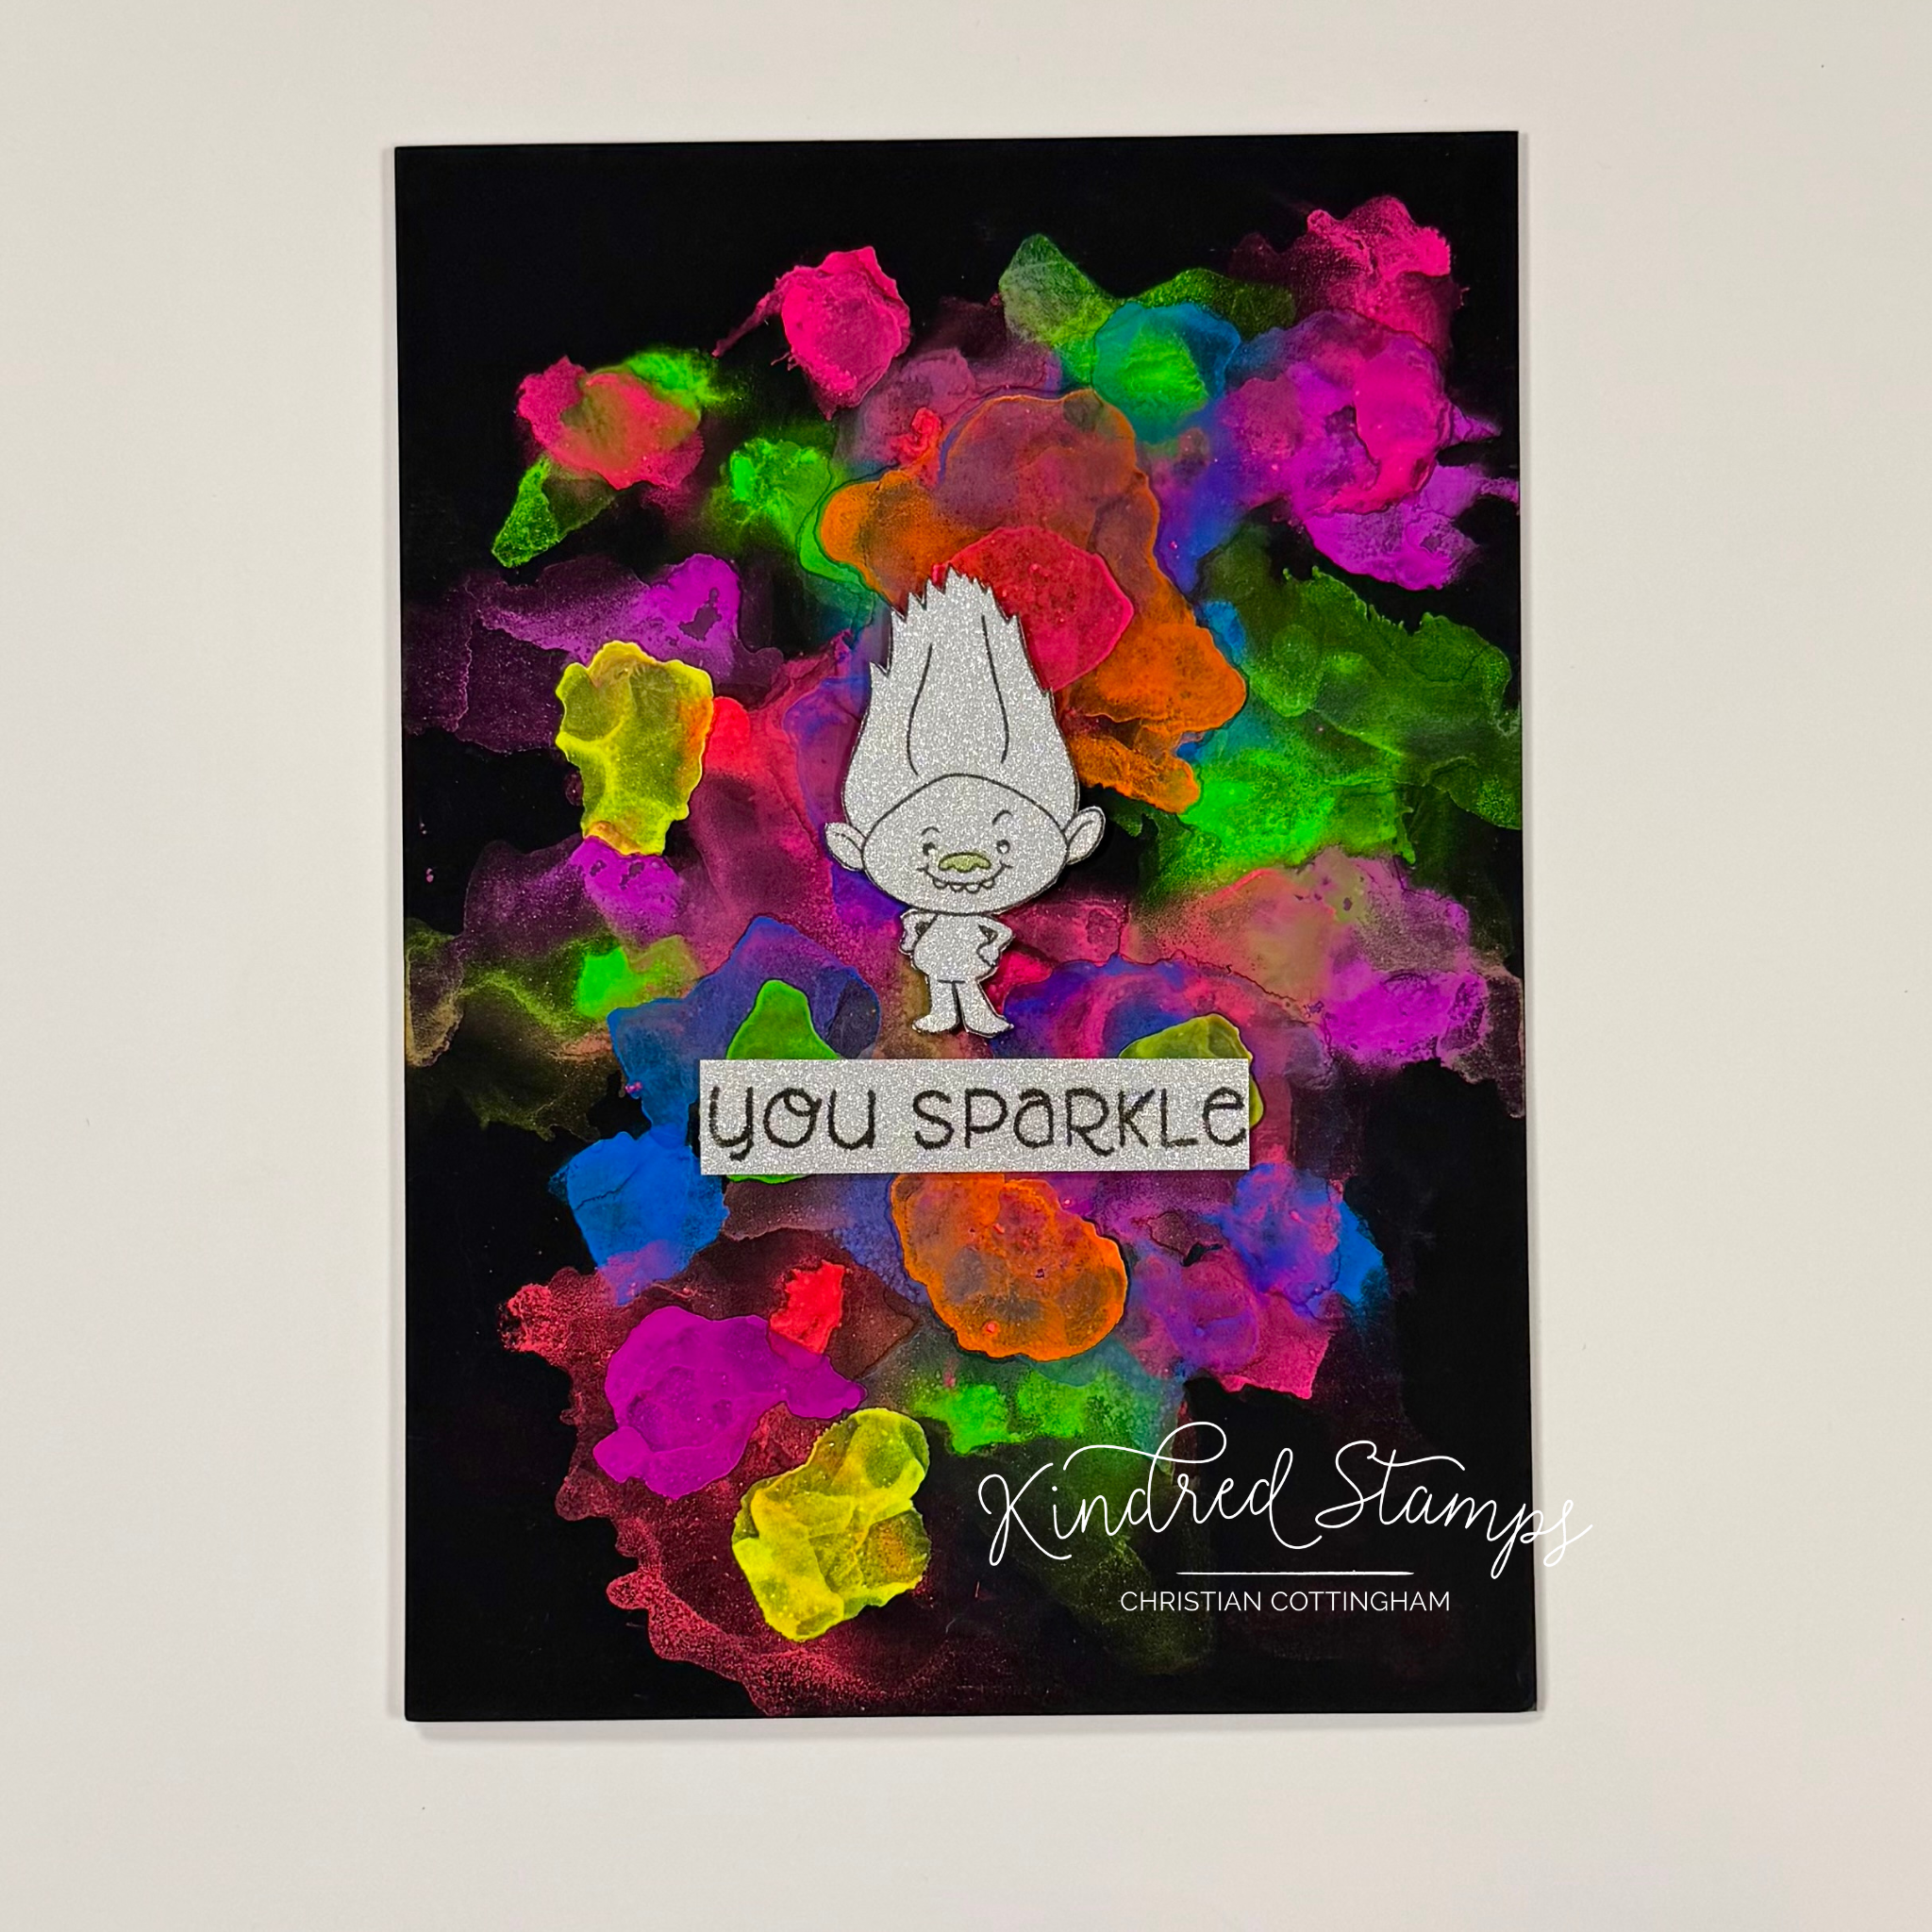
The Silver Boy from the Sparkle Friends stamp set was stamped with alcohol safe ink on a piece of Silver Sparkle Ranger Alcohol Ink Cardstock. When dry, the Silver Boy nose was colored with an Olo Marker. He was then fussy cut out on the line and edged with a black fine liner pen. The sentiment was stamped on the same Silver sparkle card stock.
To make the psychedelic background, a 5 inch by 7 inch piece of Matte Black Ranger Alcohol Ink Cardstock was pulled from the stash. The deep matte finish of this card stock makes the neon inks pop off the paper. The background was “colored” with Ranger Fluorescent/ Radioactive/ Ignite/ Razzle/ Hyper/ Atomic/ Electric/ and Caution alcohol inks.
The alcohol ink background was adhered to an A7 card base. The Silver Boy and sentiment were popped up with black thin foam tape and placed onto the alcohol background.
This card took about 15 minutes from start to finish because of the limited coloring and allowing the sparkling Silver Guy reflect the neon color on the saturated matte black background. Shine a little black light on this card and you are at the rave with the Sparkle Friends.
Card Size: 5 inches by 7 inches (A7)
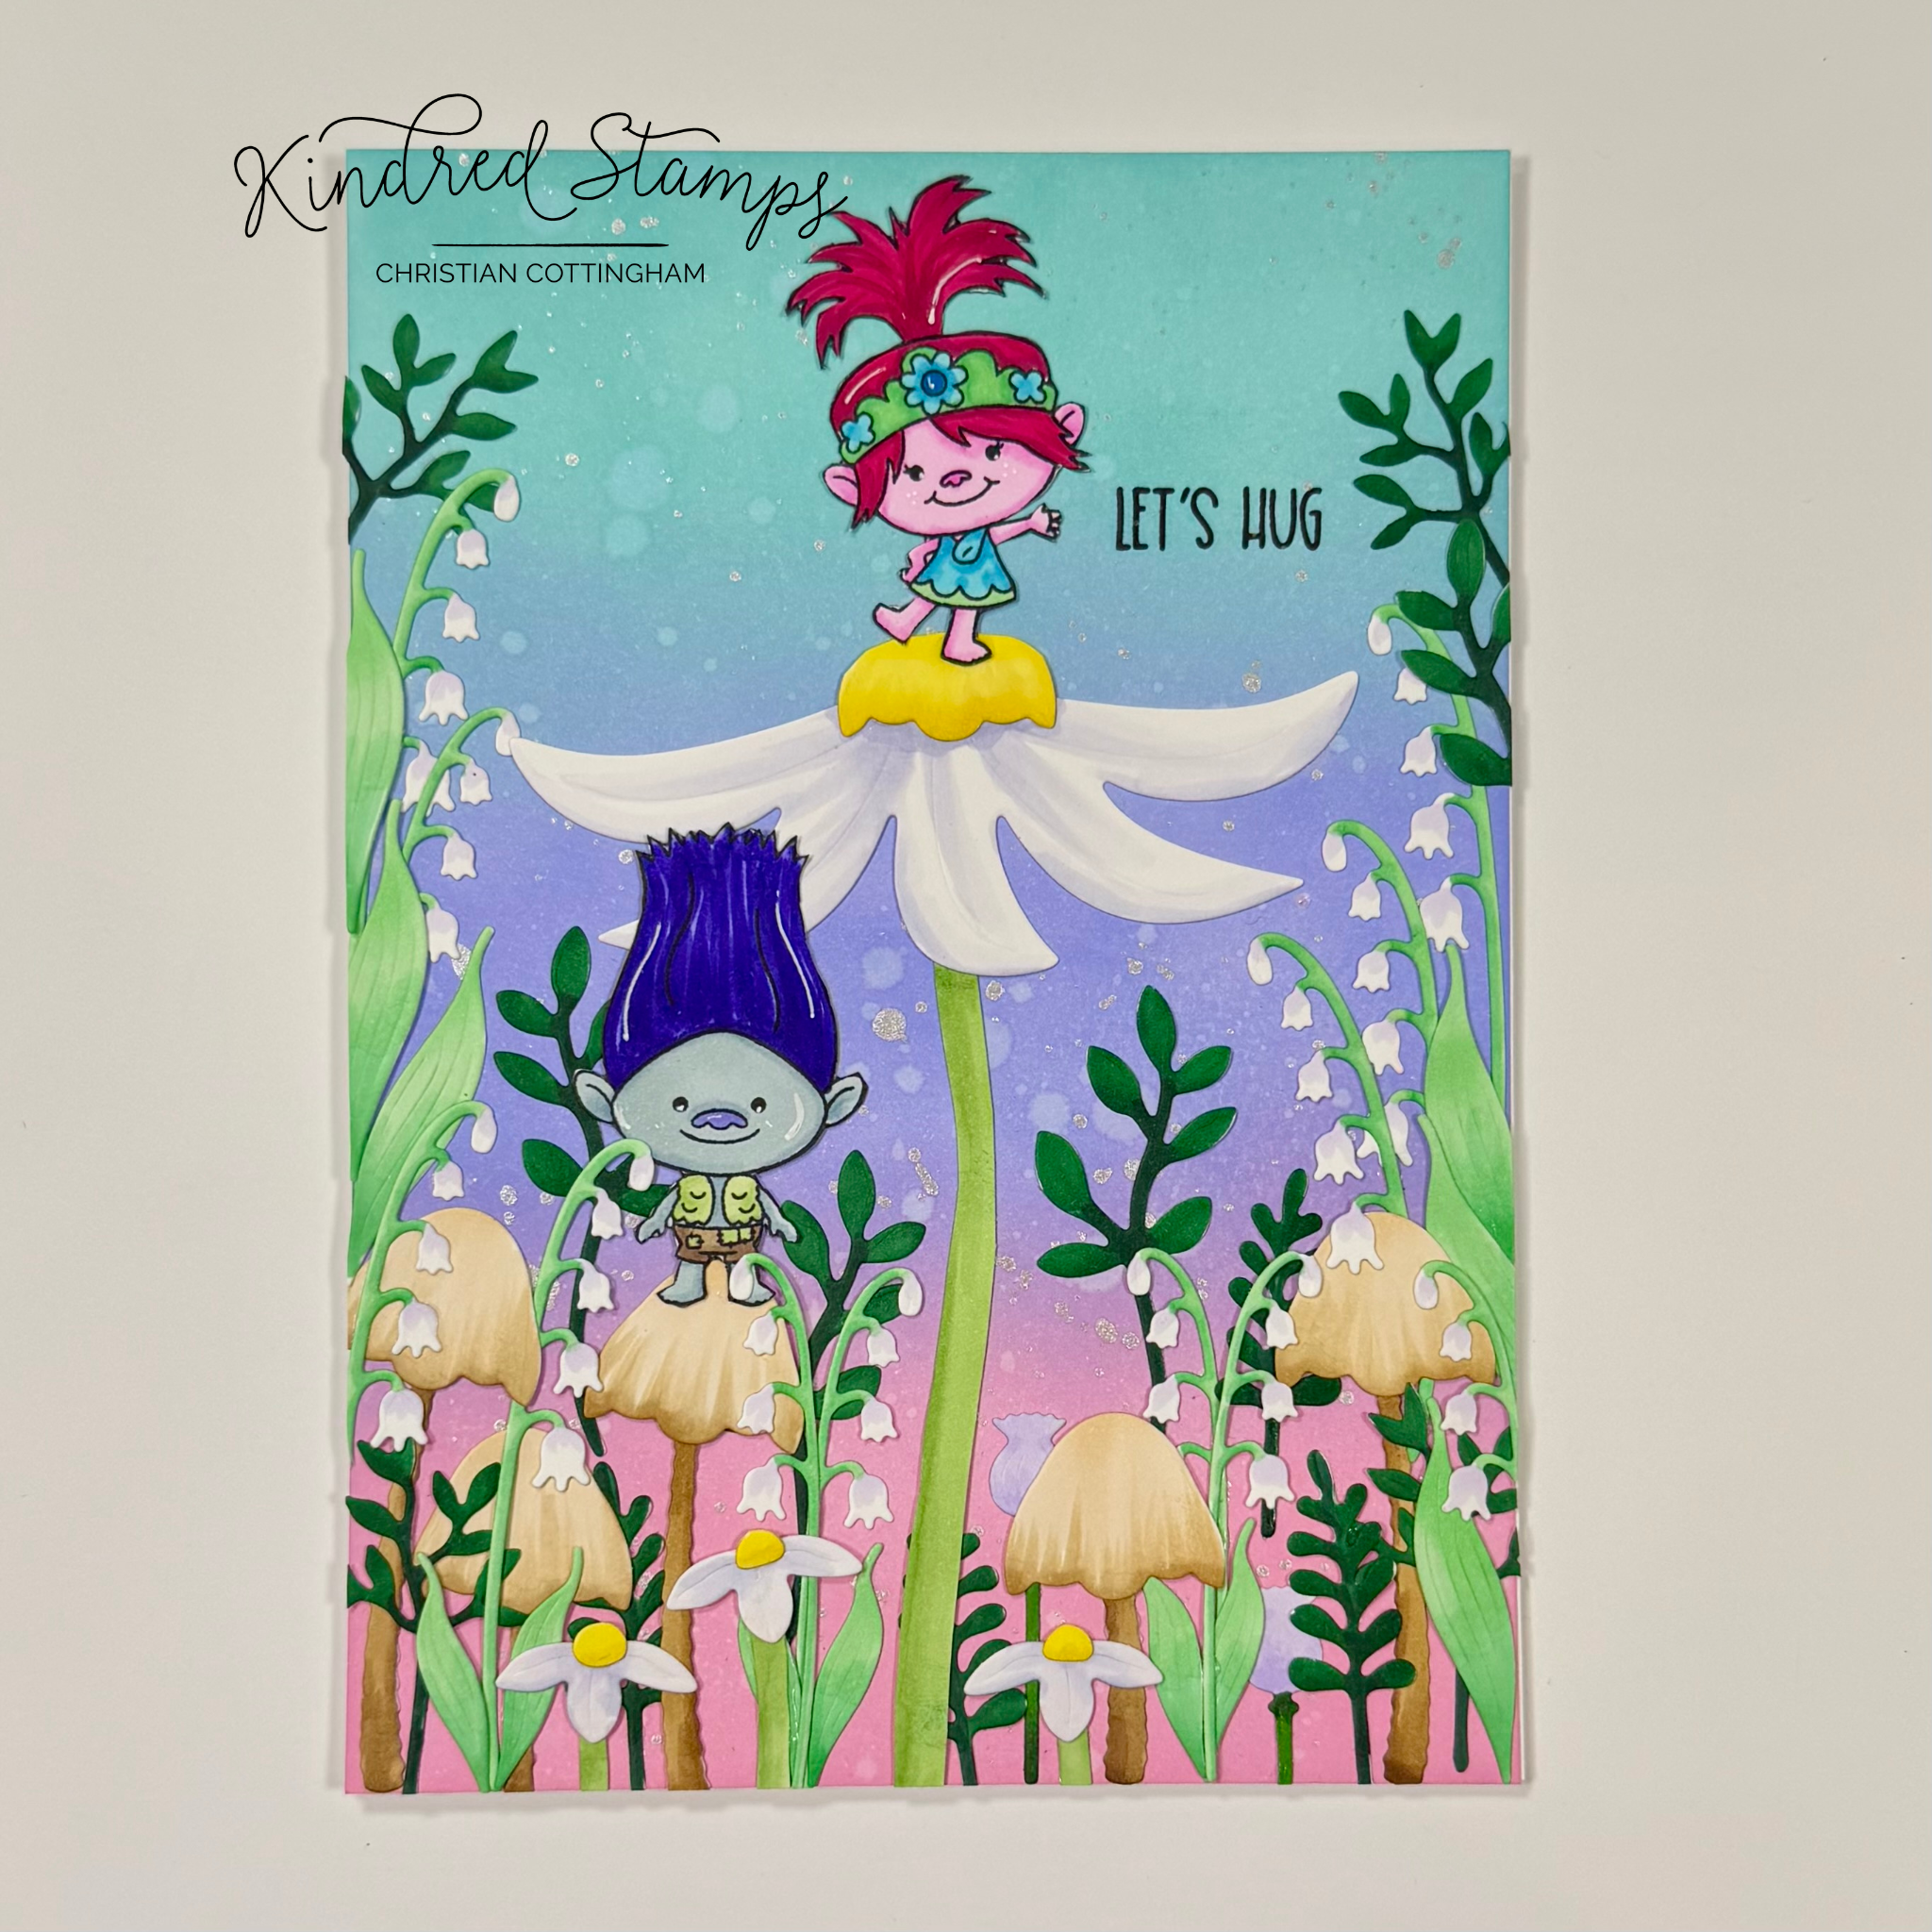
Project Five: Forest Hug
Just because you are small doesn't mean you can’t do anything you believe in especially when you have friends there to support you! This card scene shows off two of the Sparkle Friends in a forest scene that utilizes some unusually dies that you may already have in your stash. Let’s break it down.
Sparkle Friends, Kindred Stamps
The background was up first because of the dry time needed for the inky background. An A7 panel (5 inches by 7 inches) of white card stock was ink blended with Distress Oxide Inks (Kitsch Flamingo/ Shaded Lilac/ Salvaged Patina). When the blend was to my liking, I spattered the background with water. Picked up any moisture left with a paper towel and then spattered the background with Perfect Pearls in the color way Perfect Pearls. The background panel was set aside to dry completely.
From the Sparkle Friends stamp set, I stamped the Blue Boy and Pink Girl in alcohol safe ink. The images were colored with Olo Markers (See Color Guide) and cut out on the line. The images were then edged with a black Fine Liner pen to hide any cutting mishaps. These 2 friends were set aside to start the components of the forest scene.
To make the forest flowers and mushrooms, the following die sets were re-imagined: Strawberry House Die/ Fairy Cloche/ Bakery Treats Add-On/ and Entrance Gate Die. This sounds like an unusual pairing, but it meets all my needs!
From the Fairy Cloche Dies, all foliage was cut multiple times from white card stock. From the Strawberry House Dies the strawberry stem was cut out from white card stock and the stem was trimmed with scissors. From the Bakery Treat Add-Ons dies the chocolate for the chocolate dipped strawberries were cut multiple times as well as the stems to the strawberries. The chocolate chips were cut out of the same white card stock. Finally, the palm trees were cut out from the Entrance Gate Die out of white paper.
With all the piece it was time to start coloring (Olo Markers). The lily of the valley were colored with G1.4/ G1.2 for the leaves and then BV1.1 for some light color at the base of flower. The thistle was colored with BV1.2/ BV1.1 flower and YG1.7/ YG1.6 stem. The greenery was colored with G1.8/ G1.7 on all versions of stems. One piece of chocolate covered strawberry was trimmed down to act as the center of the flower for the Pink Girl to stand on. This piece was colored with Y1.4/ Y1.2. The strawberry stems (large and small) were colored with BV2.2/ BV2.0. To make stems for the daisies, I trimmed down some scrap paper to resemble the stems and colored with G5.3/ G5.2. The remainder of the chocolate strawberry pieces were colored with )4.1/ O4.3/ and O4.6 to now become mushrooms. The palm trees got a little haircut and the tree bark was colored with the same colors as the mushroom to be the stems. Finally, a few of the chocolate chip pieces were colored with Y1.4/ Y1.2 for the small daisies.
The scene was arranged and then adhered to the blended card panel with liquid glue. Finally, the sentiment “Let’s Hug” was nestled into the scene and stamped with pigment ink with a stamping block. The card panel was glued to an A7 card base. This card really showcases how a little imagination and a can do attitude can make something big!
Card Size: 5 inches by 7 inches (A7)
Project Six: Sparkle Memory Game
Need a quick gift for that is full of Sparkle Friend fun?? Or maybe a birthday party swag bag? This project comes together so fast and only used one stamp! The Sparkle Friend Die Cuts are a perfect way to “cheat” at making a project. Let’s break it down.
Sparkle Friends Die Cuts, Kindred Stamps
The Sweets Paper pack was utilized to decorate the inside of the box and for the memory cards. The cards were trimmed out of the same piece of pattern paper in the same direction to 3 inches by 2.5 inches. (Quantity: 12) The corners were round with a corner round punch. Two of each of the Sparkle Friend Die Cuts were pulled from the package and adhered with liquid glue ensuring that the opposite side of the card did not match each other (yes… I made sure you could cheat when you are playing the game). The cards were set aside to dry.

The card box was cut from the Treat Box die twice out of holographic card stock. The box was assemble and set aside to dry. The inside panels were lined with a pieces of Sweets Paper Pack. On a scrap of white cardstock, the sentiment was stamped in pigment ink and attached to a coordinating piece of pattern paper. This was attached with foam tape to the inside lid of the box. A thin strip of pattern paper was adhered to the top of the box and along the sides to give the illusion of ribbon on the box.
To finish decorating the box, the bow from the Gift Card Dies was die cut from white card stock and colored with Olo Markers (RV1.7/ RV1.5). The bow was assembled and glued flat to the bow to help protect the bow from little fingers peeling it off.
This project took just a few minutes to make and has a hit of nostalgia of playing this memory game and always wanting to have one that was in what ever obsession I was in at that time.
Project Seven: Dance Party
Nothing like a Happy Dance to send some birthday cheer! The Sparkle Friends are having a dance off and want you to join in. Let’s breakdown this card…
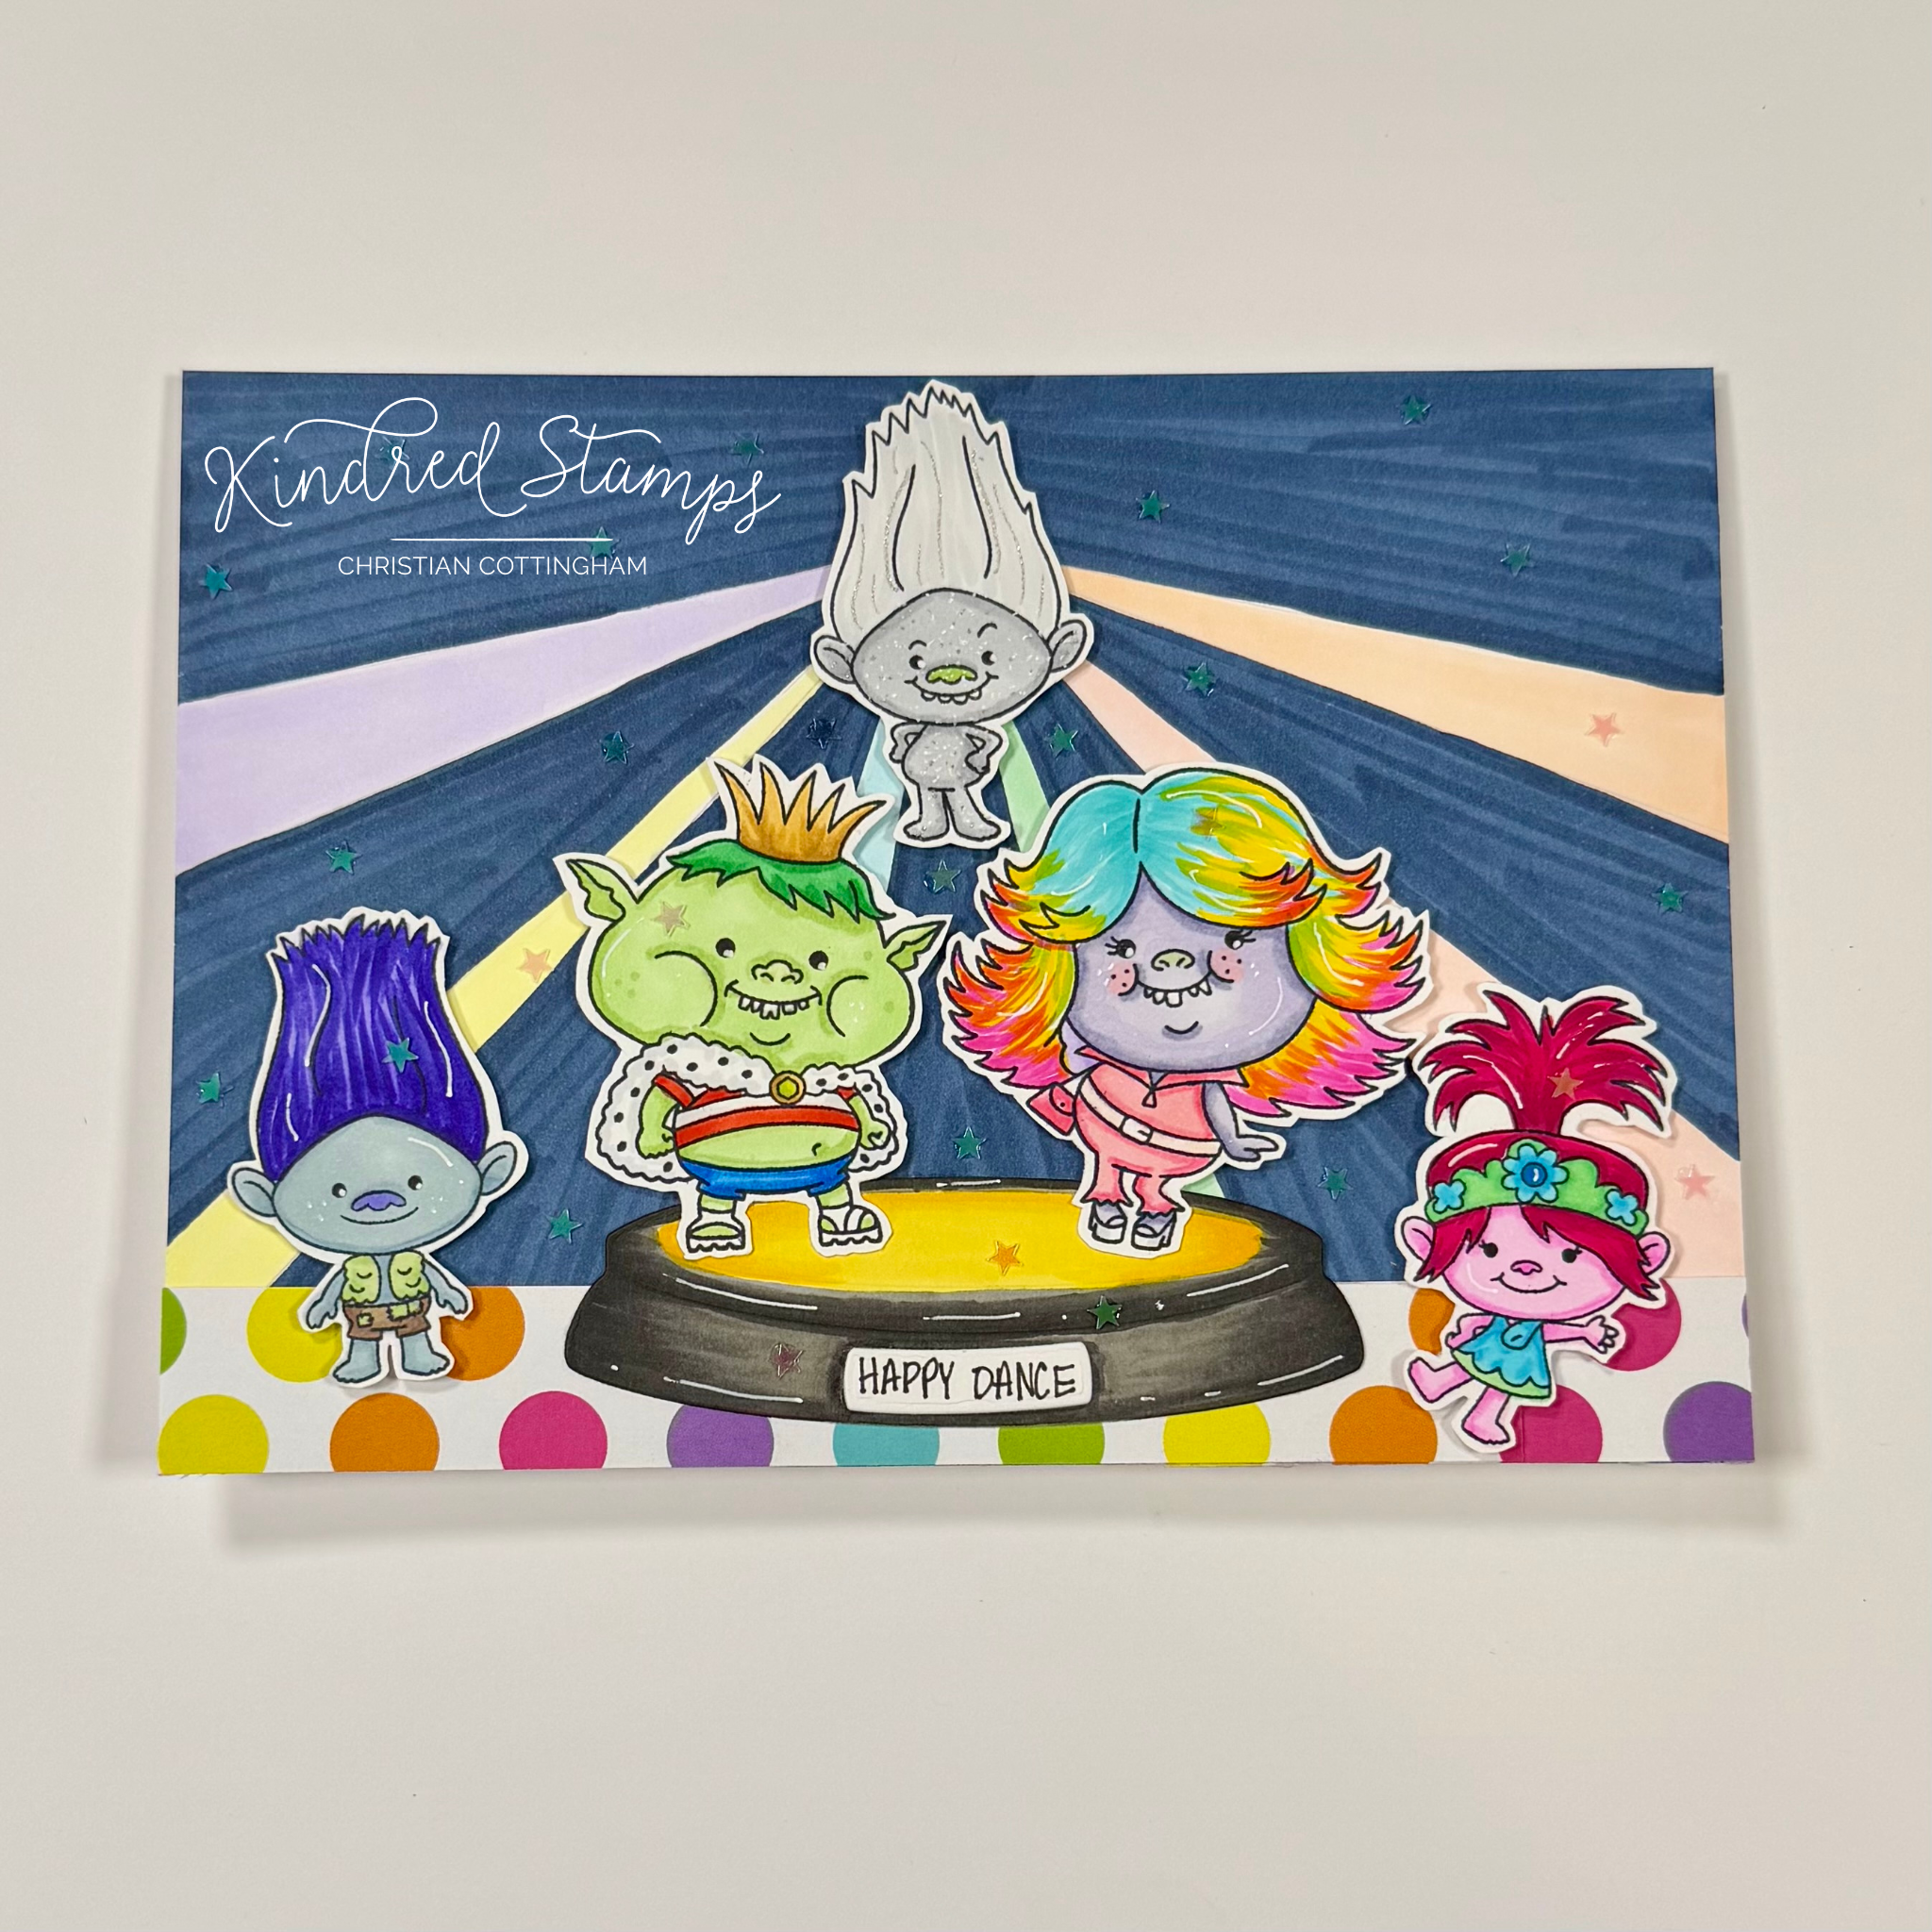
Sparkle Friends, Kindred Stamps
An A7 panel was trimmed down to 5 inches by 7 inches. Six stripes were sketched in with a pencil with a center point 1 inch below the edge of the panel. The stripes were colored in a pastel rainbow with Olo Markers (Y1.1/ G0.1/ B1.1/ R0.1/ O2.1). To achieve the same line texture, the spacing above and between the rainbow strips we colored in a burst pattern with an C018 Altenew Artist Marker.
All images from the Sparkle Friends stamp set were stamped in alcohol safe ink and colored with Olo Markers. (See Color Guide) The images were fussy cut on the line and edged with a fine liner marker.
The dance floor taps into the Sweets Paper Pack. A strip of the pattern paper was adhered to the bottom of the colored card panel. I wanted a dance floor to also have a light up stage just like the dance shows of years gone by. So, I dug through my stash and found the Fairy Cloche Die. The base was the perfect dimensions and size for the Sparkle Friends to dance on!
The base was cut from white card stock and colored with Altenew Artist Markers (TG07/ TG05/ TG03; Y207/ Y106/ C004). The dance floor assembled and the feet of the Rainbow Girl and King Boy were adhered. On the label, I wrote Happy Dance with a black gel pen.
To assemble, the card, the dance floor was adhered with thin foam tape behind the dancing pair only. This allowed the dance floor and their bodies to be flush. The Blue Boy and Pink Girl were popped up with foam tape and applied to either side of the dance floor. Finally, the Silver Boy was dotted with white gel pen and Star Dust gel pen, ensuring I placed dots on the stamped lines to give the appearance of sparkle. He then had thin foam tape applied and centered above the dance floor scene. The finished panel was adhered to an A7 card base. The sentiment “Sending you a super sparkly birthday wishes” was stamped in pigment ink in the inside of the card with a stamping block.
To add even more retro nod to dance show of days gone by, I added iridescent stars scattered throughout. This happy dance that is a perfect way to celebrate a friends or family members birthday.
Card Size: 5 inches by 7 inches (A7)
Project Eight: Card Set
Bring in some bling by using Sparkle Dots Stencil! This gift set is the perfect way to spread some shiny sparkly cheer! Let’s break it down.
Sparkle Friends, Kindred Stamps
Colored cardstock that complimented each character was trimmed to an A2 panel (4.25 inches by 5 inches). On the Glass Mat, the stencil was taped with low tack tape on the left side only. This will act as a hinge for the gel placement. A piece of colored cardstock was centered under the stencil and 2 more piece of tape were applied to the Glass Mat to create a jig where the colored cardstock can be aligned with. Using Decofoil Transfer Gel Duo, a thin layer was applied to the first piece of cardstock. The stencil hinge was lifted and the colored cardstock removed. The next piece of colored cardstock was lined up with the tape jig and the stencil hinge closed. The gel was applied. This was repeated for all 5 panels.
While the gel dried, the Sparkle Friends images were stamped in alcohol safe ink and colored with Olo Markers (See Color Guide). The images were fussy cut out and foam tape applied to the back of the images. These were set aside.
Sparkle Friends, Kindred Stamps
Panels of foil were trimmed to just larger than the A2 card panel with a coordinating color for each of the images. I utilized Decofoil in Gold D’or, Summer Rainbow, and Rainbow. I also utilized Gina K Fancy Foils in Sparkling Silver and Turquoise Sea. The foil was applied to the colored cardstock (pretty side up). Though not required, I did utilize the Fuse foiling system to heat set the foil. Any laminator would work for this process.
Sparkle Friends, Kindred Stamps
The now sparkling panels were trimmed down to 4 inches by 5.25 inches. The panels were adhered flat to the prepared side-fold card bases. The colored images were placed in the center of the radiating Sparkle Dot Stencil. Finally the sentiment was stamped in the inside panel of the card.
This set of cards will be paired up with matching envelopes and placed in a little box for gift giving.
Card Size: 4.25 inches by 5.5 inches (A2)
The entire Kindred Stamps release will be available this Friday at 8am PST/11am EST. Be sure to subscribe to the Kindred Stamps blog to see a daily line up of sneak peeks from our amazing Design Team! Come join the Fan Club and release event to be part of the release fun, and you may just win some Kindred Stamps credit!!
Coloring Guide:
Pink Girl:
Hair: RV1.7/ RV1.5
Flesh: RV1.2/ RV1.1 (one in RV1.3/ RV1.2)
Headband: G1.4/ G1.2; B2.4/ B2.2; B2.6
Dress: G1.2; B2.4/ B2.2
Blue Boy:
Hair: BV1.7/ BV1.4
Flesh: BG7.3/ BG7.2
Vest: G5.2/ G5.1
Shorts: O7.5/ O7.3
Silver Boy:
Hair: NG1/ NG0
Nose: YG3.4
Body: NG3/ NG1; While gel pen/ Star Dust gel pen
Rainbow Silver Boys:
R2.2/ R2.0; R1.5/ R1.4; OR1.3/ OR1.4; Y2.3/ Y2.2; G1.7/ G1.5; BG2.7/ BG2.5; B2.6; B2.4; V2.6/ V2.4
Rainbow Girl:
Hair: BG1.4/ RV1.3/ Y2.3
Flesh: BV4.4/ BV4.2; R2.2; YG3.2
Jumpsuit: R2.3/ R2.2
Belt: OR1.0
Shoes: NG1
Purse: R2.3/ R2.2
King Boy:
Crown: YO2.5/ YO2.3
Hair: G1.5/ G1.4
Flesh: G5.2/ G5.1
Cape: NG; YG2.3/ G5.3; YO2.3/ YO2.5
T-shirt: NG; R0.5/ R0.4
Shorts: B0.5/ B0.4
Shoes: NG1
Pizza Scene (Altenew Artist Markers)
Wall: WG05/ WG03; WG 01
Booth: R335/ R318
Table: C026/ C025/ C017
Pizza: Y932/ Y821/; Y803; R107
Wood Beams: Y762/ Y932/ Y821
Floor: WG07
Light: C004/ Y106; C013/ C014; Y260/ Y025
Collector to Creator: Part 3
Are you stuck being a collector instead of a creator? This is the 3rd part to the series to overcome the fear of inking up your stamps and adding color to images. Come on the adventure with me!
Are you ready to up your game and transition from a collector instead of creator?? Part 3 installment will show you two ways to start adding dimension to your colored images. The first fun fold card brings dimension by adding shadows and variation with colored pencils. The second project will walk through utilizing two alcohol marker combinations to increase depth in your images. These two projects utilize product from Kindred Stamps (affiliate links listed below).
You can head over to the Kindred Stamps YouTube Channel or to my channel to see how these cards were made: https://youtu.be/RJzgNf4rWPg
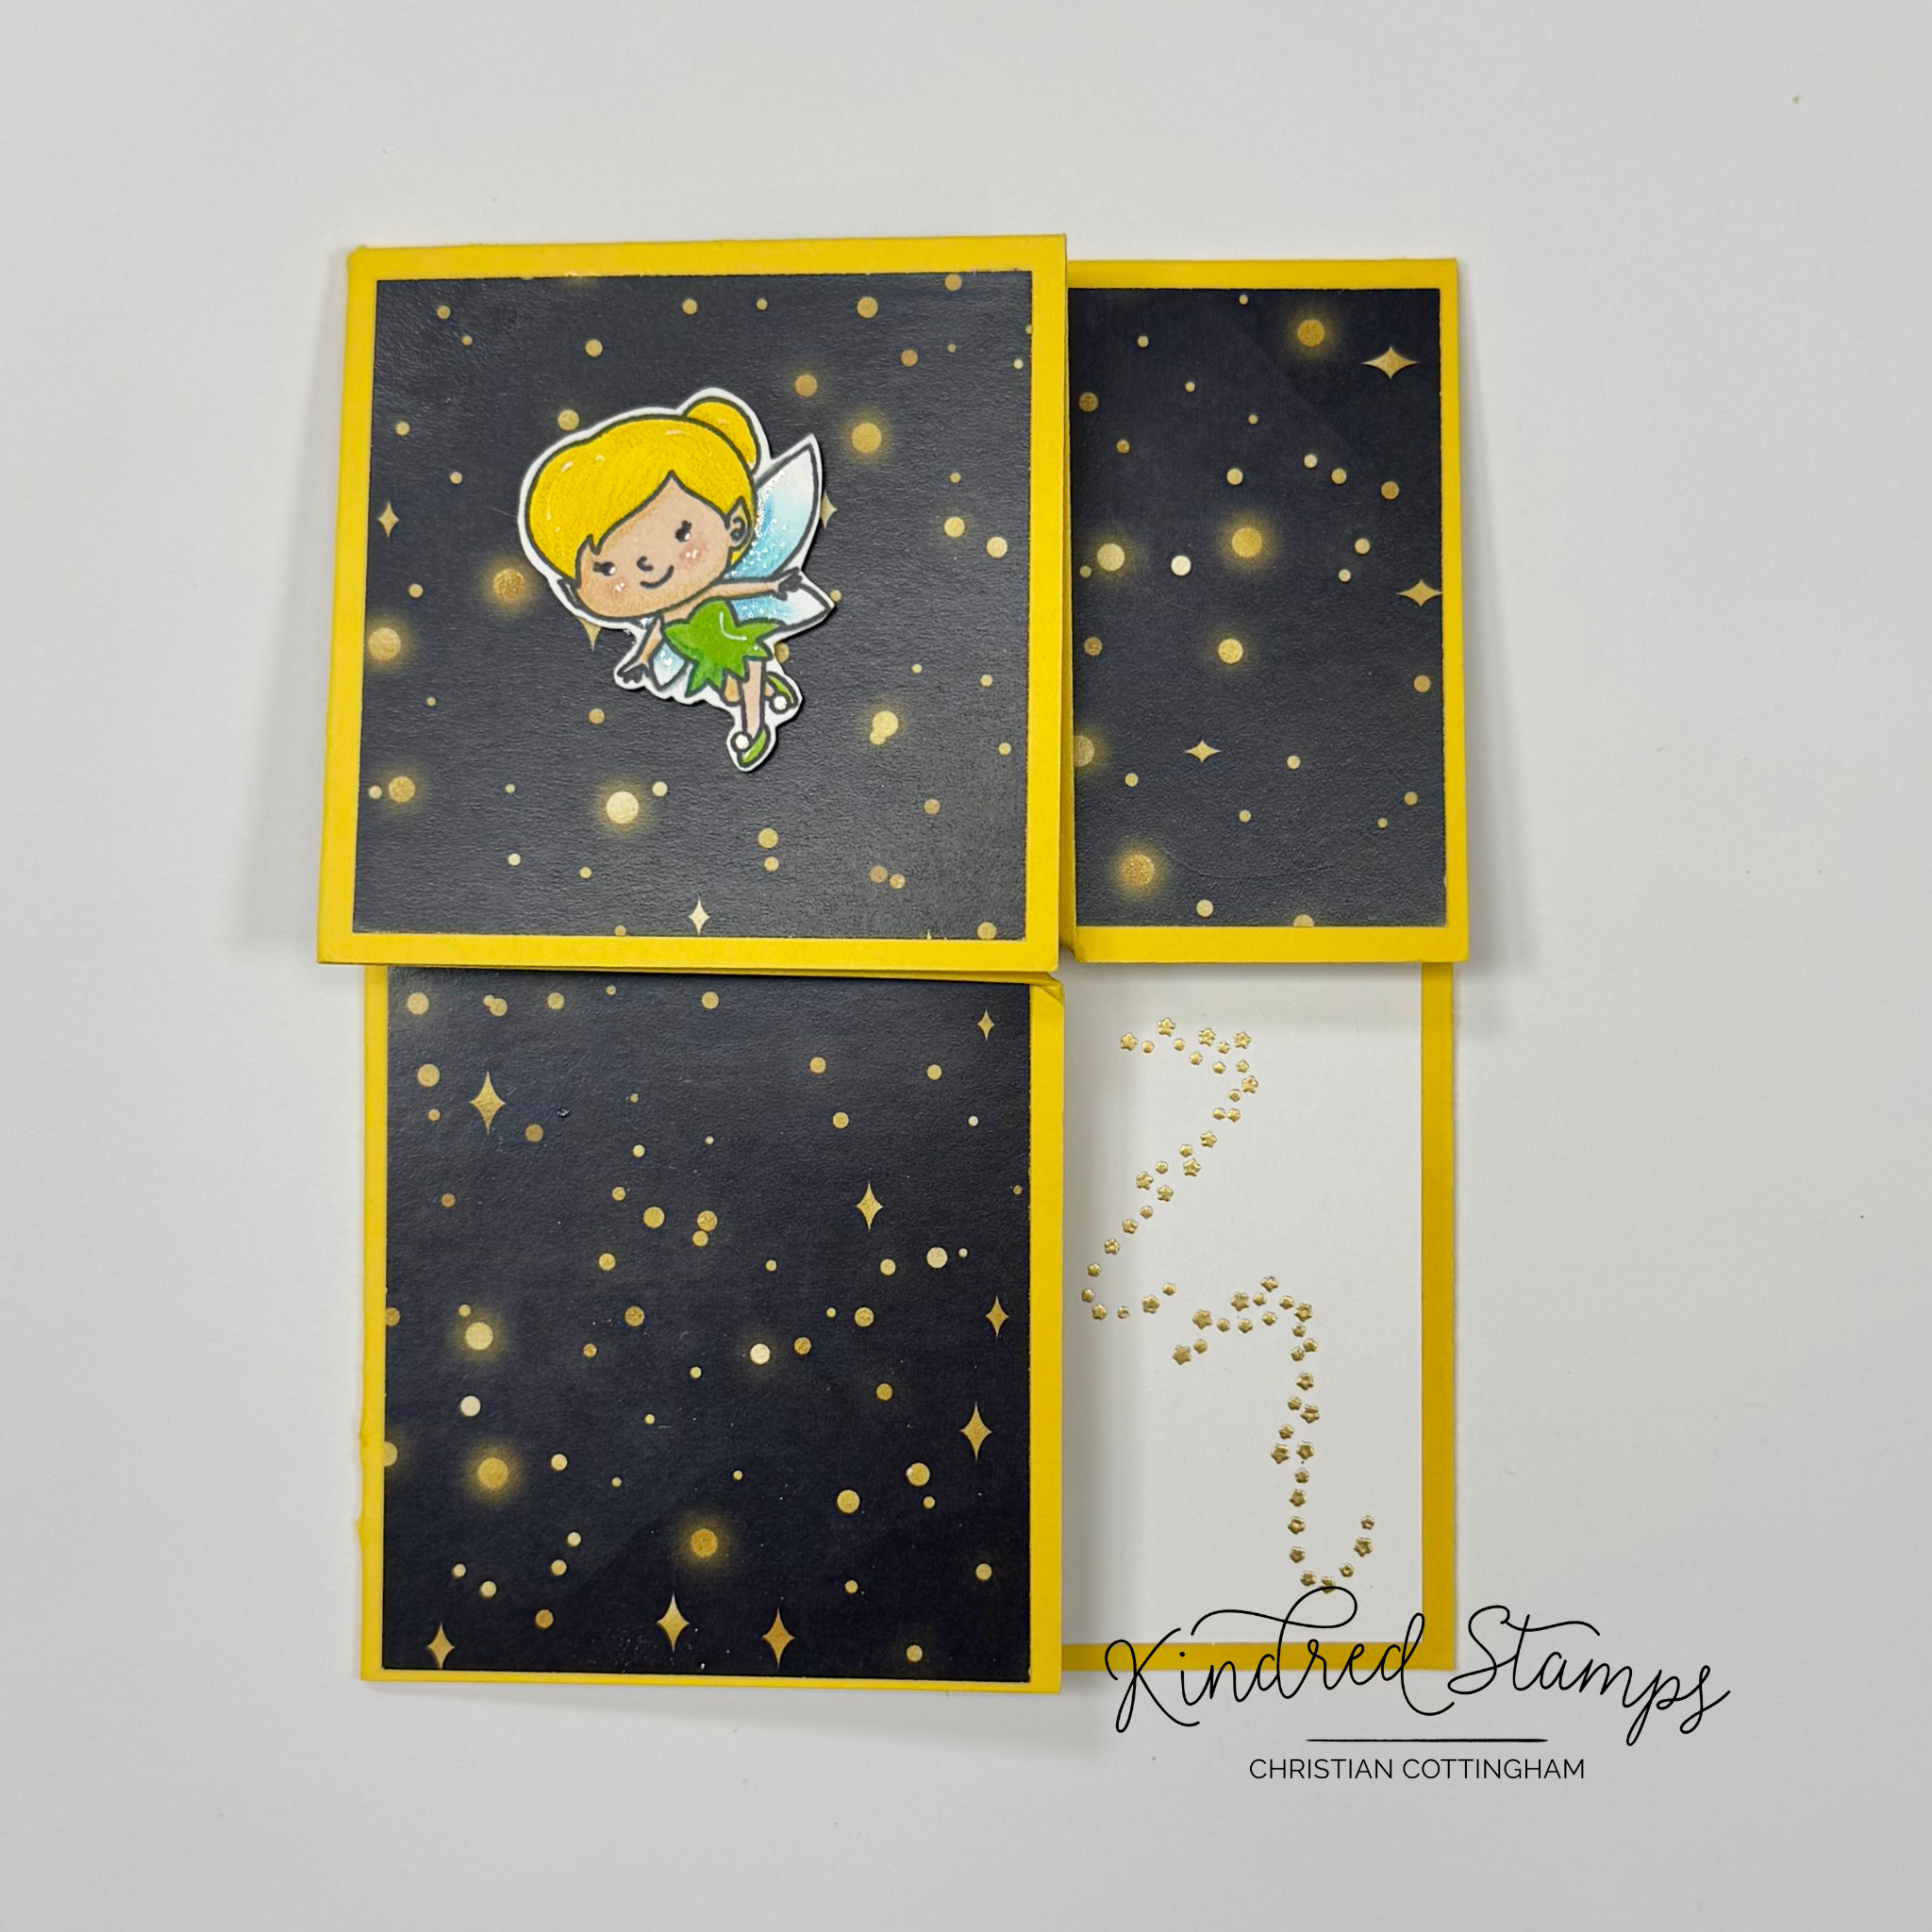
Pixie Dust, Kindred Stamps
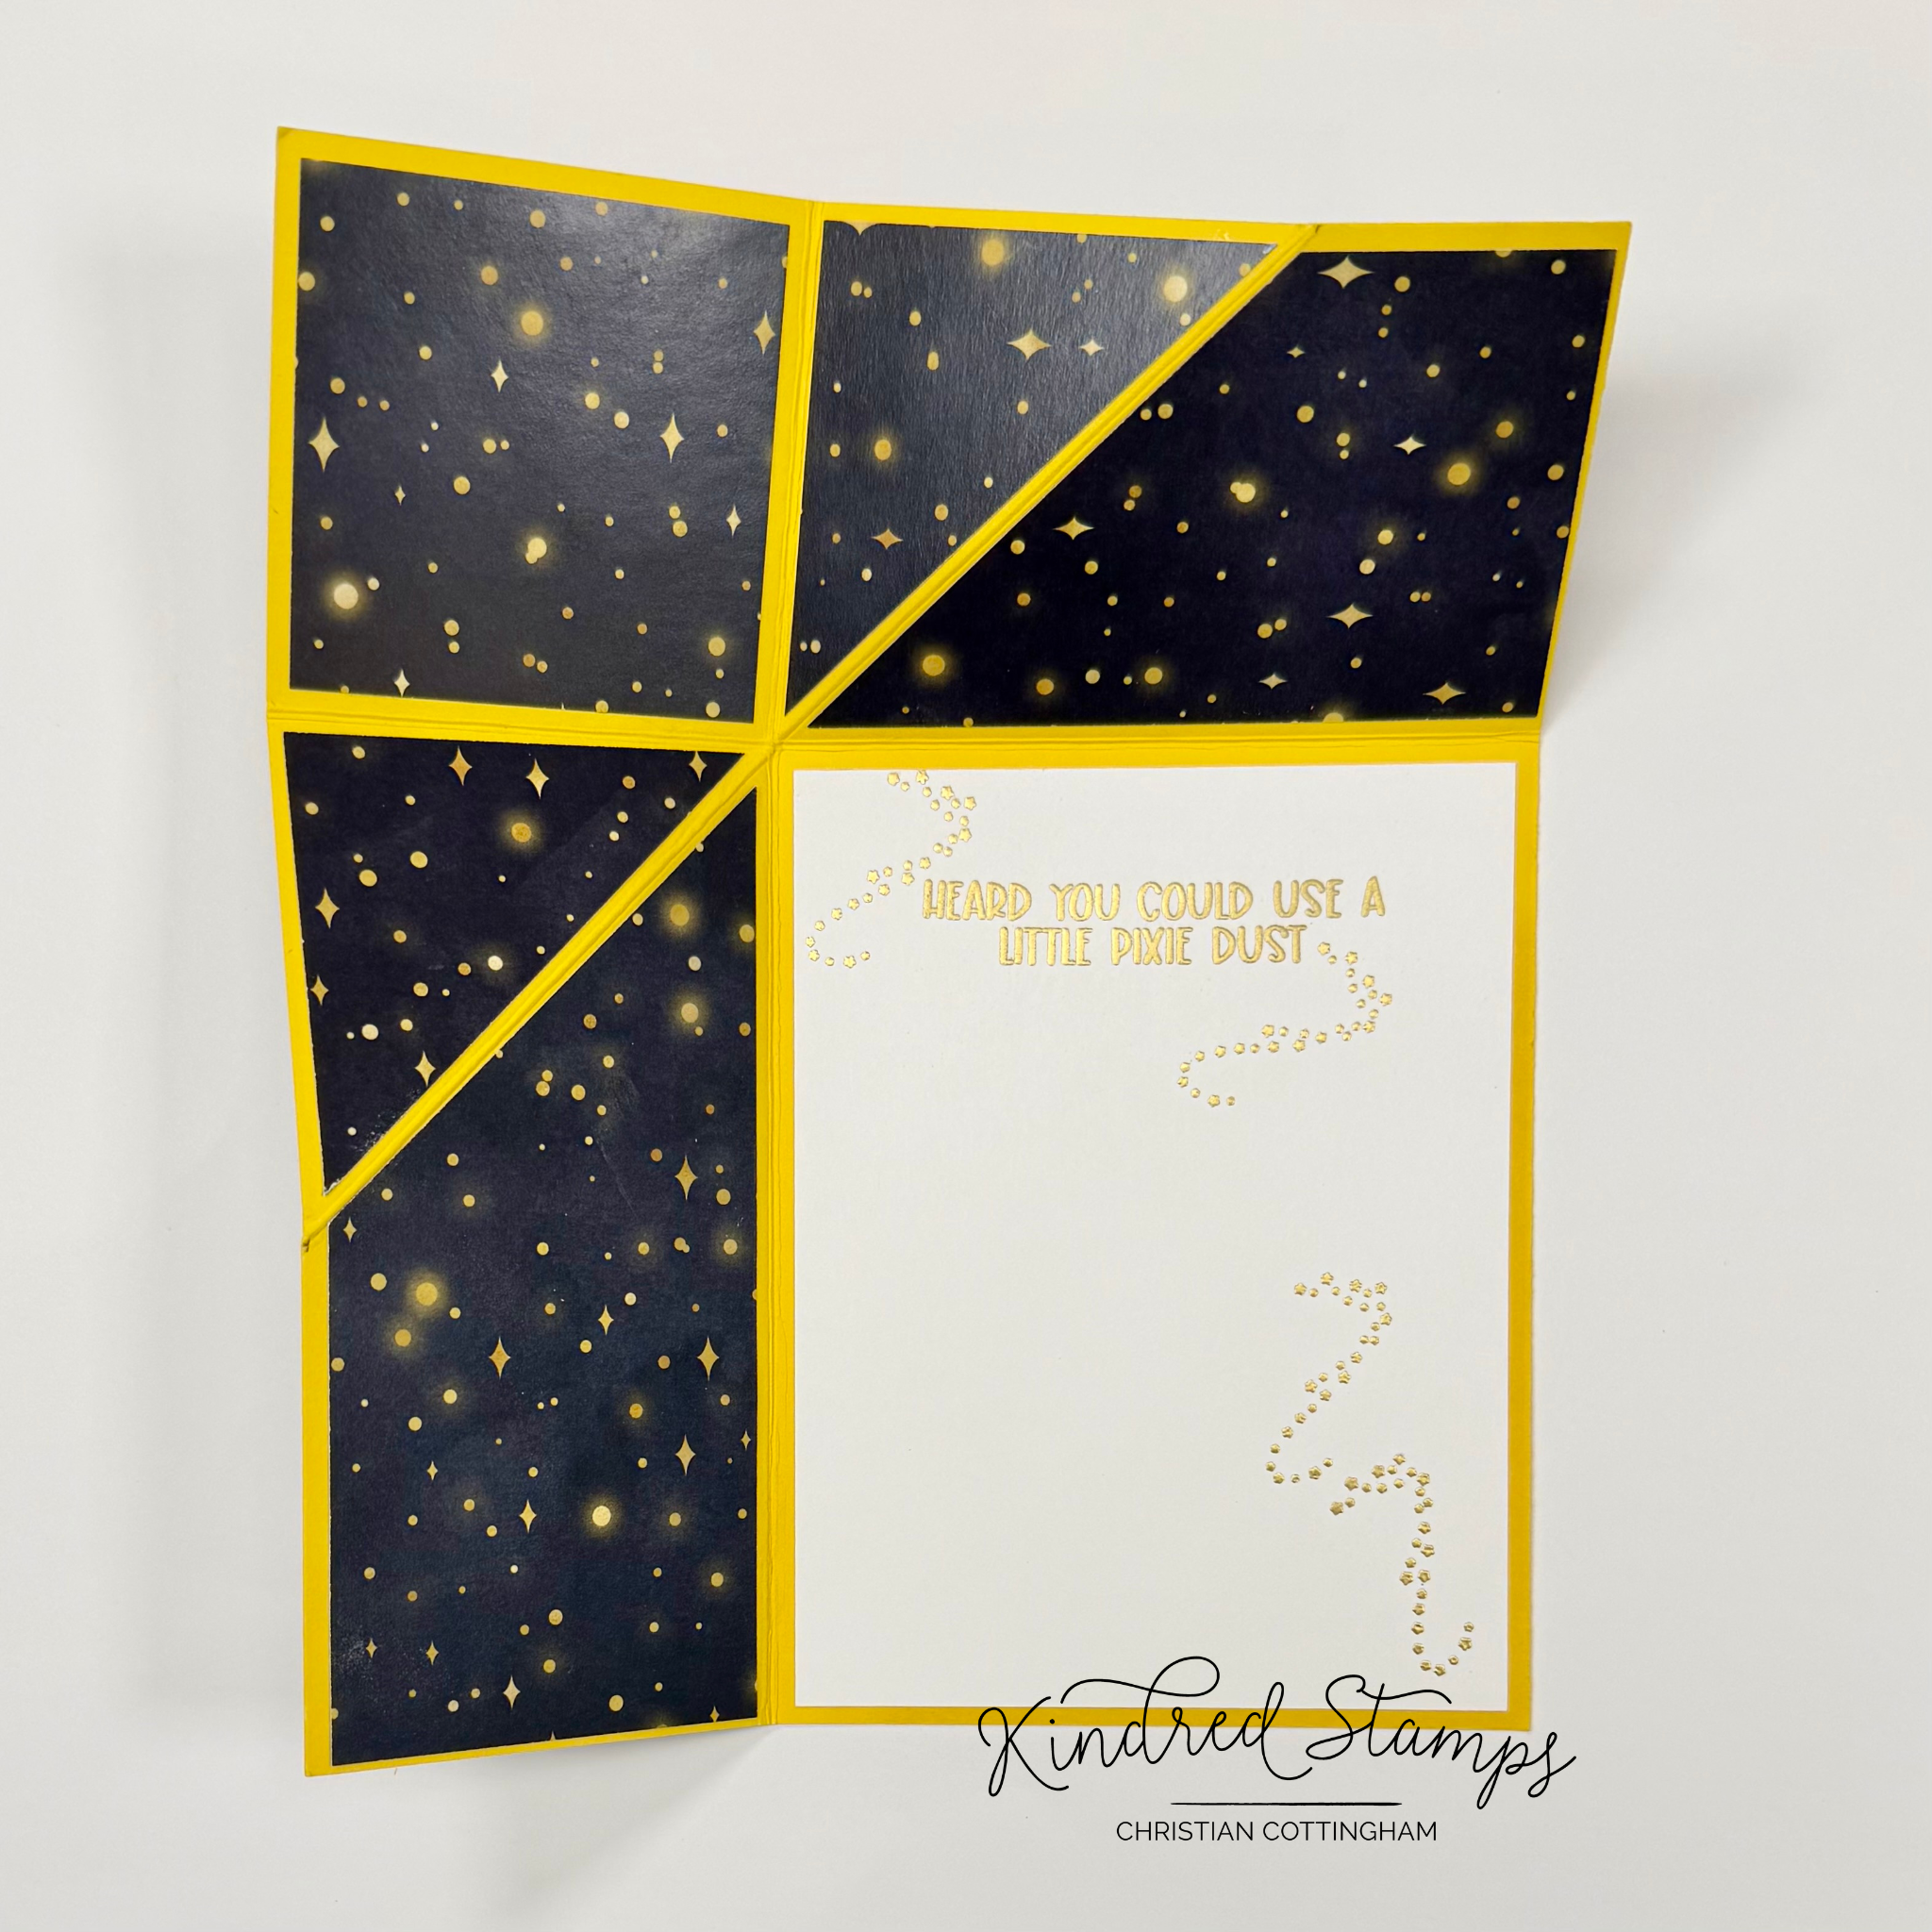
Pixie Dust, Kindred Stamps

Pixie Dust, Kindred Stamps
Kindred Stamps (affiliate links):
Pixie Dust: https://www.kindredstamps.com/products/pixie-dust?_pos=1&_sid=1c1679c6b&_ss=r&aff=97
Celestial Paper Pack: https://www.kindredstamps.com/products/celestial-paper-pack?_pos=1&_sid=a98b2e253&_ss=r&aff=97
Adeline Alpha Dies: https://www.kindredstamps.com/products/adaline-alpha-die-set?_pos=1&_sid=4b69afbe3&_ss=r&aff=97
Sentiment Strip Dies: https://www.kindredstamps.com/collections/craft-dies/products/sentiment-strip-dies?aff=97
Color Guide: (Olo Markers/ Prismacolor Premier Color Pencil)
Pixie: Y2.3/ OC1098; YG1.4/ PC909; BG0.2/ PC1027; OR7.1/ PC1092/ PC1039
Girl: O2.5// O2.7; B4.3/ B4.1; B4.6/ B4.3; R5.3; R5.5; CG7; O7.1/ O7.3
Boy: YG1.6/ YG1.4; YG2.7/ YG2.5; R0.6/ R0.5; O4.6/ O4.3; OR2.7/ OR2.6; OR7.3/ OR7.1

Get Lost: March Kindred Stamps Release
I’d be lost without you! The Get Lost stamp set from Kindred Stamps tells us we should never grow up!
Never grow up… we know it’s a trap… bills to pay… deciding what to make for dinner every…single.. night…. The Get Lost stamp set gives us permission to never grow up and I am here for it! These boys are staying young as long as they can and so you can you! Let’s go back to our childhoods and go on adventures with our friends once more, no bills to pay, just friendship and imagination… but first a PSA…
This blog utilizes affiliate links. If you choose to click on the links provided to purchase, you are supporting me as I receive compensation for your purchase. If purchasing is not in your books, no worries, I hope you find inspiration for projects you design. By clicking on the links, you are letting Kindred Stamps know that you like my content and to keep bringing me back. Thanks for your time and I’d be lost without you.
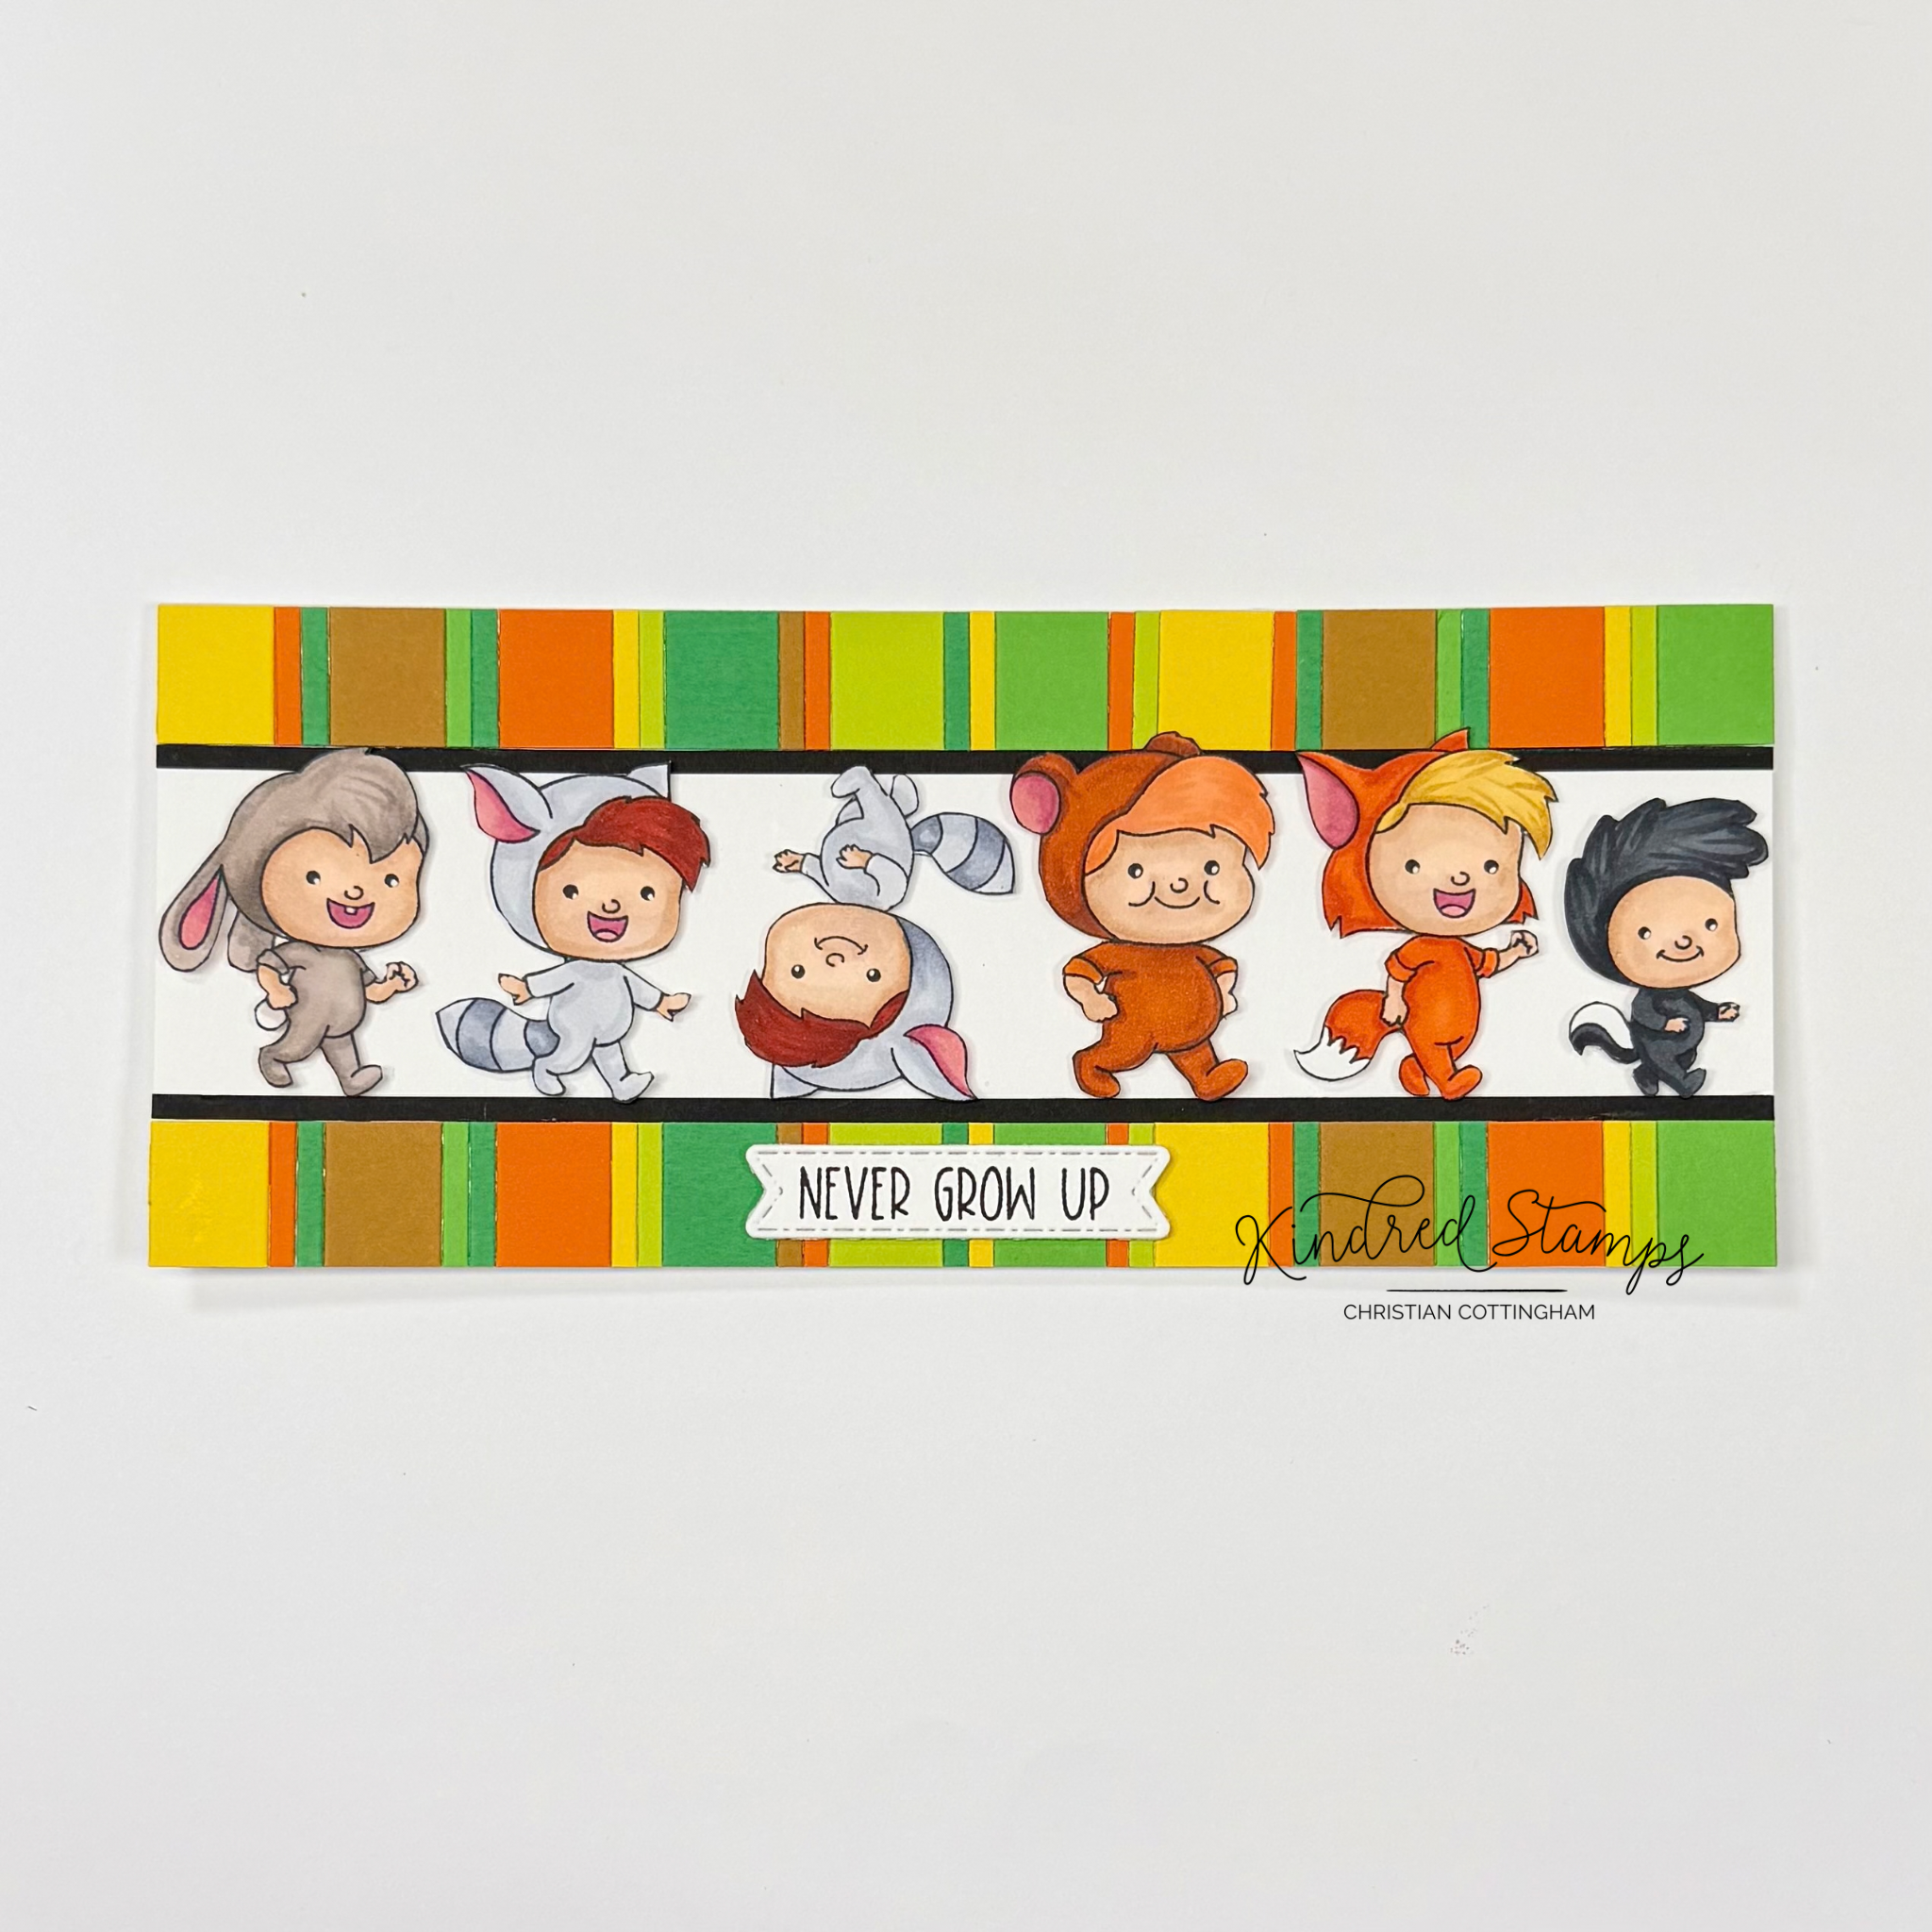
Project 1: Marching Hill
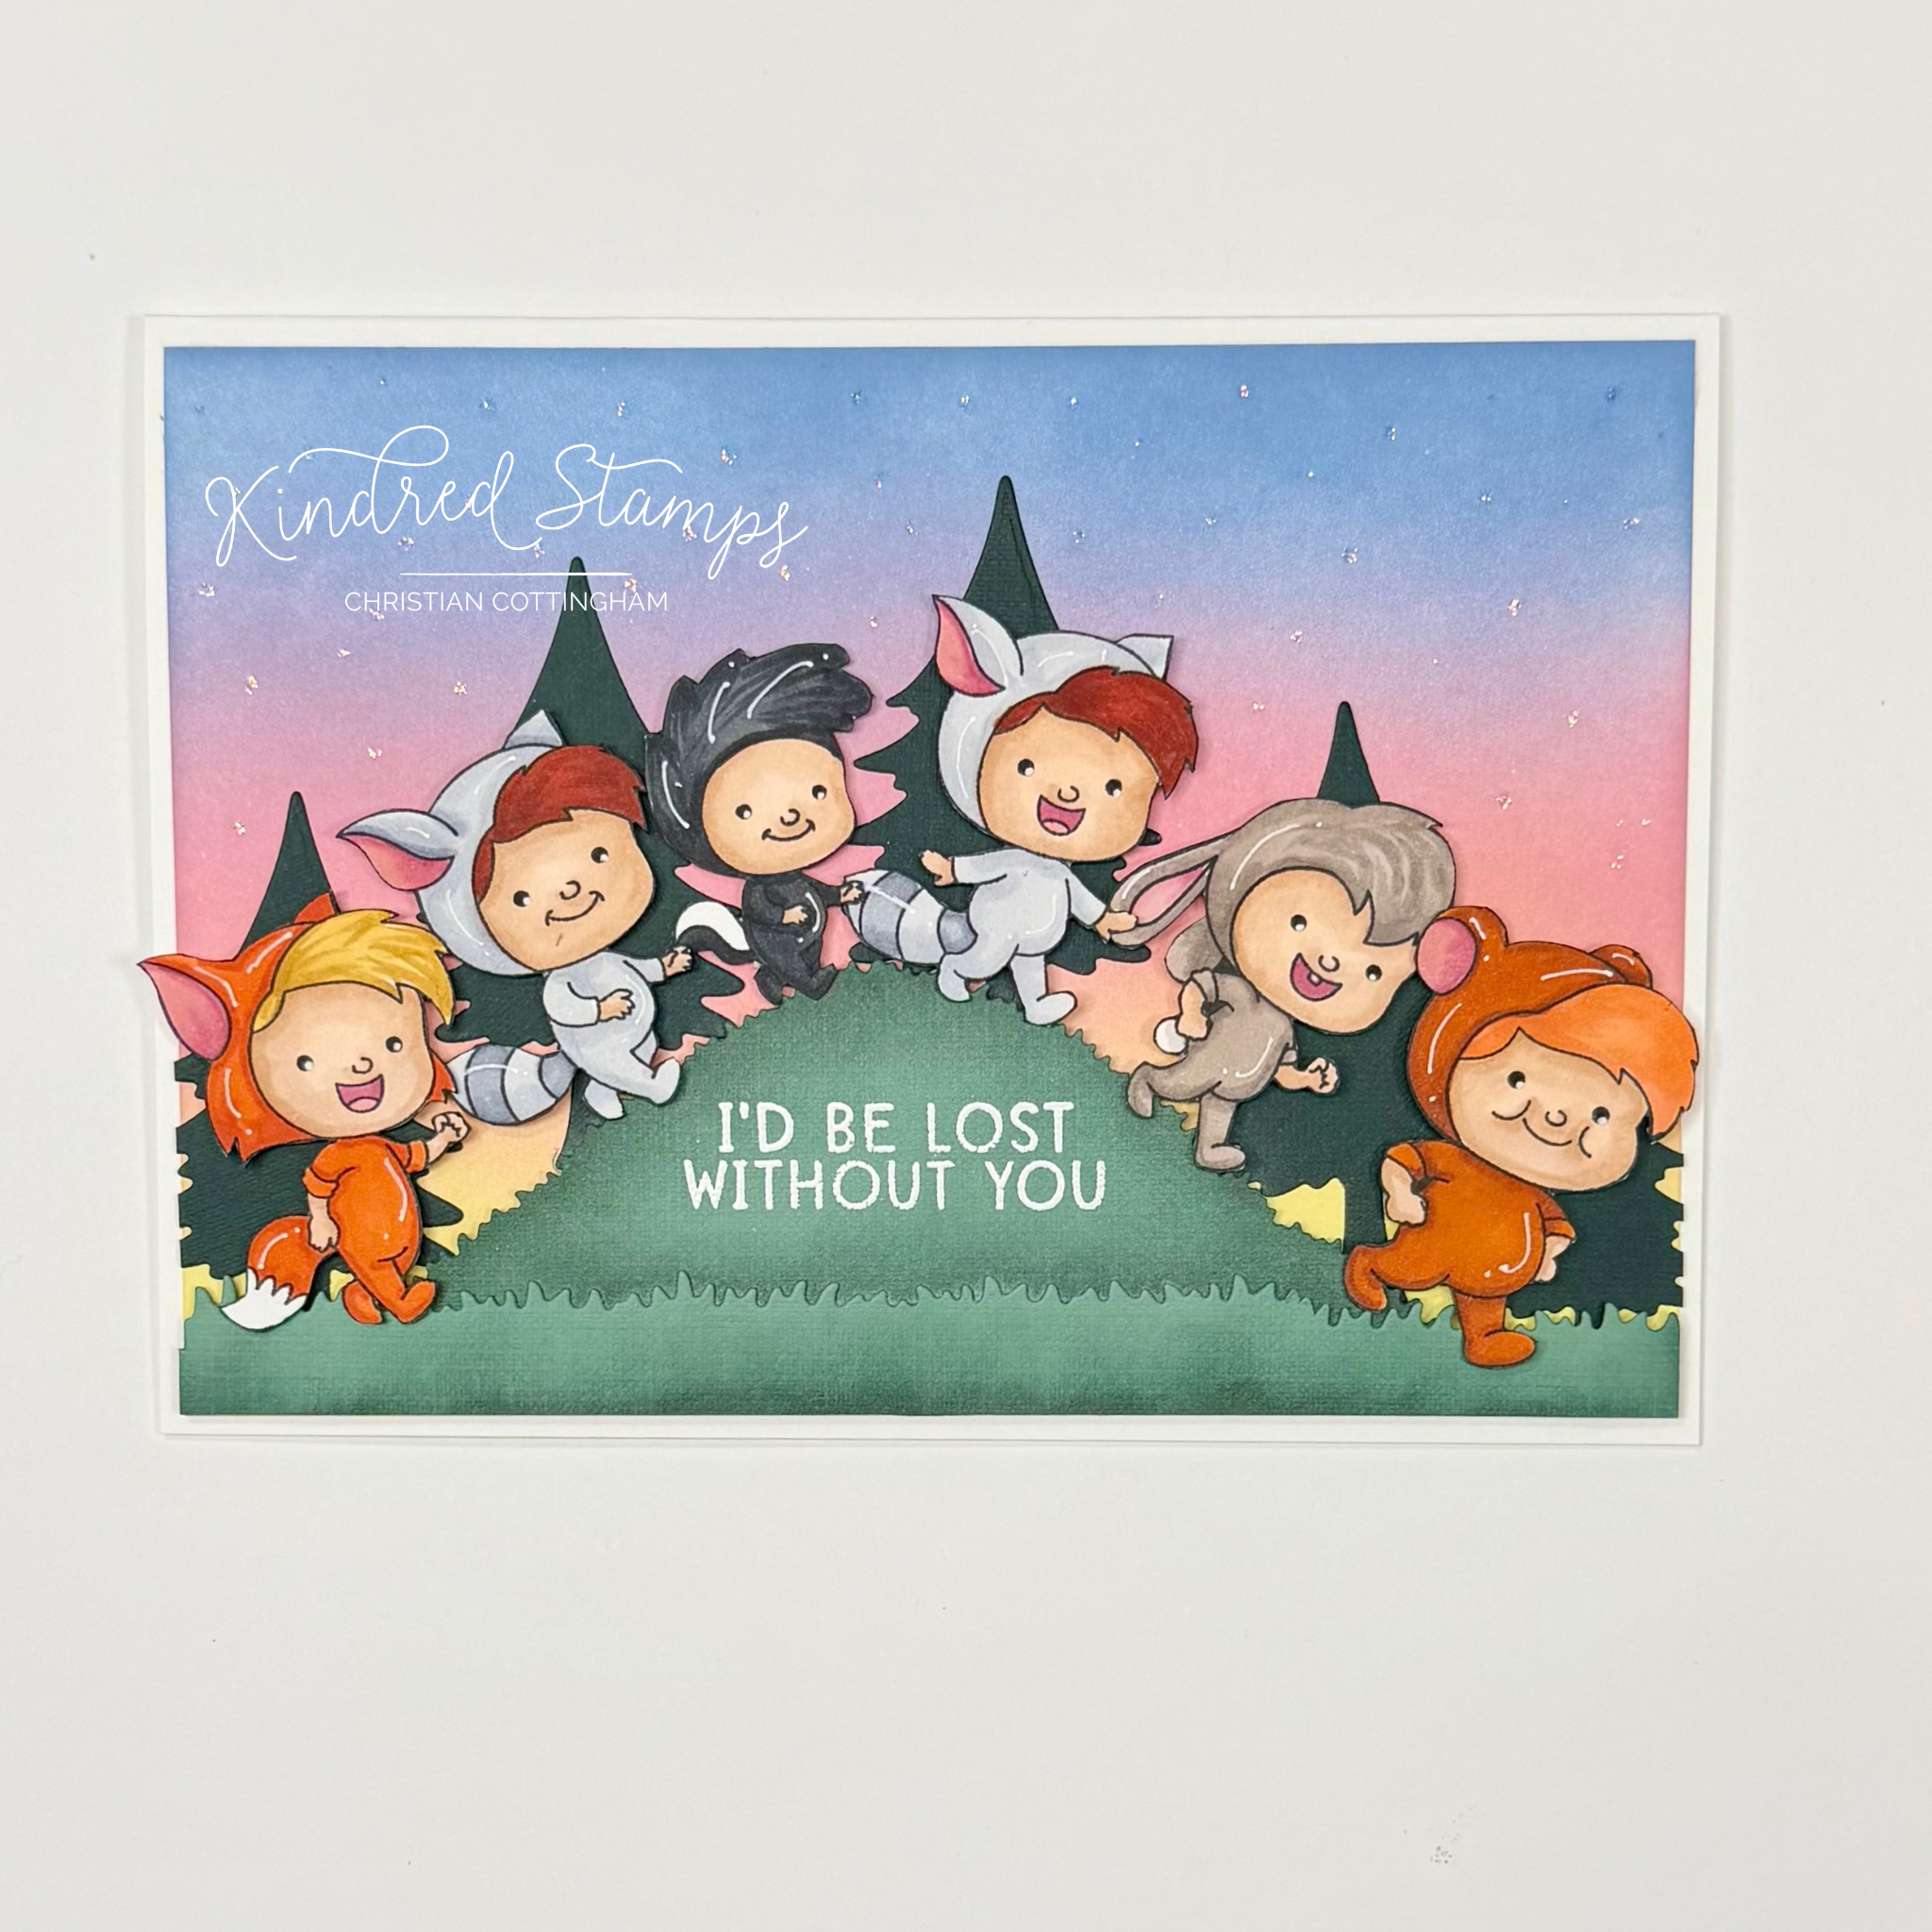
Get Lost, Kindred Stamps
The Get Lost boys are out marching and singing on one of their adventures. No hill to big for them to climb. This A7 card pulls in some die cuts and simple ink blending to make build the scene. Let’s break it down.
A panel of smooth white cardstock was trimmed to 4 3/4 inches by 6 3/4 inches. With a soft hand, the panel was inked in a gradient sunrise or sunset… you get to choose! Yellow on the bottom and blue on the top. Inks utilized: Gina K Designs Lemon Drop/ Dusty Rose/ Powder Blue. This was set aside to dry.
The Get Lost images were stamped in alcohol ink and colored with Olo Markers (See Color Guide). The boys were fussy cut out on the line and were edged with a black fine liner brush pen to hide the irregularities in my cutting. Thin foam tape was applied to the back of the boys. These were set aside to prepare the remainder of the scene.
The House In The Hill Die will provide the hill, the grass, and finally the trees for the scene. Five trees were die cut from a deep green cardstock. The hill was cut from a medium green cardstock. Finally, a strip of medium green cardstock was cut twice with the grass die to make the length needed for the card. The hill and the base of the grass panel were edged with Gina K Designs Dark Spruce ink to give a little dimension. When dry, the hill was prepped with an antistatic tool, the sentiment was stamped with a watermark ink, sprinkled with Snowfall embossing powder, and finally heat embossed.
Thin foam tape was applied to the hill and the outer section of the grass to avoid excess bulk to the card. The center section of grass was glued flat to the hill. The hill was placed lightly to the card (allowing me to lift and tuck before pressing it down completely). The five trees were glued flat behind the grass and hill.
The Get Lost images were arranged marching up and down the hill! Finally some Stickles were applied across the sky line to give the card a little bling without taking away from its design.
Size: A7 (5 inches by 7 inches)
Project 2: Marching Rocks
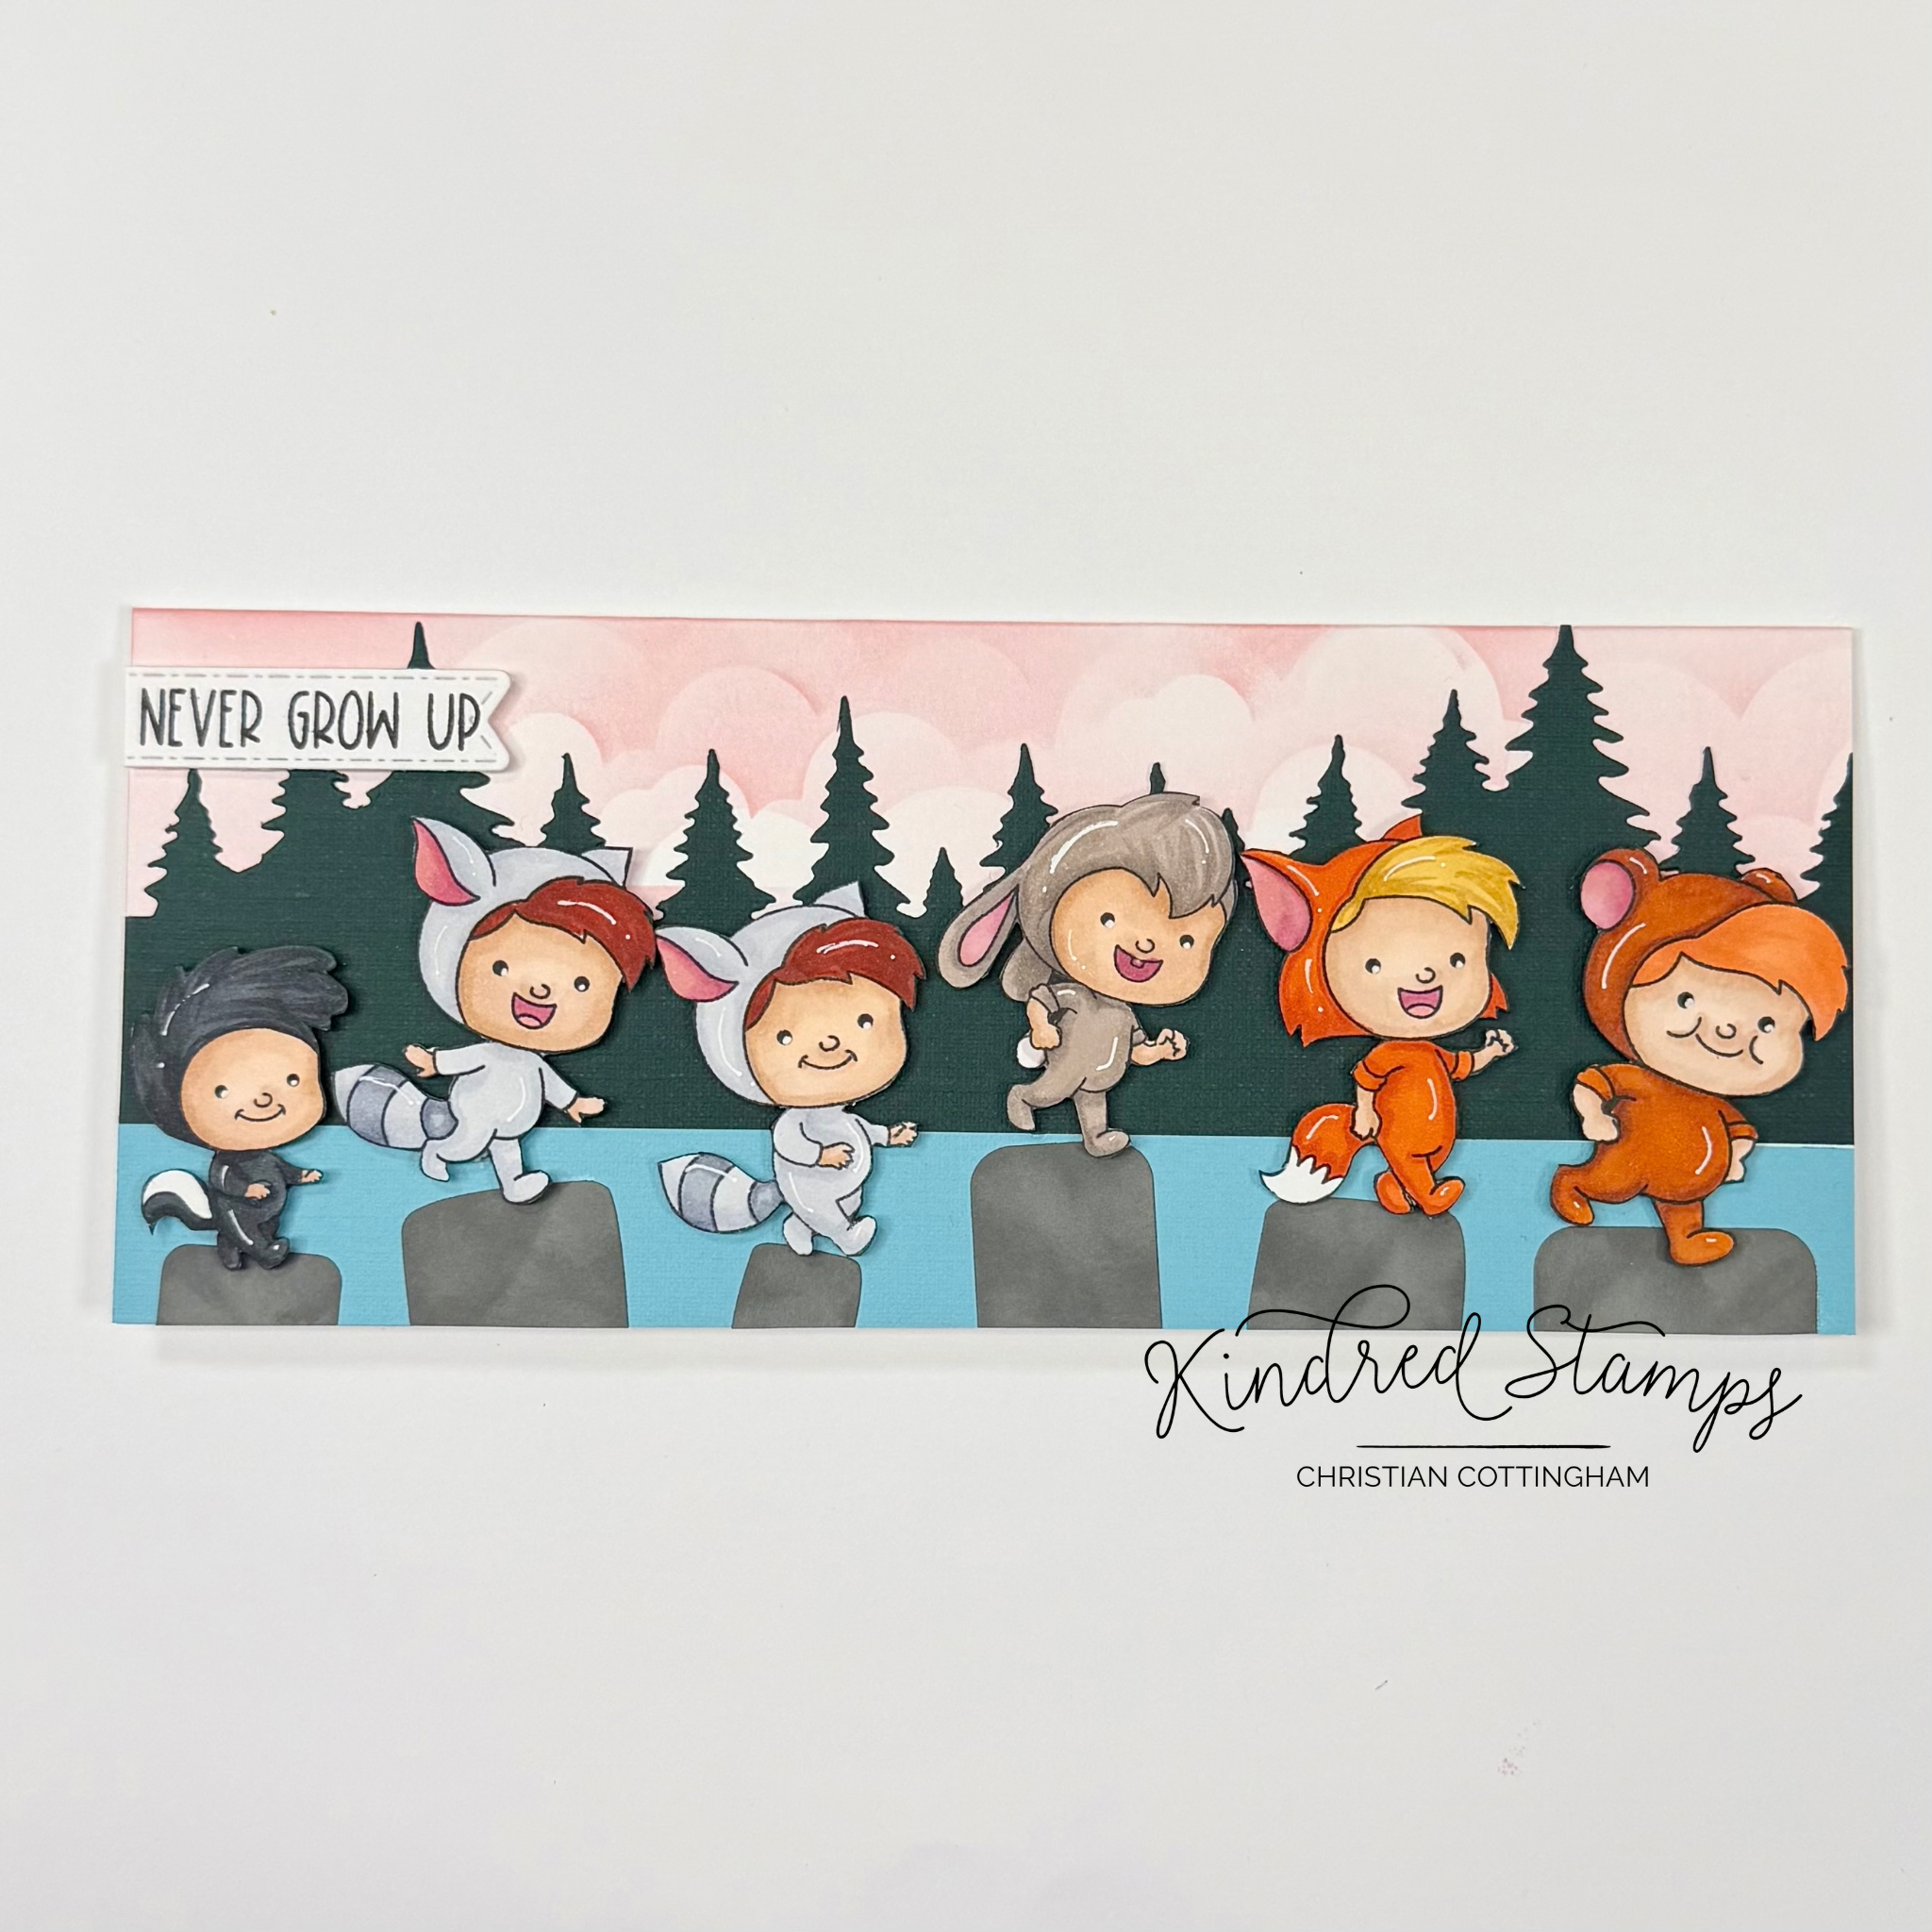
Get Lost, Kindred Stamps
Not only did they march over a hill, but across a stream with a waterfall! To get through the water without getting wet, the Get Lost boys are skipping across the stones. This slimline showcases their shenanigans perfectly.
The slimline card base was stenciled on with the Grass and Cloud Stencil with Innocent Pink (Gina K Designs). This was set aside to dry while the coloring commenced.
The Get Lost images were stamped in alcohol safe ink, colored with Olo Markers, and fussy cut out on the line. (See Color Guide)The edges of the stamped images were marked with a black fine liner. Thin foam tape was applied to the back of each of the boys.
Since I was inking up the stamps, I stamped the sentiment on a piece of scrap paper. Utilizing the Sentiment Strip Dies, the sentiment was positioned with the sentiment close to one side. A thin foam tape was attached to the back of the strip and set aside.
Green cardstock was die cut with the Tree Scene Die, twice on the same line for the length of 8.5 inches. A piece of blue cardstock was cut down to be the water. These two pieces were glued to the card base. The sentiment was placed on the top left corner with the sentiment lining up with the far left side. The overhang was trimmed off.
Finally, it was time to make some rocks. Looking through my stash, I found the Chocolate Candy Dies and thought… “self, don’t you see those rocks?” “Sure do’” I responded back. Pulling out some of the chocolate dies and a piece of gray cardstock, the rocks started to come to life. To give the rocks some “rockiness” a small blending brush and Stormy Sky ink (Gina K Designs) the rocks came to be.
The rocks were arranged flat along the base of the card with the overhang cut off. The Get Lost images were arranged skipping across the rocks.
Size: Slimline (3.5 inches by 8.5 inches)
Project 3: Marching Attention
Get Lost, Kindred Stamps
If you watched Part 1 of the Crafter to Collector Series on YouTube (Kindred Stamps or Cardigans & Cards), you will recognize a great way to add some spunk to a card by keeping the theme with some paper strips. This simple card is bright and cheerful and has some unexpected twist to add interest.
Pulling out an assortment of green, yellowy-brown, orange, and yellow cardstock multiple strips were cut down. With a double-sided adhesive on a piece of copy paper approximately 2 inches wide was prepped and assembled in a repetitive sequence. The panel was trimmed into two 3/4 inch strips. These panels were adhered to the slimline on the top and bottom edges, leaving a crisp white center. Two thin black strips of paper were glued lengthwise along the the top and bottom striped strip line. This breaks the vertical lines, drawing the eyes to the white center panel.
The Get Lost images will fill out the center panel. The boys were stamped with alcohol safe ink and colored with Olo Markers (See Color Guide). After fussy cutting on the line, a black fine liner was run along the edges. Thin foam tape was applied to the back of each boy.
The boys were spaced equally in a marching order across the white panel. One of the boys was turned upside down for an unexpected punch to add some playfulness to the layout. Finally, the sentiment was stamped on a matching piece of white cardstock and die cut with the Sentiment Labels Die set. The sentiment was popped up with some thin foam tape and centered onto the bottom striped section. This card pops with some simple colored card stock arranged in a fun pattern.
Size: Slimline (3.5 inches by 8.5 inches)
Project 4: Hiding Tree
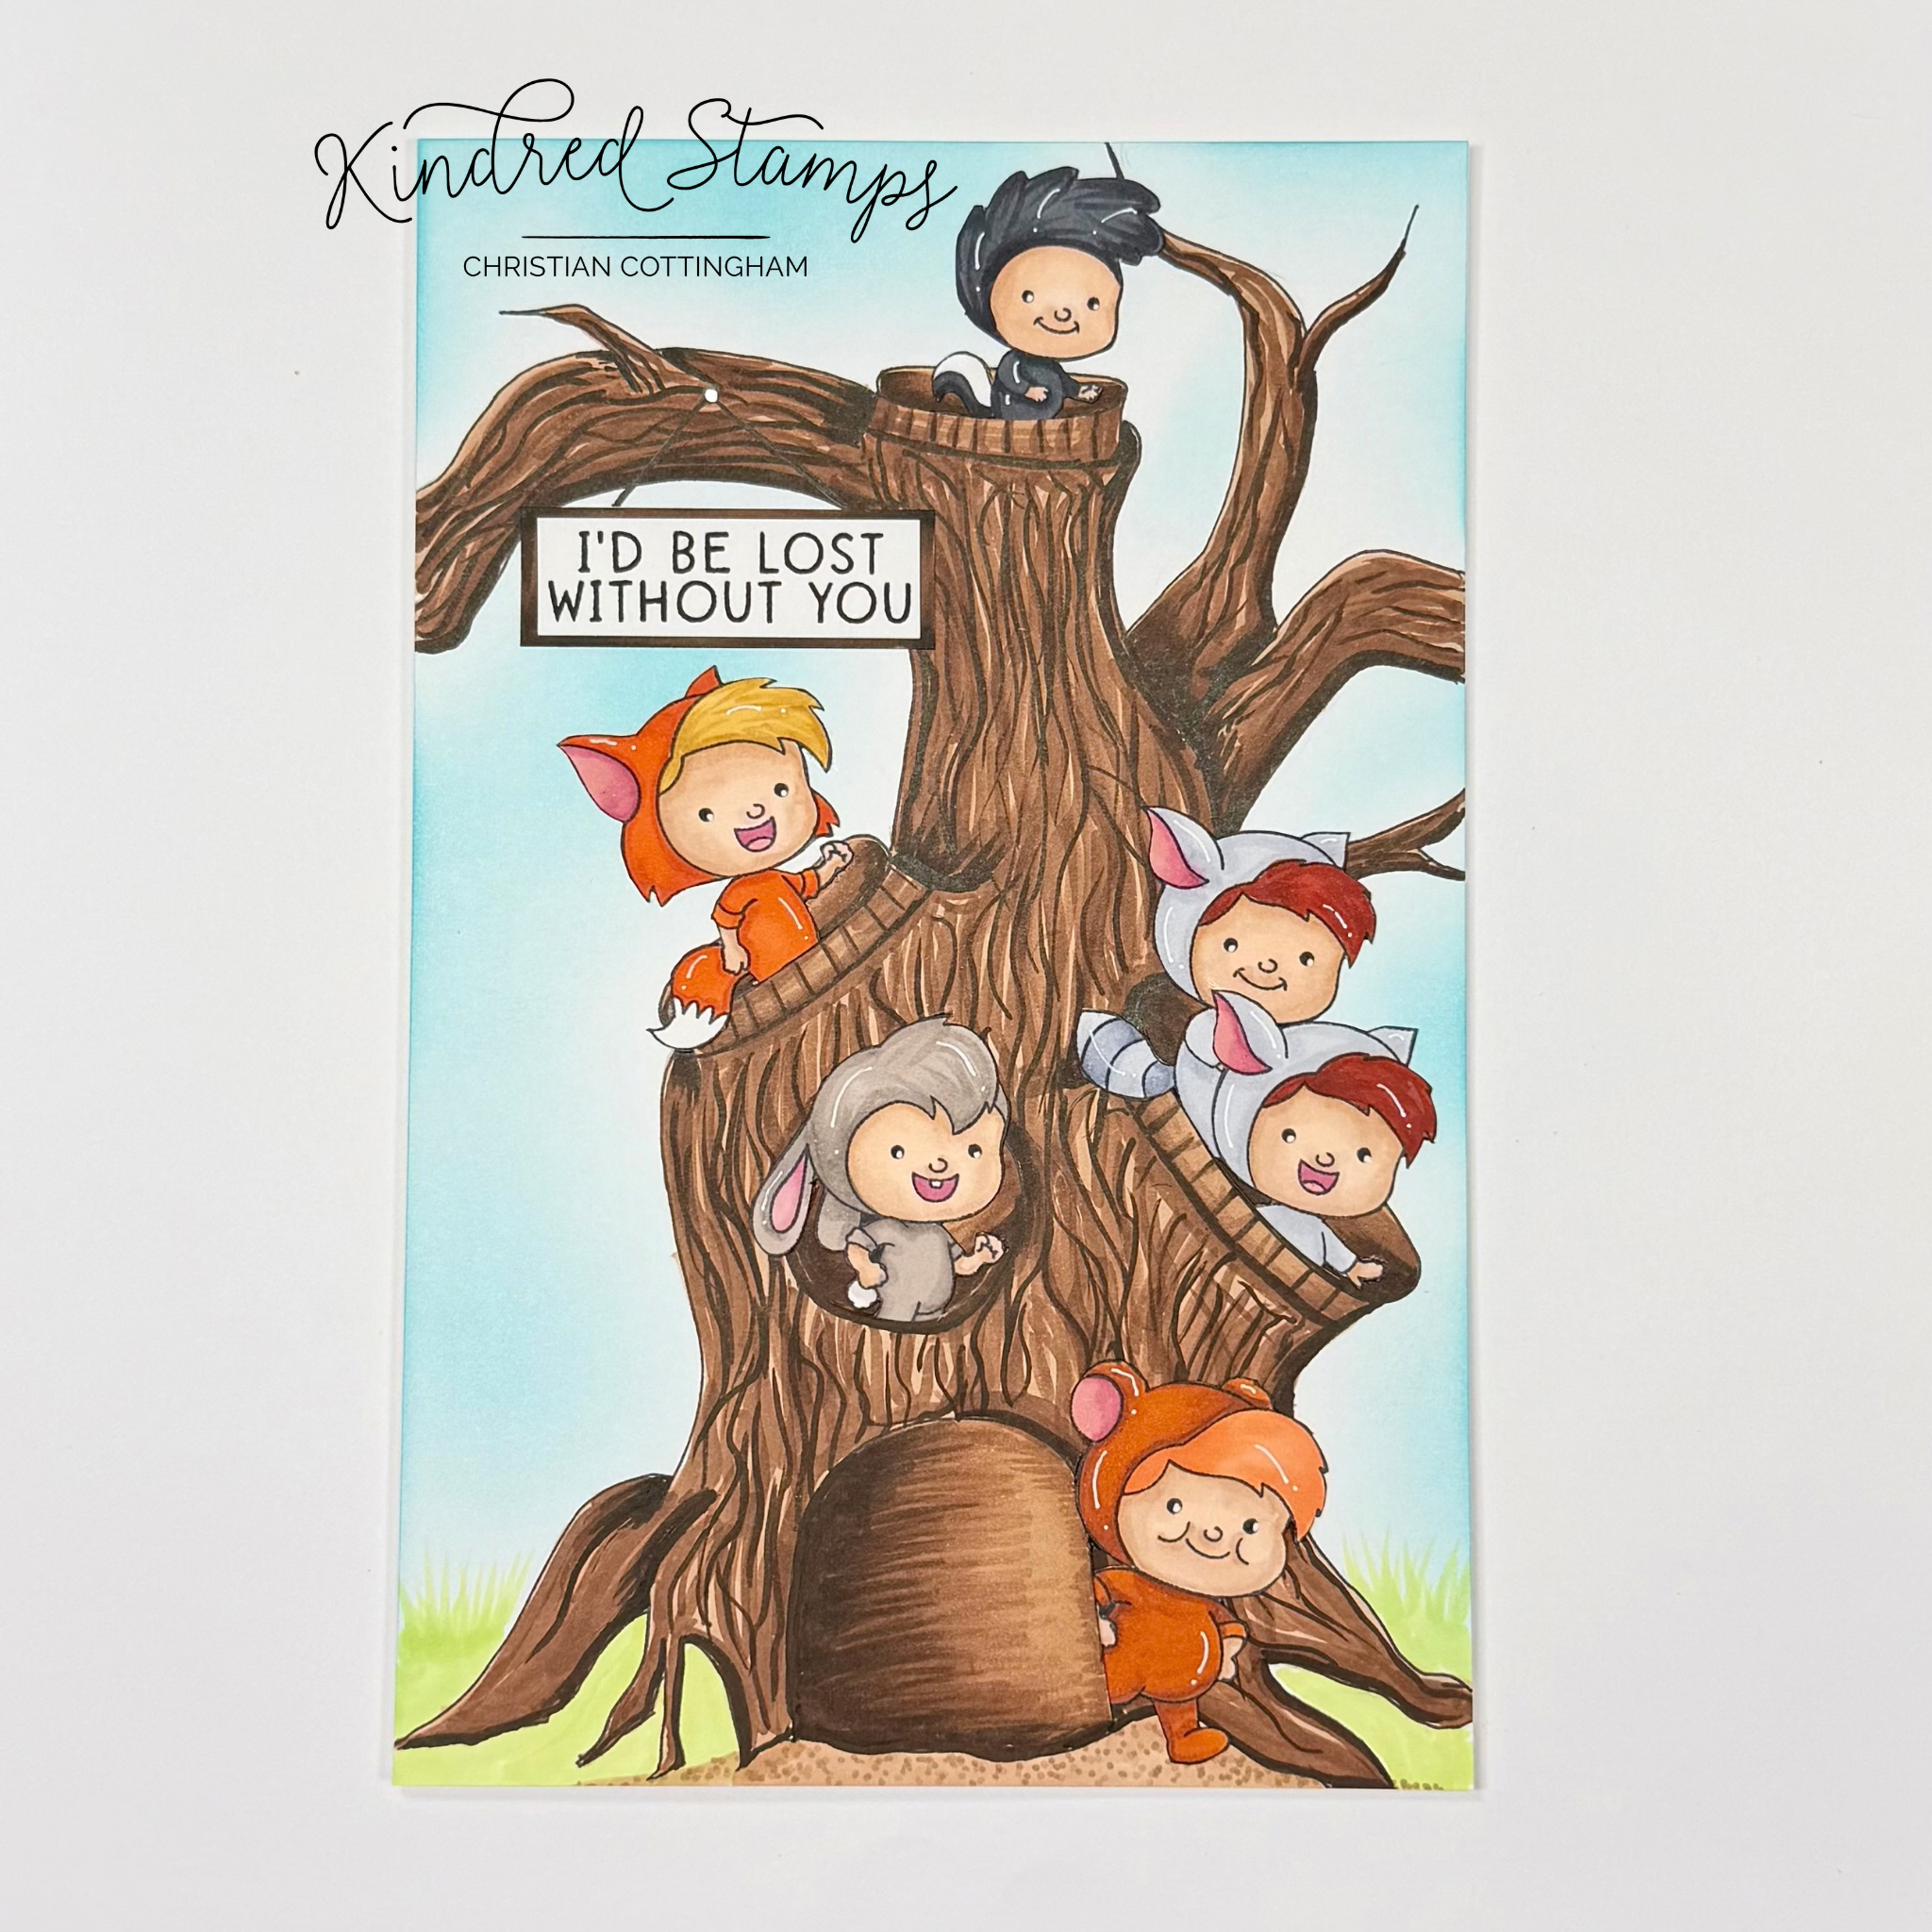
Get Lost, Kindred Stamps
Having a secret hiding spot is essential when you are living in the woods. This card is a go big or go home type of card, especially to fit this ginormous tree on it. Let’s dive in on this sticking but simple to make card.
The Get Lost images were stamped with alcohol safe ink and colored with Olo Markers. (See Color Guide). The boys were fussy cut out and edged with a black fine liner.
A piece of white cardstock (8.5 inches by 5.5 inches) was cut down, okay who am I kidding, I took it from my card base stock…. I roughly sketched a tree on the card panel using the Get Lost images to determine the size of the openings needed for the entry points. Once my tree was sketched to my liking, I used a fine liner pen and traced the basic tree outlines (think of a coloring book page, just the black lines and you get to do the magic).
The sky was ink blended (Sea Glass Gina K Designs) with a light hand and no cares if it went inside the lines of the tree as it was going to be colored brown. I did leave the ground color free as that was going to be filled with an alcohol marker.
To color the tree, in sections I layered the colors. The tree base was inked with Altenew Artist Markers in Y911 (Sand Dunes). Then the wiggly lines were added with Y821 (Rocky Shores) and Y932 (Mocha). The grass was flicked into the sky with G702 (Frayed Leaf) and the path in front of the door was colored with Y911 and Y821 stippling.
The sentiment was stamped on a piece of white card stock. A mat was cut slightly larger from the same white cardstock and the colored with the Y932 and Y821 markers. The sentiment was glued to the tree card panel. Using a black fine liner, the lines were drawn to a point to act as the strings for hanging the sign. A silver gel pen dot was placed were the lines intersected.
To insert the Get Lost images into the tree, a craft knife was called into action. Small slits were cut and the boys were inserted and glued into place.
Finally, the card panel was ready to be glued to an A9 card base. It truly amazes me that just drawing some simple line and some sloppy coloring of squiggly lines really brings this tree house to life. I’ve always like bigger cards and this one is no exception!
Size: A9 (5.5 inches by 8.5 inches)
The entire Kindred Stamps release will be available this Friday at 8am PST/11am EST. Be sure to subscribe to the Kindred Stamps blog to see a daily line up of sneak peeks from our amazing Design Team! Come join the Fan Club and release event to be part of the release fun, and you may just win some Kindred Stamps credit!!
Coloring Guide:
Bear:
Flesh: OR7.2/ OR7.1/ OR2.0
Ears: R5.5/ R5.3
Suit: O2.5/ O2.7
Hair: OR2.3/ OR1.3
Fox:
Flesh: OR7.2/ OR7.1/ OR2.0
Mouth: R5.5/ R5.3
Hair: YO2.5/ YO2.3
Ears: R5.5/ R5.3
Suit: OR1.6/ OR1.4
Rabbit:
Flesh: OR7.2/ OR7.1/ OR2.0
Mouth: R5.5/ R5.3
Suit: RG5/ RG3; RG0
Ears: R5.5/ R5.3
Skunk:
Flesh: OR7.2/OR7.1/ OR2.0
Suit: NG9/ NG7
Raccoons:
Flesh: OR7.2/ OR7.1/ OR2.0
Mouth: R5.5/ R5.3
Hair: OR2.7/ OR2.6
Suit: CG5/ CG3/ CG1
School Skippers: Feburary Kindred Stamps Release
It’s that time of year where playing hooky is a law… The School Skippers know how to live it up!
We all need just one day off to escape the daily grind… get up… work… come home… work some more… feed your face… go to bed… and repeat… every… single…day… We should take inspiration from the School Skippers stamp set and just take the day off and live in the moment. This small but mighty stamp set is the perfect excuse to take some time for yourself live in the crafty moment. You are worth it!
This blog utilizes affiliate links. If you choose to click on the links provided to purchase, you are supporting me as I receive compensation for your purchase. If purchasing is not in your books, no worries, I hope you find inspiration for projects you design. By clicking on the links, you are letting Kindred Stamps know that you like my content and to keep bringing me back. Thanks for your time.. now let’s live in the moment!
Project One: Cruisin’

School Skippers, Kindred Stamps
Going for a drive on a mental health day is a necessity, especially if you can have the top down and the wind blowing through your hair! The School Skippers were perfect inspiration. This simple card features a few dies and simple coloring to set the scene. Let’s break it down.
The background was cut from a panel of white cardstock with the largest rectangle from the Card Basic Die and ink blended on the top third of the card with Arctic (Altenew Fresh Die Ink) to give the illusion of the sky. A piece of gray card stock was then cut with the same rectangle die from the Card Basic Die. The City Scape die was positioned on the top third of the gray cardstock and cut out. This will provide the city in the back of the cruisin’ School Skippers.
On a piece of Express-It card stock, the car, grill, and tires were die cut from the Drive-In Memory Dex die set. The car was colored with Olo Markers (R0.6/ R0.5; NG7/ NG9; NG3/ NG1/ NG0; B1.0). The car was assembled with liquid glue. The sentiment was stamped onto a scrap piece of Express-It cardstock and trimmed to be the license plate of the car. This was glued to the front of the car.
The School Skippers were stamped in alcohol safe ink on Express-It cardstock and colored with Olo Markers. (See Color Guide). The images were fussy cut out and arranged with the Sick Boy and Girlfriend in the front seat and the Best Friend positioned in the back seat sitting on the bench of the convertible. Foam tape was applied.
To assemble the card a piece of black cardstock was adhered to a top-folding card base. The sky panel cut from the Card Basics Dies were adhered. The city scene from the gray cardstock was adhered to the sky panel. Finally, the car filled with the School Skippers were positioned on the lower portion of the scene. The crew was out cruisin’ and enjoying the sun!
Size: A2 (4.25 inches by 5.5 inches)
Project Two: Swing Batter Batter Swing
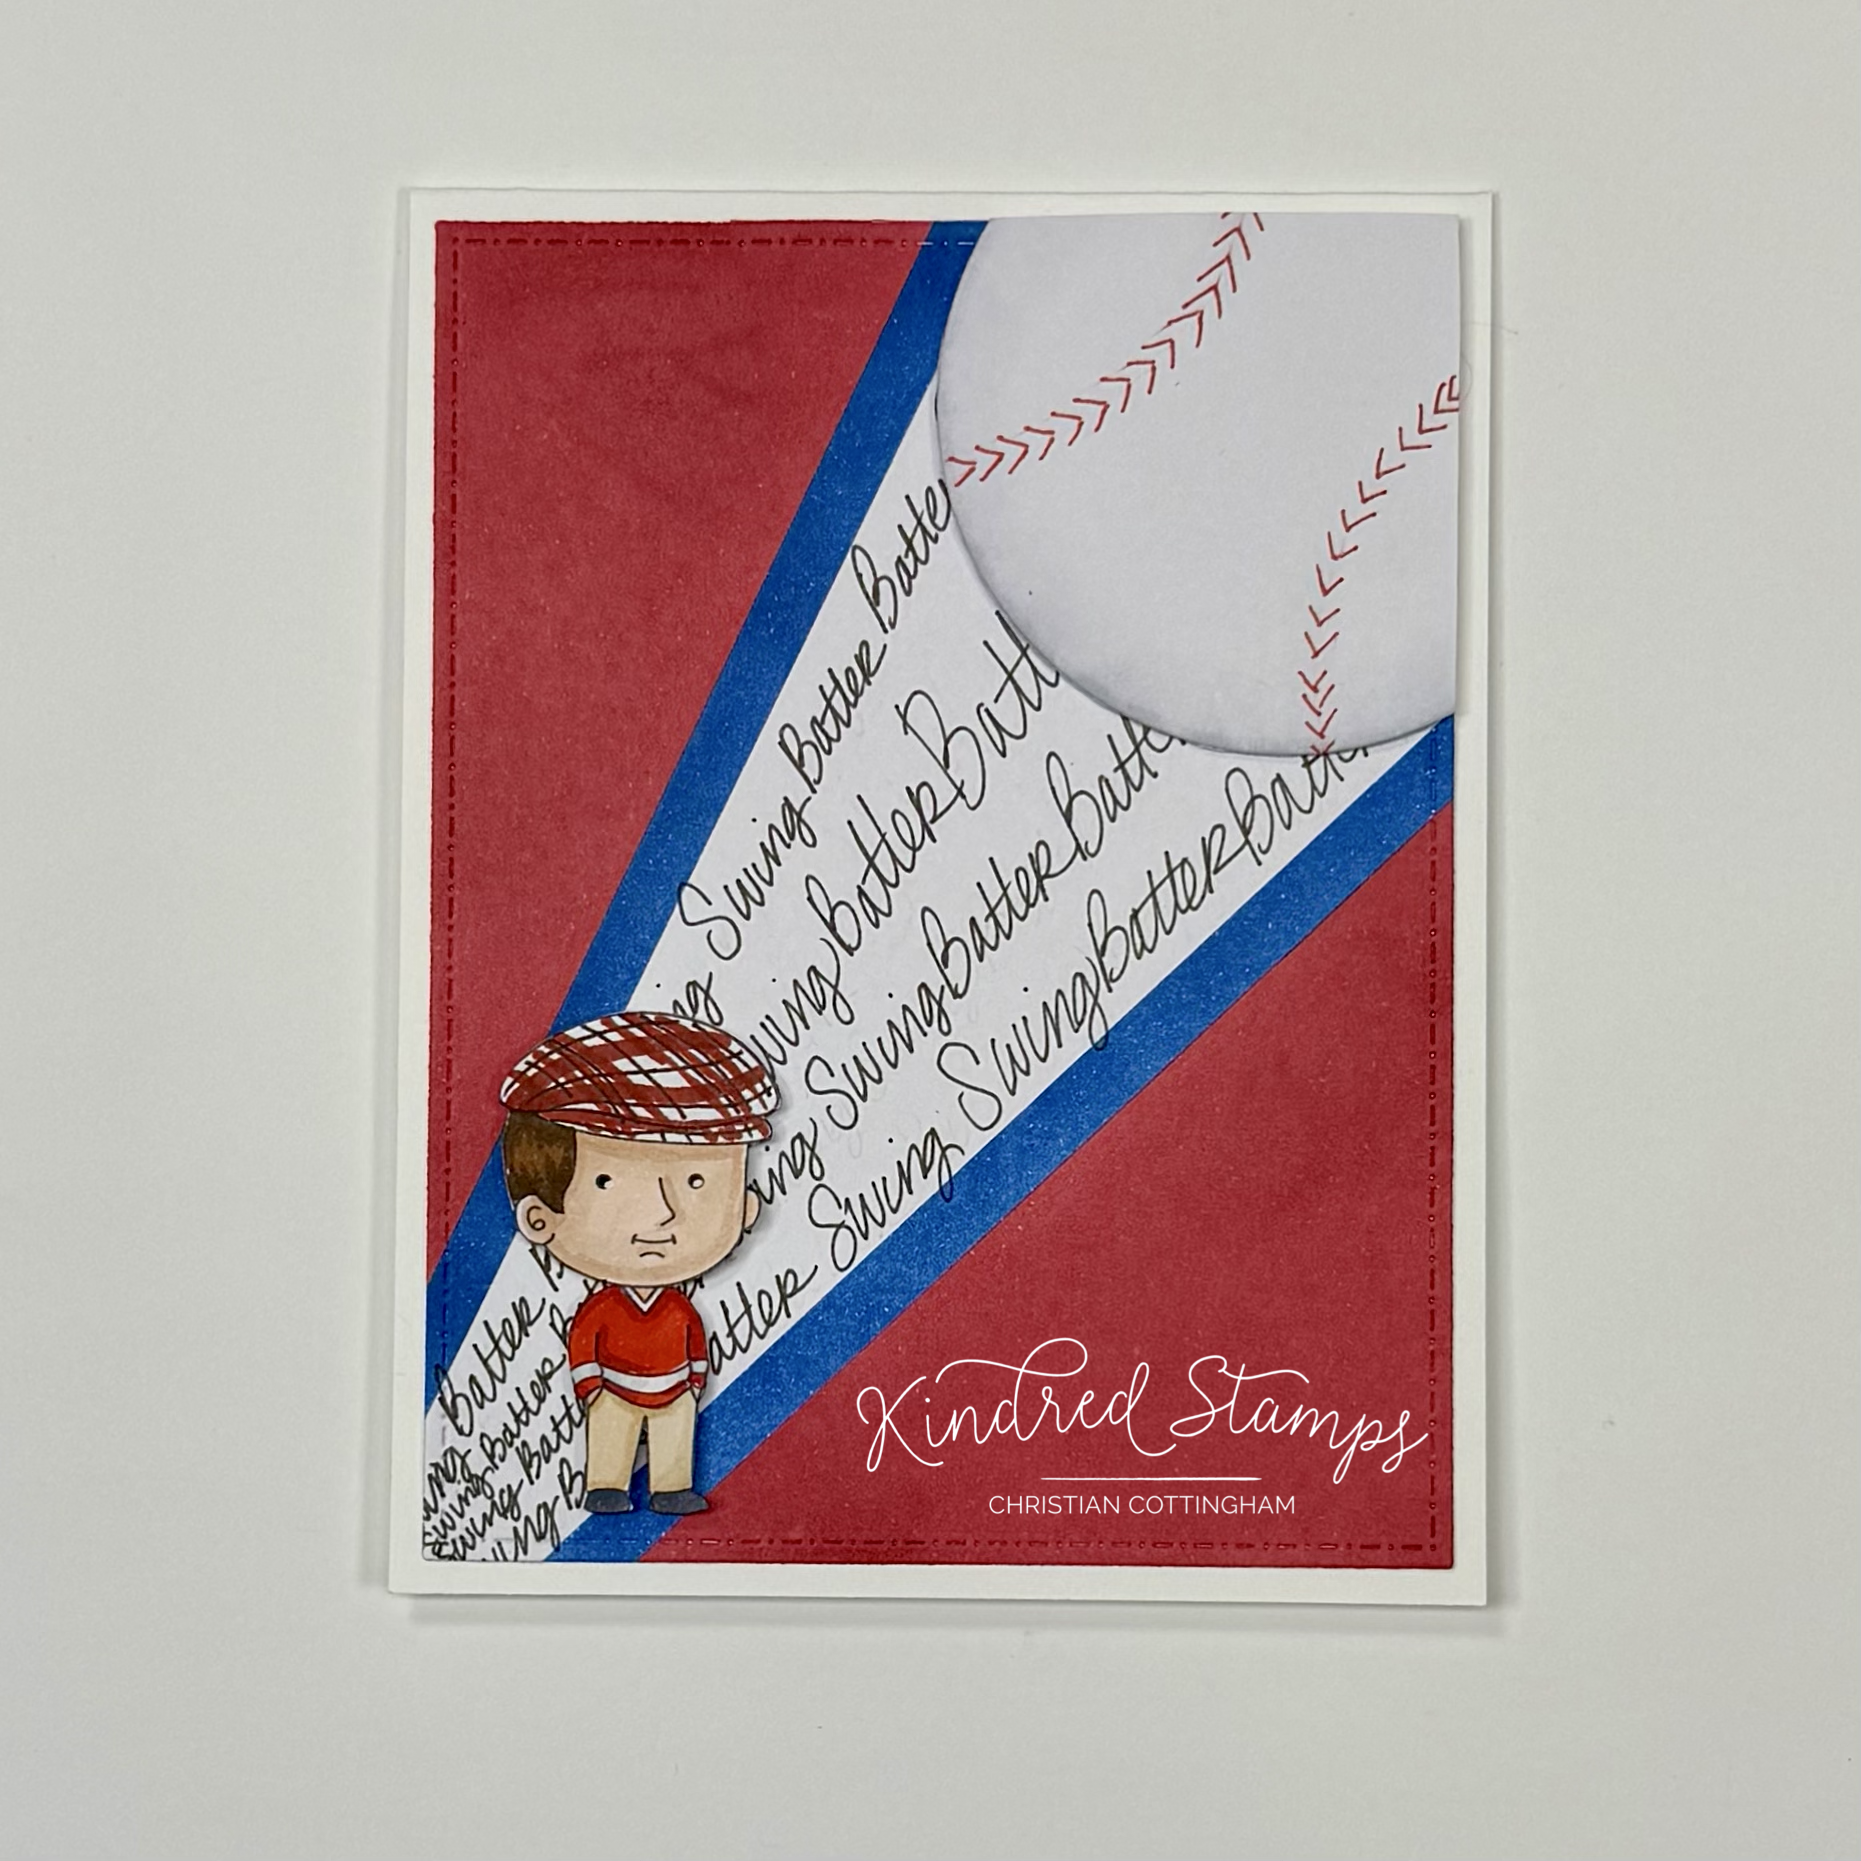
School Skippers, Kindred Stamps
If you’re going play hooky, why not go to a game??? This simple card hits it out of the park and can be modified to any team colors!
The Best Friend from School Skippers was colored with Olo Markers on Express-It cardstock and fussy cut out. (See Color Guide). Foam tape was applied to the back of the image and set aside.
A piece of Express-It cardstock (4.25 inches by 5.5 inches) was masked with masking paper in the shape of a cone with the thinner edge on the bottom left corner and the widest part at the top right. This section will remain white. Next two pieces of masking paper were cut to 0.25 inch strips. These were aligned on the sides of the already placed masking paper. These stripes will be inked blue. With the paper prepped, it was time to ink blend. With red ink (Lobster by Lawn Fawn) the open areas of card stock were inked up. The thin strips of masking paper were then removed and sticky notes were applied on the edge of the red blended section lines. Blue ink was applied to the small striped sections (Blueberry by Concord & 9th). All masks were removed. With a pencil, I lightly sketched lines to write the sentiment. “Swing Batter Batter Swing” was written from left to right with font growing as it moved toward the top right corner with a fine liner pen. Pencil lines were erased and set aside.
Now that the background was ready, the Card Basic Dies were being put to use. The panel was cut down with large rectangle die. The smallest circle was also cut from the same Express-It cardstock. Die cutting complete, it was time to make a baseball! To make the stitch lining on the ball, the negative part of the die cut was sketched with pencil. Pulling out a red gel pen, stitching was drawn. The pencil lines were erased and I pulled out a light gray ink to edge the sides of the baseball to give it a rounded look (Soft Stone by Gina K Designs). Foam tap was applied to the back of the baseball.
To assemble the card, a top-folding card base was prepped. The baseball was placed on the top right with overhang. I centered the circle in the handwritten section of the panel. The excess was trimmed. The card panel was adhered flat to the prepared card base. Finally, the Best Friend was positioned in the lower right corner of the card. This simple card is definitely a home run and perfect activity for playing hooky!
Card Size: A2 (4.25 inches by 5.5 inches)
Project Three: Trip to the Museum

School Skippers, Kindred Stamps
Need to recharge your creative energy when you are on your mental health day? Why not go to the museum! The School Skippers are checking out the Impressionist style art and so can you!
The School Skippers were stamped with alcohol safe ink, colored with Olo Markers and fussy cut out of Express-It cardstock. Foam tape was applied to the lower portions of the images (more will be applied during assembly once I knew were the images would be positioned in front of the art work). These images were set aside while the scene was being built.
Utilizing the Art Frames Dies, the back panels were cut for 3 frames (one large rectangle and two of an oval-ish frame. The frames for the back panels were also cut from matte gold cardstock. Pulling out some watercolors and size 2 round brush it was time to harness my inner Monet… well, I tried at least…. Little scenes were made with little smudges of color layered to look like mountains, floral fields, and some woodland trees… at least that’s what I tell myself. The colors came from the 12-pan Altenew watercolor set, however, all colors were pulled up off of my pallet so I have no idea what colors they were. Harness your inner Monet and pick was feels right for you! When the water color was dry, the gold matte frames were glued to the background. These were set aside to make the background.
Express-It card stock was cut down to 5 inches by 7 inches. With a pencil and ruler, a horizon line was drawn. This will be where the floor and wall meet. The floor was sketched in with perspective to provide a foreground. A grid pattern was sketched. A piece of masking paper was placed along the horizon line. With a light gray ink, the panel was blended lightly from the base to white at the top of the panel (Soft Stone, Gina K Designs). With the straight edge of the masking paper still in place, a black line was drawn with a fine liner pen. The masking paper was removed and it was time to color the flooring. With Olo Markers and a random color placement the little squares were filled in (WG3/ WG1/ WG0). With a colored pencil, the lines were darkened to give the illusion of grout.
The colored panel was cut down to fit the 3 frames lined up to the edge. The frames were then glued to the “wall” on the colored panel. The School Skippers were positioned with the Sick Boy in the lower right corner and the Girlfriend and Best Friend placed further up the panel to give the illusion of depth in the center to the left side. Foam tape was applied to the heads of the images as needed so they remained flat even when over laying the watercolored frames.
Finally, the sentiment was stamped, trimmed down, and matted with a piece of black cardstock. To assemble the card, an A7 card base was prepped. A piece of black cardstock was cut to 5 inches by 7 inches and glued to the card base. The trimmed panel was centered and glued to the card. The School Skippers know how to recharge creatively and you can too!
Card Size: A7 (5 inches by 7 inches)
Project Four: Pool Time
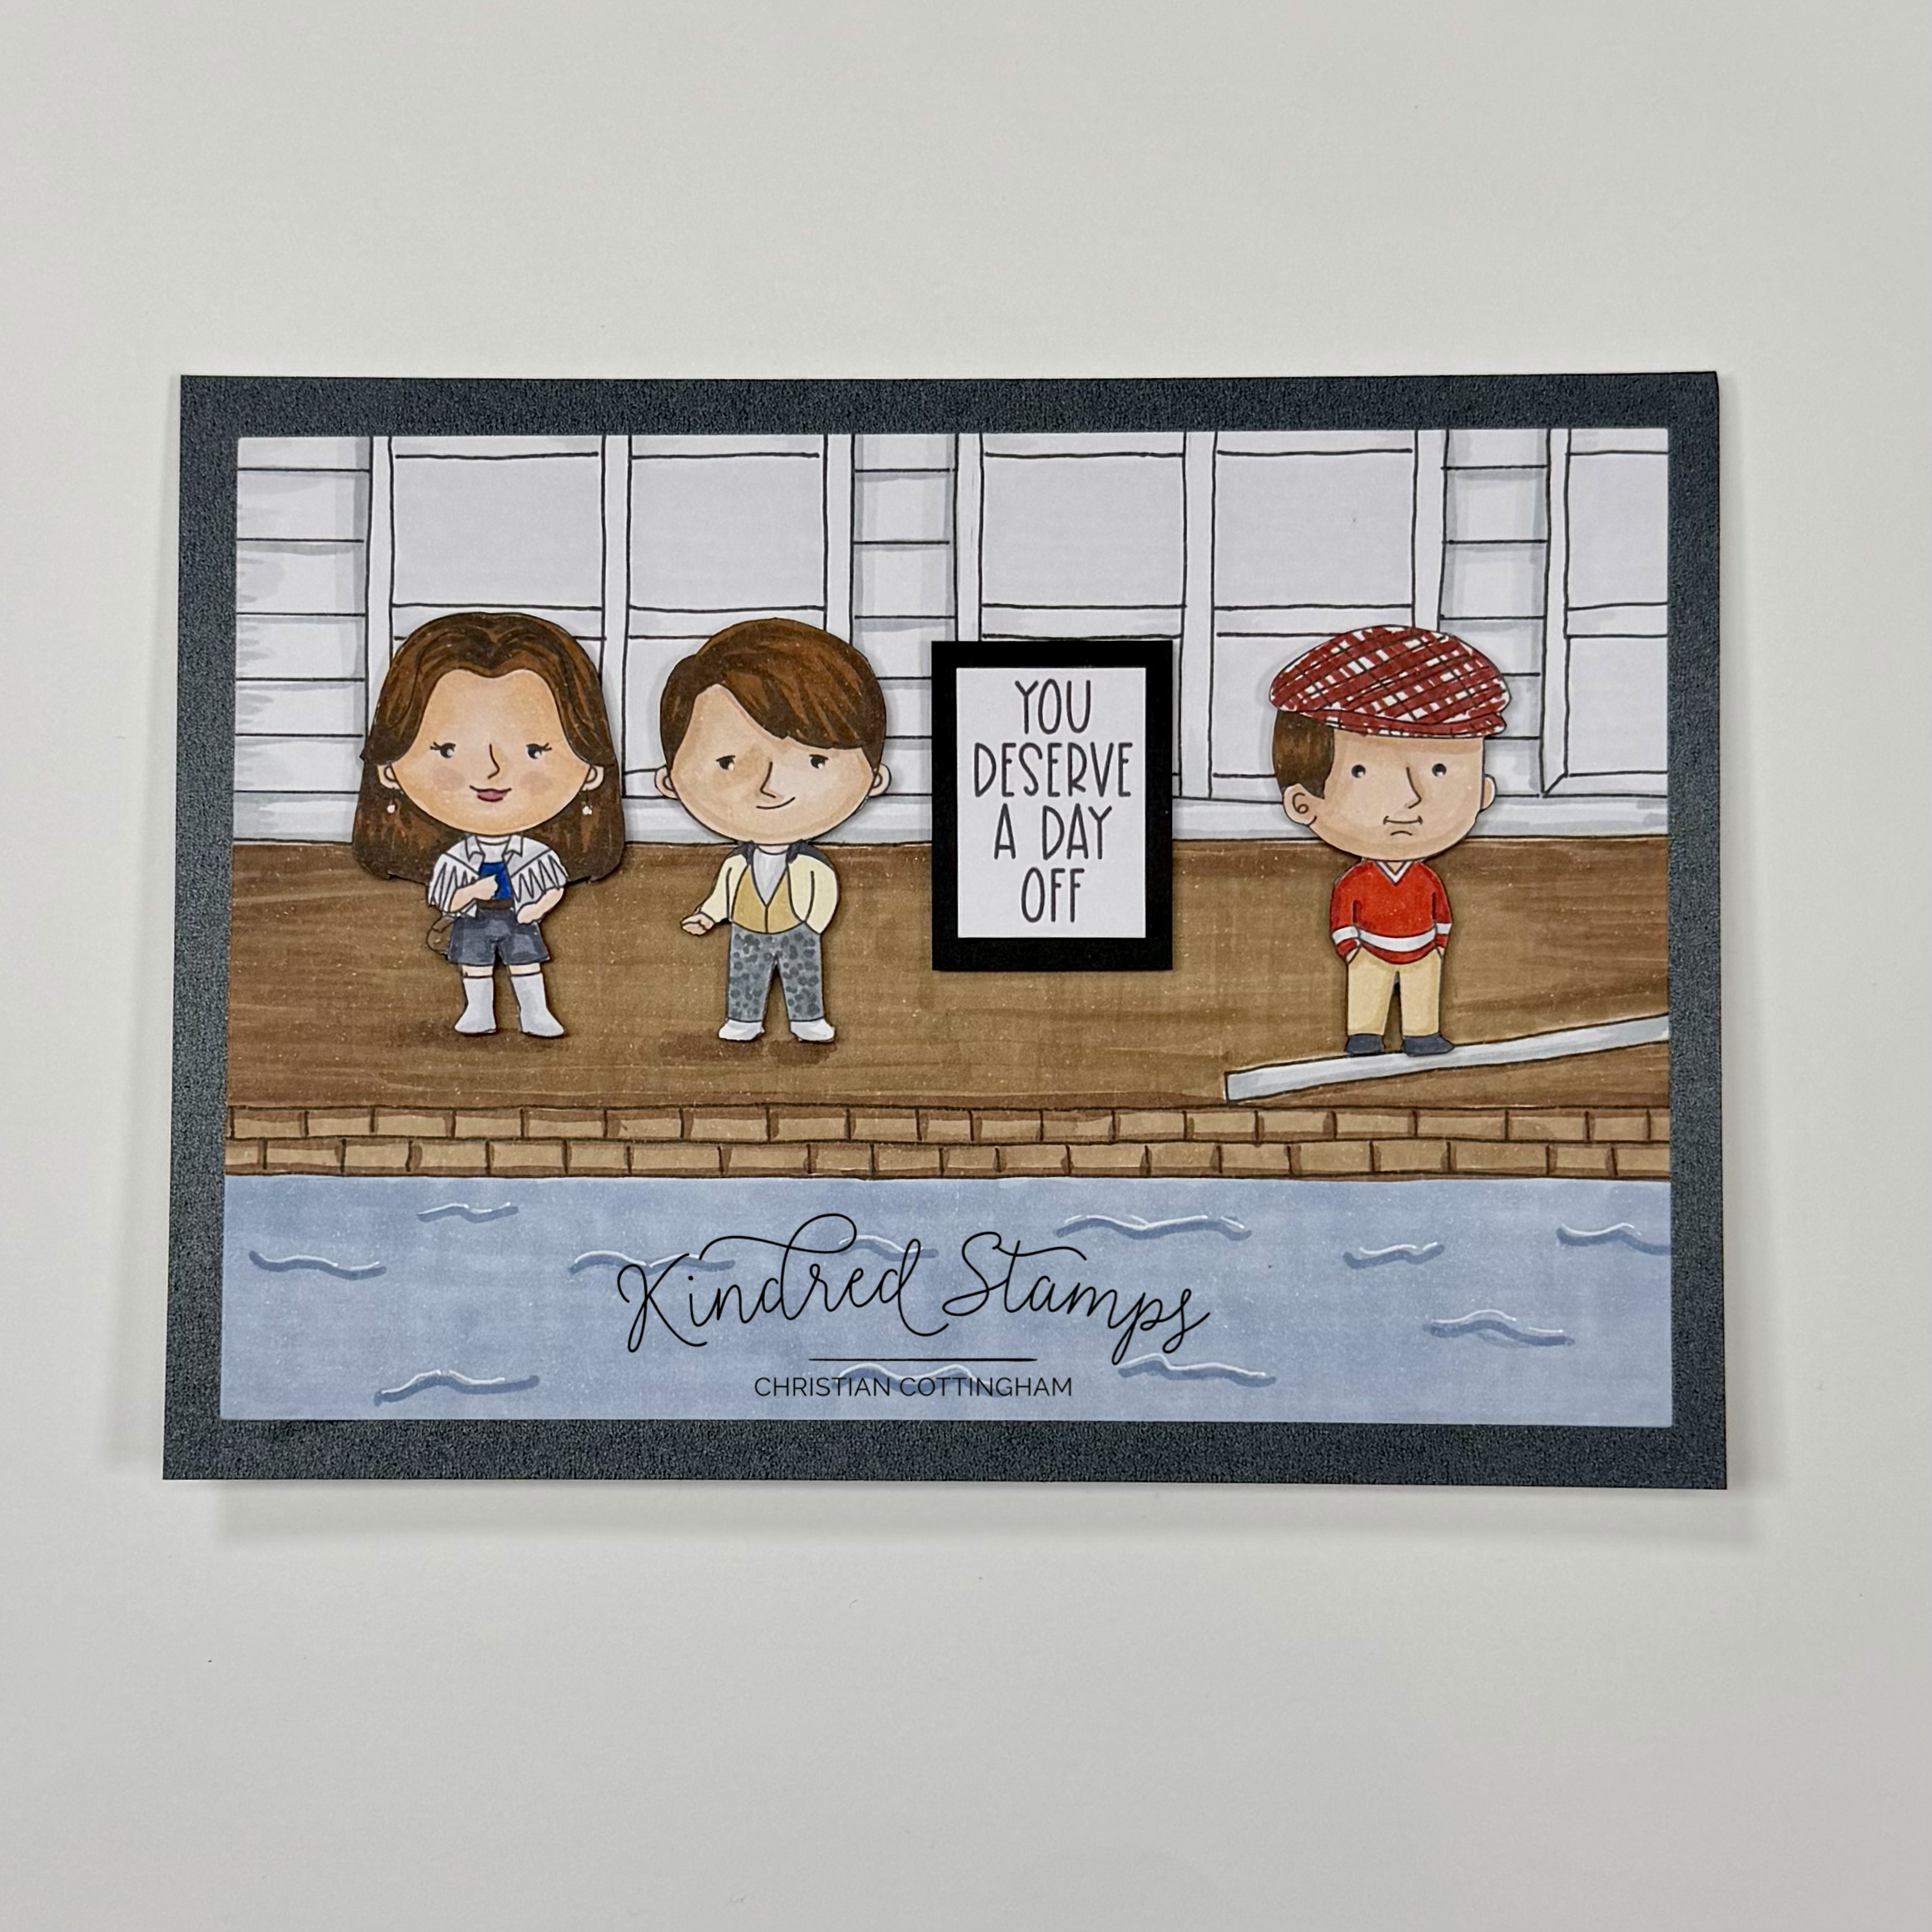
School Skippers, Kindred Stamps
Why not spend some time relaxing if you are playing hooky?? The School Skippers are living it up enjoying some sun by the pool! There really is not to walk through with this card. Using some simple sketched lines and some colored images, the card came together in the amount of time it would take for a umbrella drink to be sipped on while sitting by the pool.
The School Skippers were stamped in alcohol safe ink on Express-It cardstock. They were colored with Olo markers and fussy cut out.
The background was sketched with a ruler and pencil and then outlined with an alcohol safe fine liner pen. The panel was trimmed down by 0.25 inches all around to provide a frame. The pool water was colored with Altenew Artist Markers (C022/ CG01- remember their numbering system doesn’t correlate like other brands). The brick work in the pool and then ground was Altenew Artist Markers (Y821/ Y932). The siding and door trim were colored with Olo Markers (NG3/ NG1) and the window shades were colored (NG0). The diving board was colored with Olo Markers (NG3/ NG1).
The sentiment was stamped and trimmed. A black mat was cut to fit the sentiment. The images and sentiment were adhered to the colored panel. An A7 card base was prepped and a piece of black cardstock panel (5 inches by 7 inches) was adhered. The colored panel was centered and adhered. It’s winter where I live and I totally could use some time sitting beside a pool with an umbrella drink in my hand soaking up the sun (someplace warm… not the frozen tundra I live in).
Card Size: A7 (5 inches by 7 inches)
Project Five: Float Singer
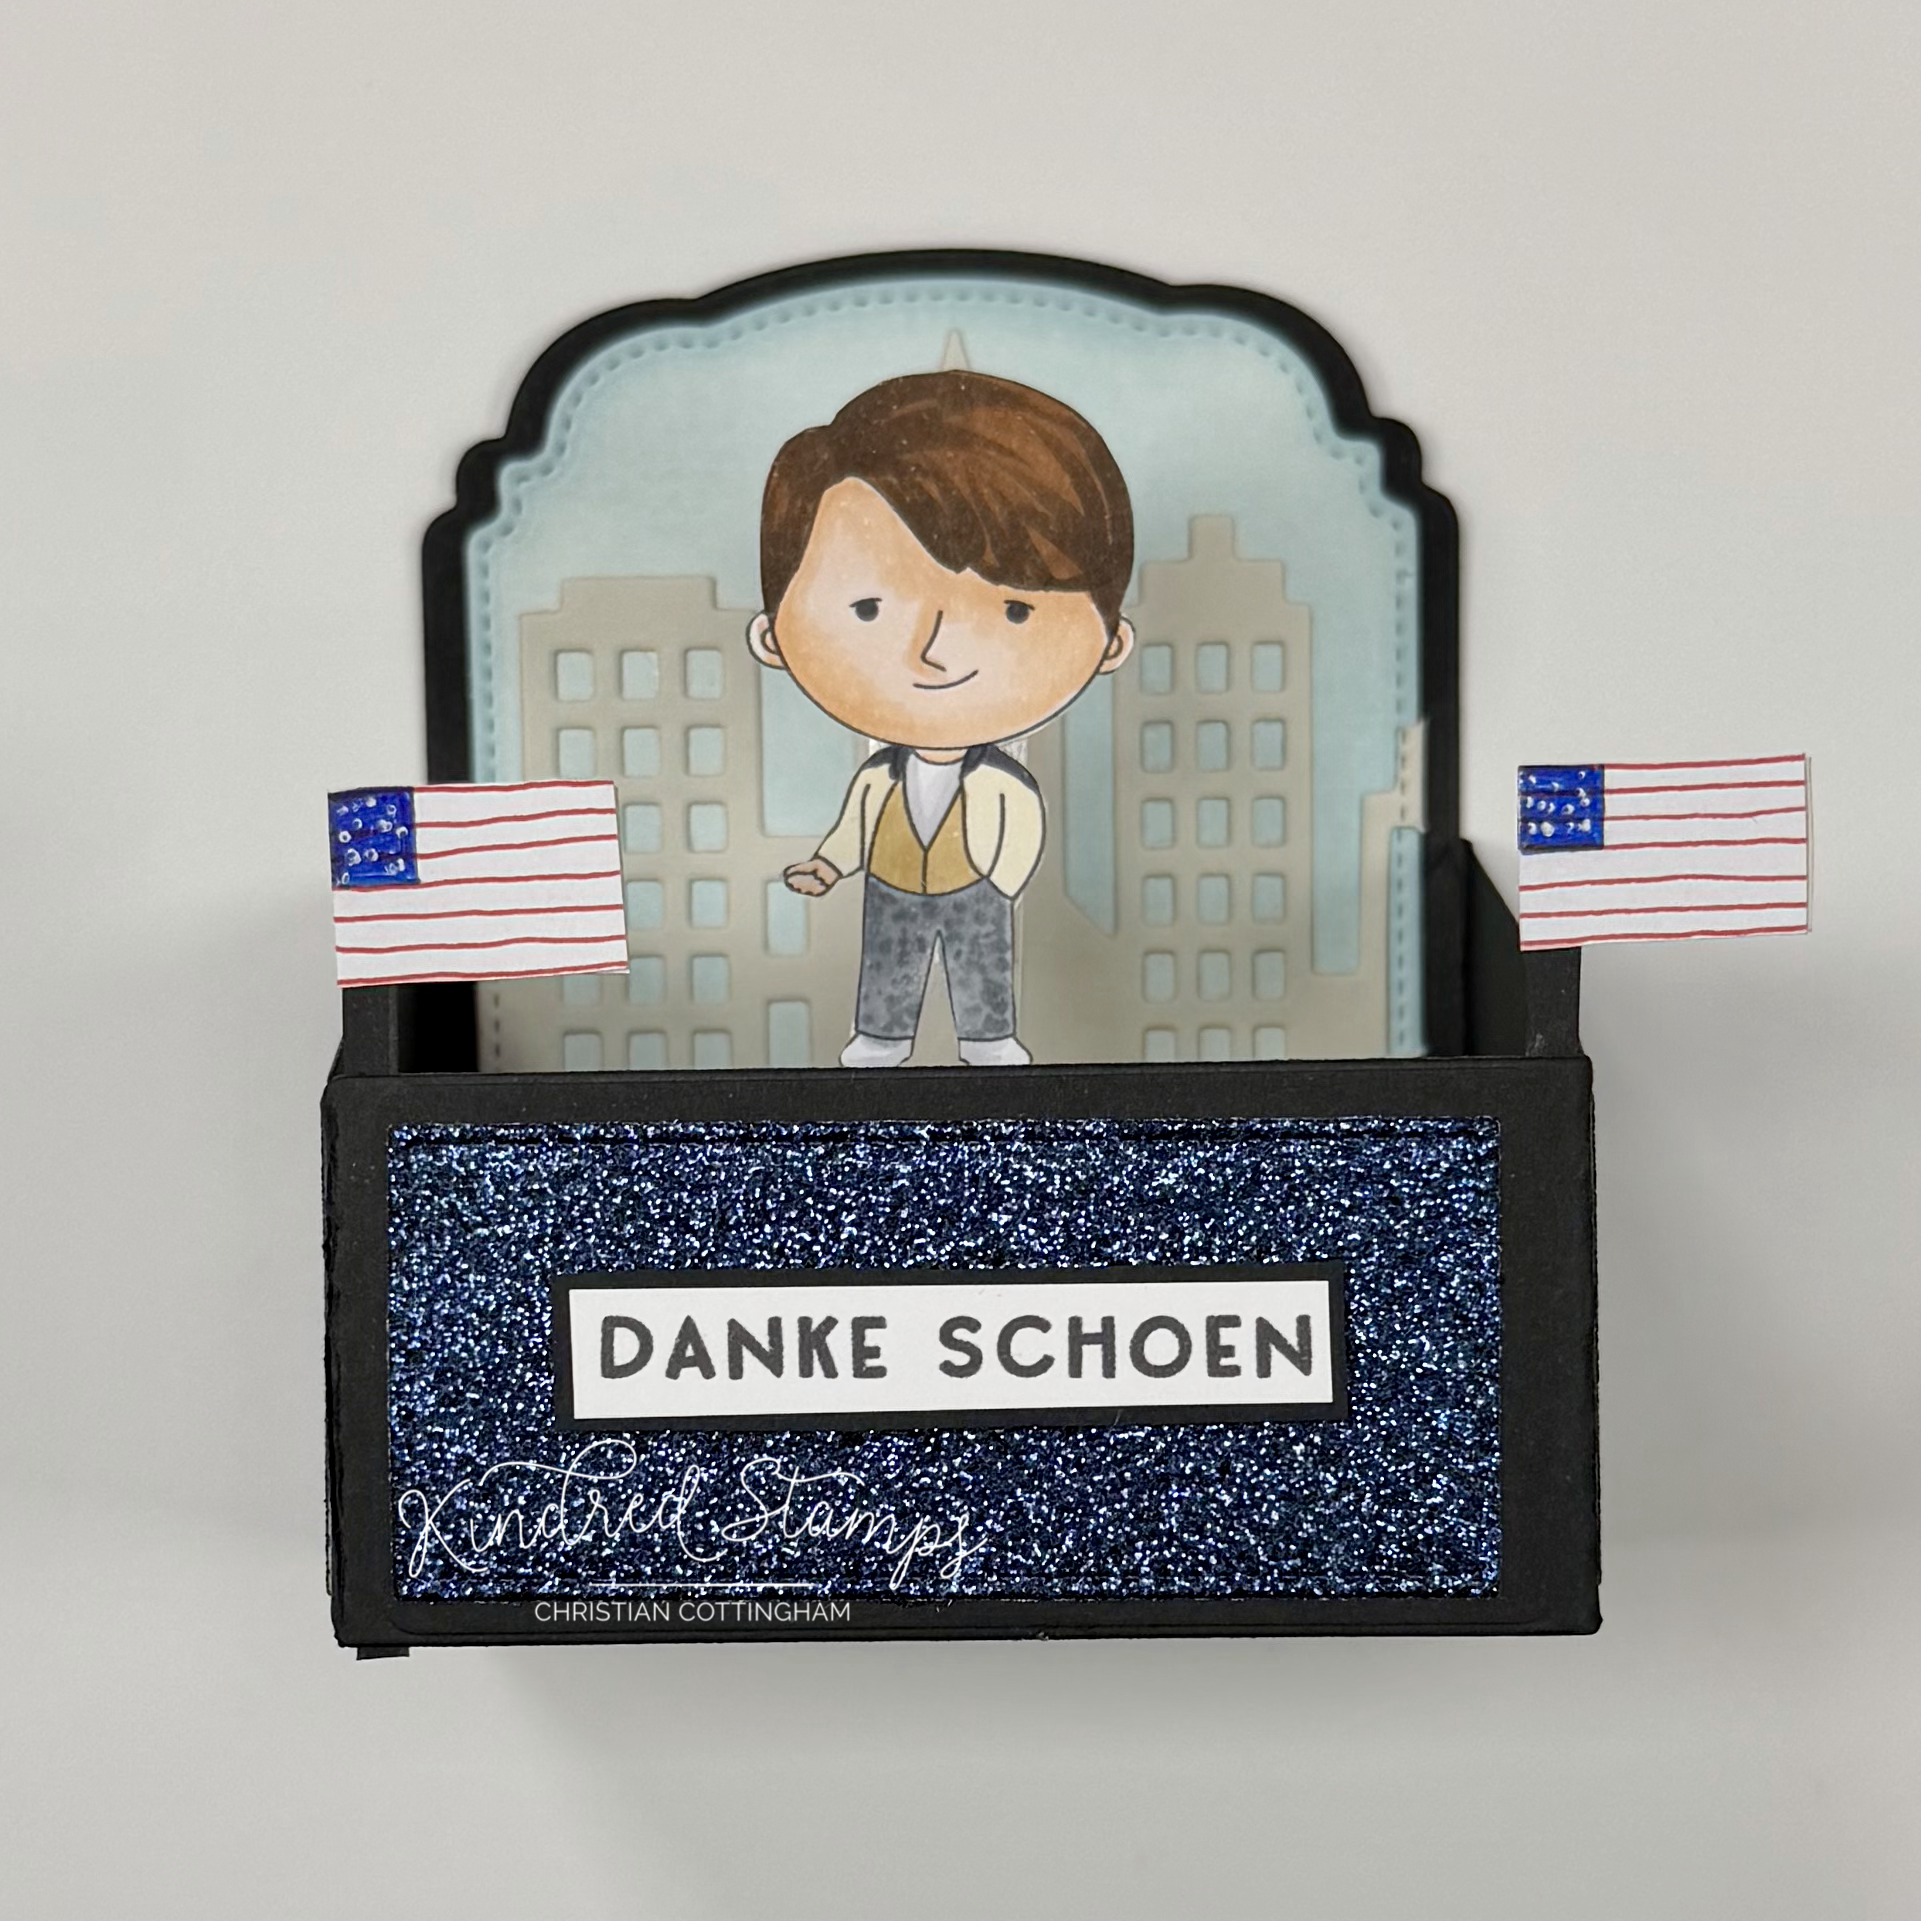
School Skippers, Kindred Stamps
Perfect way to spend the remainder of your day of playing hooky then being on a float! The School Skippers know how to make an day worthy! The Box Card die is the perfect float for the Sick Boy to sing his germs away.
The Sick Boy was stamped with alcohol safe ink, colored with Olo Markers, and fussy cut out on the line. (See Color Guide). The image was set aside to prepare the float.
The Box Card die components were cut from a heavy weight black cardstock (Black Gina K Designs). The side panels and front panel were cut from blue glitter cardstock (PinkFresh Studio). The a piece of white card stock was utilized to cut two inner layer pieces. With a piece of gray cardstock (Soft Stone Gina K Designs) was cut with the same inner layer piece. The gray cardstock panel was then cut with the City Scape die.
One piece of the white cardstock was ink blended with light blue ink (Arctic by Altenew). The gray City Scape scene was glued to the inked panel. It was now time to assemble the box card. The black cardstock was assembled and then the side panels, front panel were applied. The inked background was adhered to the front of the card base, where the plan white panel was glued to the back of the base to allow a place to write a personal message.
The Sick Boy was attached to a small piece of thick acetate to add support to the Express-It paper. He was attached to the middle bridge of the box card. Every float needs some flags, and this float was no exception. On a piece of white cardstock, a drew two flags drawn with red gel pen, blue gel pen, and then some white dots to act as stars with a white gel pen. Thin black strips were cut from the leftover pieces from die cutting. A strip was applied to the back of each flag and the flags were secured in the front corners of the float.
The sentiment was stamped, trimmed down, and matted with a piece of the same black cardstock for continuity. This was attached to the front glitter panel with some thin foam tape. The float was done! School Skippers sure know how to take a day off! If you purchase this set, it is a law… you too have to play hooky… I give you permission!
The entire Kindred Stamps release will be available this Friday at 8am PST/11am EST. Be sure to subscribe to the Kindred Stamps blog to see a daily line up of sneak peeks from our amazing Design Team! Come join the Fan Club and release event to be part of the release fun, and you may just win some Kindred Stamps credit!!
Color Guide:
All images were stamped on Express-It cardstock
Sick Boy:
Flesh> OR7.2/ OR7.3/ OR2.0
Teeshirt> CG3/ CG1
Jacket> YO0.1; CG7
Pants> NG7/ NG5
Vest> O4.3
Shoes> CG3
Hair> OR3.8/3.7
Girlfriend:
Flesh> OR7.2/ OR7.3/ OR2.0
Jacket> CG3/ CG1
Vest> B0.7/ B0.6
Shorts> CG7/ CG5
Boots> CG3/ CG1
Hair> OR3.8/ OR3.7
Belt> O4.8
Bag> O7.7/ O7.5
Best Friend:
Flesh> OR7.2/ OR7.3/ OR2.0
Shirt> CG3/ CG1; R0.6/ R0.5
Pants> O4.3/ O4.1
Hat> R1.7
Shoes> CG7
Hair> OR3.8/OR3.7
Collector To Creator: Part One
Go from Collector to Crafter in no time flat using Pixie Dust!
Are you a collector?? Purchasing all the stamps?? Organizing them and storing them away as your little preciouses? Let’s take the leap and go from Collector to Crafter. In this mini-series we are going to take simple steps to break out of the collector only mentality to being a creator!
In this video, we will be pulling out a set from deep in my stash and make 2 projects with it. Over the course of the video we will start breaking down the barriers to help you become a creator.
YouTube Video: https://youtu.be/IVjd130t3Dk

This set utilizes the following products from Kindred Stamps. (Affiliate Links)
Pixie Dust Stamp Set: https://www.kindredstamps.com/products/pixie-dust?_pos=1&_sid=1c1679c6b&_ss=r&aff=97
Card Basic Dies: https://www.kindredstamps.com/products/card-builder-basics-die?_pos=1&_sid=0be568523&_ss=r&aff=97
Emerald City Embossing Powder: https://www.kindredstamps.com/products/emerald-city-embossing-powder?_pos=1&_sid=6c2885516&_ss=r&aff=97
Kindred Stamps Website: https://www.kindredstamps.com?aff=97

Pocket Oz: Kindred Stamps January Release
It’s time to travel to a far off land with the Kindred Stamps 2026 release of Pocket Oz! Perfect for gift giving and home decor.
Pocket Oz, Kindred Stamps
Come away with me on a tiny adventure to land that that’s full of life and color! The Pocket Oz stamp set from Kindred Stamps January release takes you on an adventure through a story of finding strength from within to stand for those without a voice and coming of age. It felt like home making these projects.
This blog utilizes affiliate links. If you choose to click on the links provided to purchase, you are supporting me as I receive compensation for your purchase. If purchasing is not in your books, no worries, I hope you find inspiration for projects you design. By clicking on the links, you are letting Kindred Stamps know that you like my content and to keep bringing me back. Thanks for your time! Now let’s take a trip to a far off land…
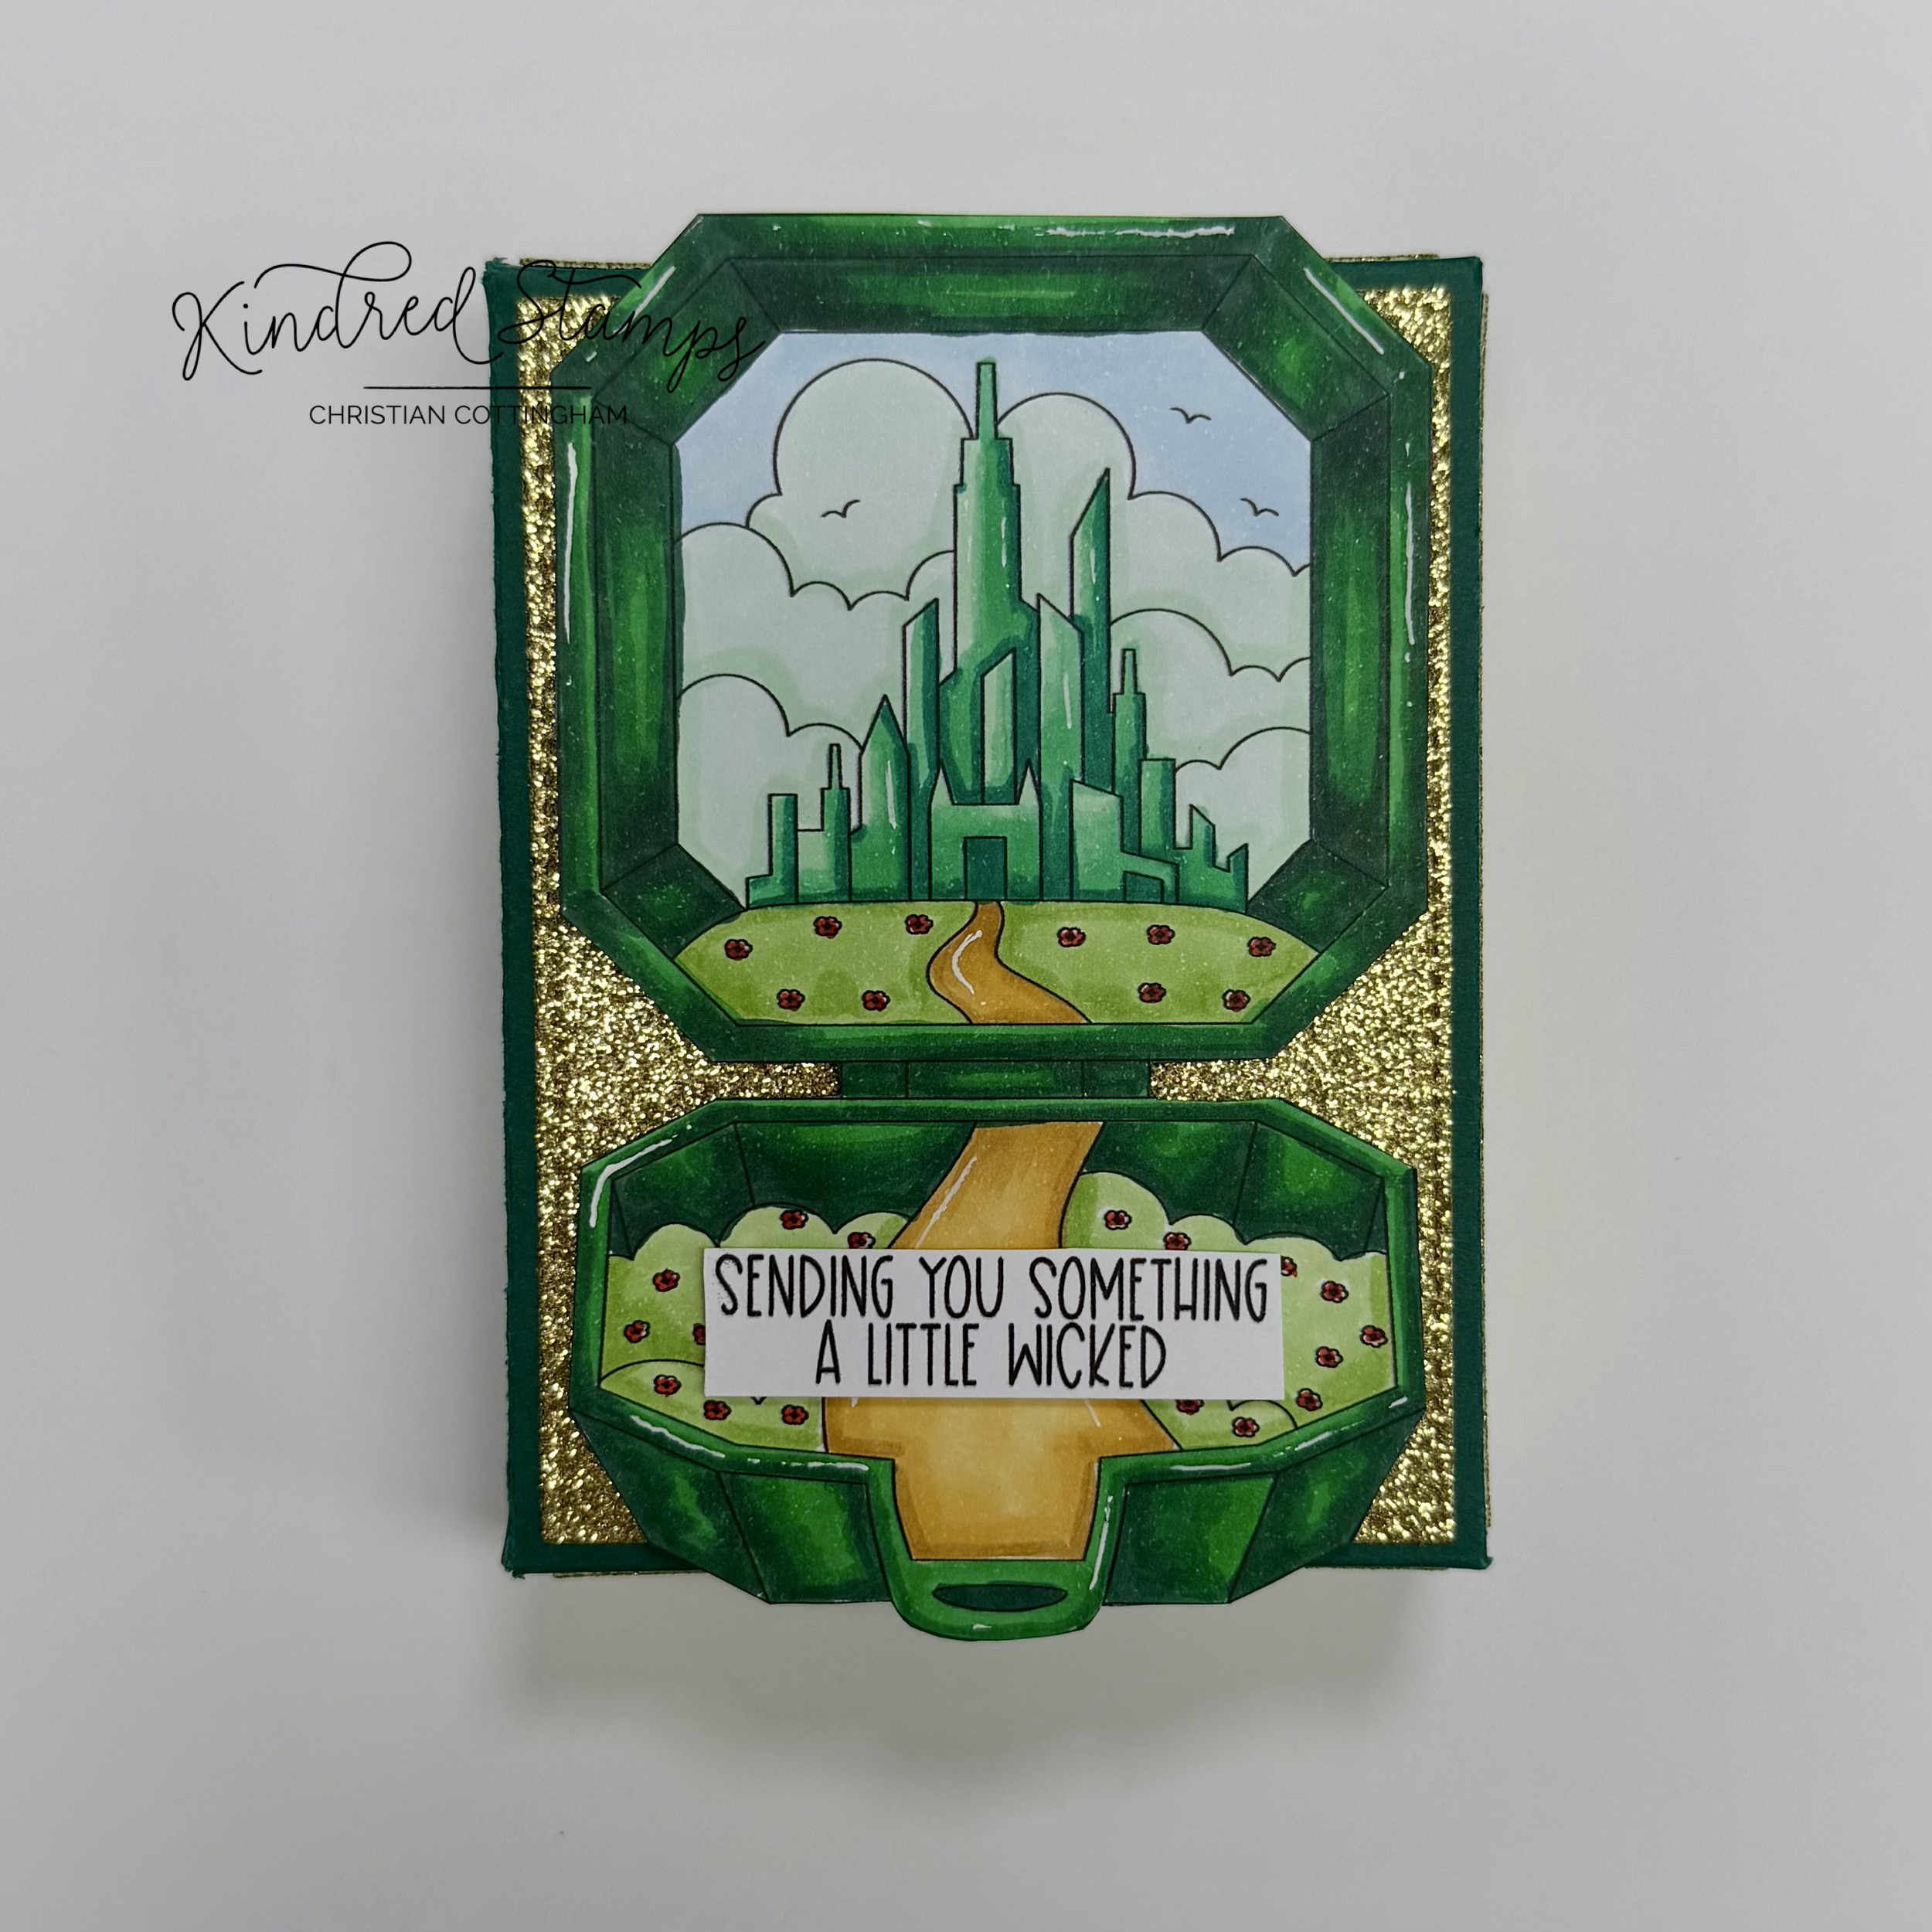
Project One: Dimensional Pocket Oz Overload
Pocket Oz, Kindred Stamps
This card started as a home decor piece. It was going to go into a shadow box frame. I still think this would be amazing as such, but then I thought how can I make this into a card that can be sent to someone who can frame it themselves. This allows the recipient to have the frame that matches their own decor. Let’s breakdown how I accomplished the dimension with still be able to send it in the mail.
For ease of framing for the recipient, an A7 card base was prepped. An A7 panel was cut from a deep green cardstock and adhered flat to the card base. This was set aside. The black frame was prepped. Using a set of A7 dies, a frame was made by cutting 2 dies at the same time. Two pieces of black cardstock were cut at 1.25 inches by 4 inches. These panels were scored at 0.25 inch increments. The 1.25 inch side of the paper was aligned into the corner of the scoring tool with the lines going down the 4 inch length. The panels were accordion folded and adhesive was applied to on end of the mountain folds and these were adhered to the back side of the frame on the long sides. These will be the springs that can be smooshed down for mailing. A piece of gold cardstock was cut out of the largest frame die. The frame with springs attached was then adhered to the gold die cut. The framed panel was centered onto the card base. With the paper prep done it was time to get stamping!
With alcohol safe ink, the entire pocket was stamped once. Then the top scene only was stamped 2 more times. Finally, the four figurines and the sentiment were stamped. The images were colored with Olo Markers (See Color Guide). Because the image will be cut out in layers, don’t waste your markers. For example, when I colored the entire pocket, I did not color the inside scene on the top scene. This section will be cut out at the grass line. For the second layer, I only colored the the castle and did a swipe of green on the grass just to camouflage any alignment mistakes. The scene was cut out on the line of the castle. Finally, the last scene was colored with only the sky and a swipe of green around the castle and the frame.
Thin foam tape was placed behind the castle panel. This panel was aligned on top of the base sky panel. Thin foam tape was then placed on the back of the grass on the entire pocket scene and aligned with the castle scene. Because I used the thin foam tape, the total thickness of this section is standard foam tape depth. The standard foam tape was placed only on the base section of the pocket. Adhesive was placed on the top of the pocket scene. The dimensional pocket was centered in the frame.
Finally, a piece of acetate was trimmed to fit between the frame side. This will act as a support for the figurines to prevent sagging as the piece ages. The figurines were lined up and adhered to the frame base and the acetate bridge.
To complete the card, the sentiment was matted with a piece of green card stock and attached to the side of the frame. The dimension is multilayered and can easily be inserted into a 5 inch by 7 inch shadow box or larger depending on the recipient’s liking. Pocket Oz is the perfect home decor that can be mailed!
Card Size: A7 (5 inches by 7 inches)
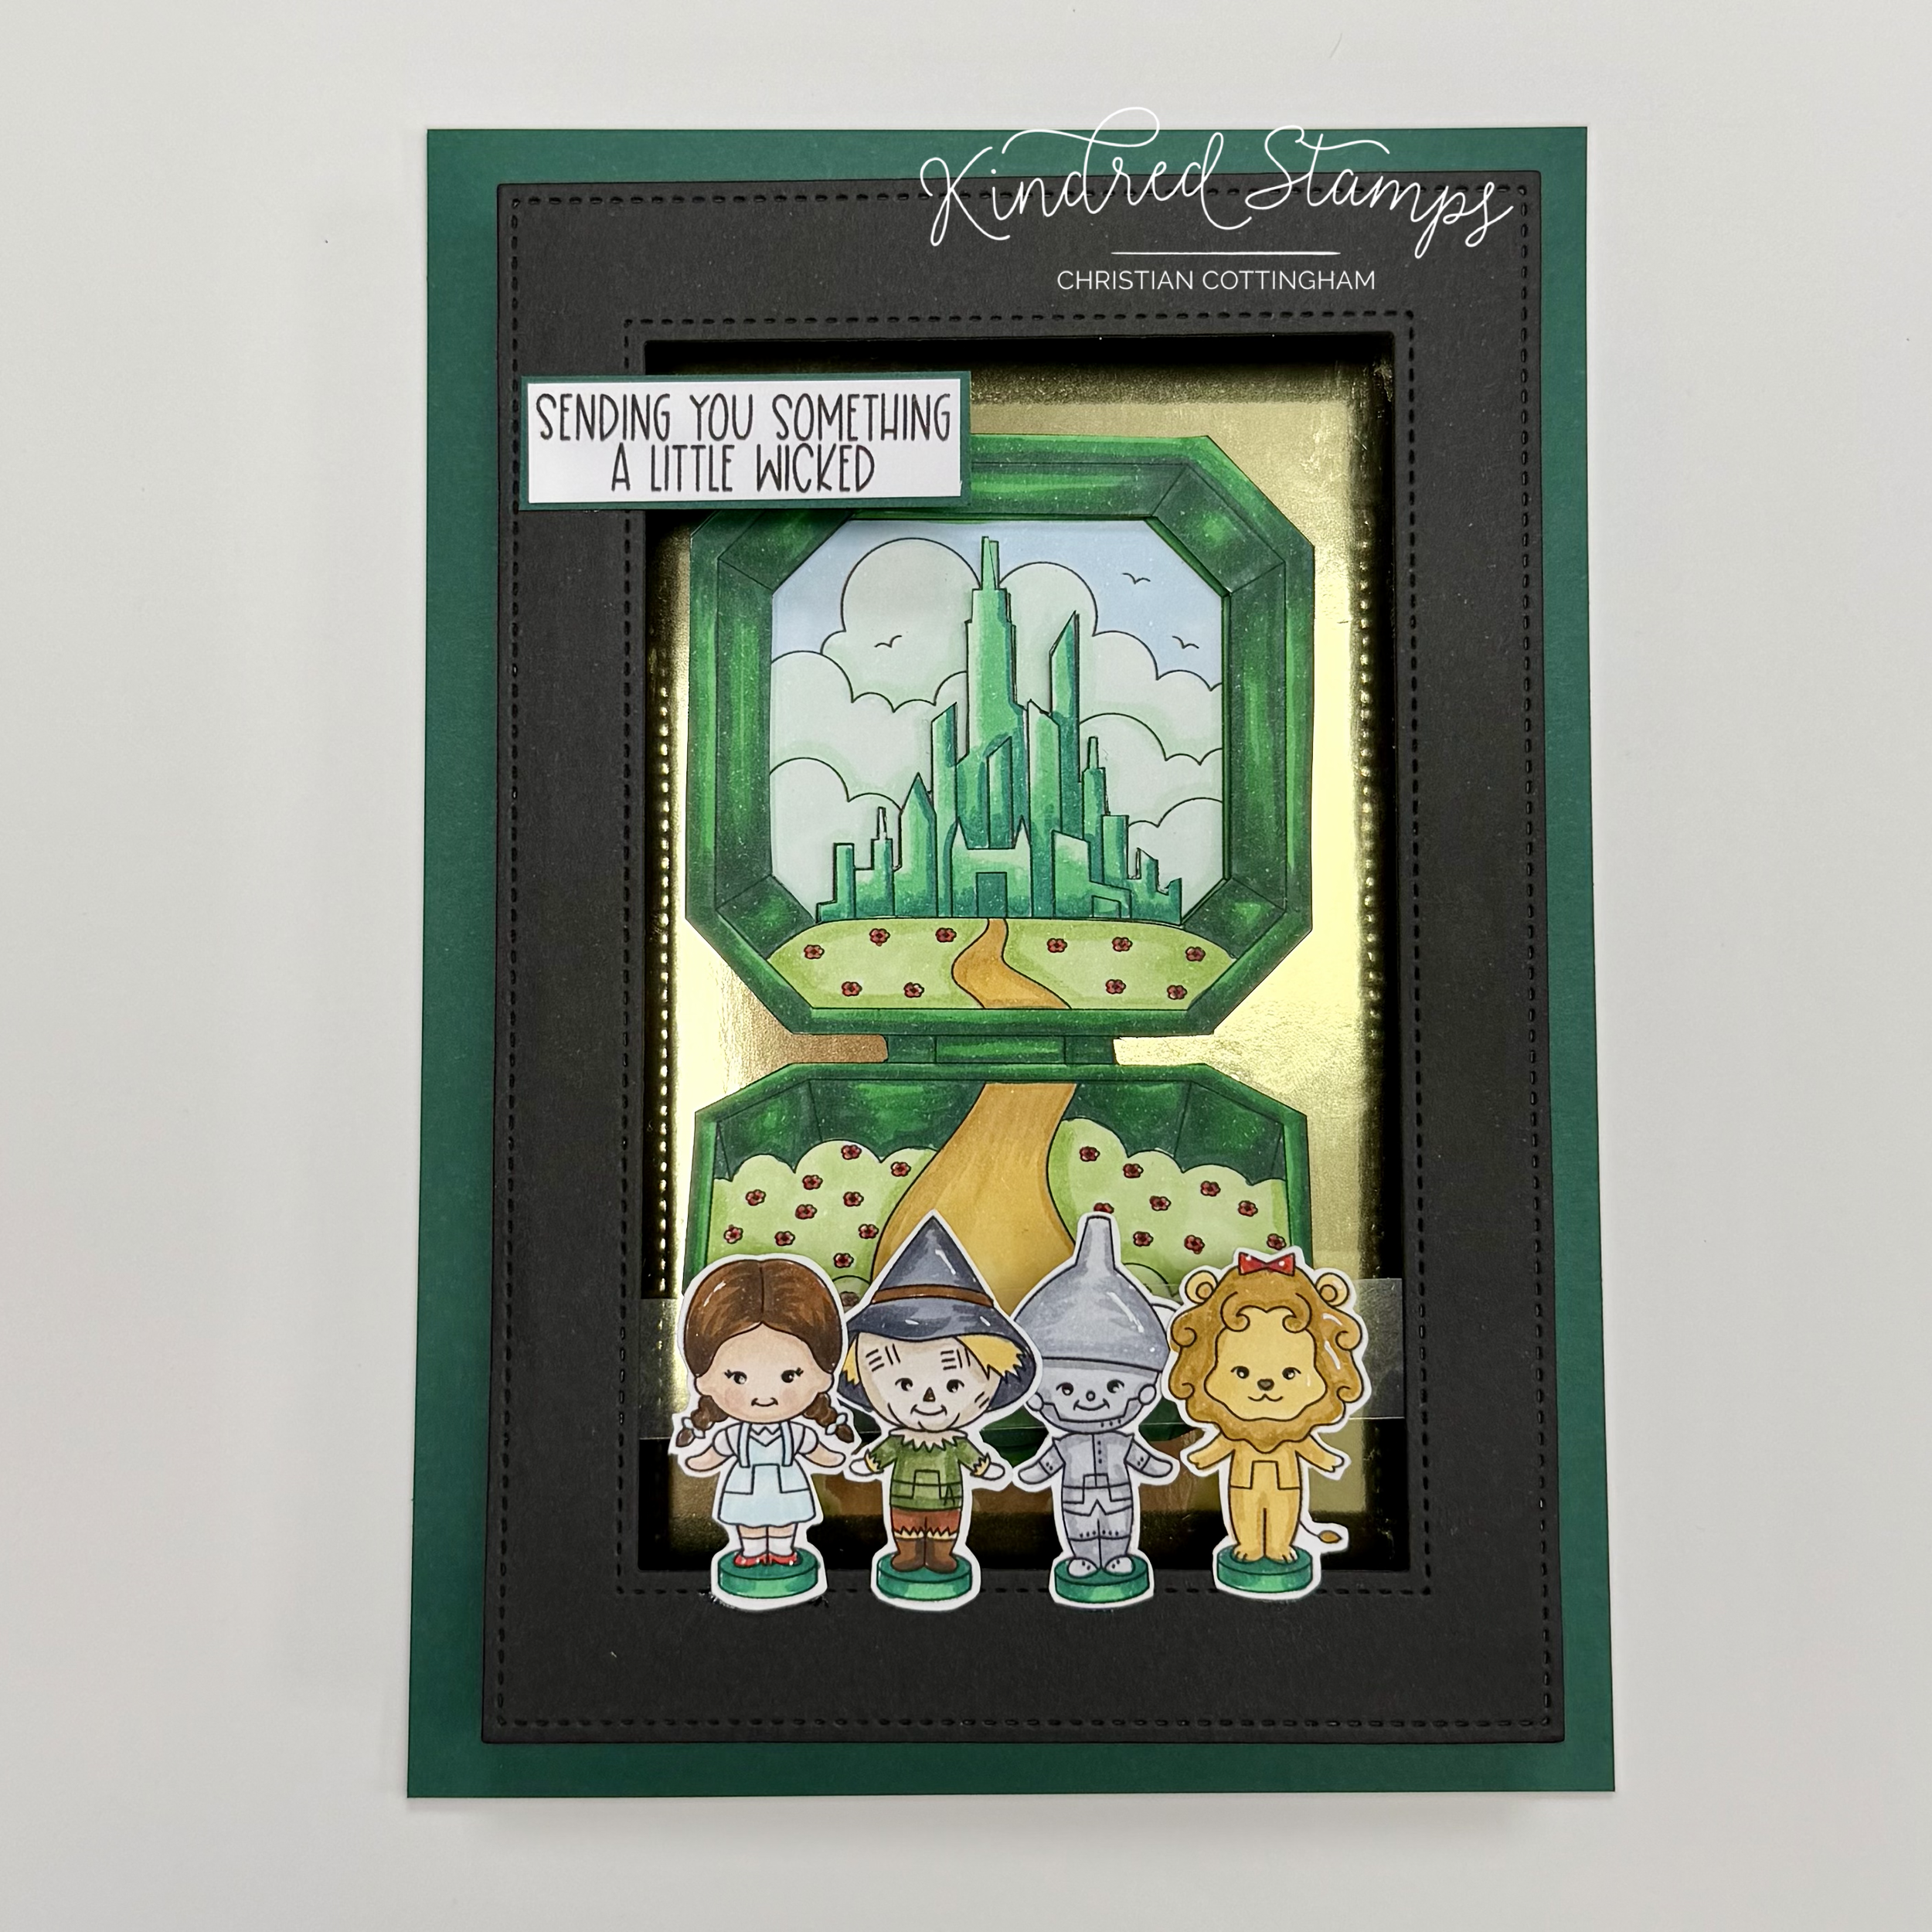
Project Two: Pocket Oz Emblem
Pocket Oz, Kindred Stamps
When I saw the top of the Pocket Oz scene, I instantly saw an emerald that needed to be center stage on a card. It only needed it’s supporting cast to accent the card. Let’s breakdown this simple but sticking card.
The top scene and mini-figures were stamped in alcohol marker safe ink. The top scene and figurines were colored with Olo Markers and fussy cut out on the line. A black fine liner brush pen was used to edge the images to hide my cutting mistakes. The sentiment was stamped and cut into a sentiment strip. The same gold cardstock was utilized as a mat for the sentiment. These were set aside to make way for the card panels.
The background of the card panel was cut from a deep green cardstock to a 5 inch by 7 inch panel. Using a A7 card front die set, a piece of white cardstock was cut to provide a nice frame around the panel. A piece of 1 inch masking paper was centered on the white cardstock. With a tiny dot background stamp and Gina K Design Christmas Pine ink, a pattern was stamped onto the white panel. The masking paper was removed to reveal a white split in the pattern. Two pieces of gold cardstock were cut to 1/8 inch strips and glued to the white panel.
With all the pieces ready, it was time to assemble. An A7 card base was prepped and the green card panel was adhered to the base. The white panel was popped up with thin foam tape and centered on the card. The figurines and top pocket scene had thin foam tape applied and then were adhered to the card front. This emerald looking scene is star of this card and forces your eye to analyze the adorable scene. I just can’t even!
Card Size: A7 (5 inches by 7 inches)
Project Three: Gift Tag Gift Box
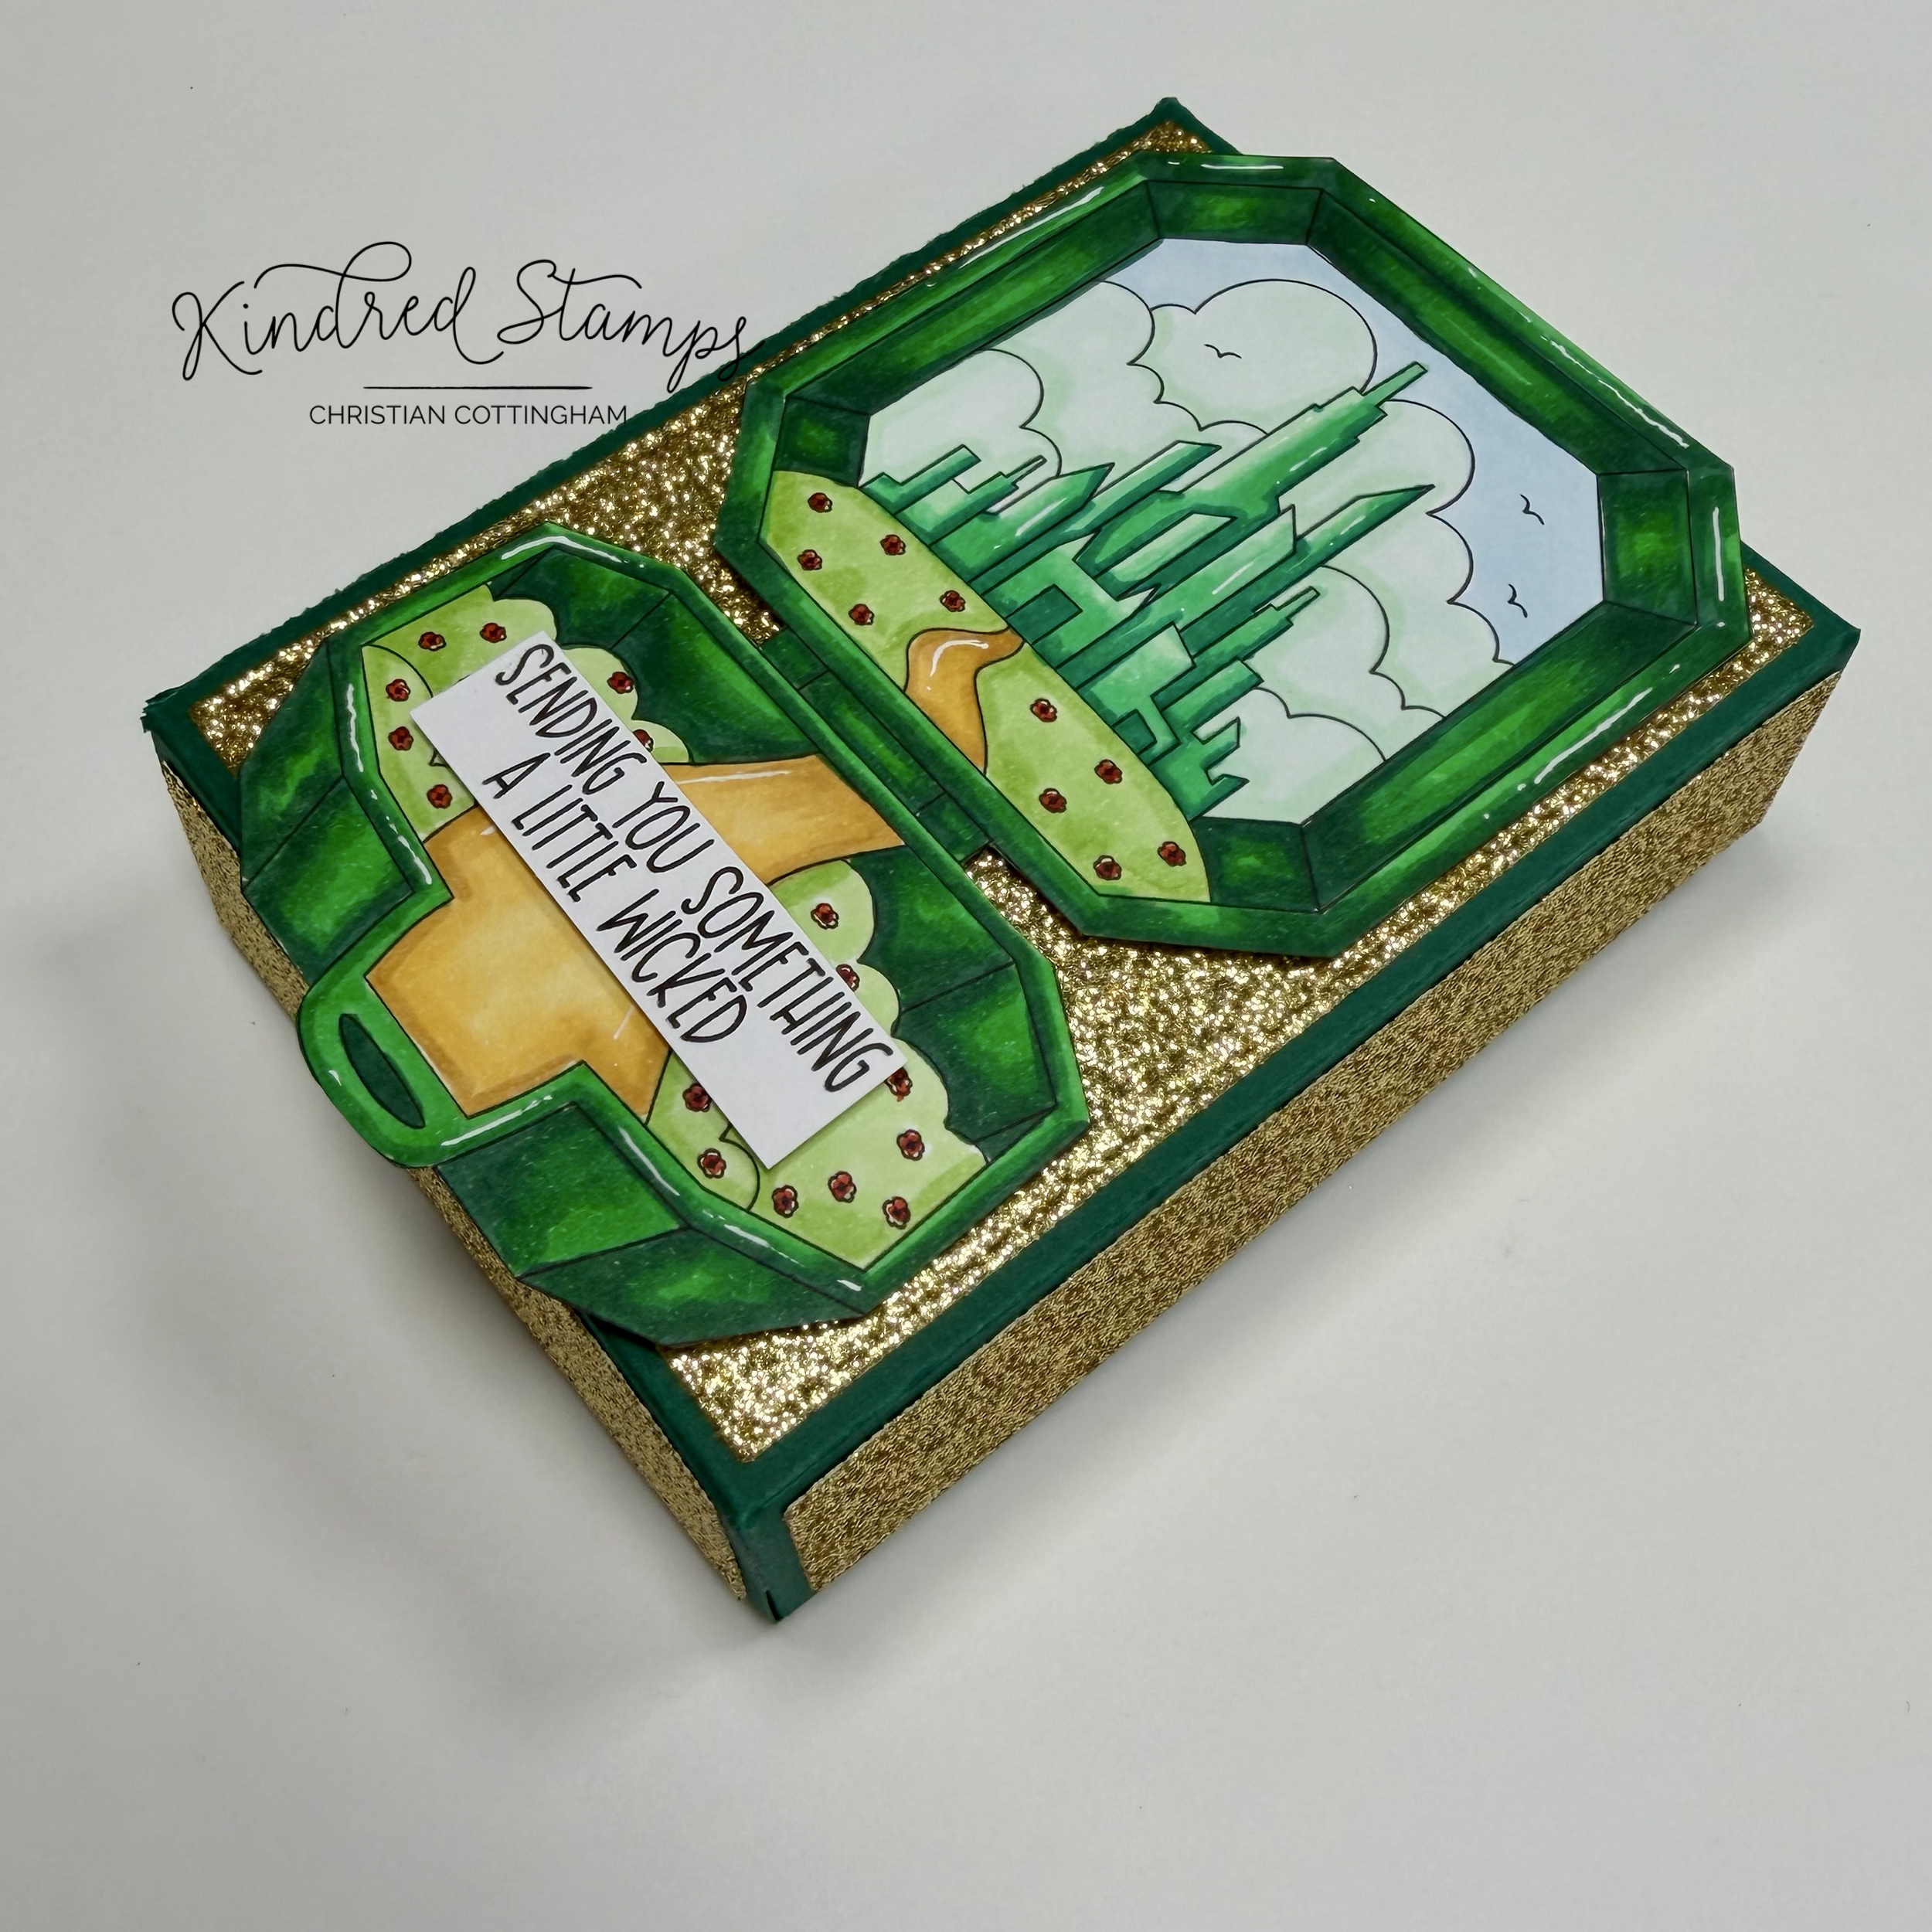
Pocket Oz, Kindred Stamps
The Pocket Oz set works perfect for a gift set! I am always trying to find ways to give a homemade gift that have a pop of whimsy and don’t take me forever to make. Pairing Pocket Oz with the Treat Box die set made this gift set come together in a quick.
The Pocket Oz images were stamped with alcohol safe ink on white cardstock. Using Olo Markers, the individual pieces and the Pocket scene were colored (See Color Guide). The stamped images were fussy cut out and the edges inked with a fine liner brush to hide any mistakes in my not so stellar cutting skills. The sentiment was stamped 6 times and then cut into sentiment strips. These pieces were set aside.
Pocket Oz, Kindred Stamps
To make the box that will hold the gift tags, the main die from Treat Box die set was cut from green card stock and assembled. The side panels and the front rectangle were die cut from gold glitter cardstock. These pieces were adhered to the box itself. The pocket scene was adhered with foam tape and liquid glue to ensure contact with the rough texture of the glitter card stock. The box was set aside to dry.
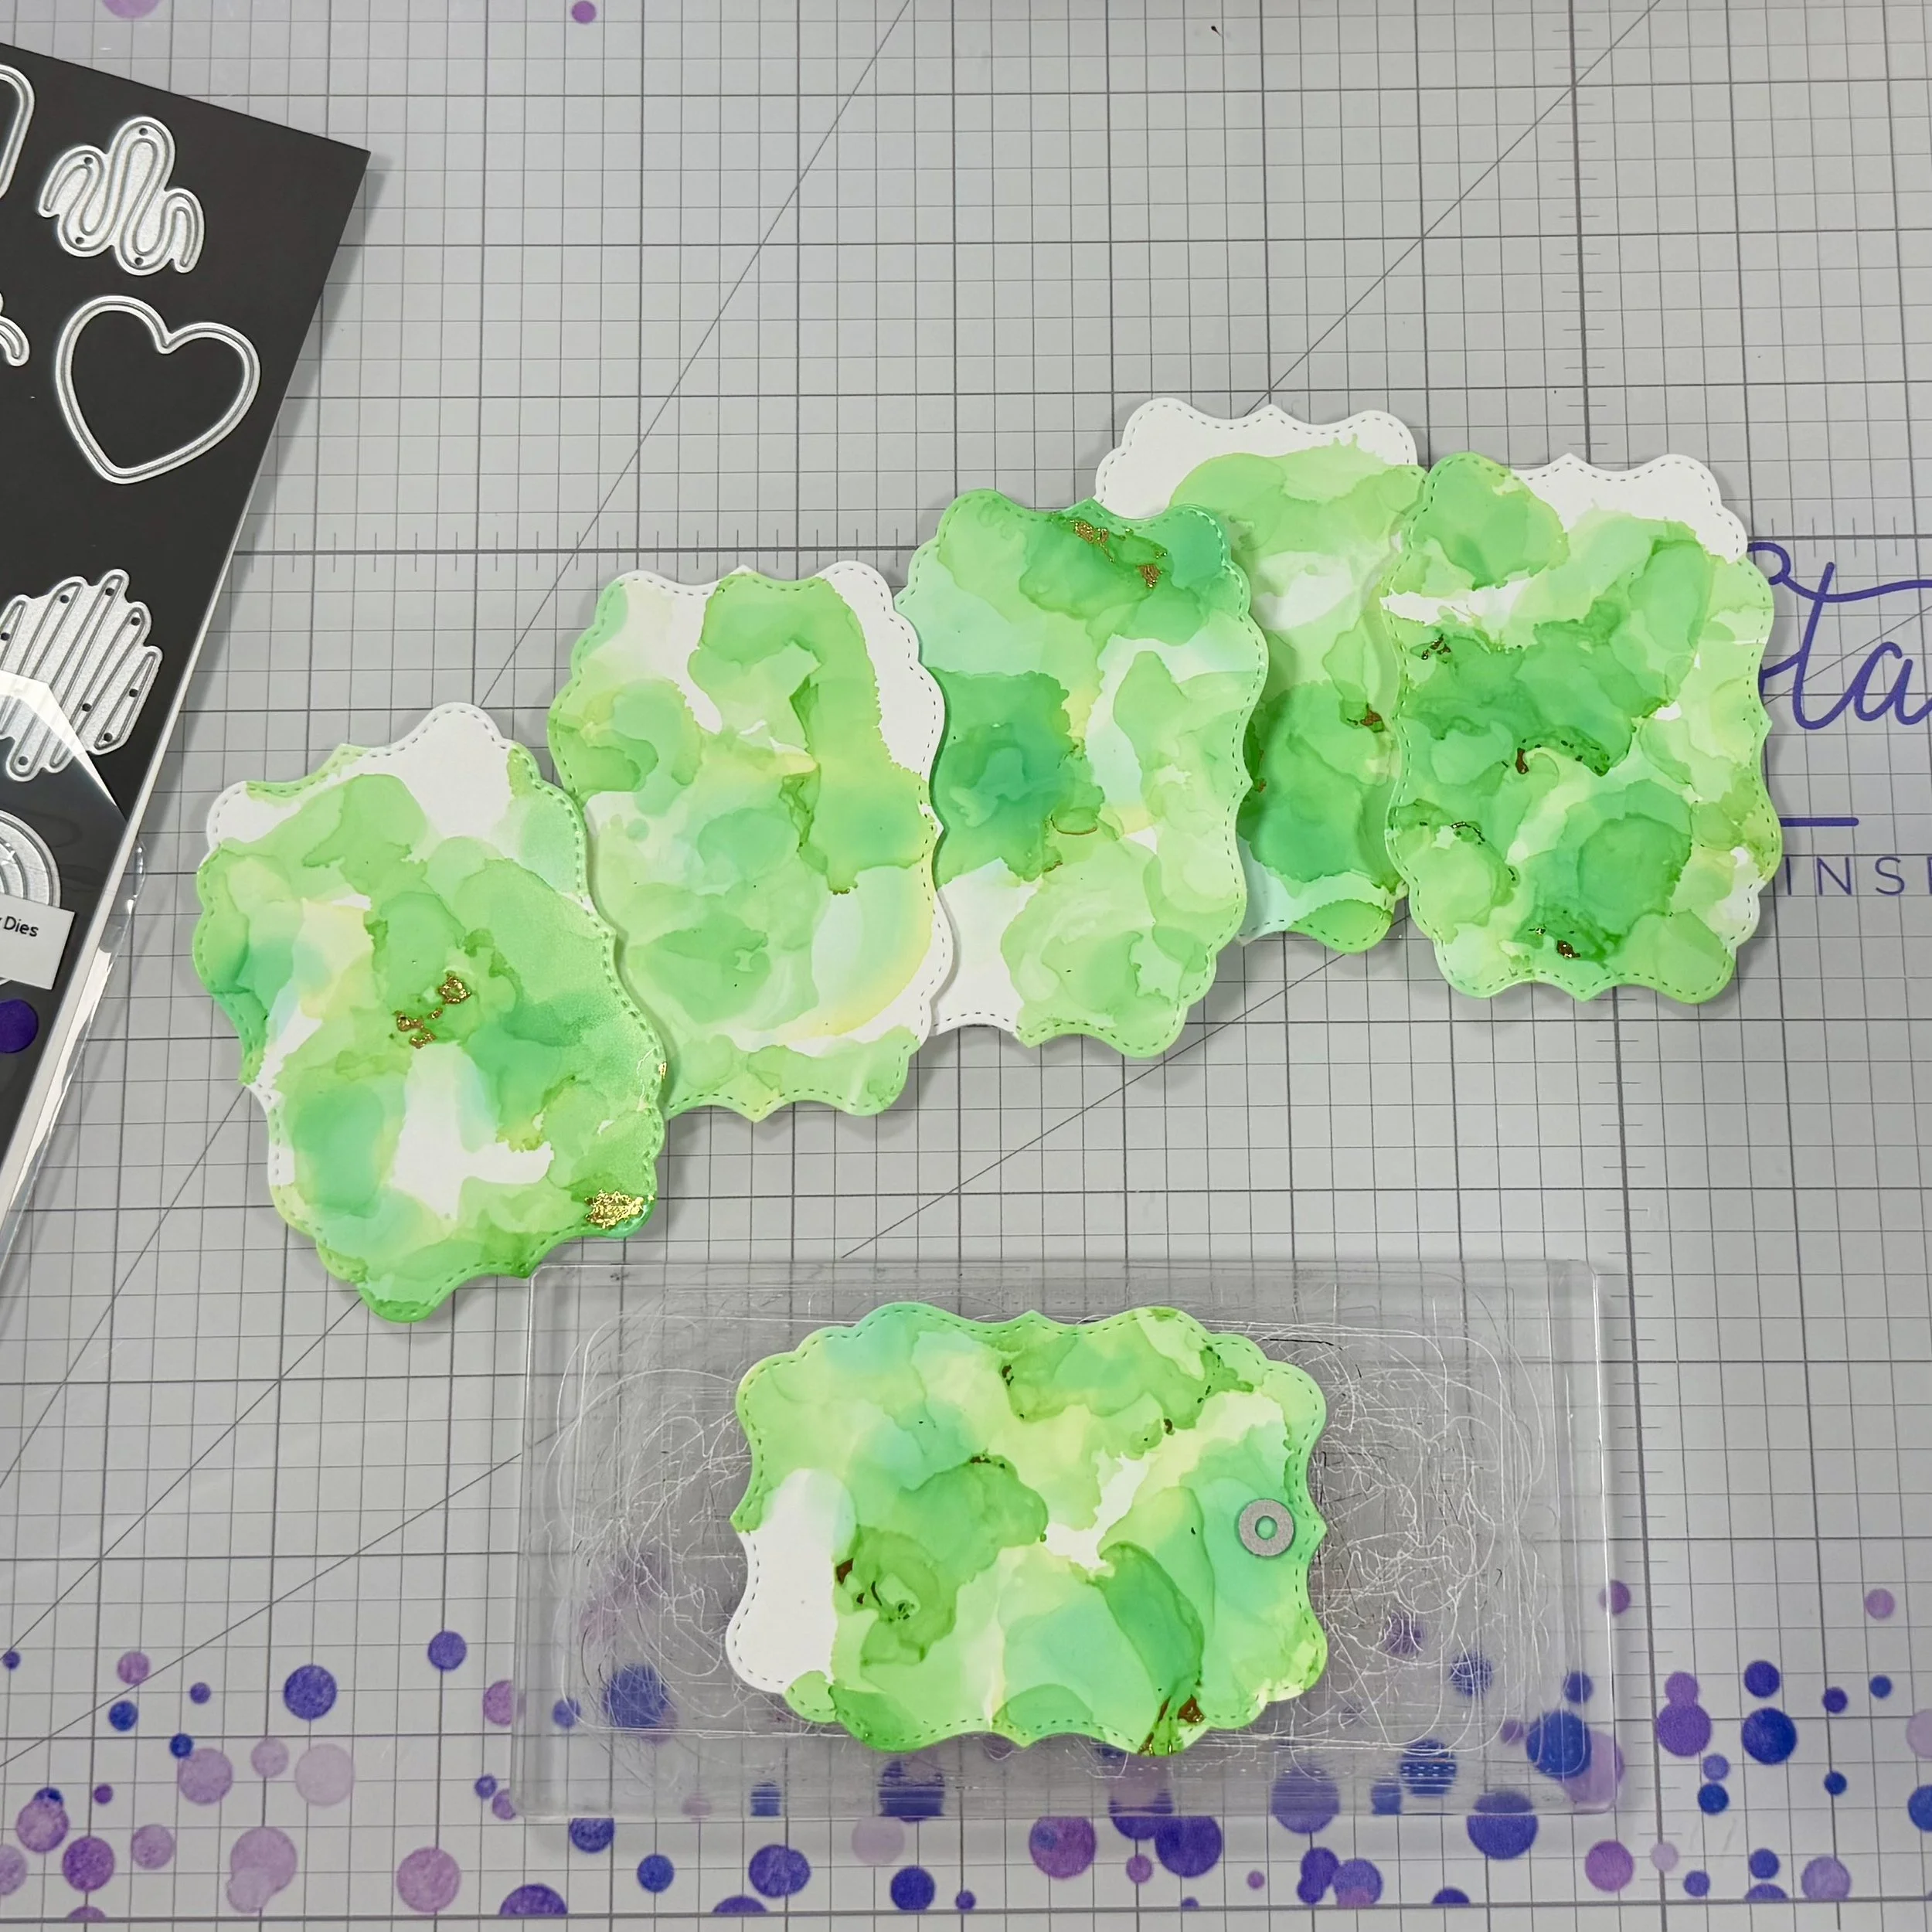
I wanted the tags to be simple but have lots of character and alcohol ink with some foil was the perfect pairing. To make the alcohol ink background, I pulled out some coated paper. In this instance, I dug in my hoarder stash and came across some old photo paper (remember when you printed photos at home on your printer???). Using Altenew Artist Alcohol Ink in Minty Mint (G201), some 91% alcohol, and the hand held blow tool, the design came to be. Thermoweb Decofoil in Gold D’or was pressed into the tacky areas of the alcohol inked background.
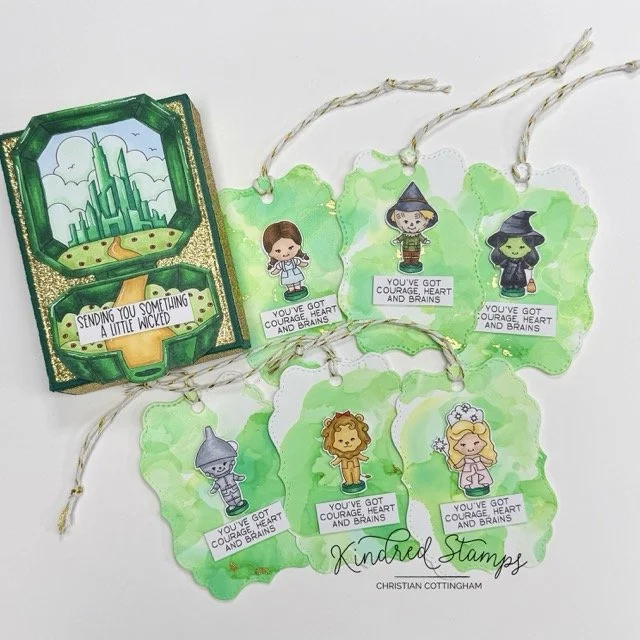
Pocket Oz, Kindred Stamps
Pulling out the Treat Box die, the ornate label was used to die cut 6 tags from the alcohol inked paper. The tags needed some holes, so I pulled out the Chocolate Candy Dies for the small circle. You can use any small shape for this hole. I didn’t want to distract from the simplicity of the tag so the circle was my choice.
Each of the tags were assembled with a pocket piece and a sentiment. These were popped up with some foam tape. Finally a piece of twine was tied around each tag. The tags fit perfectly inside my Pocket Oz box and I can’t wait to give this gift to someone soon!
Card Size: PUT MEASUREMENTS HERE
Project Four:Pocket Oz Waterfall
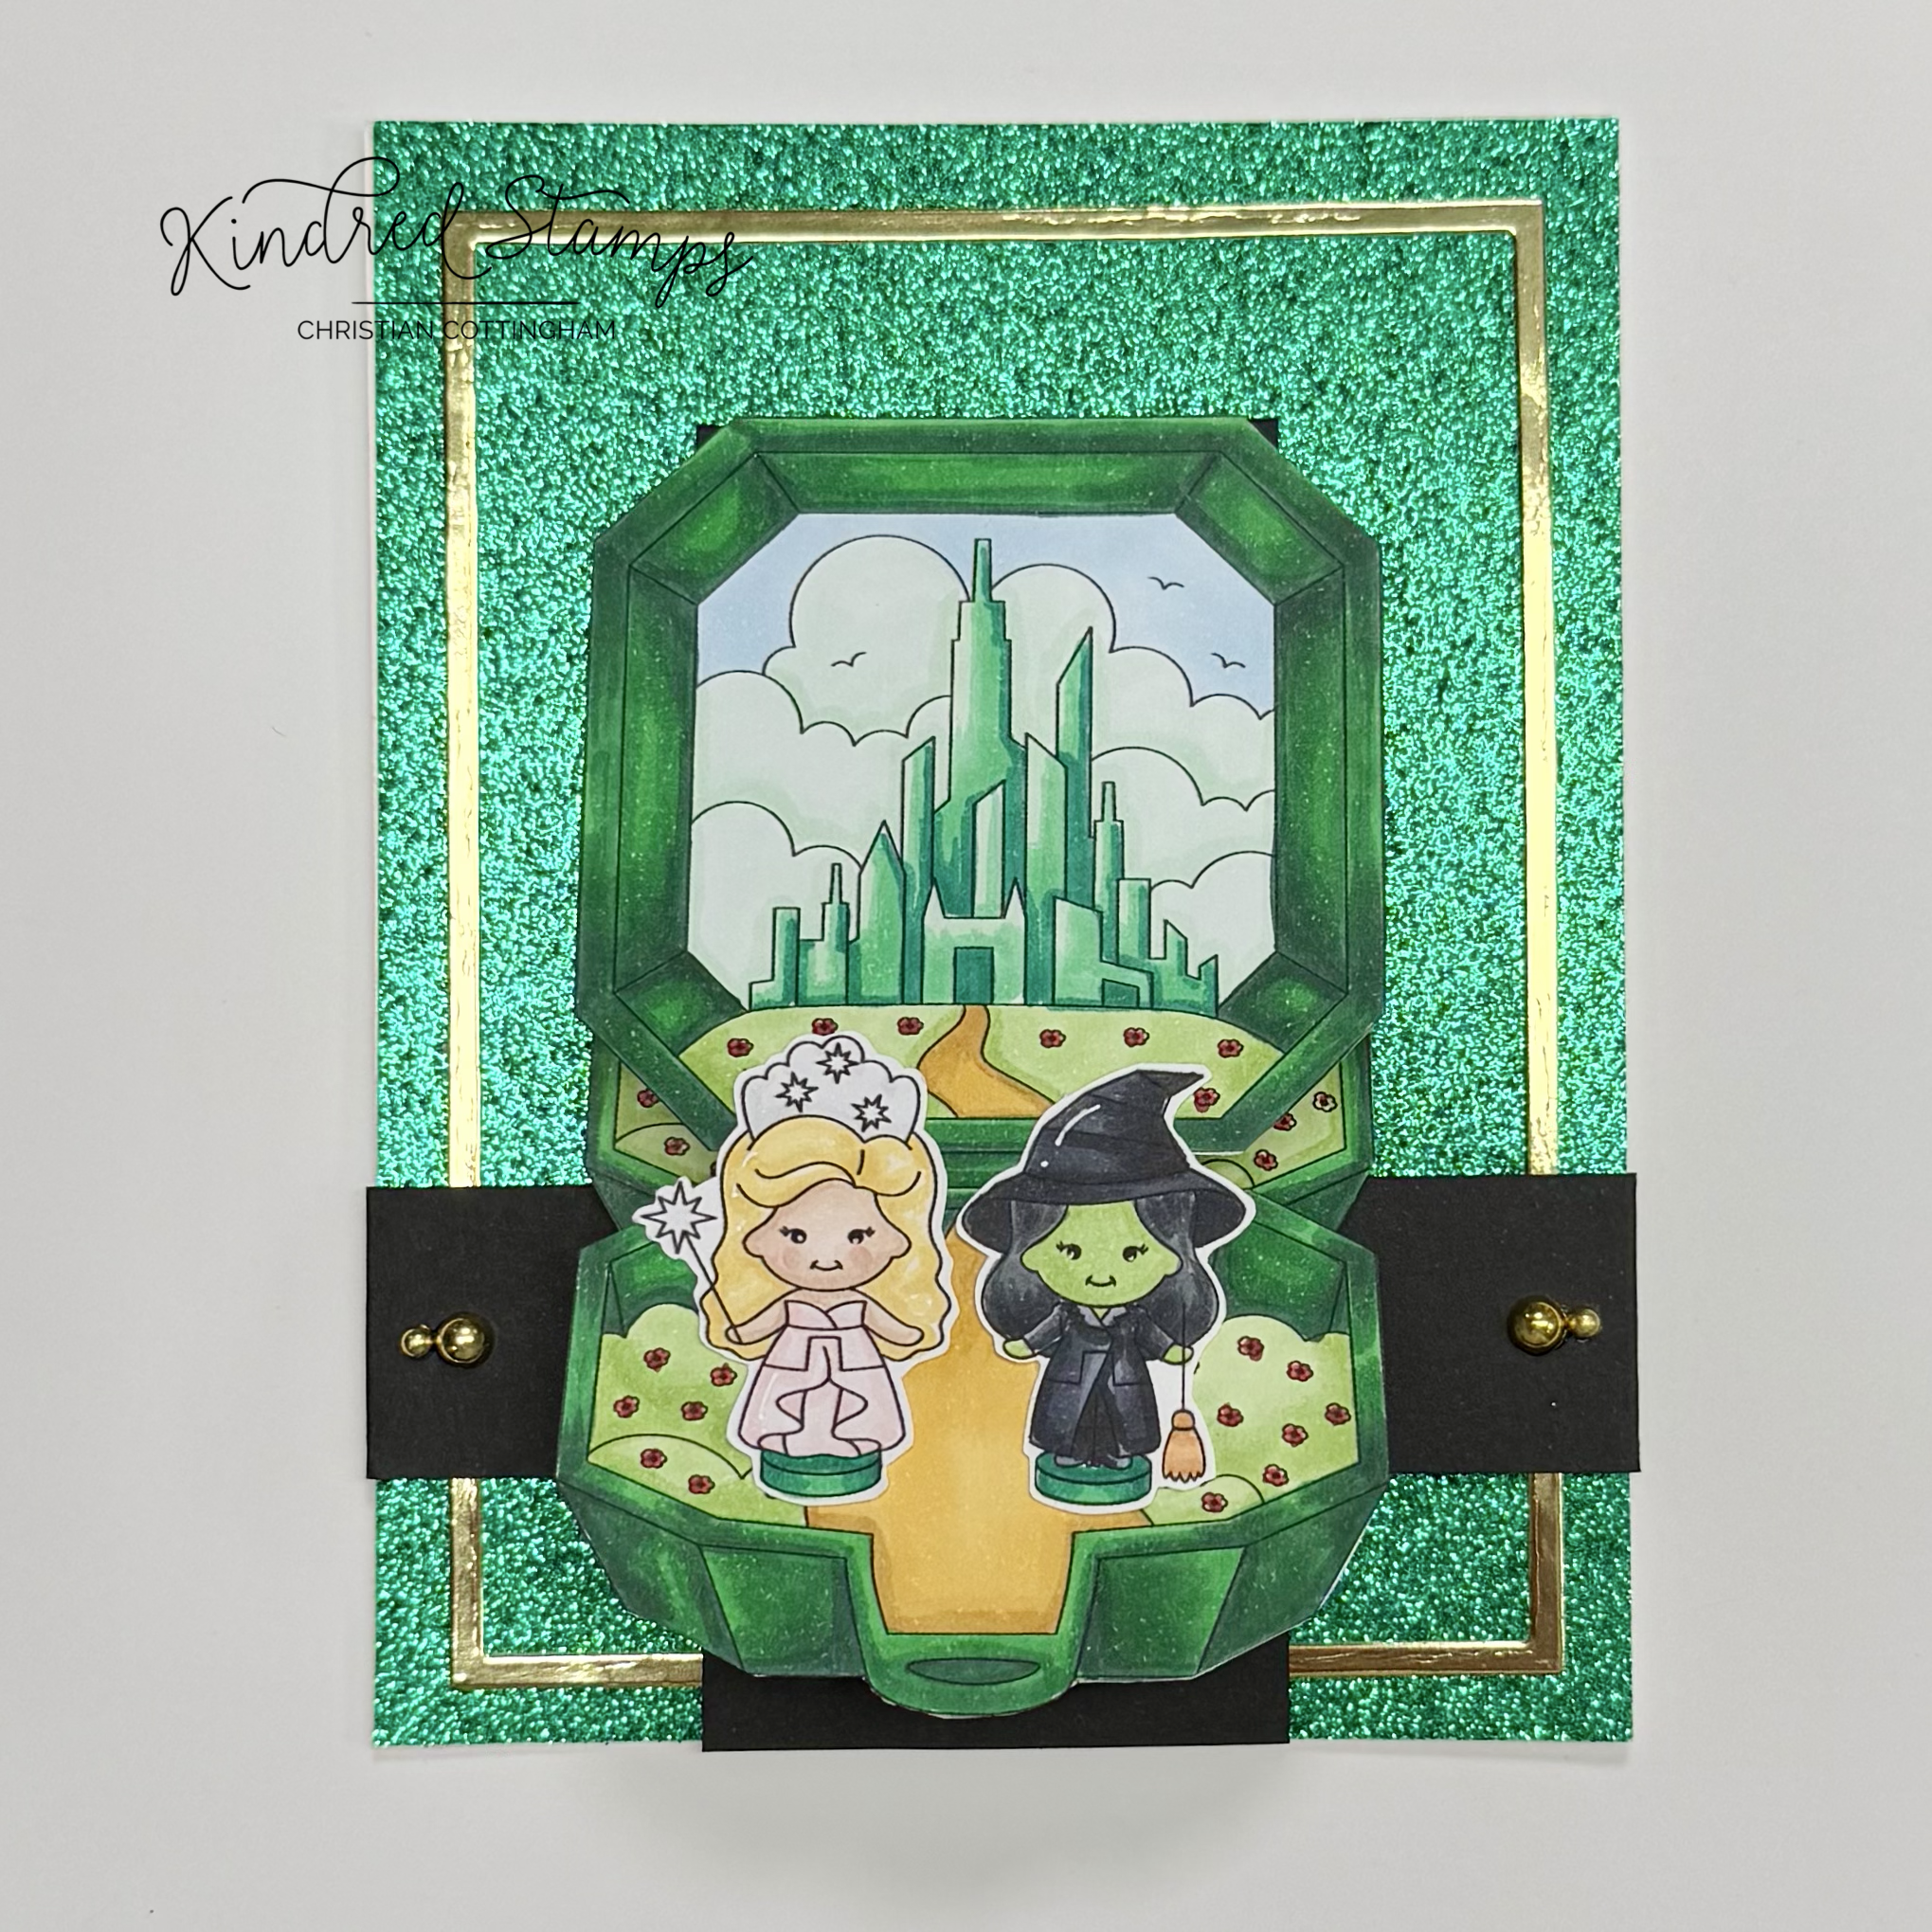
Pocket Oz, Kindred Stamps
This interactive card makes the Pocket Oz set come to life! With a simple mechanism, you are able to flip through the scenes and see the pocket come to life. Let’s flip in…
The Pocket Oz scene was stamped 3 times with alcohol safe ink. One full pocket scene was colored and fussy cut out on the line. The 2 other scenes were colored on the base of the pocket only and fussy cut out on the line. The remaining stamps were stamped with alcohol safe ink, colored, and also cut on the line. All images were colored with Olo Markers (See Color Guide). The sentiment was stamped on a piece of white card stock, trimmed to a strip and colored with Olo G0.4. All pieces were set aside to work on the mechanism.
With a piece of black card stock (2 inches by 10.5 inches) was scored at 2.75 inches, 3.5 inches/ 4.25 inches/ and at 5 inches. The folds were reinforce by folding each score line with a mountain fold and a bone folder. A piece of double sided strong tape was placed on the front side of the mechanism. The tape is on the base of the same side as the 2.75 score line. This mechanism was set aside. The base of the mechanism was up next. A piece of black card stock 1 inch wide by 6.25 inches long was scored at 1 inch and at 4.25 inches. These pieces were set aside until the remainder of the card base was prepared.
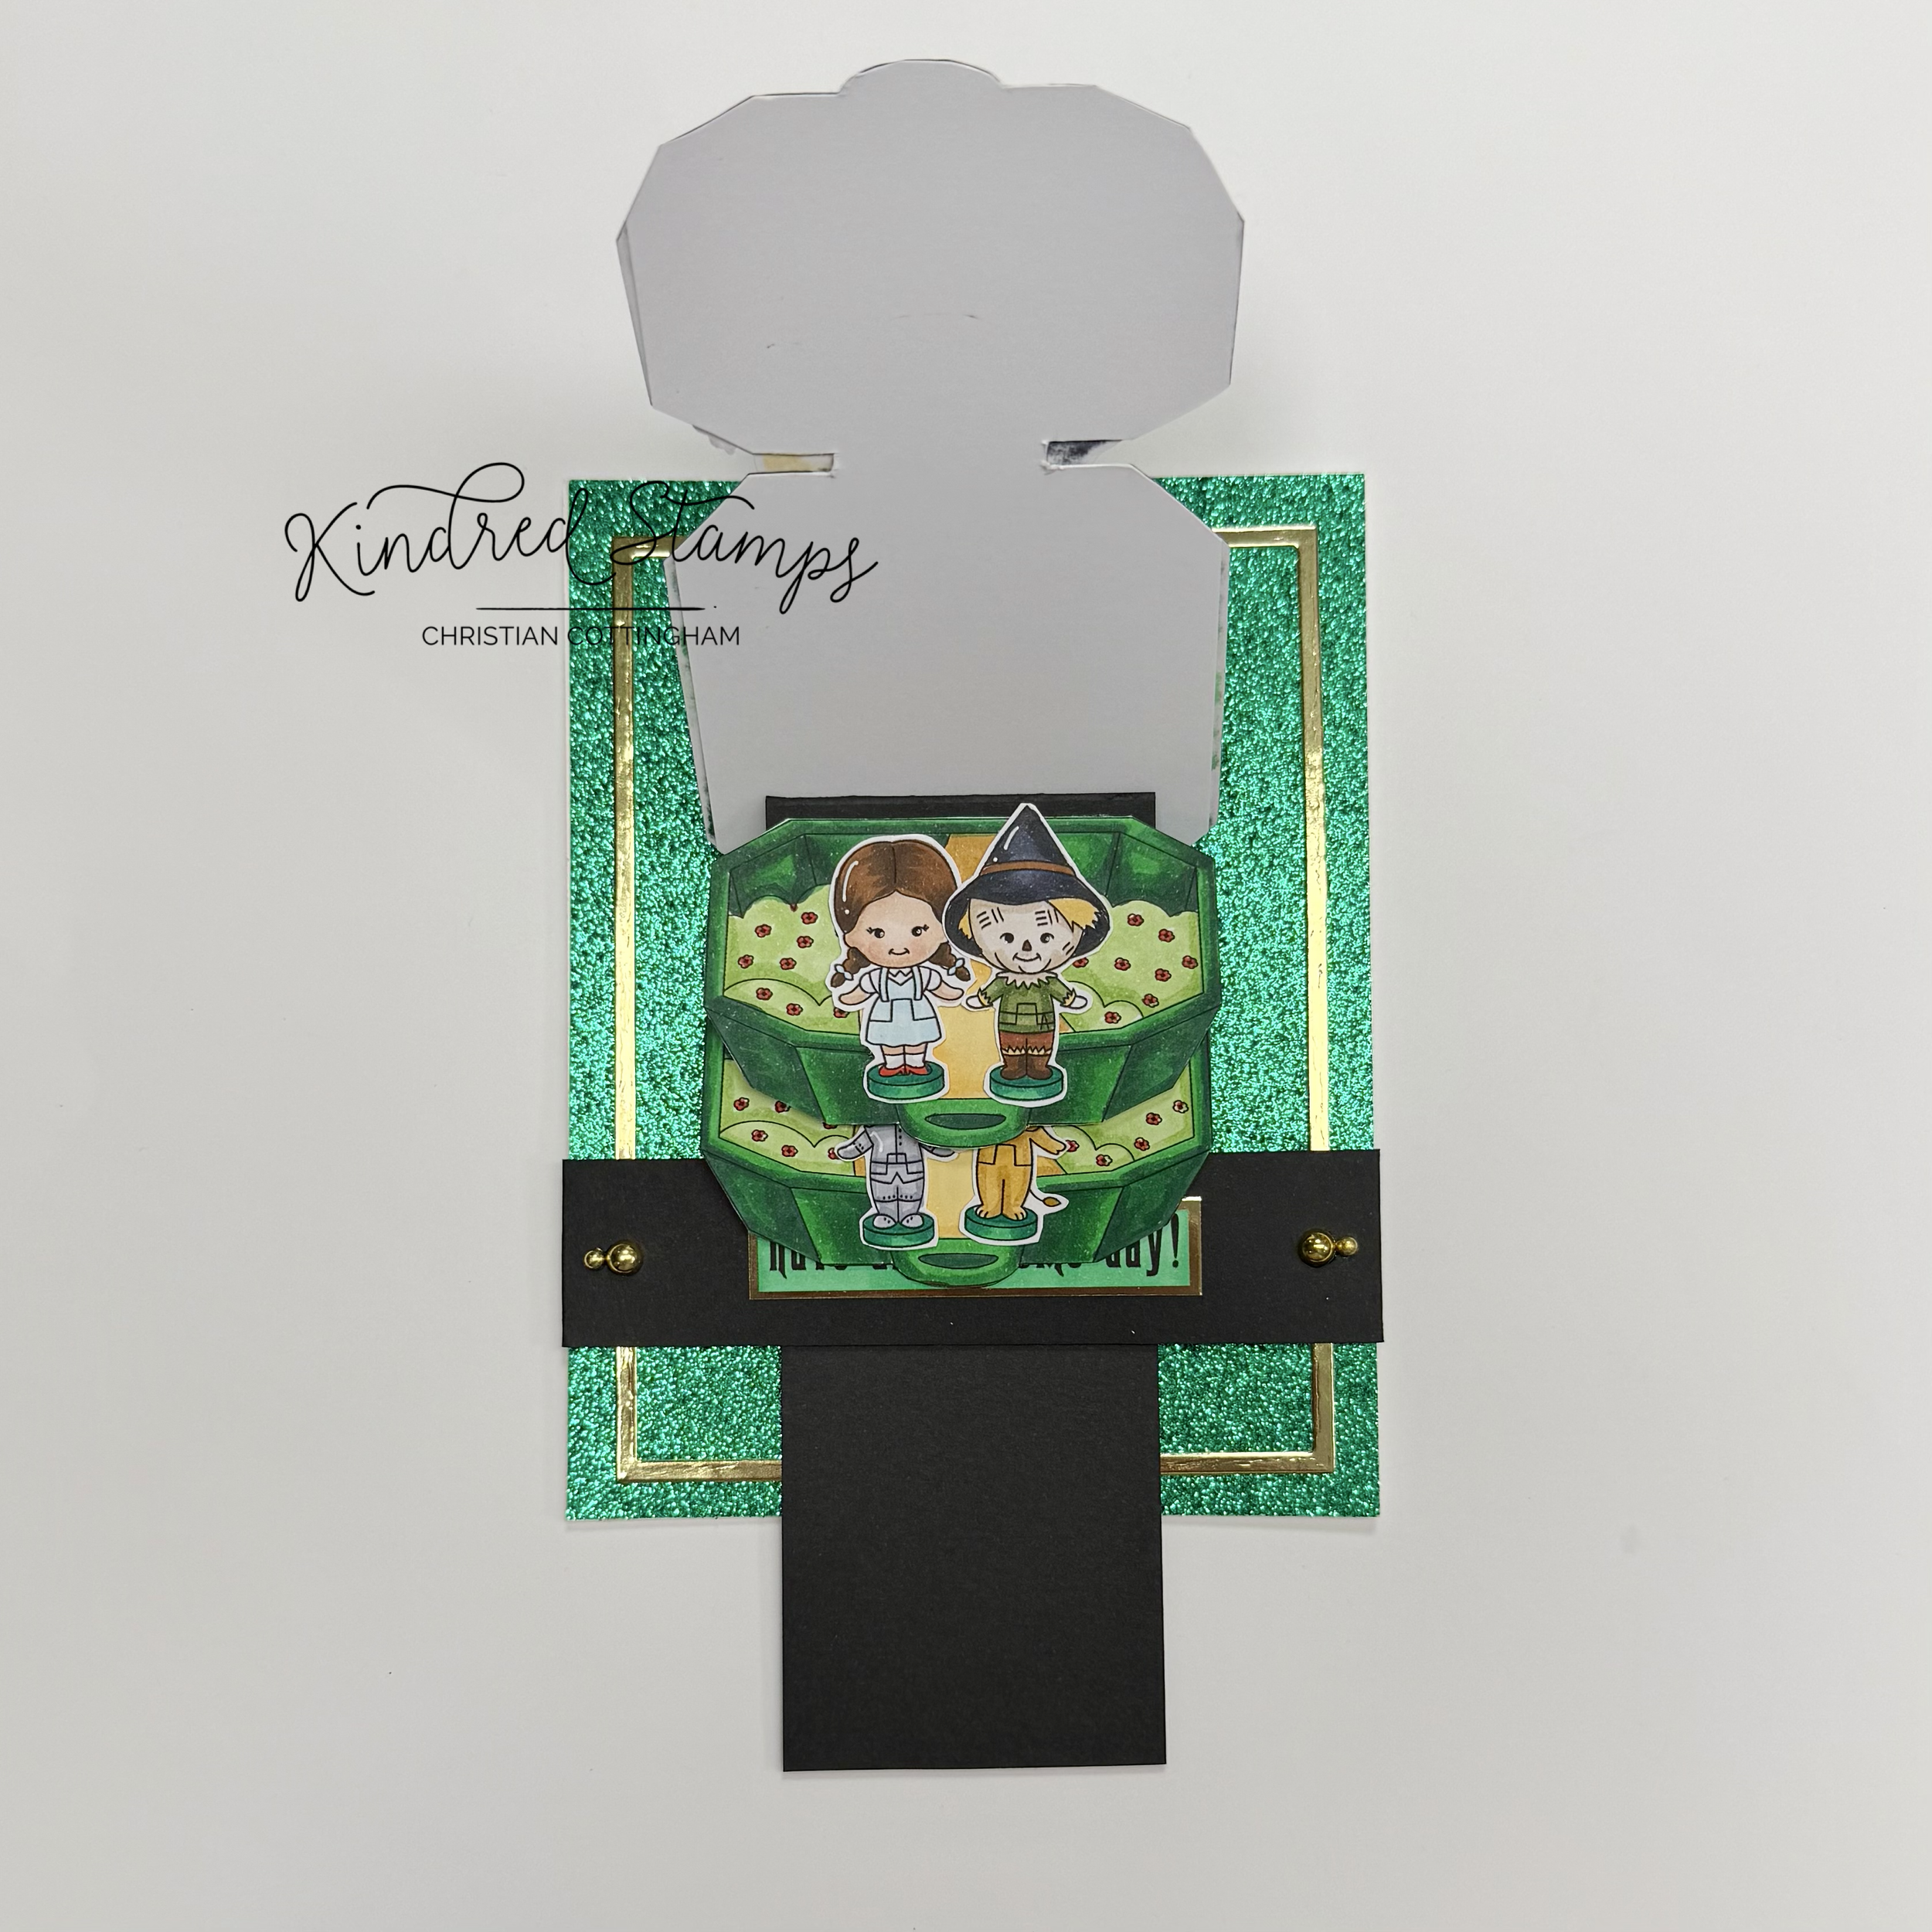
Pocket Oz, Kindred Stamps
A piece of green glitter card stock was cut into an A2 panel (4.25 inches by 5.5 inches). A piece of shiny gold cardstock was die cut with a frame die and adhered with liquid glue to the glitter cardstock. Using the magnets on the Craft Mat, the frame was allowed to dry completely with pressure to the glitter cardstock. Once dry, it was time to start assembly.
The mechanism and belly band will be assembled first. Using the glitter card base as a guide, position the belly band towards the lower portion of your card. Fold the mechanism at the 5 inch score line with the scored pre-folded mountain folds facing up with the sticky tape also facing up. Center the mechanism on the card. Adhere the mechanism to the inside of the belly band. Use a strong adhesive not tape runner. This is the only thing holding your mechanism to your card. Adhere the tabs on either side of the belly band to the back side of the glitter card panel. The panel can be adhered to the A2 card base (4.25 inches by 5.5 inches). There will be over hang that comes out under the belly band. This will be trimmed down when the card is assembled.
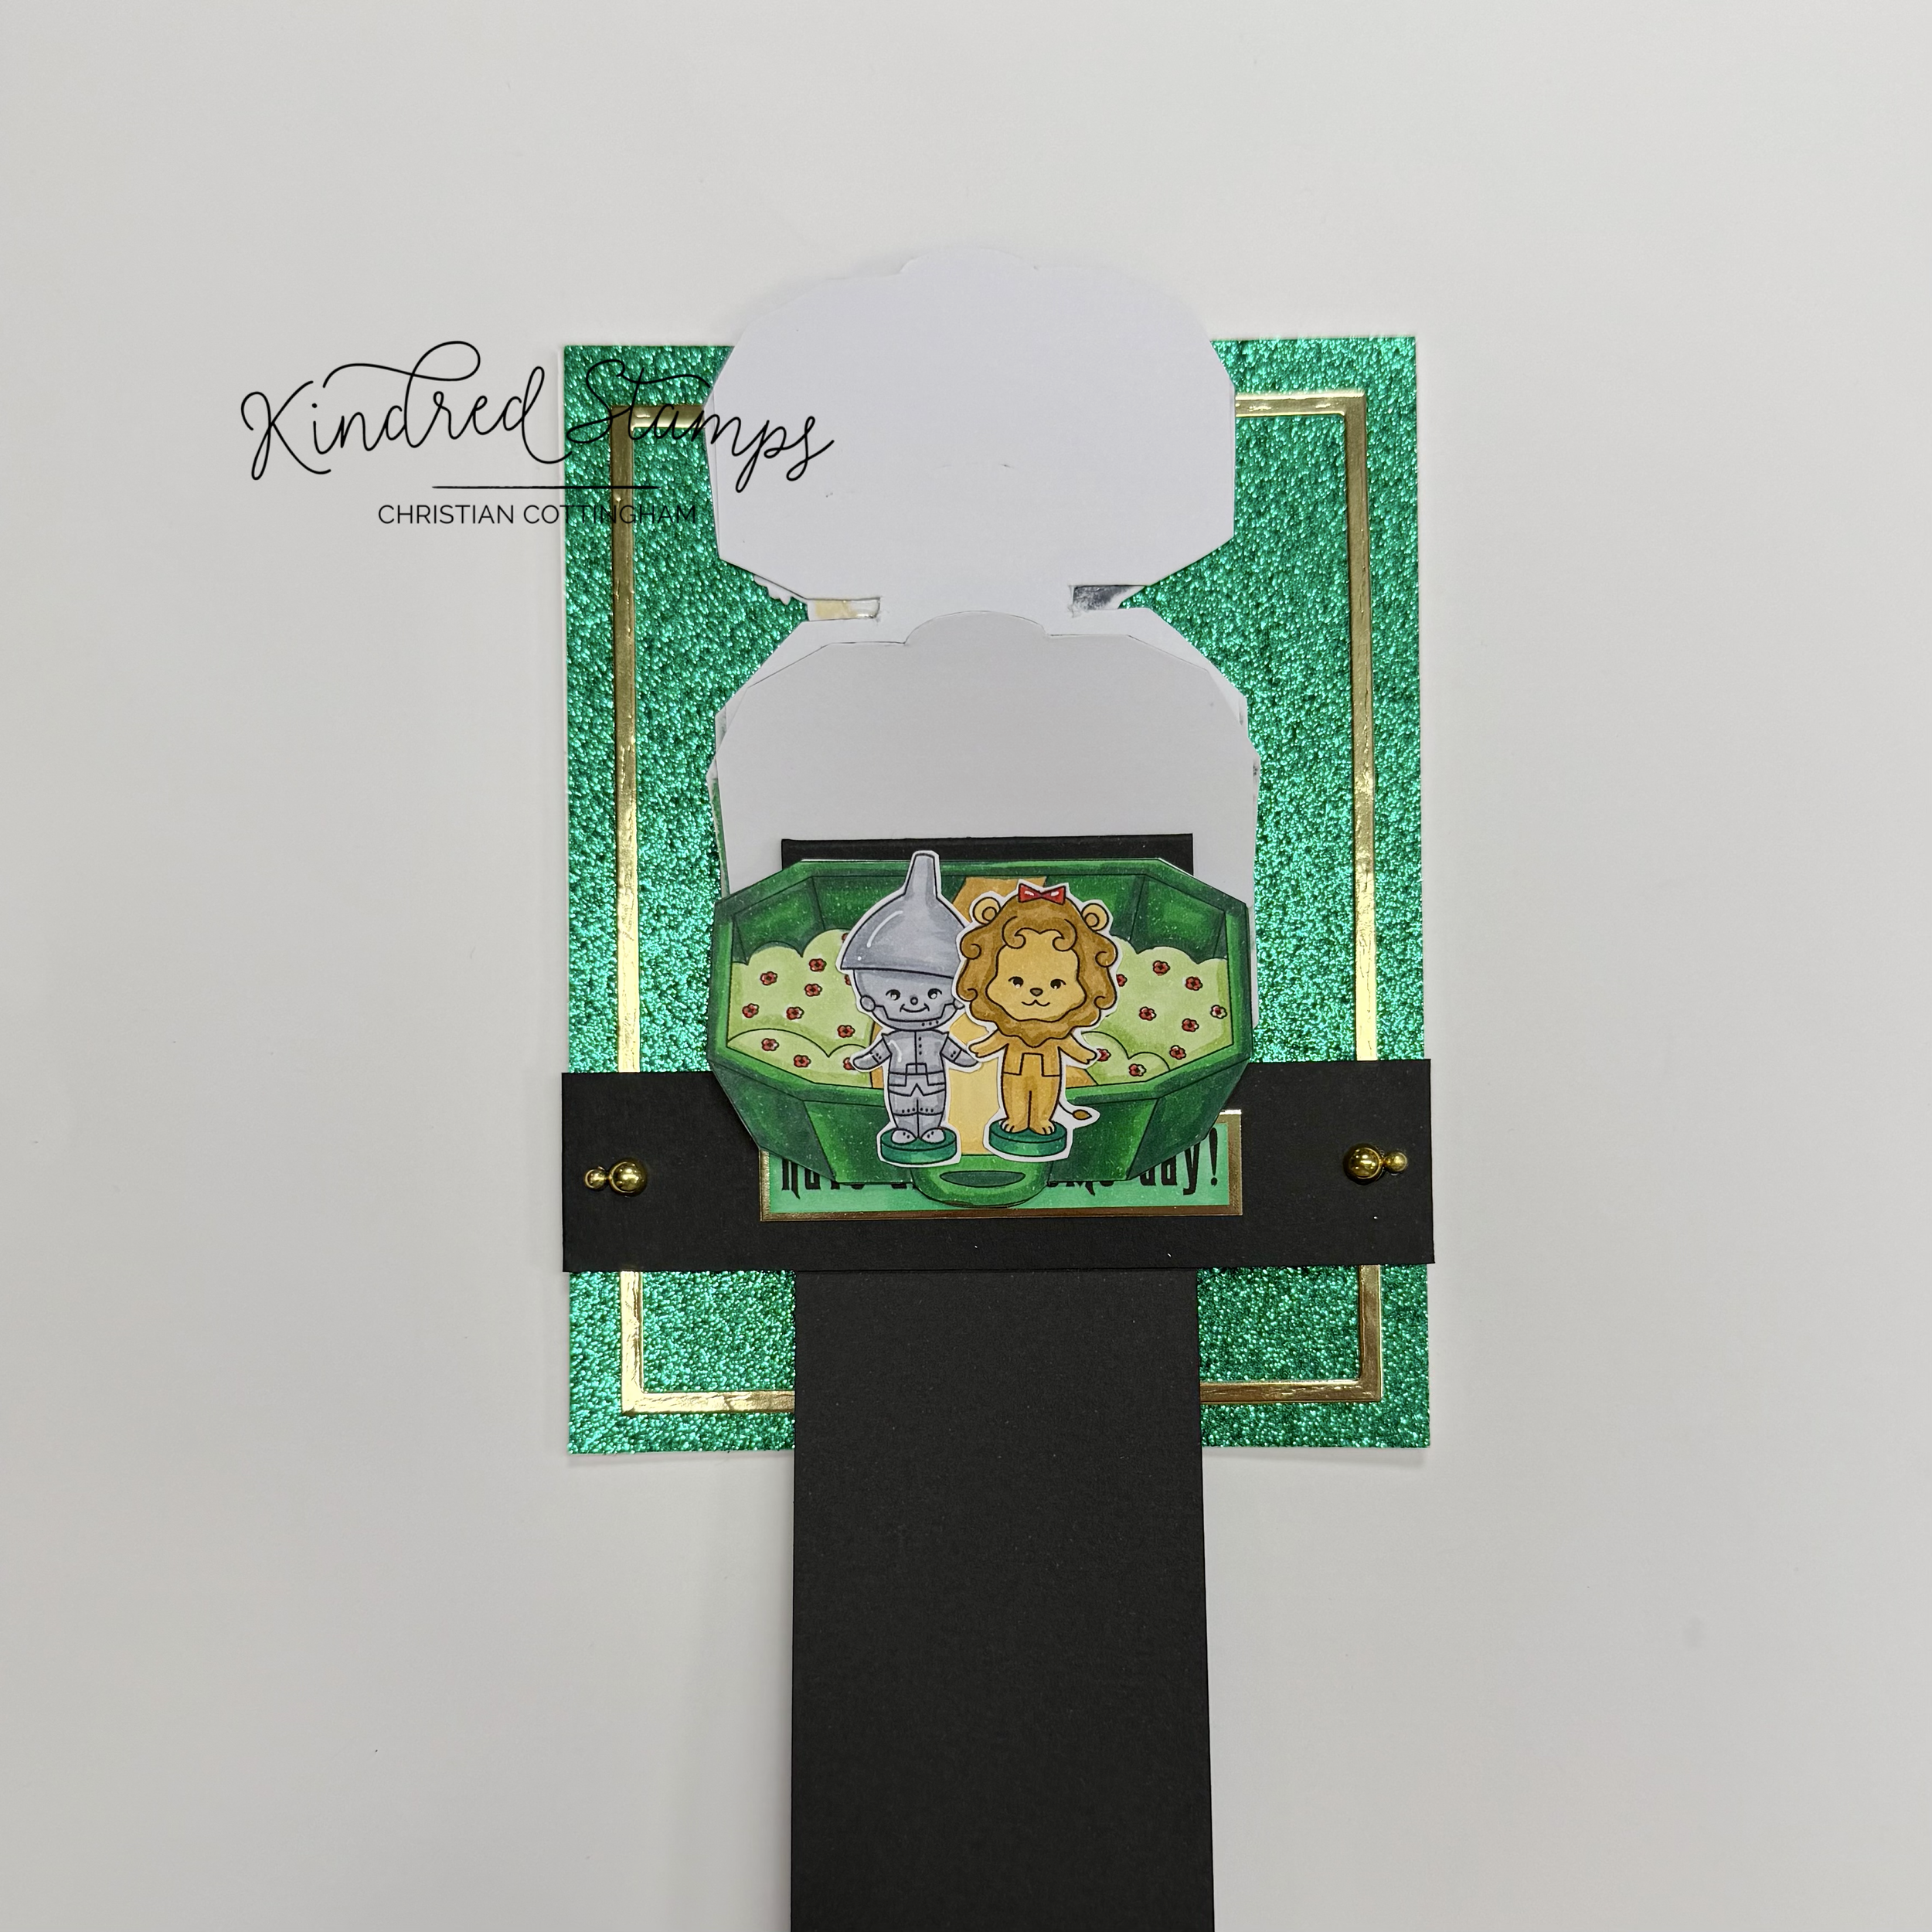
Pocket Oz, Kindred Stamps
Now it is time to make the flipping magic. You may not be bothered by the alcohol ink bleed on the back of your images that will be seen when flipping the card. I didn’t like it. I glued my images onto a piece of card stock and then fussy cut them… again… Your OCD may let you skip this and I am so happy for you! I wish I could have. With the images all cut out again, it was time to assemble. A piece of shiny gold paper was cut down to frame the sentiment strip. The matted sentiment strip was centered and adhered to the belly band.
To place the images onto the mechanism, it is important that the images are only adhered to the individual sections between the score lines. This is what will lift and flip the image. If you adhere to all of the sections, you will have no flip just a flop. Working from the bottom section, adhesive was placed in-between the third section of score lines from the top of the mechanism. One of the base only designs was lined up without going over the top of the score line. The Metal Man and Lion were adhered to the base without going over the top of the score line. This process was repeated with the second base on the section of score lines and the Girl and Scarecrow. Finally, the complete pocket was adhered to the top section of the score lines. The two witches were adhered to the design. The remainder of the mechanism was trimmed to be flush with the card. I chose not to decorate this mechanism, but a “pull” stamp would be great to give instruction. Finally a couple shiny gold bits were placed on the sides of the belly band because why not!
Now you can flip open the scenes that can be played out in the Pocket Oz! Flip to your heart content!
Card Size: A2 (4.25 inches by 5.5 inches)
The entire Kindred Stamps release will be available this Friday at 8am PST/11am EST. Be sure to subscribe to the Kindred Stamps blog to see a daily line up of sneak peeks from our amazing Design Team! Come join the Fan Club and release event to be part of the release fun, and you may just win some Kindred Stamps credit!!
Color Guide:
All images were stamped on Express-It cardstock
Girl:
Flesh> OR7.2/ OR7.1/ OR2.0; R5.3
Socks/ Shirts> CG1
Dress> B1.1/ B1.0
Hair> OR3.8/ OR3.7
Shoes> R0.5
Scarecrow:
Face> O7.3/ OR7.1; OR3.7
Straw> YO2.3
Shirt> YG8.7/ YG8.5
Hat> CG7/ CG5; OR3.7
Pants> OR3.7/ O2.7
Shoes> OR3.8/ OR3.7
Lion:
YO2.7/ YO2.5/ YO2.3; O7.7
Bow> R0.6/ R0.5
Metal Man:
CG5/ CG3
Good Witch:
Flesh> OR7.2/ OR7.1/ OR2.0; R5.3
Hair> YO2.3/ YO2.2/ YO0.1
Dress> R2.0/ R2.2
Crown> NG1/ NG0
Bad Witch:
Broom> OR3.4/ OR3.2
Flesh> G5.3/ G5.2/ G5.1
Hat/ Jacket> CG9/ CG7/ CG5
Hair> NG9/ NG7
Pocket Scene:
Road> YO2.5/ YO2.3/ YO2.2
Castle> G0.6/ G0.4/ G0.1
Clouds> G0.1/ G0.0
Sky> B0.2
Walls> G1.8/ G1.7/ G1.5
Grass> G5.3/ G5.2
All Bases:
G0.6/ G0.4

Underwater Birthday
Let’s head under the sea to shellabrate a birthday!
Making a scene card is a great way to showcase your coordinating stamps, dies, and stencils. Using a set from deep in my stash I was able to make a simple scene.
You can check out the video on how this was made:
https://youtu.be/DoCv4mWOL7o
Products utilized:
Underwater Buddies (Kindred Stamps)
Pineapple Die (Kindred Stamps)
Ocean Scene Stencil (Kindred Stamps)
Icing On The Cake (Pink and Main)
Gina K Designs Inks
Altenew Crisp Dye Inks
Distress Oxide Inks
Pink Fresh Studios Ink
Affiliate Link to Kindred Stamps: https://www.kindredstamps.com?aff=97
Coloring Guide:
Sponge:
Body- Y2.3/ Y1.2/ Y1.1
Shirt- CG3/ CG1
Pants- YO2.7/ YO2.5
Tie- R0.6/R0.5
Mouth- R0.6/ R0.5/R0.4
Crab:
Body- R0.5/ R0.4
Eyes- YG2.1
Pants- BV2.3/ B4.3
Shirt- B2.2/ B2.0
Mouth- R5.5/ R5.3
Belt- CG7/ CG5/ YO2.3
Snail:
Shell- R5.5/ R5.3; BV1.4
Eyes- YG2.1
Body- B0.2/ YG2.1
Squid:
Flesh- BG2.4/ BG2.3/ BG2.1
Feet- BV2.2/ BV4.4
Shirt- YO2.5/ Yo2.3
Starfish:
Flesh- OR2.2/ R0.2
Shorts- YG2.3/ YG1.2; BV1.4/ BV1.2
Mouth- R5.3/ R5.1/ R5.5
Marine Drifter:
BG7.3/ BG7.2/ B7.0/ BG7.6/ R5.5/ R5.1
Squirrel:
Suit- CG5/ CG3/ CG1
Flower Y1.2/ Y1.1; RV0.4/ RV0.2
Flesh- OR3.7/ OR3.4; O4.1
Acorn- OR4.3/ OR4.6
Mouth- R5.5/ R5.3
Nose- R5.3
Born To Be Brave Interactive Card
Born to Be Brave interactive card for a special Marine’s birthday!
Born To Be Brave, Desert Layering Scene Stencil, and Grass and Cloud Stencil (Kindred Stamps)
How else to make a 21st birthday special than by making it a pop-up! Best part is, there are no interactive dies required. Just some paper folded up to act as the pop-up mechanism. This video will walk you through the process. Once you master this pop-up once, you will be able to pop-up anything you can imagine!
You can check out the Youtube video that details how this card was made by clicking here: https://youtu.be/iYXRdNMRT3s
Card Basic Dies & Stitched Numbers (Kindred Stamps)
Kindred Stamps Supplies Utilized (affiliate links):
Born To Be Brave: https://www.kindredstamps.com/products/born-to-be-brave?_pos=1&_sid=e68278780&_ss=r&aff=97
Cards Basic Die Set: https://www.kindredstamps.com/products/card-builder-basics-die?_pos=1&_sid=0be568523&_ss=r&aff=97
Desert Scene Layering Stencil: https://www.kindredstamps.com/products/desert-scene-stencil?_pos=7&_sid=9b7ef49a0&_ss=r&aff=97
Stitched Numbers Dies: https://www.kindredstamps.com/products/stitched-numbers-die-set?_pos=1&_sid=afeadf188&_ss=r&aff=97
Grass and Clouds Stencil: https://www.kindredstamps.com/products/grass-and-clouds-stencil?_pos=1&_sid=62466c165&_ss=r&aff=97
Color Guide (Olo Markers):
Marine:
Flesh OR7.2/R7.1/OR2.0
Hair YO2.5/YO2.3/Y2.2
Hat CG3/CG0; BK/CG7/CG5
Belt CG3/CG0; gold pen Jacket CG7/CG5/BK; R0.5; gold pen
Pants B4.7/B4.6; R0.5
Shoes BK/CG7/CG5
Helicopter YG8.5/YG8.3/YG8.2; WG7/WG5; CG1/ B2.0
Card Size: 5 inches by 7 inches

Alrighty: Kindred Stamps Dec. Release
Alrighty… The Kindred Stamps December release features this private investigator and sentiments to boot! Check out my blog to see some inspiration!
Alrighty! Kindred Stamps blew it out of the park with this 4 inch by 4 inch stamp set. Two iconic poses and 3 perfect sentiments reflect this private investigator in the best ways.
This blog utilizes affiliate links. If you choose to click on the links provided to purchase, you are supporting me as I receive compensation for your purchase. If purchasing is not in your books, no worries, I hope you find inspiration for projects you design. By clicking on the links, you are letting Kindred Stamps know that you like my content and to keep bringing me back. Thanks for your time! Alrighty let’s begin…
Project One: Jersy Patch
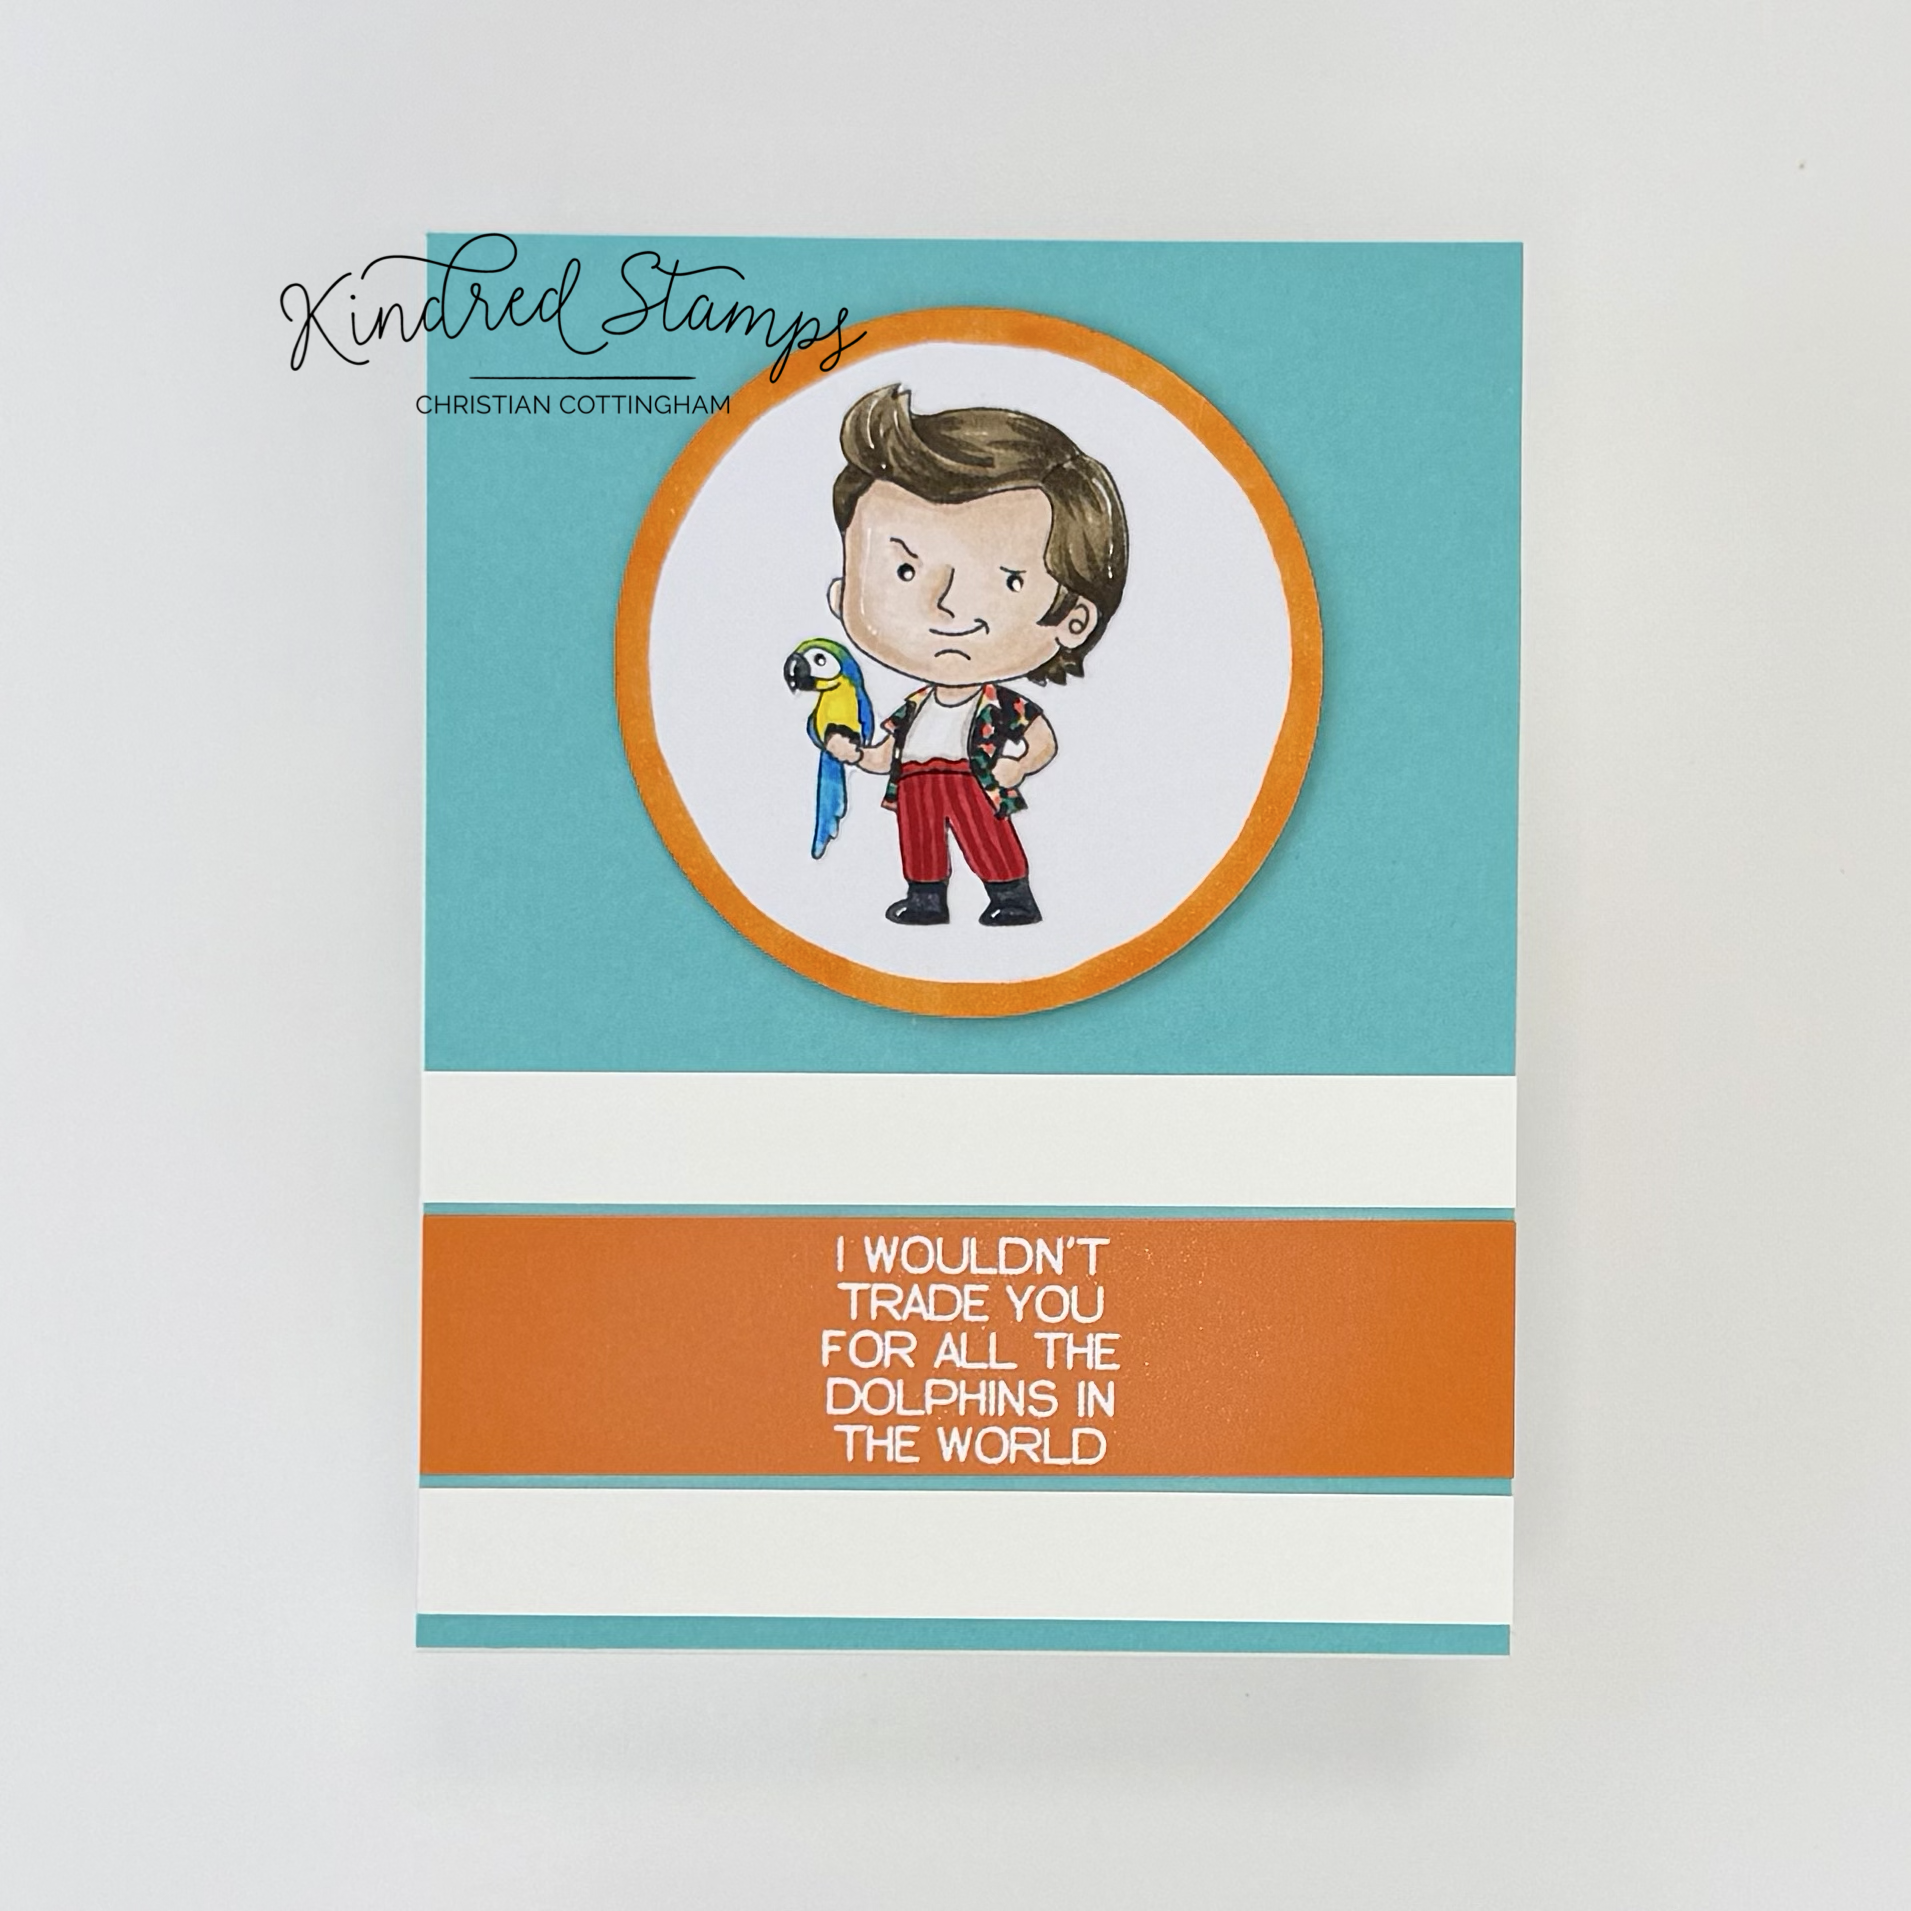
Alrighty, Kindred Stamps
The Bird Guy from the Alrighty stamp set was stamped on Express It white card stock with alcohol safe ink and colored with Olo Markers. See Color Guide. He was fussy cut out on the line and edged with a black brush fine liner pen to hide any cutting errors. This was set aside to work on the card base.
A piece of turquoise card stock was trimmed to 4.25 inches by 5.5 inches. Two strips of white Express It paper was cut to 0.5 inch by 4.25 inches. A piece of orange card stock was cut to 1 inch by 4.25 inches. The orange strip was prepped with antistatic tool and the sentiment was stamped with embossing ink. Snowfall Embossing Powder was sprinkled over the sentiment and heat set.
Pulling out the Card Basic die set, the circle shape was die cut from Express It card stock. With the O2.4 Olo Marker, the edge of the circle was traced to mimic the look of a patch. With all the piece ready, it was time to assemble!
The turquoise card stock was adhered to a A2 card base. The stripes were lined up using the grid lines on the Glass Craft Mat and placed on the bottom third of the card (white/ orange/ white). The Bird Guy was glued flat to the circle patch. With thin foam tape, the circle patch was popped up onto the top portion of the card base. Alrighty, the jersey sleeve was finally complete!
Card Size: A2 (4.25 inches by 5.5 inches)
Project Two: Blue Spotlight
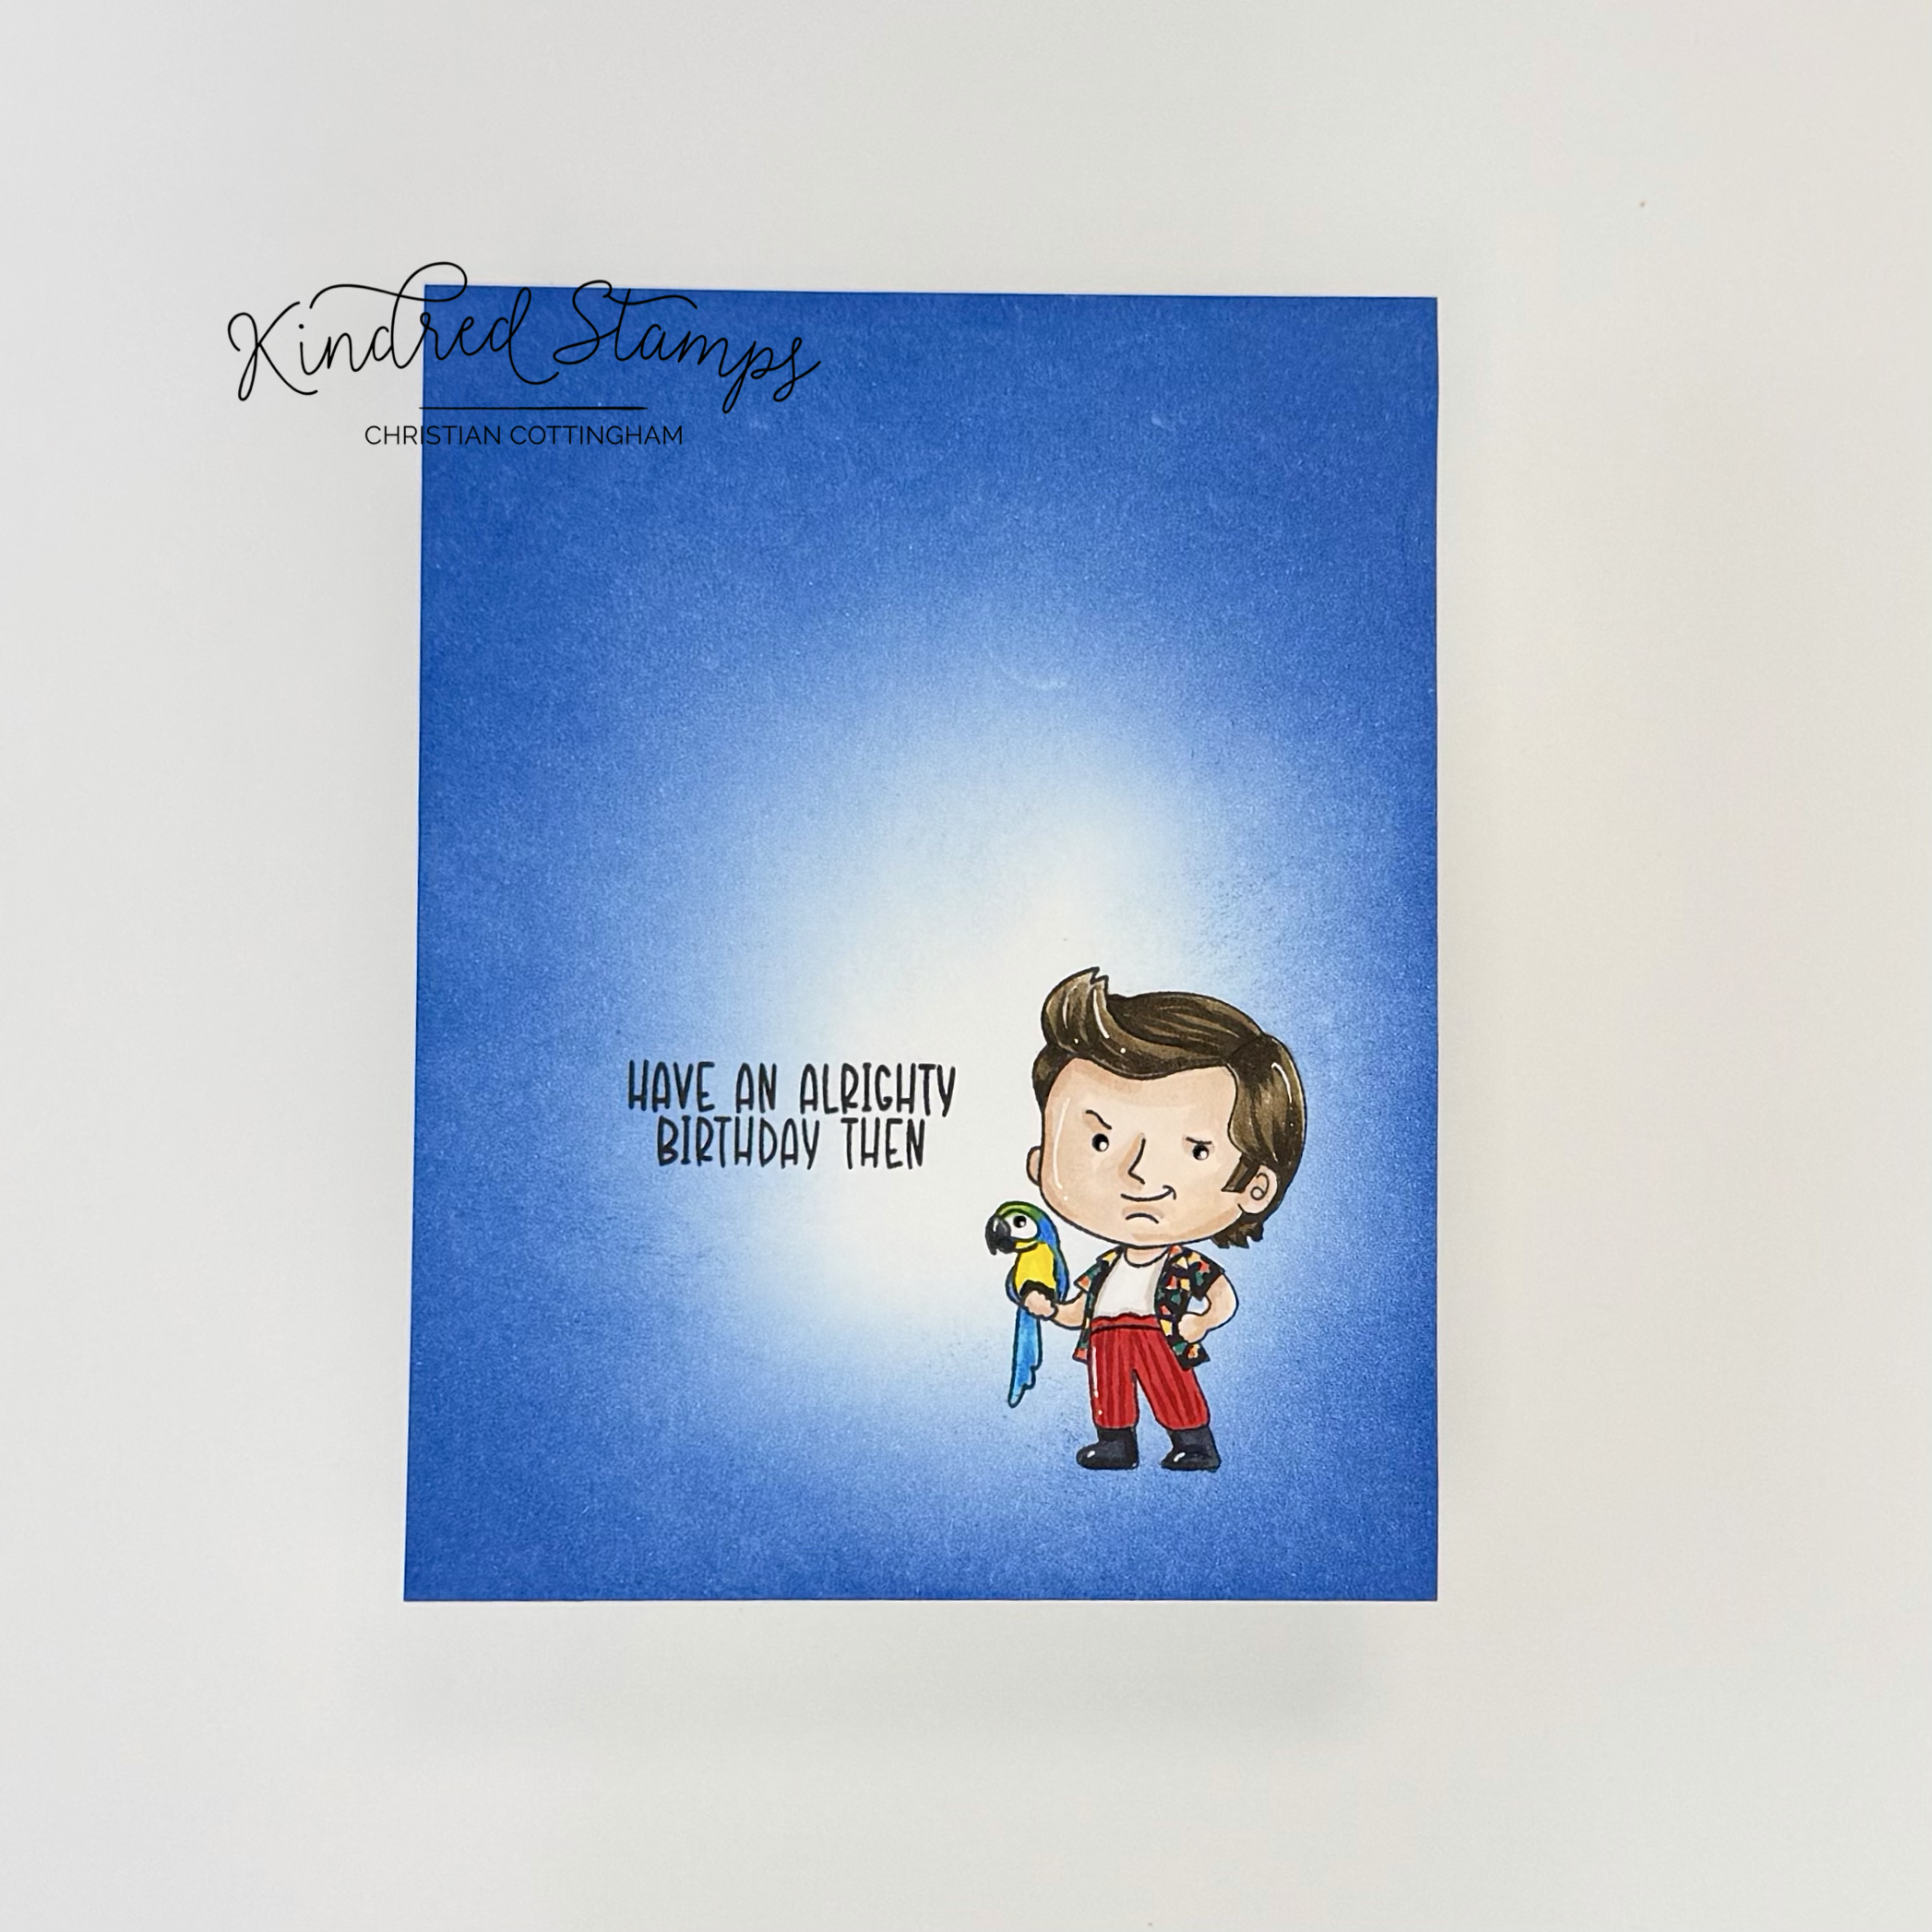
Alrighty, Kindred Stamps
This single layer card was a breeze to bring together. Alrighty, it’s not a true single layer because I didn’t want the alcohol marker to bleed through… but it is a flat card. So let’s break it down!
A piece of Hammermill 100 lb smooth card stock was cut down 5.5 inches by 4.25 inches. The Bird Guy was stamped with alcohol marker safe ink and then a mask was stamped. The mask was cut out on the line and then applied to card base. Knowing I wanted a spot light near the mask, blue ink was blended from the outside repeatedly to deepen the color intensity on the card panel leaving the center lower third uncolored.
With the panel ink blended, the mask was removed and the markers made their way to the desk. With Olo markers, the Bird Guy was colored. See Color Guide. The sentiment was then stamped with black pigment ink.
The panel was adhered to an A2 top folding card base. This card came together super fast and can mail so easily!
Card Size: A2 (4.25 inches by 5.5 inches)
Project Three: Confidential File
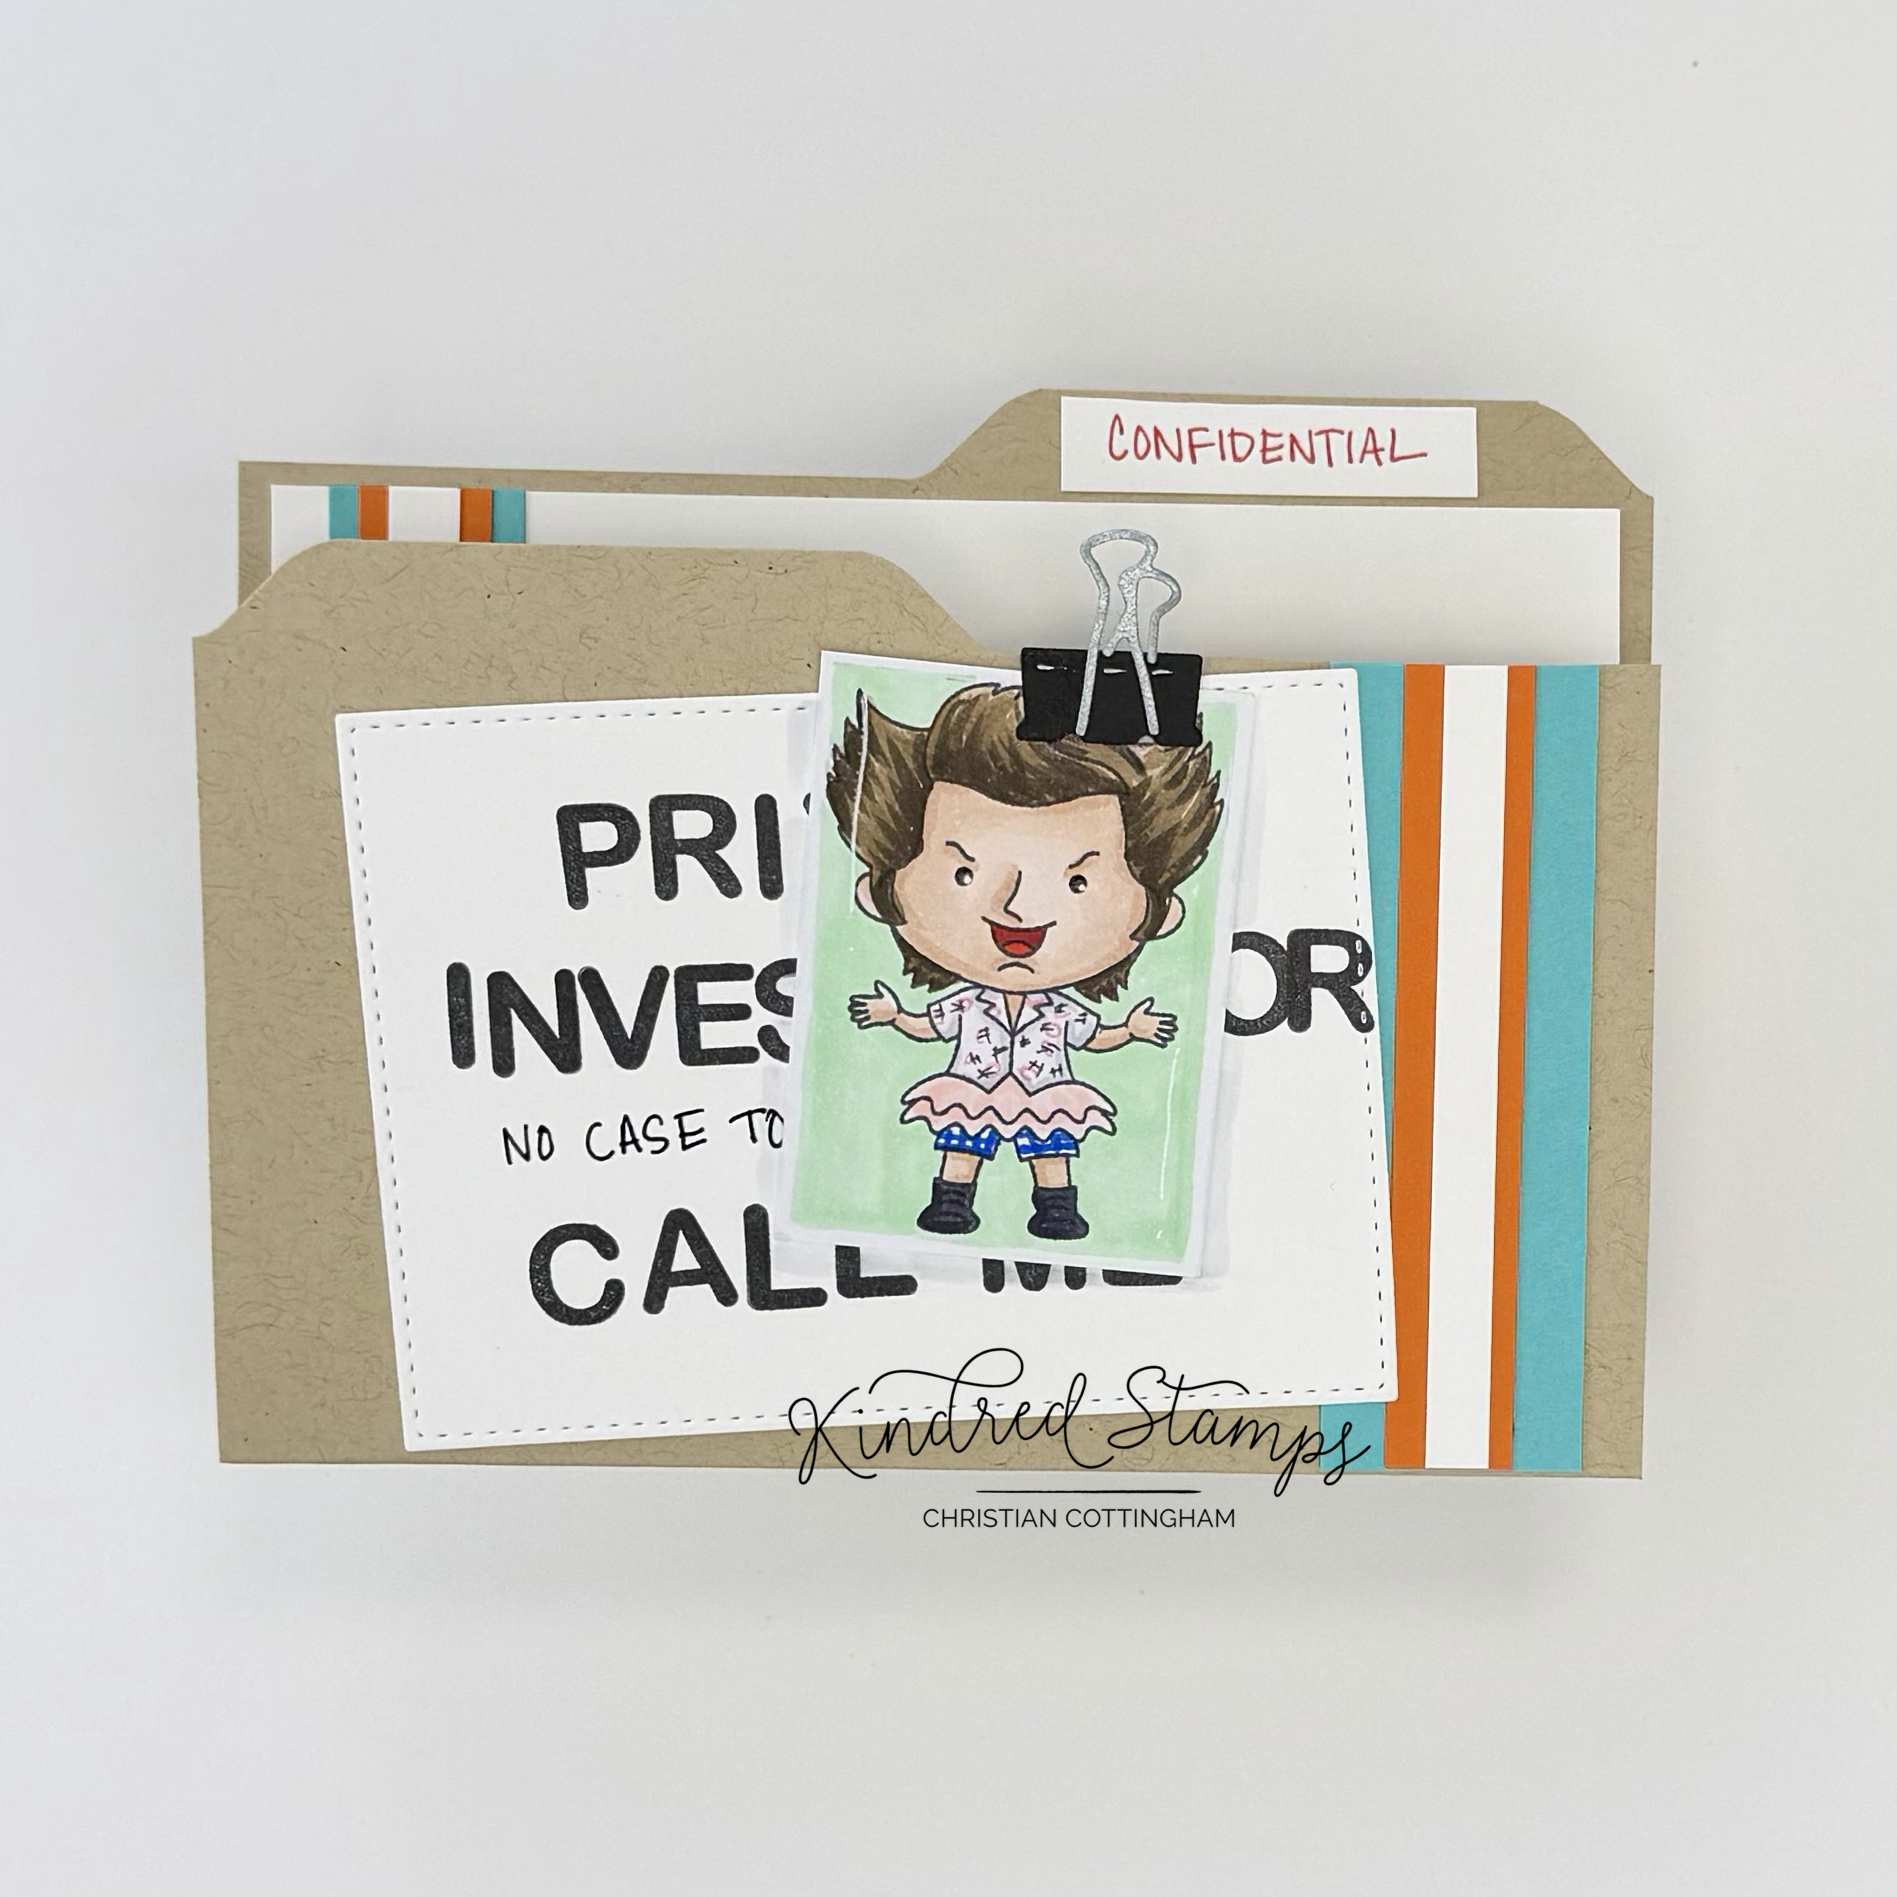
Alrighty, Kindred Stamps
Some things are confidential, but the Alrighty stamp set is not! This card was designed to look like a file folder and I just love how it turned out. Let’s jump in!
A Neenah Dessert Storm A2 card base was prepared and formed into a file folder utilizing an envelope punch board. The front of the card base was decorated with layered strips of aqua, orange, and white card stock. A piece of white card stock was trimmed to 5.25 inches by 4 inches. The sentiment from the Alrighty stamp set was stamped in black pigment ink. To continue the color theme from the front page, aqua/ orange/ and white stripes were applied. This panel was adhered with glue only on the top of of the panel to give the paper the feel like it was attached to the folder. Finally, a thin strip of white card stock was trimmed to fit on the file tab and “CONFIDENTIAL” was written in red ink. The card base was set aside.
The Treat Box Die will provide the rectangle for the poster that will be clipped to the front of the file folder. This was cut out of white 80 lb card stock. The poster was stamped out with the letters from the Friendship stamp set to say “PRIVATE INVESTIGATOR CALL ME” while “No case is too small” was printed in with a pen.
On a piece of Express It card stock, the Ballerina Guy was stamped in alcohol safe ink. The Ballerina Guy was colored with Olo Markers (See Color Guide). To give the illusion that this was a photograph, the image was trimmed to a rectangle. With a pencil, lines were sketched very lightly to signify the boarder. The background of the image portion was colored with G0.1 Olo Marker. Any visible pencil lines were erased. Digging through my stash I found a paper clip embellishment that was perfect for “holding” the poster and picture to the file folder.
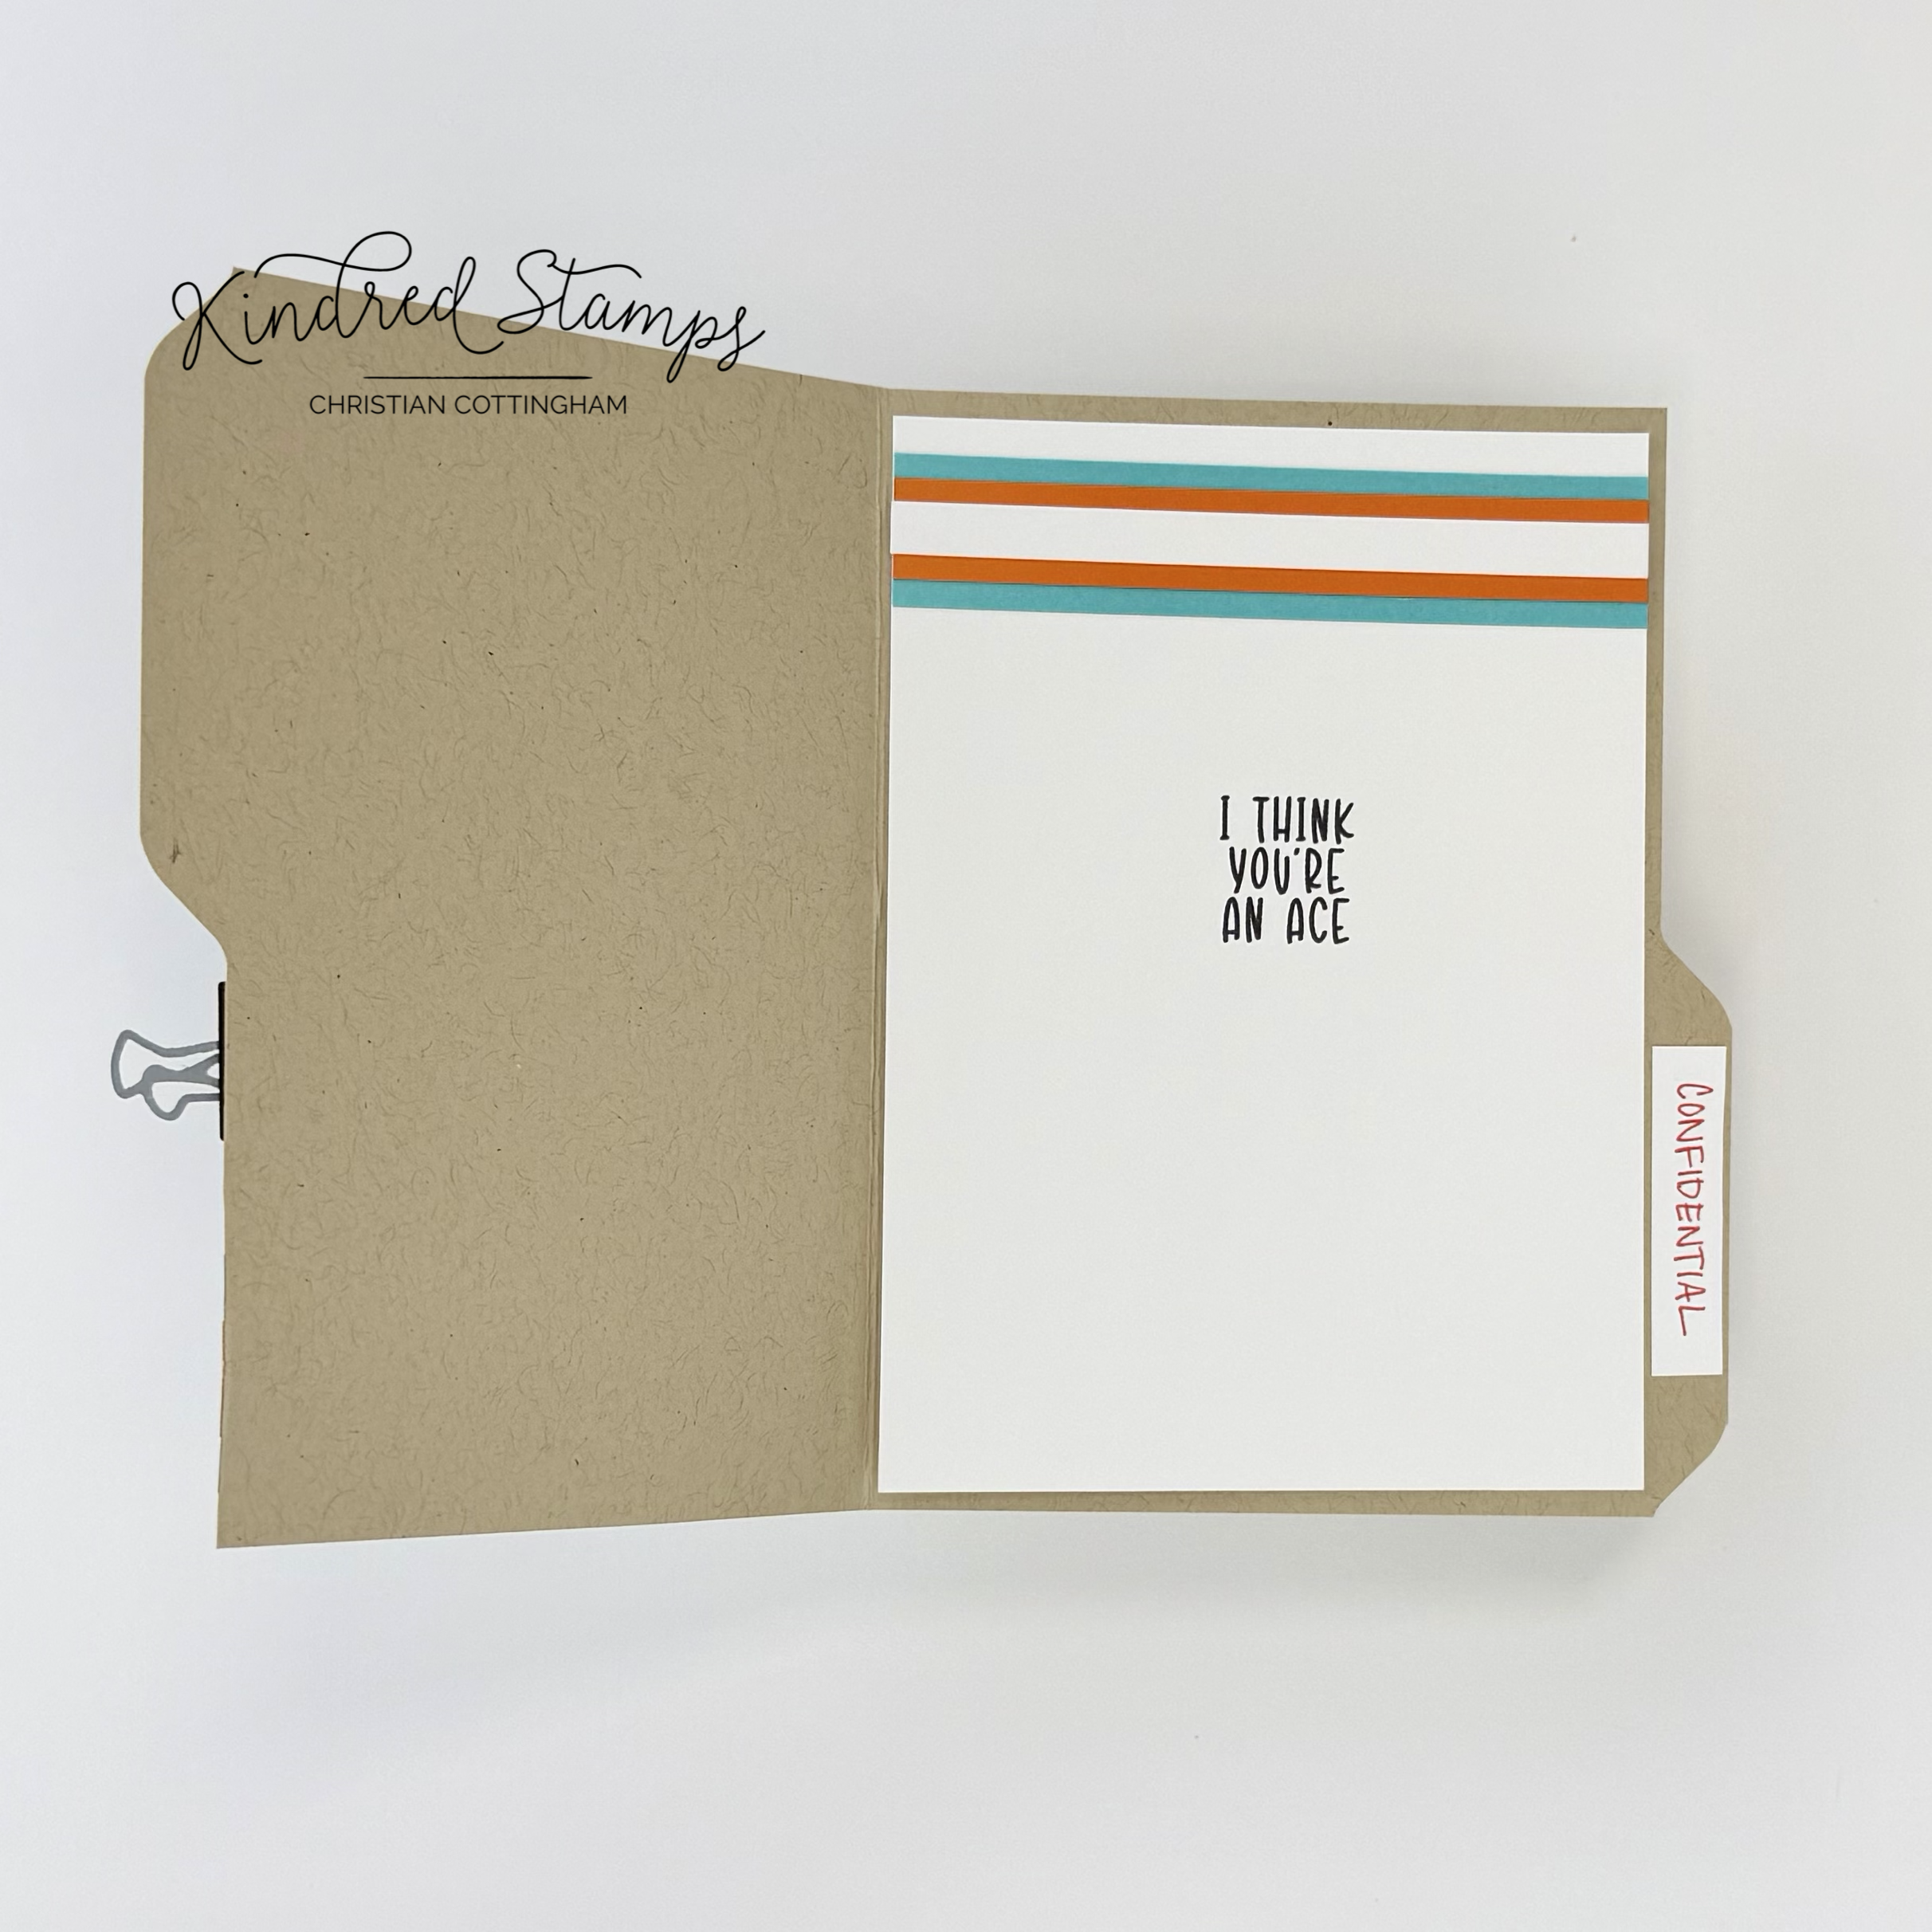
Alrighty, Kindred Stamps
To assemble the front of the card, the rectangle from the Treat Box die with the stamping was adhered crooked (on purpose for once… IYKYK). The picture was then placed even more crooked over the rectangle. Finally, the clip embellishment was glued to the edge of the front file folder.
To add dimension, I added a drop shadow to the picture with a CG1 Olo Marker and then straight lines with a gel pen down each side of the photo. Just like that the confidential folder with a sweet message in the inside was complete.
Card Size: A2 (4.25 inches by 5.5 inches)
The entire Kindred Stamps release will be available this Friday at 8am PST/11am EST. Be sure to subscribe to the Kindred Stamps blog to see a daily line up of sneak peeks from our amazing Design Team! Come join the Fan Club and release event to be part of the release fun, and you may just win some Kindred Stamps credit!!
Color Guide:
Combined colors on images:
Flesh> OR7.1/ OR7.2/ OR2.0
Hair> O7.8/ O7.7/ O7.3
Bird Guy:
Tank> WG3/ WG0
Shirt> R0.4/ RK/ G0.6/ YO2.3
Pants> R1.5/ R0.6
Bird> B0.5/ BG0.4; YG1.4; Y2.3/ Y1.2; CG9/ CG7/ CG7
Boots> CG9/ CG7
Ballerina Guy:
Shoes> CG9/ CG7
Mouth> R0.6/ R0.5
Tutu> R0.2/ R0.1
Shirt> CG3/ Cg0; Black pen; PC929 Pink Prismacolor Pencil
Shorts> B0.6

Power Siblings: Kindred Stamps November Release
You have the power to be amazing!! The Power Siblings from Kindred Stamps November Release works for so many different card designs.
You have the power to do anything you put your mind to, and the Power Siblings (Kindred Stamps November Release) echo this sentiment!! This small but mighty set contain the 3 images and 3 sentiments that can work for all sorts of situations. You have the power to use your imagination to make all the things!!
This blog utilizes affiliate links. If you choose to click on the links provided to purchase, you are supporting me as I receive compensation for your purchase. If purchasing is not in your books, no worries, I hope you find inspiration for projects you design. By clicking on the links, you are letting Kindred Stamps know that you like my content and to keep bringing me back. Thanks for your time and remember you have the power *wink*…
Project One: Castle Battle
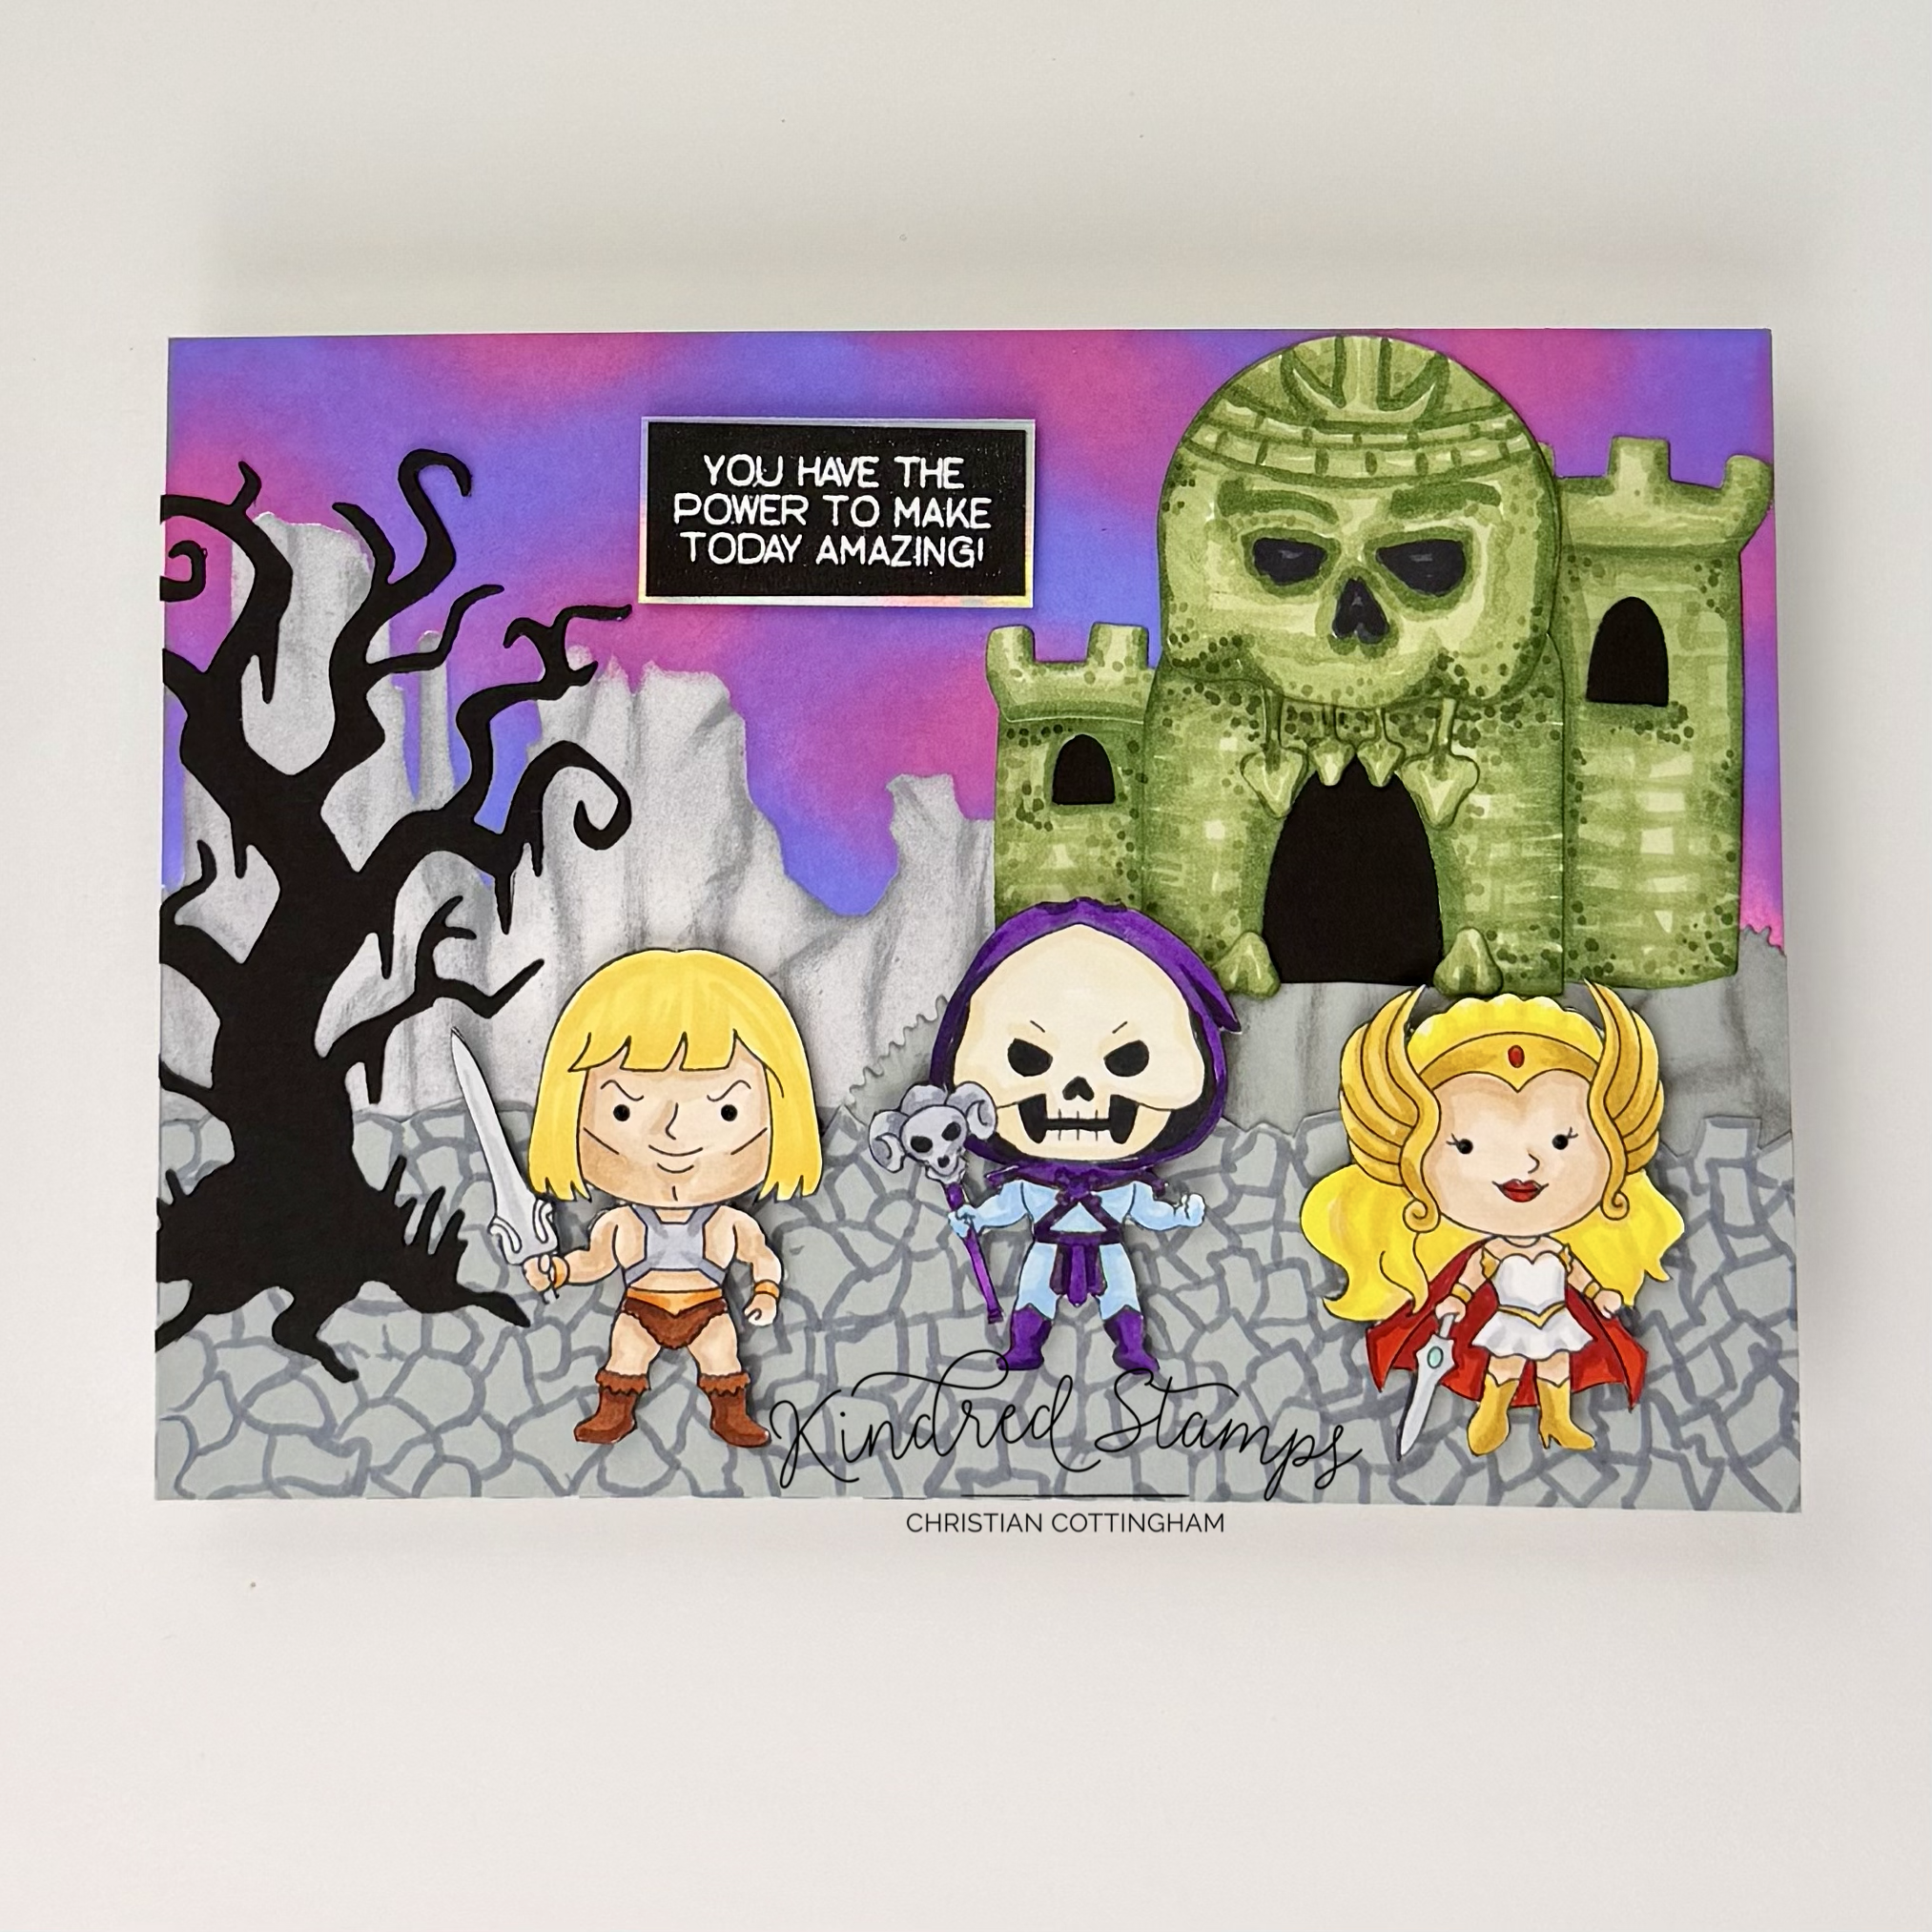
Power Siblings, Kindred Stamps
The icon castle of the Power Siblings is constantly under attack and this card plays out the battle between the Power Siblings and their enemy Skeleton Man. This card makes you rethink what supplies you have an how you have the power to make something different than what the product was originally designed for.
The Power Siblings images were stamped in an alcohol safe ink and colored with Olo Markers (See Color Guide). The images were cut out and edged with a fine liner pen to hide any cutting errors. Thin foam tape was applied to their respective backs and they were set aside. The sentiment was stamped in embossing ink and stamped on a prepared scrap of black card stock. With Snowfall Embossing Powder, the sentiment was heat set. The sentiment was cut down and matted with a piece of holographic card stock. Thin foam tape was applied to the back of the sentiment and set aside.
On an A7 panel, the negative cut out from the Desert Scene Stencil was positioned. Sticky notes were applied to the lower portion of the card to protect it during the ink blending madness that was about to pursue. With Wild Wisteria and Passionate Pink inks from Gina K Designs, the sky came to be. Leaving areas specific to each color and others where the colors were over lapped. I applied one layer and then repeated to obtain the color intensity and blend that I wanted. After a little clean up, the negative stencil was removed and the Desert Scene Stencil was applied. The distant rock formations were inked lightly with Stormy Sky ink (Gina K Designs) and then the details were added in the same color with more intensity with a small blending brush.
With the ink blending down and set aside, it was time to start some die cutting. The Spooky Tree die was cut from black card stock and set aside. Next up, the ragged hill that the castle will sit on was cut from gray card stock with the House In A Hill die. With the same Stormy Sky ink, the rock line details were added with a small blending brush. The ground was drawn on a scrap piece of gray card stock with a CG5 Olo Marker and fussy cut out with the ragged horizon line.
The castle was up next. Out of smooth white card stock, the Castle Die (retired) and the mushrooms from the Fairy Cloche Die were cut out. A piece of card stock was partial die cut out with a circle die that was fitted into the width of the main castle panel (with the door). The partial circle die cut was trimmed to mimic the top of a skull and the eyes and nose were drawn into place. The mushrooms (soon to be teeth), skull, and castle were colored with Olo markers and assembled. (YG8.7/ YG8.5/ YG8.3/ CG7/ CG5) Black card stock scraps were applied on the back of the castle over the door and windows.
To assemble the card, the stenciled and ink blended panel was adhered to an A7 card base. The castle was adhered to the hill and the hill and castle were applied to the right side of the background panel. The ground was attached flat to the back ground. The Spooky Tree was adhered flat to the left side of the card. The sentiment was placed in the sky while the Power Siblings and their foe were popped up ready to fight. This card proves with the power of innovation, you can design anything!!
Card Size: A7 (5 inches by 7 inches)
Project Two: Tiger with Power
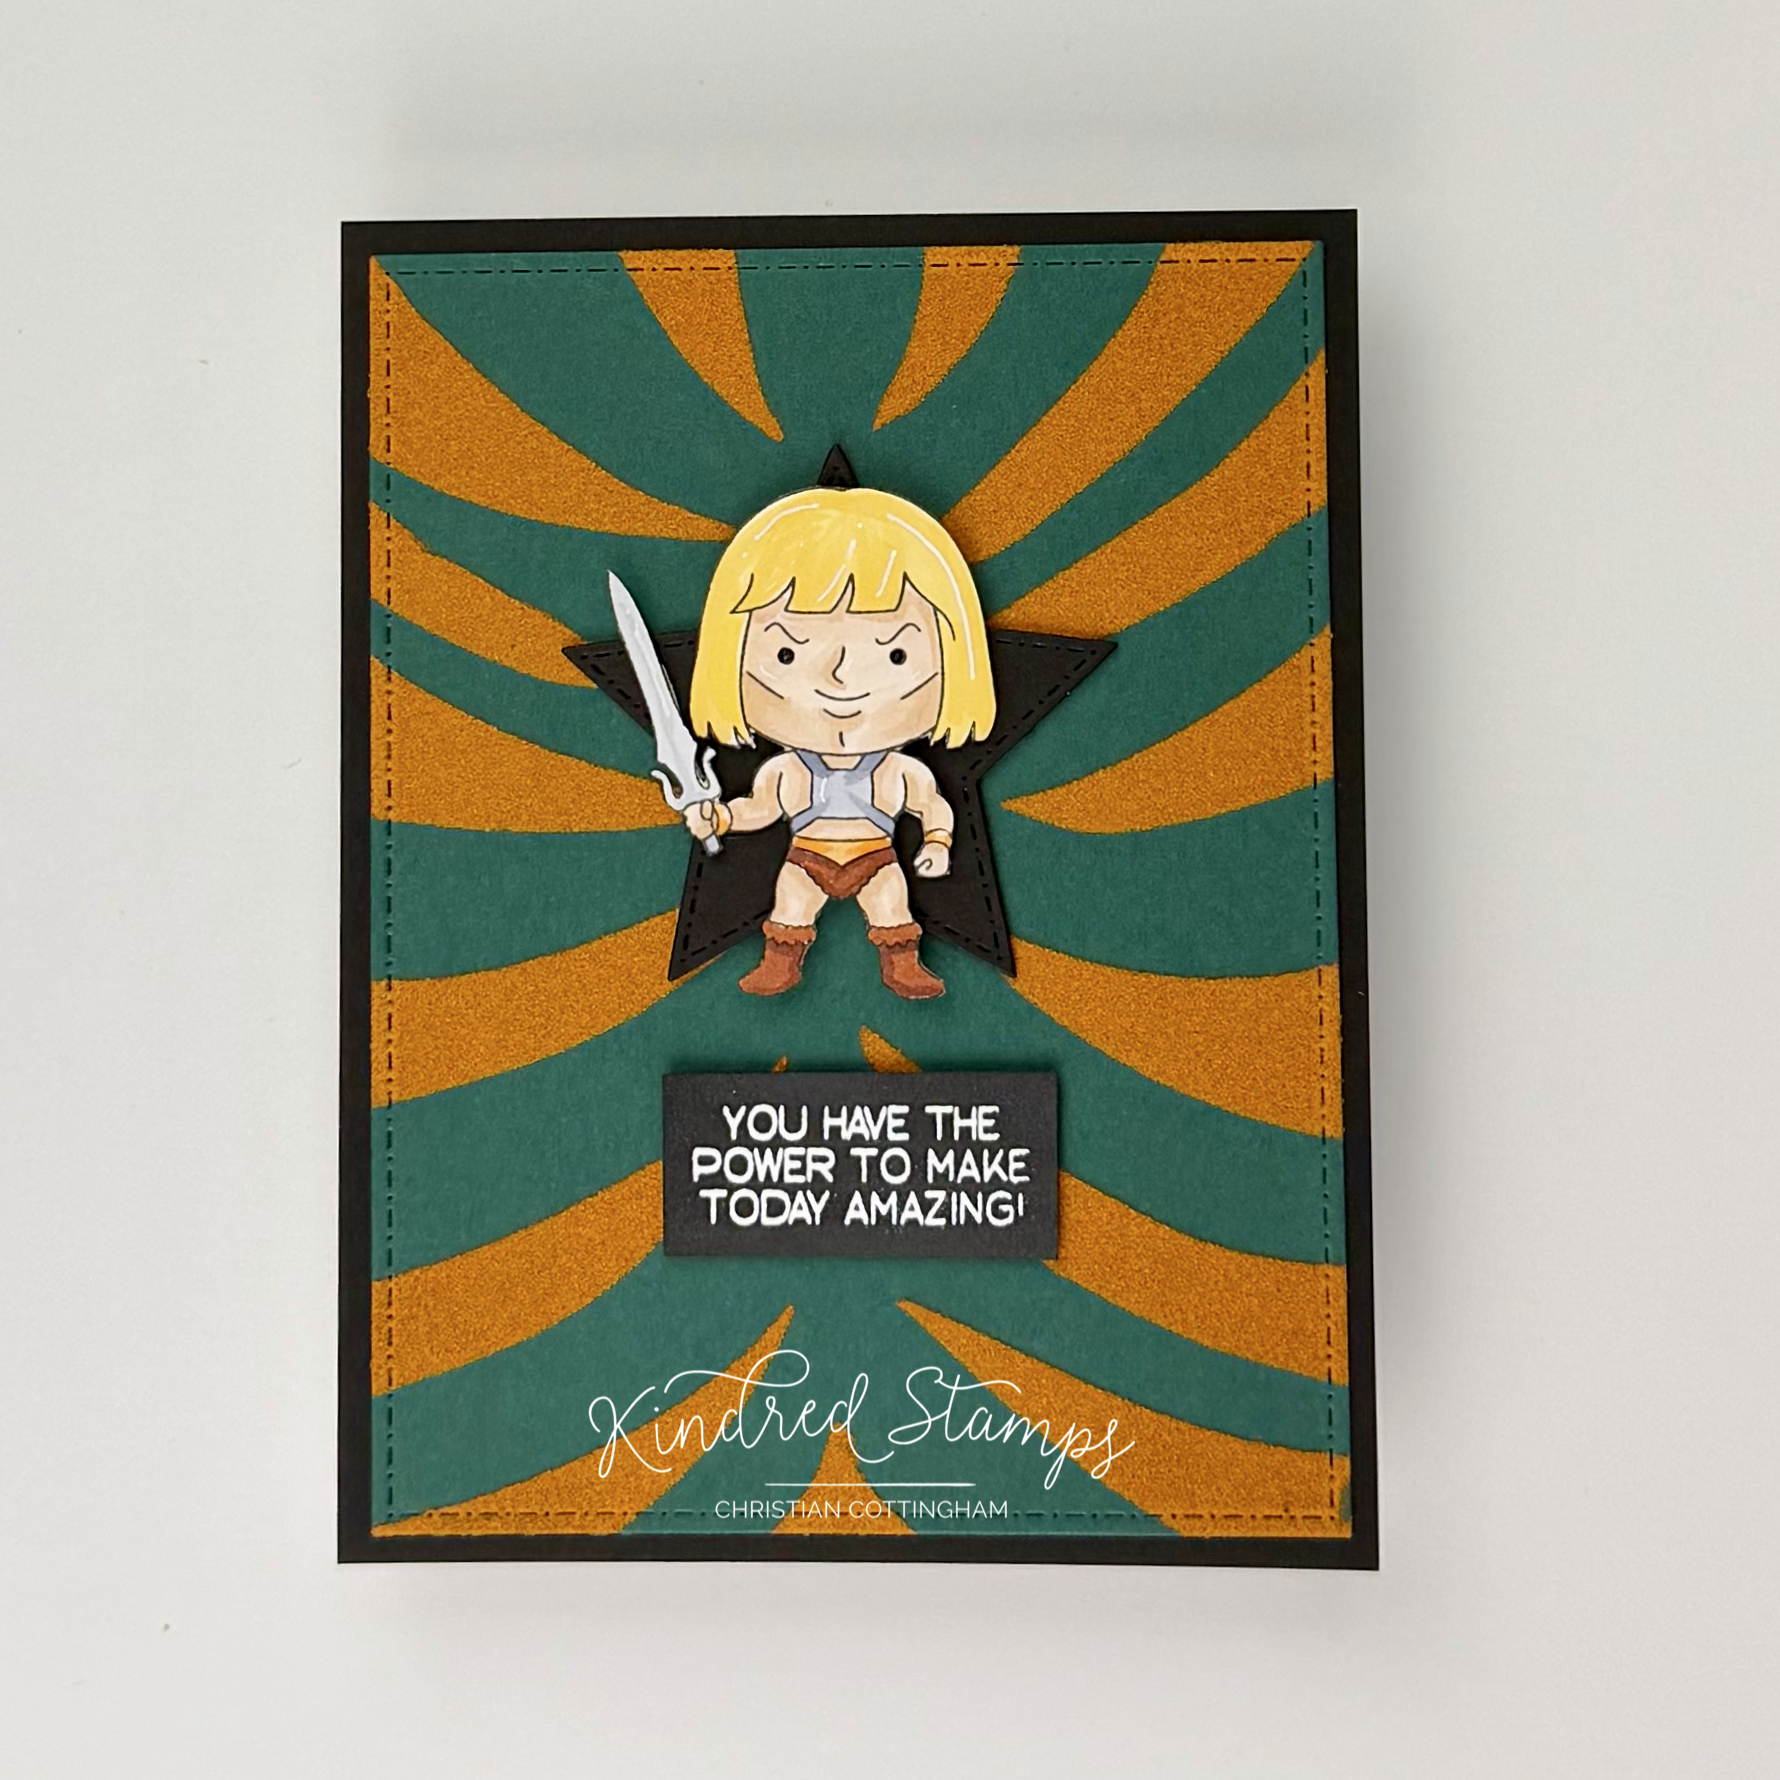
Power Siblings, Kindred Stamps
You too have the power! This card features the Power Brother from the Power Siblings in all his glory and proves that just because you don’t have something that you need, you have the power to make something amazing!
When this card was being designed, I wanted badly to have a feline companion. I tried drawing one… let’s just say I’m not an artist and I am in awe of the designer for the Kindred products. My drawing looked more like something my 5 year old niece would draw, except her’s actually looks like a feline. So, back to the “drawing board” and I decided I can make a stencil!
For the wise ones, like me, you may still have transparencies laying around in your office…. For those not in my generation, these were sheets of acetate that you used a projector for to display handwritten or typed information. This is how we, the wise ones, had college lectures or did business presentations. Ah the good old days before PowerPoint…. Anyway, I utilized a transparency (you could use a thicker piece of acetate or stencil material). Pulling an alcohol marker, I sketched in some tiger stripes that met in the center.

Make your own stencil!
With a craft knife, I cut out the areas of the stencil ensuring a boarder like in a traditional stencil. With some rubbing alcohol, I removed my drawn lines and my stencil was complete!

Pulling out some Duo DecoTransfer gel, a thin layer was applied to a deep green card stock and allowed to dry. Orange flock was applied and heat set with a laminator (I used the Gina K Designs Fuse system set at 3). The panel was ran through the system twice. Once cooled, the flock was removed and the panel was die cut down with the Cards Basic Dies.
A piece of black card stock was trimmed down to an A2 panel (4.25 inches by 5.5 inches). From the center of this panel, the star from the Card Basic Die was cut out. No one will ever know.. well, except you if you are still reading…
The Power Brother was stamped with alcohol safe ink and colored with Olo Markers (See Color Guide). He was fussy cut out on the line and then edged with a black fine liner to hide any cutting flaws. The sentiment was stamped with embossing ink on a prepped piece of scrap black card stock and heat embossed with Snowfall Embossing Powder. The sentiment was trimmed down. With all the pieces ready, it was time to assemble.
The black panel with the star in the middle was applied to a top folding card base. The flocked green panel was centered and adhered flat to the black base. Thin foam tape was placed on the back of all elements. The star was centered and applied, Power brother was centered over the star and finally the sentiment was placed. The texture and various depths from the foam tape give this simple card lots of pow! Not a bad representation of his trusty feline companion. You just have to think out side the box when your artistic skills are lacking and you too have have the power!!
Card Size: A2 (4.25 inches by 5.5 inches)
Project Three: Moon of Power
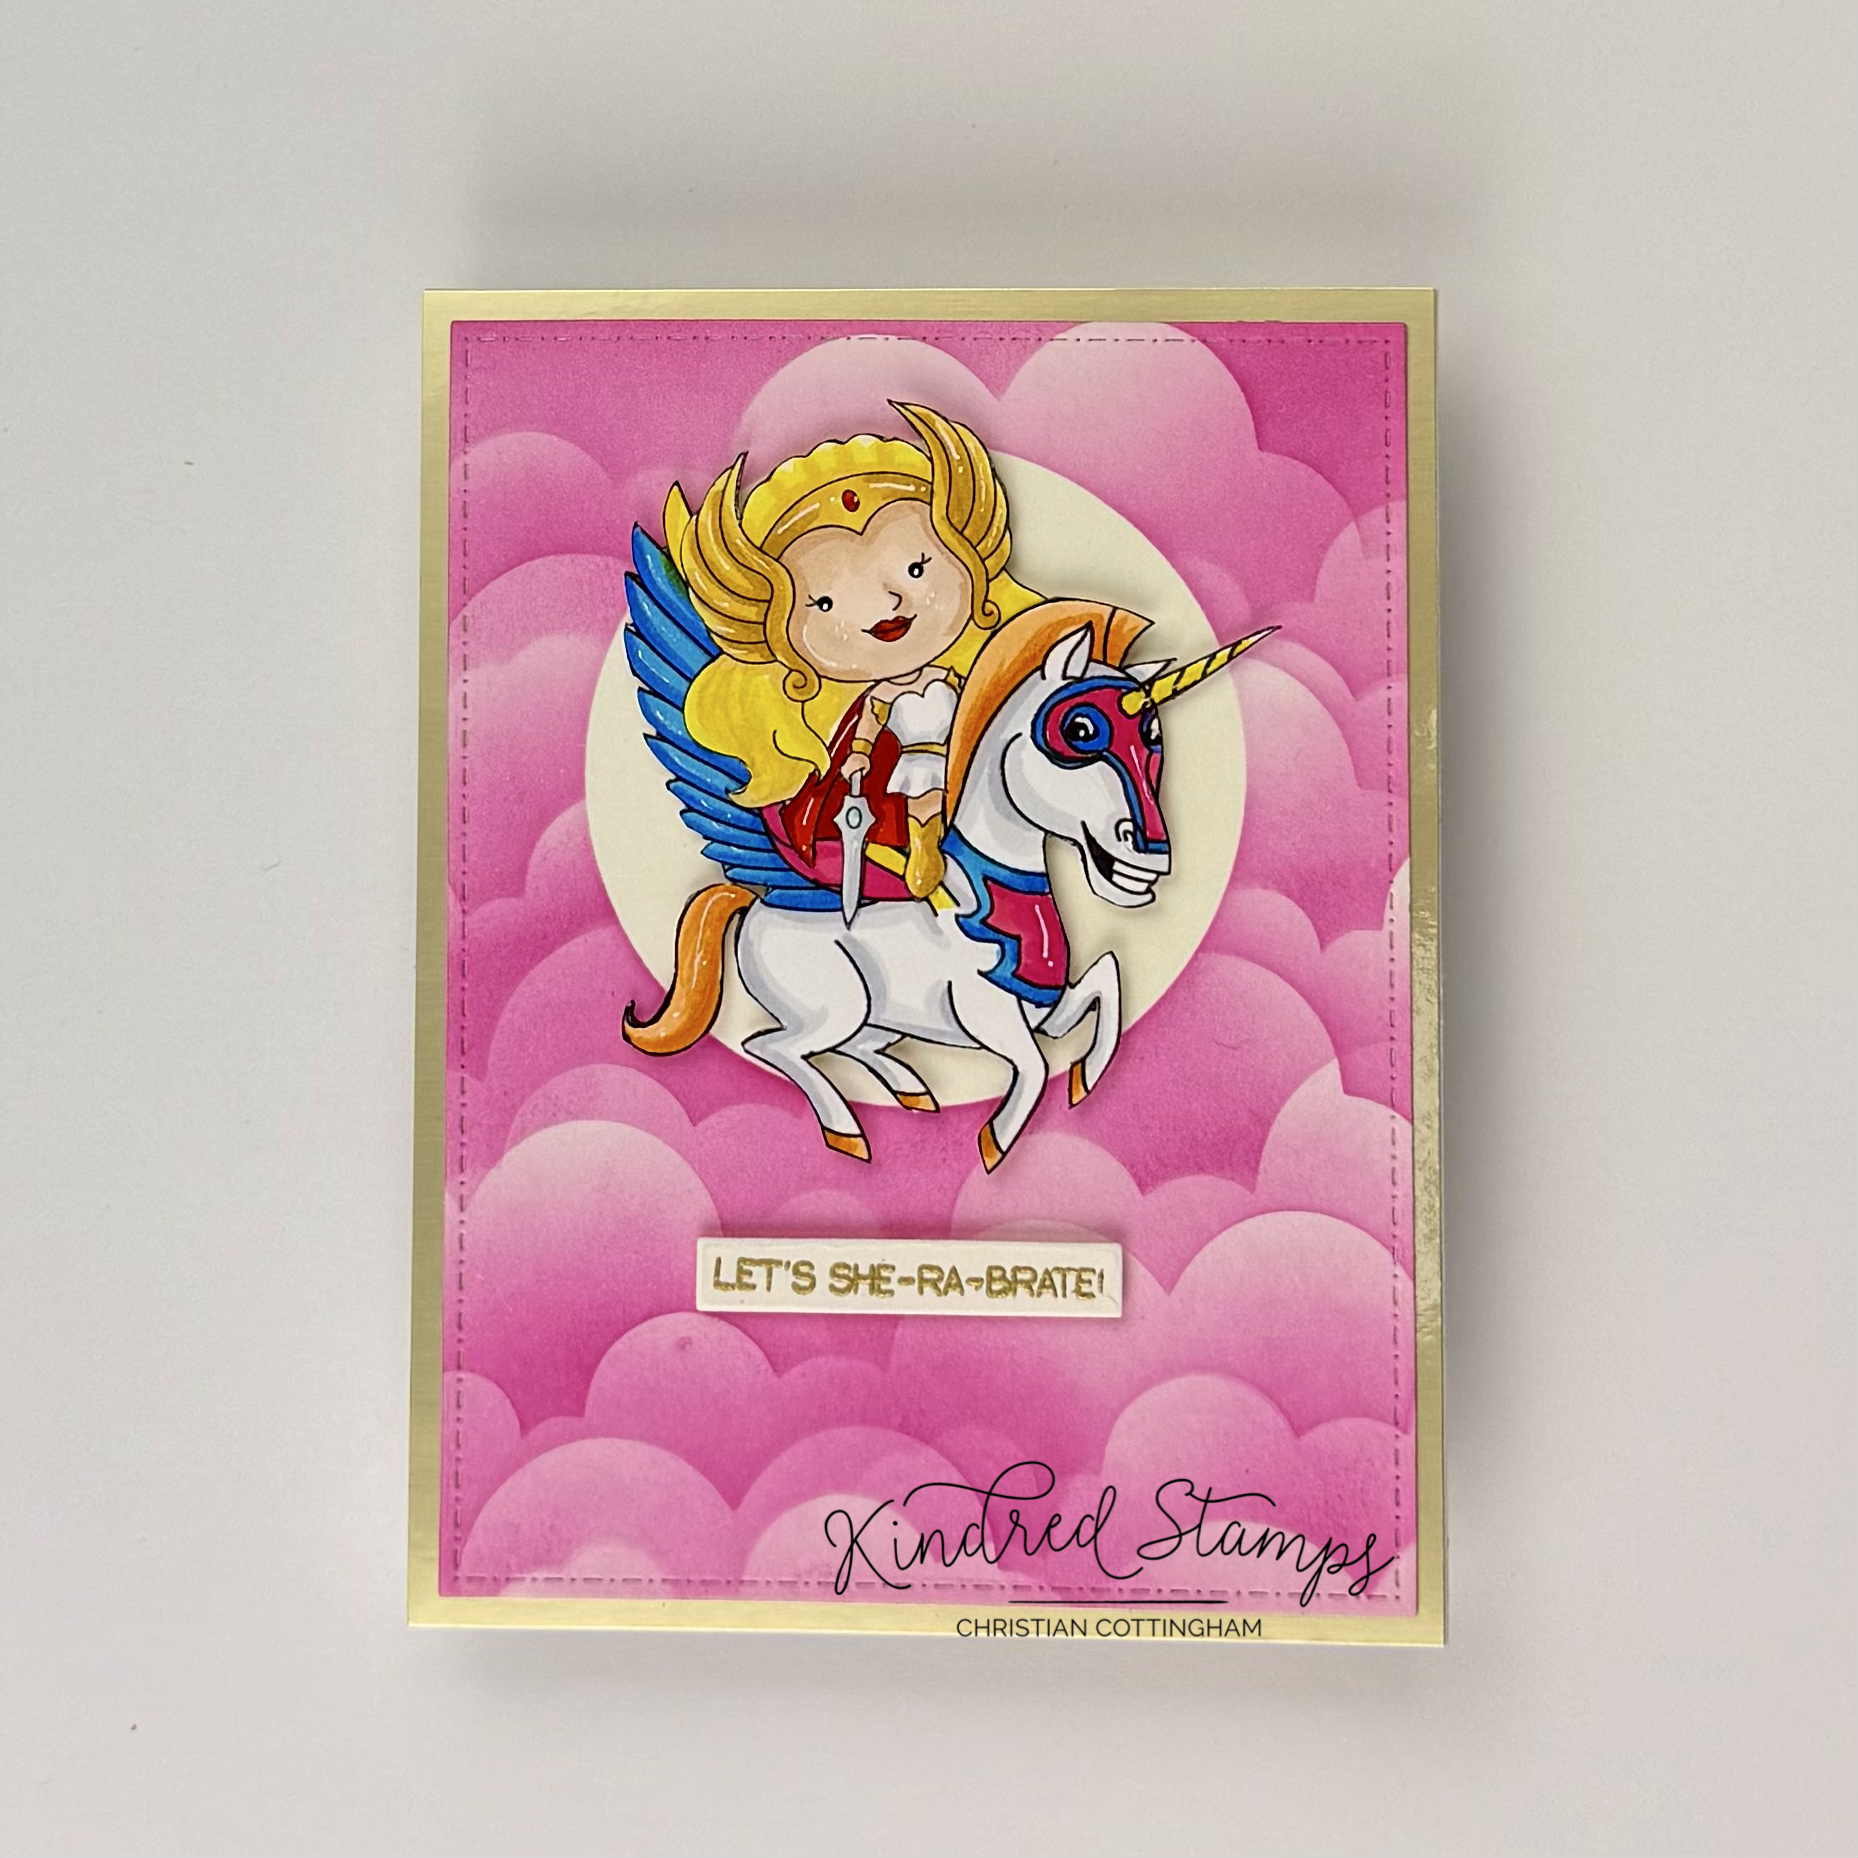
Power Siblings, Kindred Stamps
This Princess has all the power and is flying in on her winged unicorn to wish you a happy birthday! The Power Sister is the star of this card! This simple card is fast to make with the most time spent on coloring and fussy cutting. Let’s break it down.
An A2 ivory card panel (4.25 inches by 5.5 inches) was trimmed down for ink blending. To prep for the ink blending, I needed to make a mask for the moon that the Power Sister to be in front of. There a couple different ways to do this masking. I will explain both so depending on your experience level, you can choose your own adventure! Option One: On a separate A2 card panel (110 pound- thicker than the layer weight [80-100 lb] I typically utilize) cut the circle from the Card Basics Die where the moon would be on my finished panel. Keeping both positive and negative pieces. Layer both of the A2 panels with the blending panel on the bottom. On the circle die cut, place a piece of low tack tape and fit the circle back into the whole that it was cut from. Carefully remove the heavy weight A2 panel leaving the circle attached to the blending card stock. Option Two: Out of a scrap of heavy weight card stock, cut the circle die. Place a piece of low-tack tape behind the circle die cut. Place the circle on the blending panel.
With the Grass and Clouds stencil, pull out the negative long cloud. With Passionate Pink ink (Gina K Designs) stencil the cloud down the front of your panel flipping and moving the cloud around to get different cloud patterns. Clean up your desk or you will be sad…. Justing saying. Once the cleaned go ahead and remove your moon mask. To give the moon a little color, we need the positive masks we made from the die cutting. If you used Option One, layer the two panels up. You shouldn’t see any pink. If you used Option Two, place your mask over the top of the moon and use masking tape or sticky notes to cover the edges so your ink blending stays contained. Use a pale yellow ink to shade in the moon with random heavier spots. I used the whatever color was left on my blending brush. With the masks removed, the back ground panel was die cut with the rectangle from the Cards Basic Die. A panel of matte gold cardstock was cut down to an A2 panel (4.25 inches by 5.5 inches) and set aside for assembly.
Next up the Power Sister was colored with Olo Markers (See Color Guide) and fussy cut out on the line. Her winged companion utilizes the Stay Strong Digital stamp. With an alcohol safe fine liner pen, the horn, mask, and breast plate were drawn. The winged companion was colored with Olo Markers (See Color Guide) and was fussy cut out on the line. Both images were edged with a black marker to hide any defects from the fussy cutting. Finally, the Power Sister image was cut along the leg so she could be mounted to her companion. The images were popped up with foam tape and set aside for assembly.
The sentiment was stamped on the same ivory card stock prepped with an antistatic tool and gold embossing powder was heat set. The sentiment strip was trimmed down and foam tape applied.
To assemble, the Power Sister and her companion were centered in front of the moon and the sentiment centered below. The completed panel was glued to an A2 top folding card base. This card just screams celebration and power!
Card Size: A2 (4.25 inches by 5.5 inches)
Project Four: Spooky Woods

Power Siblings, Kindred Stamps
The skies on this plant ware always bright! This card showcase the evil sky in the deep woods with Skeleton Man from the Power Siblings stamp set. Using the color wheel to find the complementary colors allow the Skeleton. Man to glow. Let’s break it down!
First up, picking the sky colors! Knowing that the Skeleton man was primarily blue/ purple I wanted to use the complementary colors. A complementary color is the color opposite on a color wheel. The complementary color will enhance the vibrancy of the color you are showcasing. On a color wheel, the complementary color to purple is yellow and to blue is orange. So I knew that I would be using those two colors. I wanted to add a third color in so I choose the color red. When you look at a color wheel, the colors that sit next to each other are called analogous colors and they always look good together. Orange and red are partners and purple and red are partners on the other side. Okay, I’ll stop nerding out on why I choose the colors I did and get to the blending…
On an A2 (4.25 inches by 5.5 inches) card panel I blended the 3 colors in thirds horizontally. Wild Dandelion/ Tangerine Twist/ and Cherry Red (Gina K Designs) were blended with overlap into each section with the prior. Pulling out Distress Ink in Black Soot, the edges of the panel were darkened to give an eery look to the sky. This panel was set aside for the ink to absorb into the card stock.
The Skeleton Man from the Power Siblings set was stamped in alcohol marker safe ink and colored with Olo Markers (See Color Guide). The image was fussy cut out on the line for the outside edges. The gap between the scepter and his head was cut out with a craft knife. Foam tape was applied to the back of the Skeleton Man and he was set aside.
The dark woods scene was next. The Jungle Scene Die will be the distant background. This was cut from black card stock. To give the illusion that the Skeleton Man was in the foreground of the scene there needed to be some trees layered into the mix. To achieve this, the Bare Trees die was die cut a total of 3 times (6 trees total, 3 of both designs) from black card stock. One of each tree design were set aside. The remaining 4 trees were layered together with liquid glue. Now, there are a total of 4 trees (2 single, 2 doubled up).
To assemble the scene, the Jungle Scene die cut was adhered to the ink blended panel with the yellow ink at the bottom of the scene. Next, the 2 single trees were adhered to the jungle scene on the far edges. The double layered trees were next to be adhered. Because I wanted the trees to frame the image, one of the double-layered trees was glued upside down. Due to the pitches of the black card stock, you can not tell the die cut is upside down. The card panel now has 3 levels of forest- the jungle scene, the single layer trees, and finally the double-layered tree. This gives the illusion of depth with no extra shading or foam tape. The finished panel was placed on a card base.
Skeleton Man was adhered centered in the trees. The only thing left was the sentiment. Pulling the black card stock scraps from the bare trees out of the garbage (don’t judge… you do it too…) the paper was prepped with an antistatic powder. The sentiment was stamped with embossing ink, sprinkled with Snowfall Embossing Powder, and heat set. The sentiment was cut down and adhered to a piece of holographic cardstock to act as a frame. Foam tape was applied and the sentiment was stuck to the lower right section of the card.
With complementary color selection, the Skeleton Man pops off the card!
Card Size A2 (4.25 inches by 5.5 inches)
Project Five: Princess Power
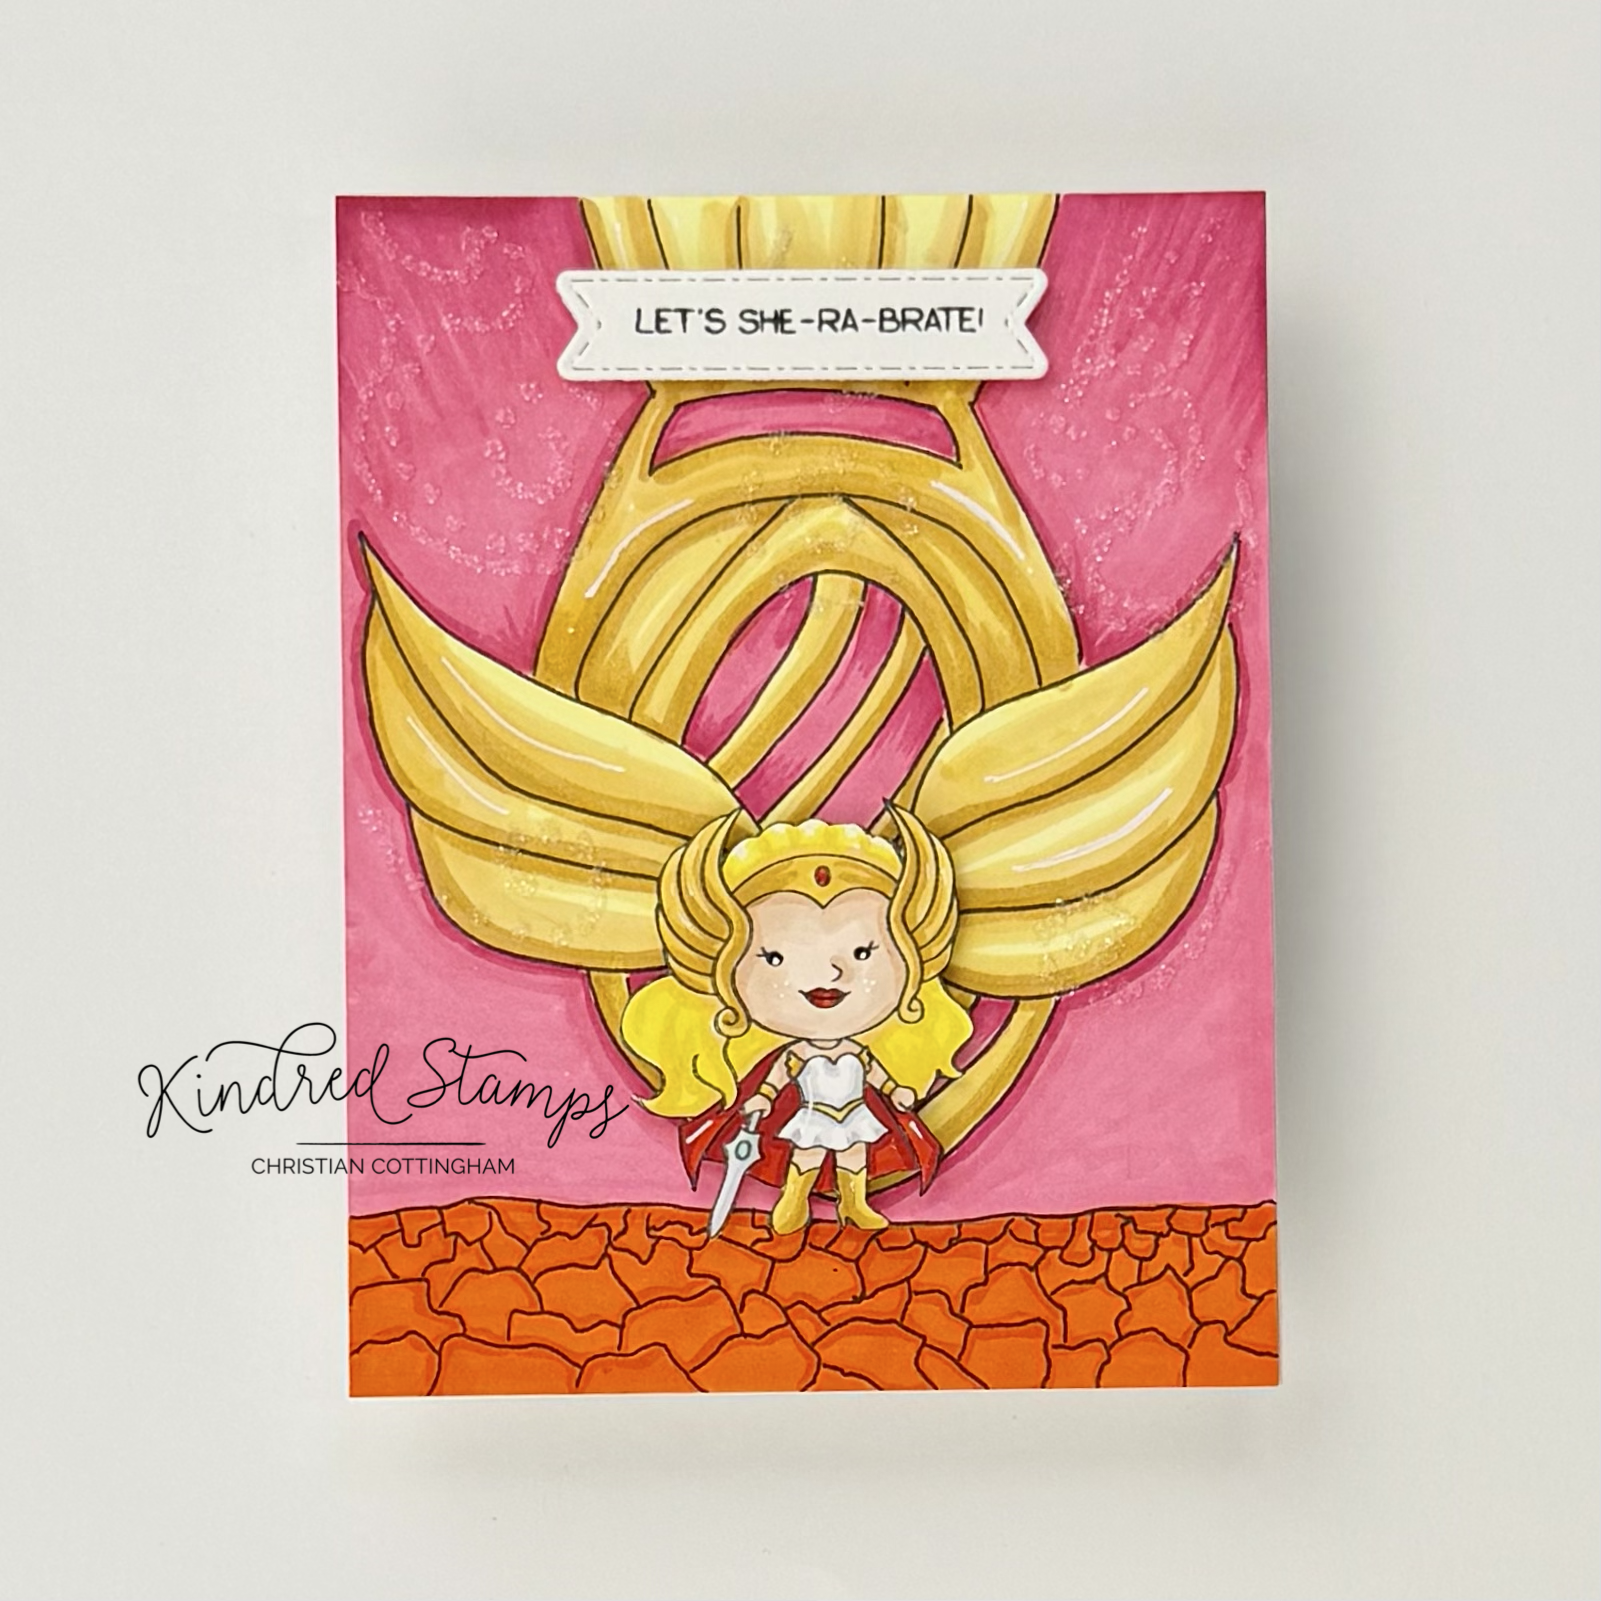
Power Siblings, Kindred Stamps
When this princess transitions to her battle stance, the golden wings appear ushering in her power. What better way to show case the girl power than a sparkly colored panel show casing the Power Sister from the Power Siblings stamp set.
On a piece of card stock, I sketched out the power medallion in pencil. Once I was satisfied with the sizing and placement it was time to stamp the Power Sister. With alcohol safe ink, the Power Sister was stamped. With the image stamped, I was able to draw in the lines of the emblem avoiding the stamped image so she would be in the foreground. The ground was drawn with smaller stones in the distance and larger in the front.
With the lines all drawn, the pencil markings were erased and the color commenced. The Power Sister was colored with Olo Markers (See Color Guide). The gold emblem was colored next with Olo Markers (YO2.5/ YO2.3/ Y1.1). The ground was colored with Altenew Artist Markers (C019/ C024). The upper third of the card was colored with Altenew Artist Markers in R504/ C003.
With Glossy Accents, small dots in swirl like pattern was applied to and Rock Candy glitter was applied. While the glitter dried, the sentiment was stamped and cut out with the Stitched Sentiment Dies and a piece of foam tape was applied.
The card panel was glued flat to a top folding card base and the sentiment was center on the top of the card. This Power Sister is here in all her glory reminding us that we all have the inner power to make a difference, you just have to declare it!
Card Size: A2 (4.25 inches by 5.5 inches)
The entire Kindred Stamps release will be available this Friday at 8am PST/11am EST. Be sure to subscribe to the Kindred Stamps blog to see a daily line up of sneak peeks from our amazing Design Team! Come join the Fan Club and release event to be part of the release fun, and you may just win some Kindred Stamps credit!!
Color Guide:
Power Brother:
Flesh> OR2.0/ OR7.1/ OR7.2
Chest Plate> CG3/ CG1
Sword: CG3/ CG1
Belt/ Wristlets> O2.5/ O2.2
Roos/ Boots> OR4.7/O2.7
Hair> YO2.2/ Y2.2
Power Sister:
Flesh> OR2.0/ OR7.1/ OR7.2
Hair> YO2.3/ Y1.2/ Y2.0
Dress> CG3/ CG1
Sword> CG3/ CG1; BG2.4/ BG2.1
Gold Elements> YO2.5/ YO2.3/ Y2.2
Jewel/ Cape/ Lips> R0.6/ R0.5
Skeleton Man:
Skull> O4.1/ YO2.0; CG9
Flesh> B0.3/ B0.2
Accessories> V2.7/ V2.6
Scepter> V2.6/ V2.4; CG5/CG3; CG9
Winged Companion:
CG3/CG1; O2.5/ O2.2; Y2.3/ Y1.2; RV1.5/ RV0.4; B0.5/B2.4

Sarcastic Teens: Kindred Stamps Oct. Release
Sarcastic Teens from Kindred Stamps does not lack any self-esteem, this teen knows it’s not her! Check out my blog to see the cards that define a generation.
Sarcasm? Low Self-Esteem? To smart for your britches? If the answer is yes to any of these questions then the Sarcastic Teens are right up your alley. These two friends set the tone for a generation. This 4 inch by 4 inch stamp set is a perfect reflection of its day.
This blog utilizes affiliate links. If you choose to click on the links provided to purchase, you are supporting me as I receive compensation for your purchase. If purchasing is not in your books, no worries, I hope you find inspiration for projects you design. By clicking on the links, you are letting Kindred Stamps know that you like my content and to keep bringing me back. Thanks for your time and let’s dive into these Sarcastic Teens!
Project 1: Hallway Teens

Sarcastic Teens, Kindred Stamps
The Sarcastic Teens are in their element in their school hallway. No low-self esteem allowed….
On a panel of 80lb Neenah Classic Crest Solar White cardstock, the 2 sarcastic teens were stamped in alcohol safe ink. Masks were stamped, cut out on the line, and positioned over the respective teens. Pulling out the trusty T-Ruler, the lockers and flooring were sketched in pencil lightly. Once I was satisfied with the location and the hallway wall, the lines were lined with a fine liner pen. The lockers were ink blended first after the hall wall and floors were masked with some sticky notes in Sweet Mango (Gina K Designs). The lockers were then masked with sticky notes and the wall was ink blended with Light Lilac (Gina K Designs). Finally the floor and trim were ink blended with Soft Stone (Gina K Designs) after the wall and lockers were protected.
All masks were removed and it was time to pull out the Olo Markers. The trim that had the gray undertone was colored with OR4.4 to provide separation from the floor. The Sarcastic Teens were then colored. (See Color Guide). With the panel colored, the panel was trimmed down to 3.75 inches by 5.5 inches.
A card base was covered with black card stock. The colored scene was adhered to the center of the card base. To frame the scene, a couple strips of holographic cardstock were trimmed to 0.25 inch by 5.5 inches and adhered.
Pulling out the Card Basic Die set, the ticket was cut from both black and white card stock. On the piece of white card stock, the stitched line was fussy cut off of the ticket. The sentiment was stamped in black ink. The sentiment was glued to the black ticket and hung on the wall in the hallway.
I couldn’t agree more with that life would suck without you and the Sarcastic Teens are the perfect vessel to send that message on.
Card Size: 4.25 inches by 5.5 inches
Project 2: Sarcasm Forever
Sarcastic Teens, Kindred Stamps
IYKYK… This circle says it all and showcases the Long Haired Teen and draws the recipient into the card to see what’s next. Let’s break it down.
First up, the front card panel. A 4.25 inch by 5.5 inch piece of blue card stock was selected and the inner circle from the Card Basic Die was cut from the center of the upper third of the panel. This panel will work as a positioning jig on the card base. A top folding card base was cut and scored. With the score line in place, the blue card stock panel was lined up on the base. The same inner circle was cut from the front panel of the card base. The card base was then folded at the score line and set aside.
The blue panel then was die cut with the large rectangle in the Card Basic Die. Using the same die, a panel of yellow card stock was cut down for the inside panel of the card base. The blue panel was glued to the front of the card base, lining up the circle. The yellow panel was glued to the inside panel opposite of the circle die to be the backing to the see through window.
Taking a piece of black card stock, the 2 circles from the Card Basic Die were lined up with the smaller circle inside the larger circle and die cut. This provided a framed circle. The word “sarcasm” was die cut with the Adaline Alpha dies. With the die cutting complete it was time to line up the letters. Using the grid on the Kindred Glass Craft Mat, the letters were aligned. Using a piece of low tack tape, the letters were picked up for ease of gluing. On a 0.25 inch strip of acetate the letters were glued with glue only going on the sections of the letters that were attached to the acetate. This was left to dry with the low tack tape still in place.
While the glue was drying, the Long Haired Teen was colored with Olo Markers (See Color Guide). She was then fussy cut out and inked on the edges with a black brush marker to hide any imperfections from cutting.
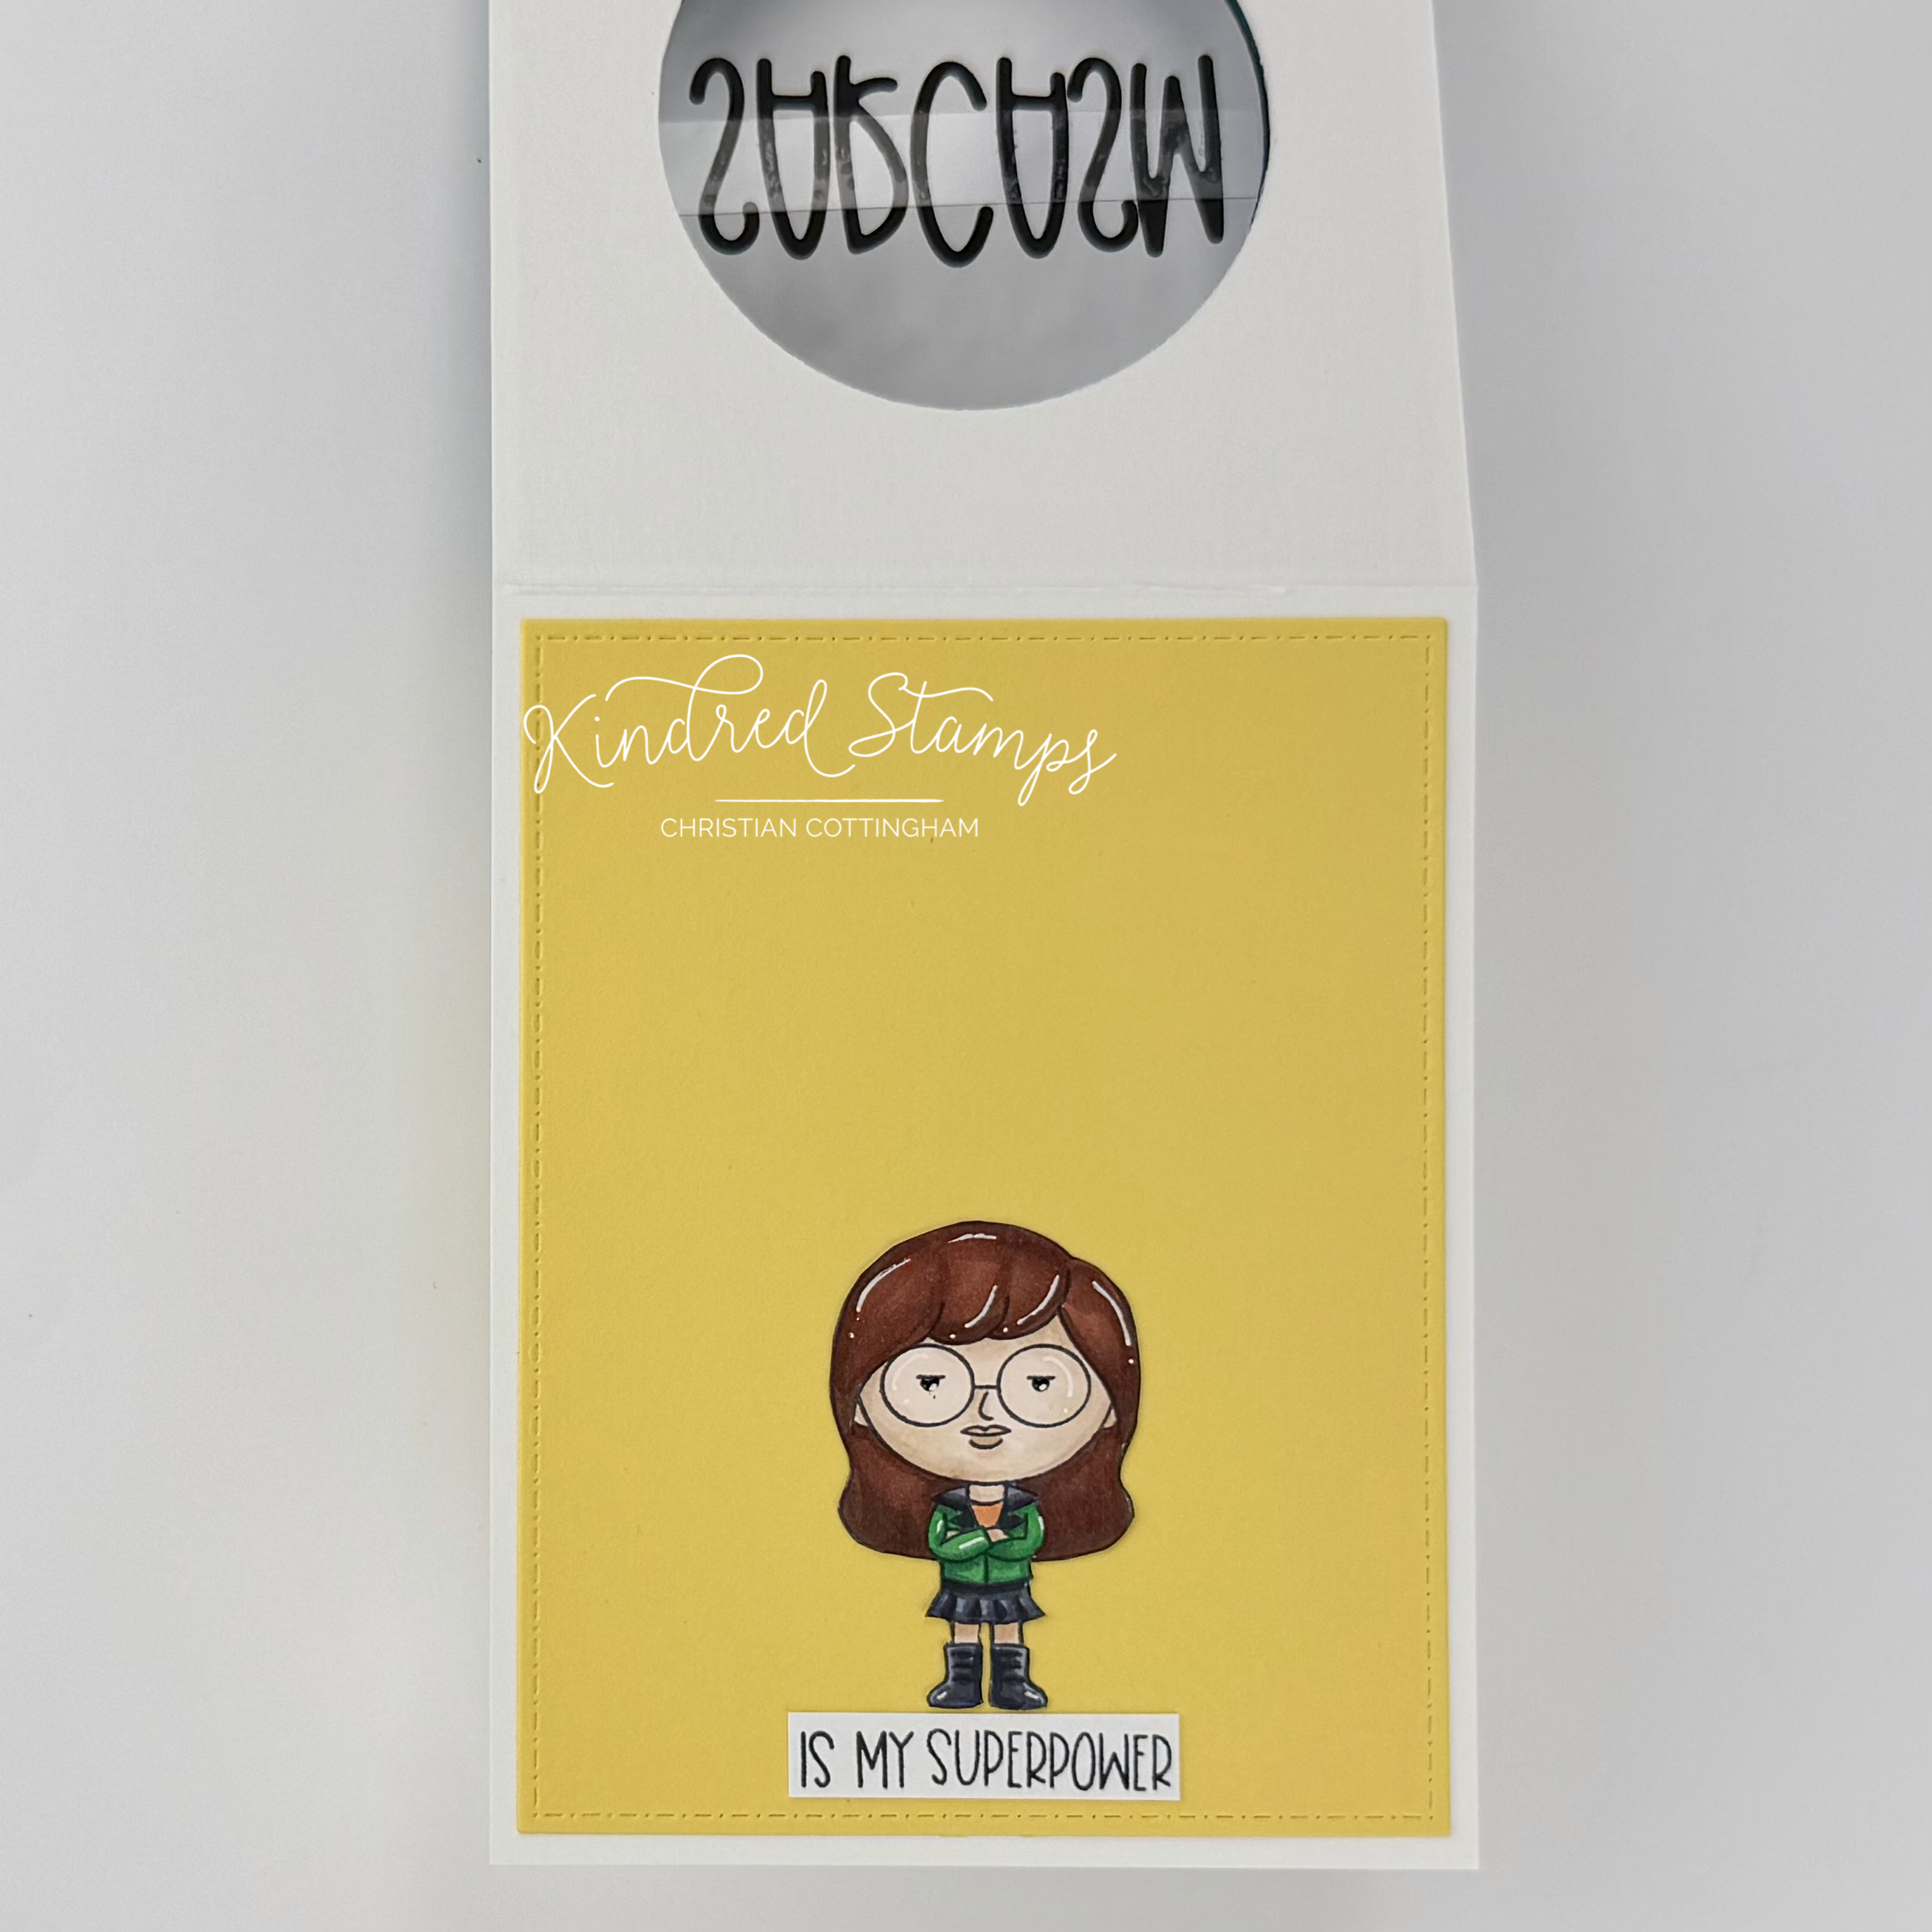
Sarcastic Teens, Kindred Stamps
The sentiment in the stamp set is a stacked sentiment “Sarcasm is my superpower” and I only needed the “is my superpower”. With the stamp on a block, the word “sarcasm” and “my superpower” were masked so ink would only be on the word “is.” This was stamped on a scrap piece of white card stock. The stamp was cleaned and then “Sarcasm is” was masked off and rest of the sentiment was inked with black card stock. Masks removed and the remainder of the sentiment was stamped in alignment with “is.” The new sentiment was trimmed to be a strip that the teen will be standing on inside the card.
With the glue dry, the acetate piece was adhered to the circle frame with strong double-sided tape. A foam strip was placed on the circle frame (extra security for the acetate letters). This was centered and secured to the front of the card panel. With the frame in place, the Long Haired Teen was positioned in the inside of the card. She was adhered flat to the card base. The sentiment strip was then centered below her.
Just like this teen, sarcasm is my superpower and my love language! I could love this more!
Card Size: 4.25 inches by 5.5 inches
Project 3: Good Taste
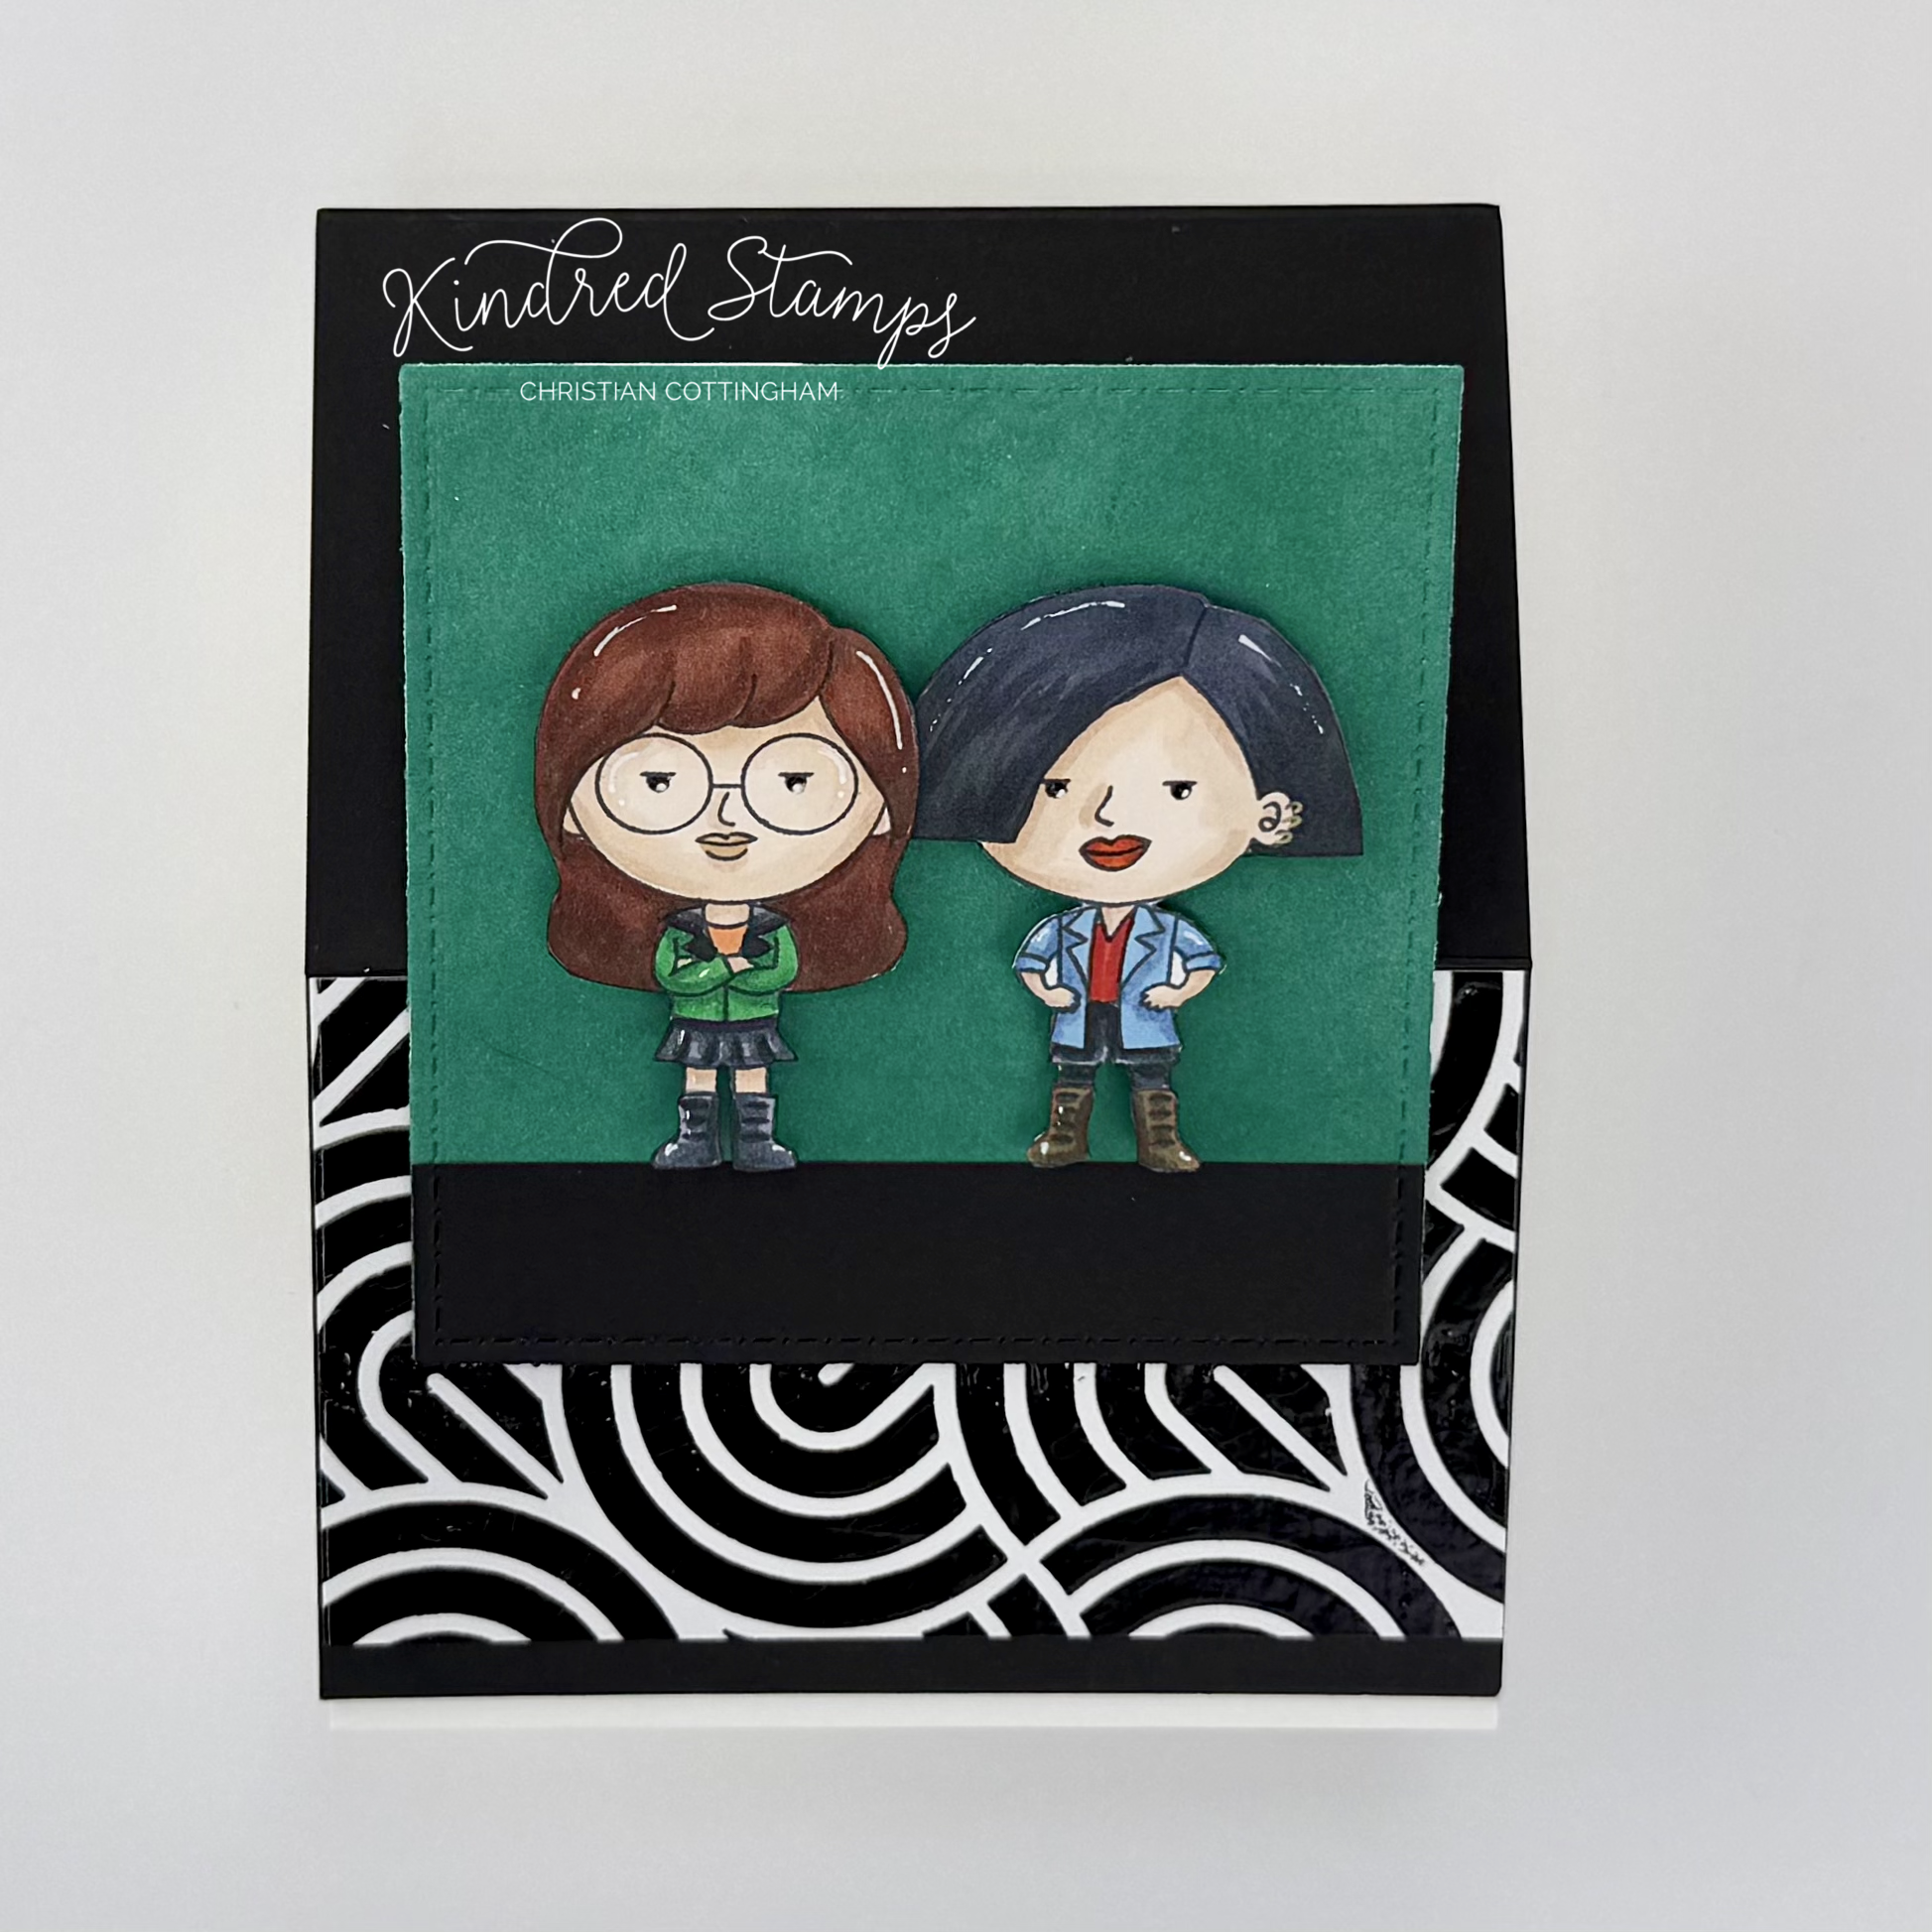
Sarcastic Teens, Kindred Stamps
Not everyone has good taste and these teens have no problem letting you know! This card frames the girls and provides the sass in the inside. Let’s break down this card.
Pulling our the Waves stencil, a piece of Hammermill 100lb card stock cut in a 6.5 inch square, Decofoil Duo Transfer Gel, a piece of shiny black piece of Decofoil and my Fuse laminator it was time to have some fun. The stencil was positioned on the larger square paper and taped to the Kindred Stamps Glass Craft Mat with a thicker piece of low tack tape. The Decofoil Duo Transfer Gel was applied in a thin smooth layer over the white card stock. The stencil was removed and cleaned immediately. The gelled panel was set aside to dry while I prepped the remaining components of the card.
A top folding card base was scored at 2.75 inches and at 5.5 inches. A 4.25 by 5.5 inch black card stock panel was scored at 2.75 inches. The score lines were reinforced and the black panel was adhered to the card base.
The Sarcastic Teens were colored with Olo Markers (See Color Guide) and fussy cut out on the line. The teens were edged with a black brush pen to hide any imperfections from cutting. Foam tape was applied and the teens were set aside.
On a piece of 80lb Neenah Classic Crest Solar White card stock, Christmas Pine ink (Gina K Designs) was blended to provide the 90’s green that my college dorm bedding and decor exploded with. The inked section was then die cut with the square shape from the Card Basic Die Set. A scrap of black card stock was also cut with the square shape to provide the flooring that the Sarcastic Teens will be standing on. This black flooring was adhered to the green square. The teens were stuck into place with the previously applied foam tape.
The Decofoil Duo Gel was finally clear and tacky and ready to be foiled. I turned on the laminator and dusted off the piece of black foil. The foil was placed on top of the gel with the shiny side up and placed into the carrier sleeve. When the laminator was ready, the panel was feed through. Even though I wanted to rip off that foil to see the awesomeness that was underneath I used restraint and let it cool first. The foil was removed and I was so pleased with the design.
The foil panel was cut to 4.25 inches by 2.5 inches. This was adhered to the card front lining up the top edge with the scored lined. This provided a black strip along the bottom of the card front. The square was then adhered only on the bottom of the square to the lower portion of the panel. This will allow the easel to move freely.
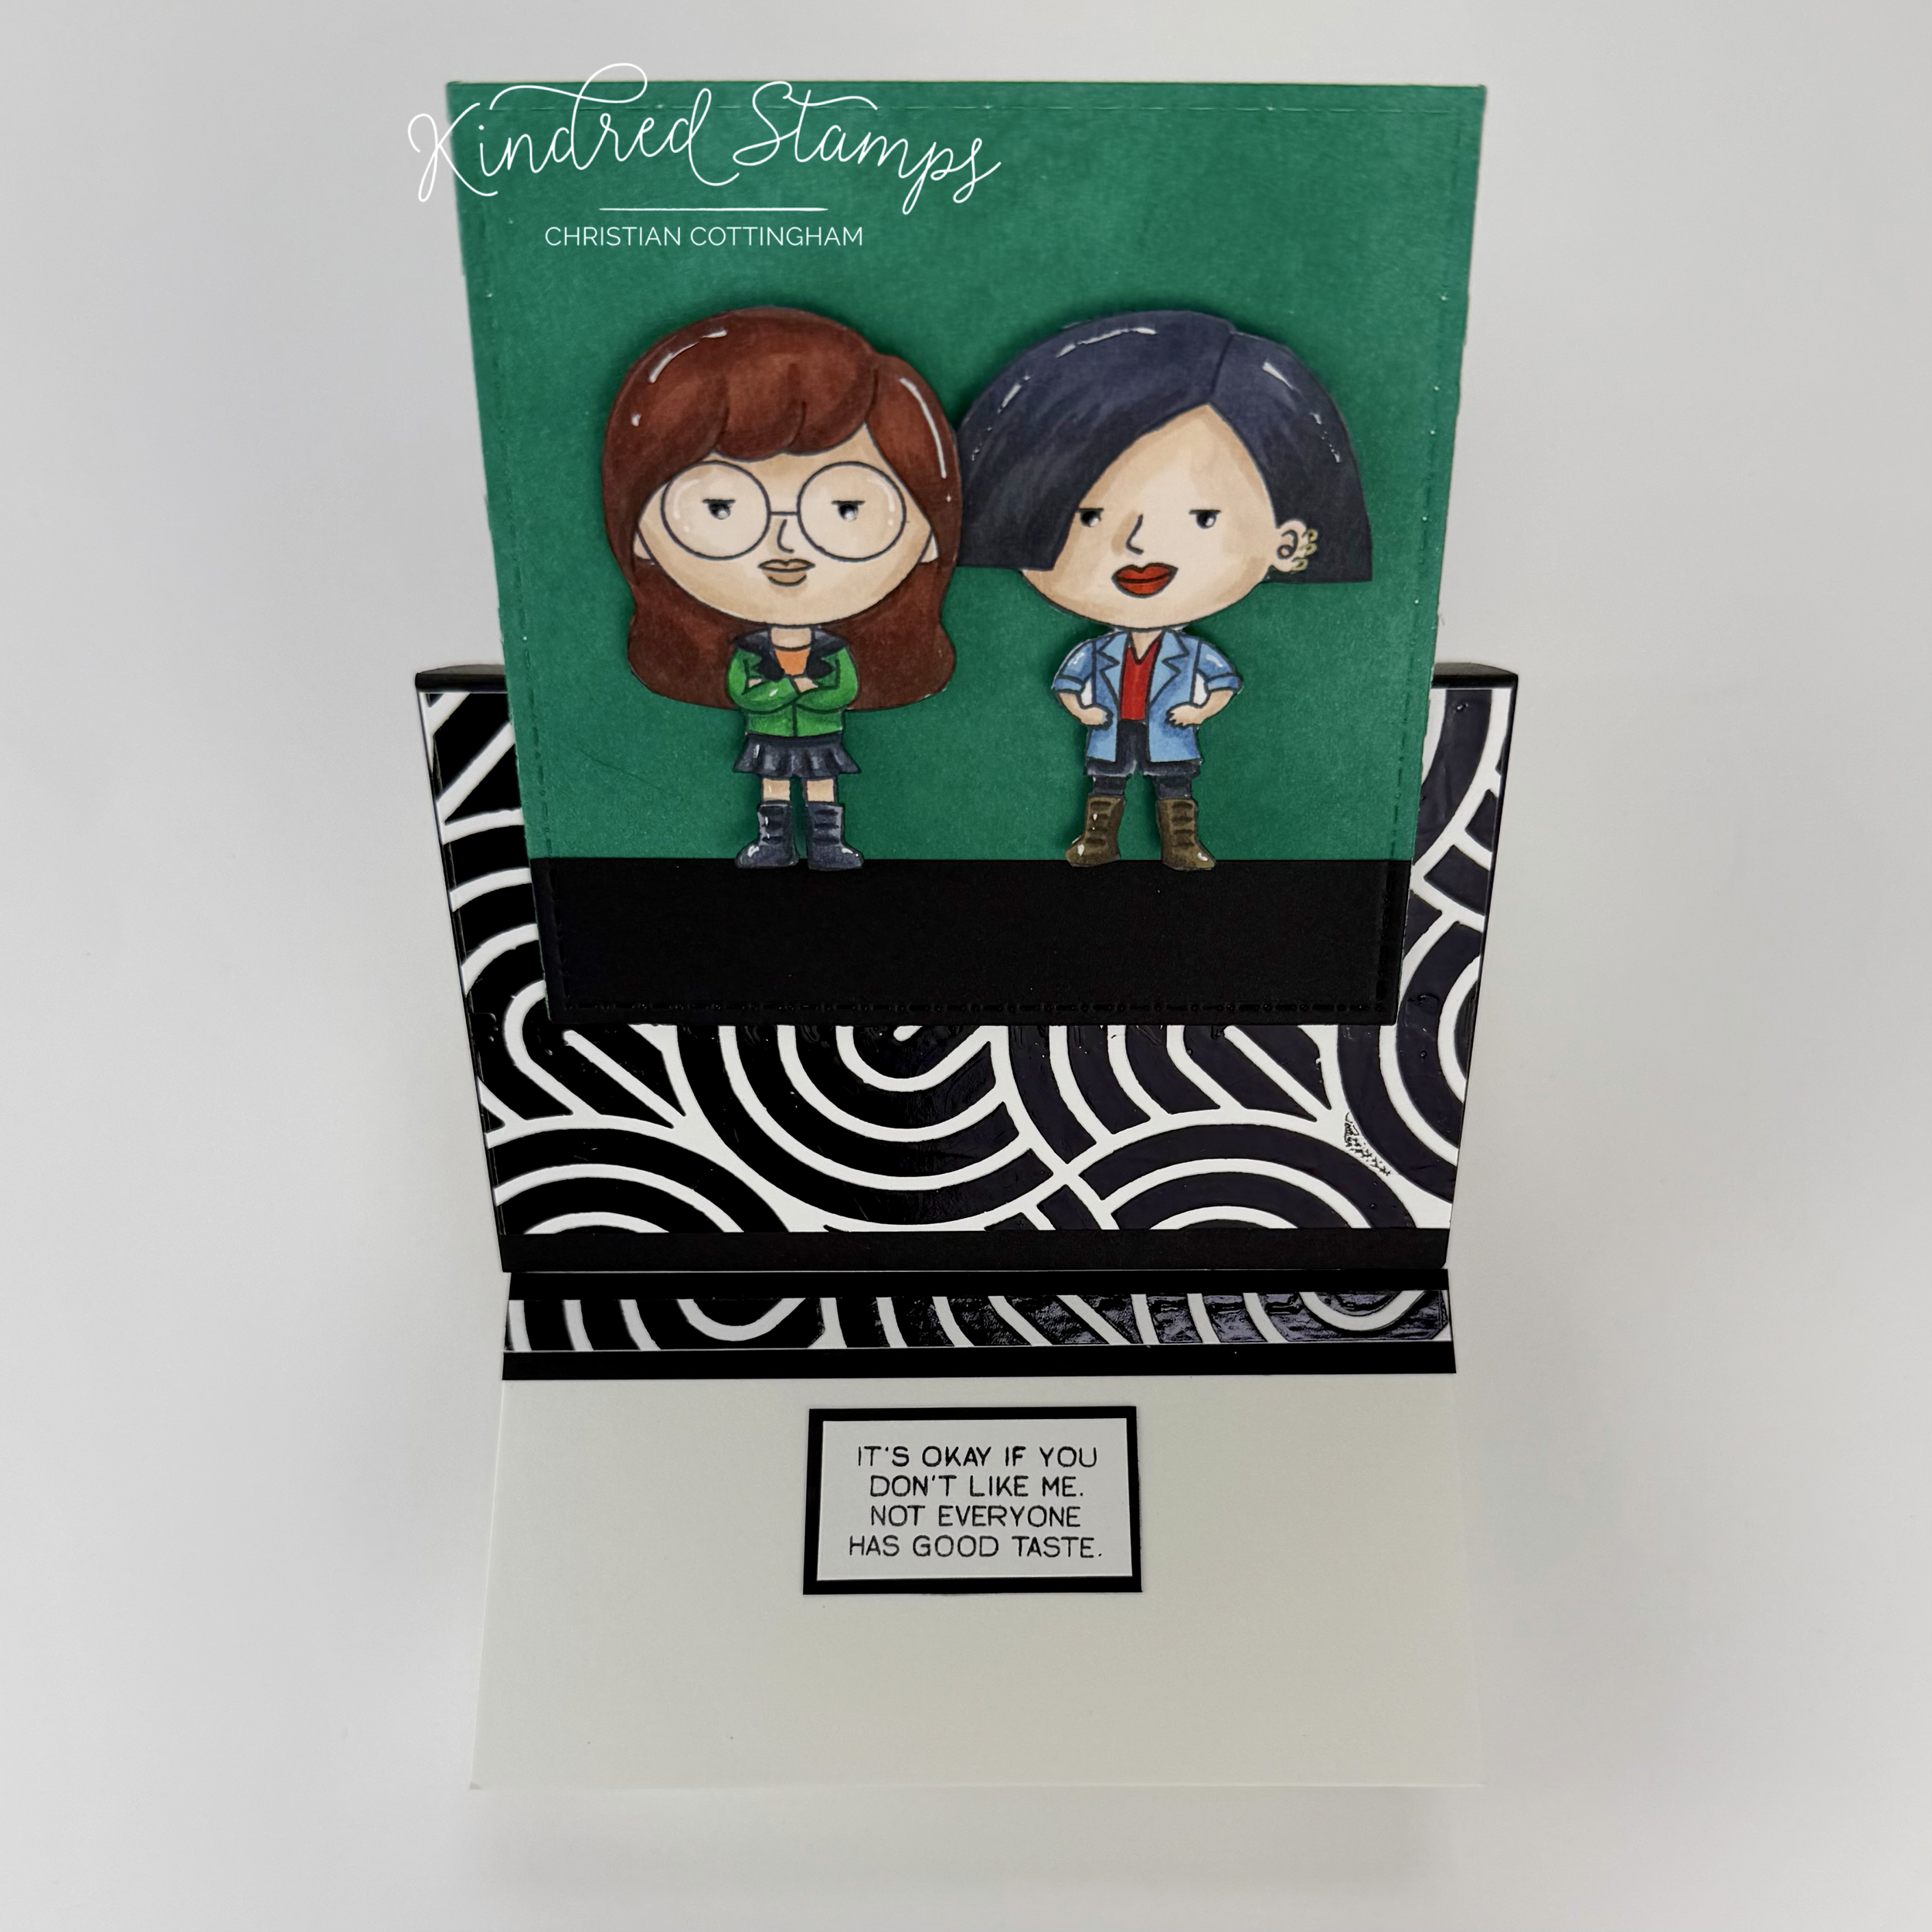
Sarcastic Teens, Kindred Stamps
The inside of the card was then assembled. A piece of the foiled panel was cut to 4.24 inches by 0.25 inches. This was framed by a piece of black card stock that was cut 4.24 inches and 0.5 inches. This was glued to the lower portion of the card panel to act as a ridge for the front easel to rest upon. The sentiment was stamped on a scrap of card stock and then cut down and layered with a scrap of black card stock. This was centered on the base.
I can’t deny their snark! Some people just don’t have good taste *wink*
Card Base: 4.25 inches by 5.5 inches
The entire Kindred Stamps release will be available this Friday at 8am PST/11am EST. Be sure to subscribe to the Kindred Stamps blog to see a daily line up of sneak peeks from our amazing Design Team! Come join the Fan Club and release event to be part of the release fun, and you may just win some Kindred Stamps credit!!
Color Guide:
Long Haired Teen:
Flesh> OR2.0/ OR7.1/ OR7.2
Lips> OR7.2
Shirt> OR2.3
Skirt/ Boots> CG9/ CG7/ CG5
Jacket> CG9/ CG7/ CG5/ G1.5/ G1.7
Hair> OR4.7/ 4.8
Short Haired Teen:
Flesh> OR2.0/ OR7.1/ OR7.2
Lips> R1.7/ R0.5
Jacket> B4.6/ B4.3
Shirt> R0.6/ R0.5
Boots> O7.7/ O7.8
Pants/ Tights> CG9/ CG7/CG5
Hair> CG9/ CG7
Earrings> gold pen

Pocket Witches: Kindred Stamps Sept Release
Tiny potions, tiny spells, big pocket surprises! The Pocket Witches, September Kindred Stamps release, are here to bring you birthday wishes and to stir up some trouble!
Come we cast spells and fly tiny… right into your cart! The Pocket Witches from Kindred Stamps bring these witches into our pockets so they can go anywhere. This stamp set is the star of the show, large enough to cover an A2 card front and versatile enough to be used in different ways. Grab your eye of newt and let’s stir up some cards.
This blog utilizes affiliate links. If you choose to click on the links provided to purchase, you are supporting me as I receive compensation for your purchase. If purchasing is not in your books, no worries, I hope you find inspiration for projects you design. By clicking on the links, you are letting Kindred Stamps know that you like my content and to keep bringing me back. Thanks for your time and let look at some tiny things!
Project One: Table Top Pocket Witches
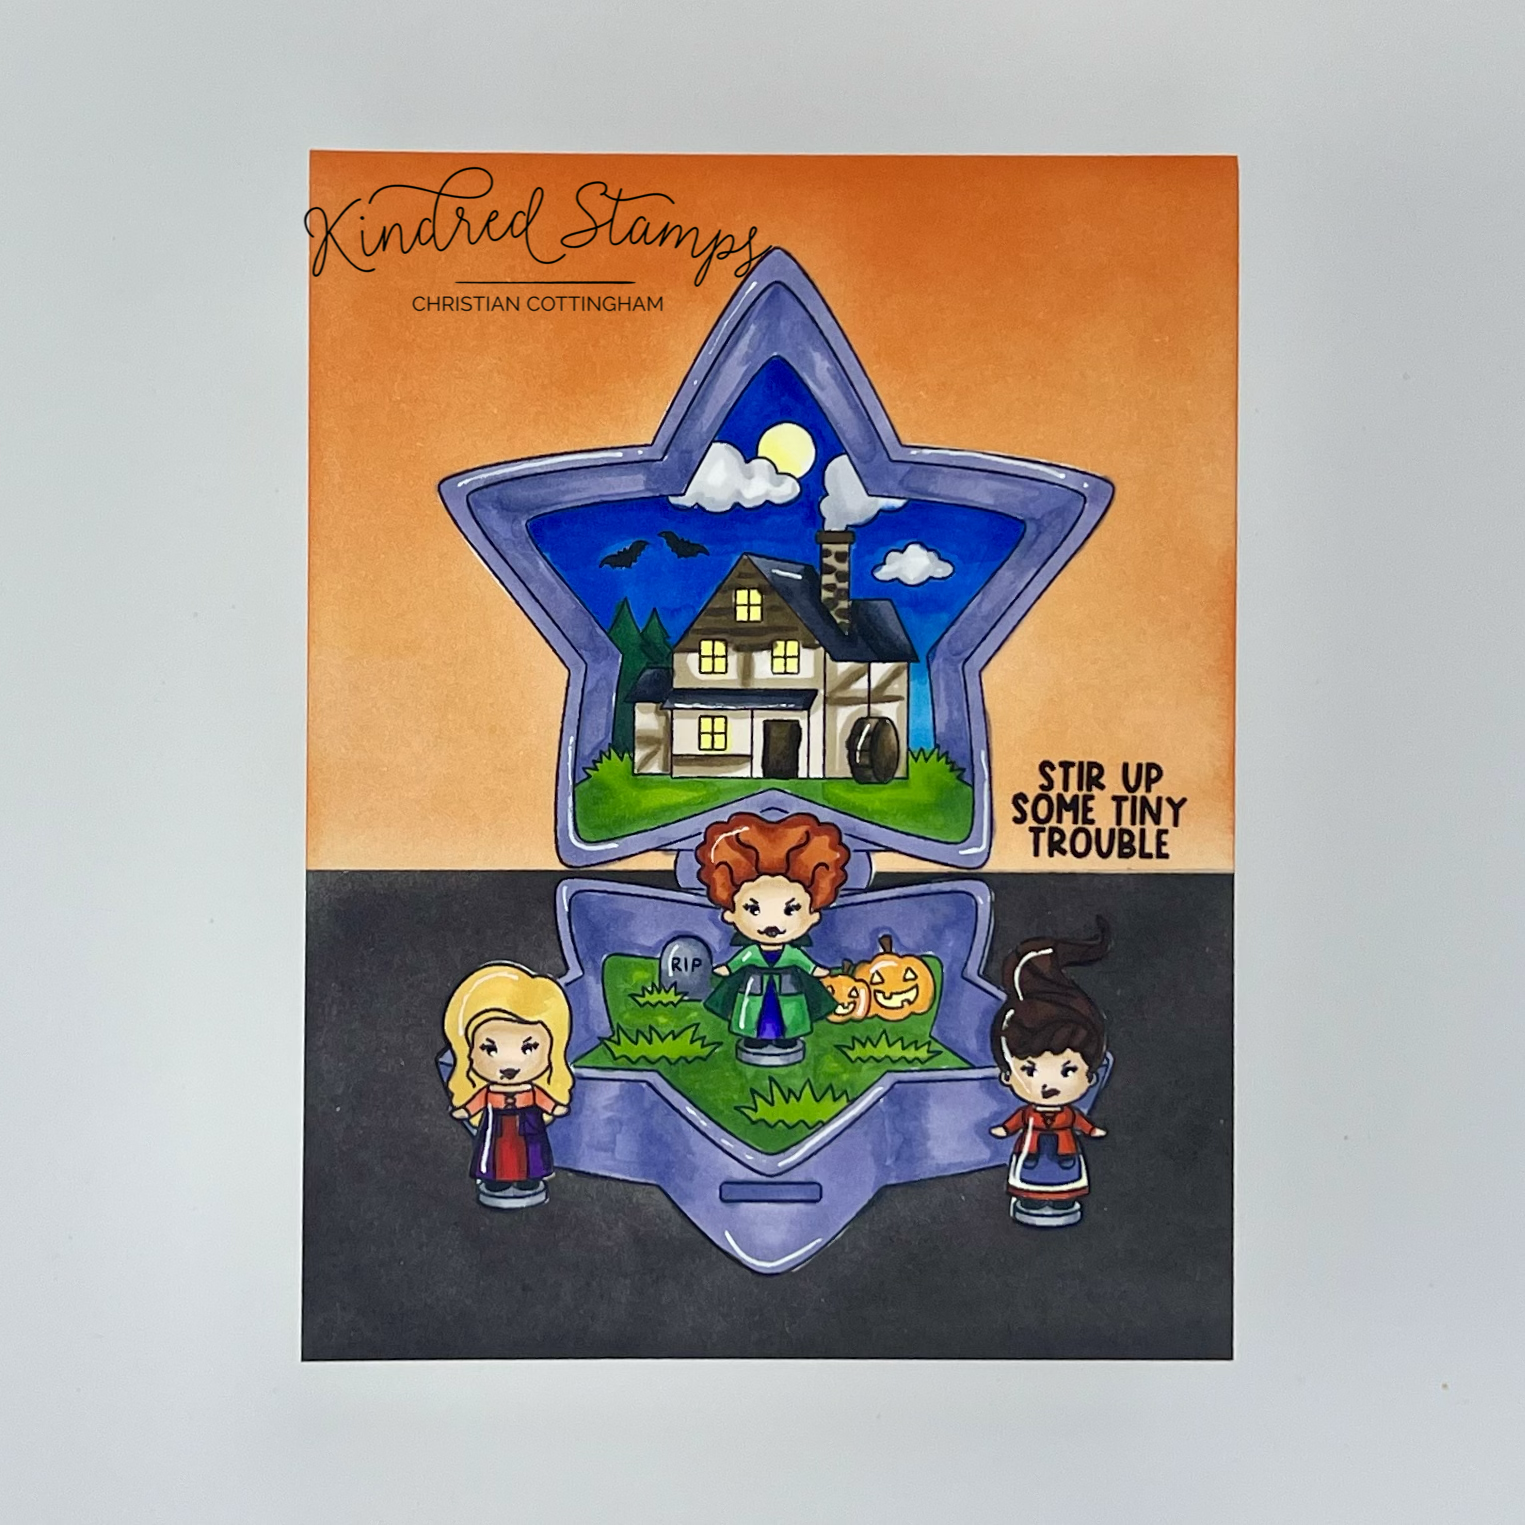
Pocket Witches, Kindred Stamps
The Pocket Witches are stirring up trouble on this single layer card. By using simple masking techniques, the witches are in the scene with no fussy cutting and the background can be inked up any way you’d like!
The pocket scene and the three witches were stamped on masking paper and fussy cut out on the line. (These masks will be used on all 3 of the card projects so the prep time was worth it. I store the masks on the back of the stamp acetate to use as many times as I can.). Now with the masks at the ready, it was time to stamp the panel.
To ensure that my images were centered, I did place the pocket scene mask on the card panel (with the backing still attached). The three witches were placed over the masked pocket cutout in their designated areas, one on each side outside of the pocket and then one in the center of the pocket base. The stamps were picked up with the stamping platform and the pocket scene mask was removed. The witches were stamped in alcohol safe ink and their respective masks were applied. The pocket scene stamp was then placed on the panel over the masked witches and stamped with alcohol safe ink. The mask for the pocket scene was then applied over the the scene (with the witches underneath). The panel was removed from the stamping platform and with a piece of low tack tape the table top line was determined. Utilizing Tangerine Twist (Gina K Designs) the top of the card was blended from the top down so there was more intensity of color at the top of the card. The low tack tape was then repositioned for the blending of the base. Black Onyx ink (Gina K Designs) was blended smoothly on the bottom portion of the card. All masks were removed and it was finally time to get some coloring done.
The Pocket Witches images were colored with Olo Markers (Pocket Design II; See Color Guide). White gel pen accents were placed to give a little pop to the images and to mimic the plastic sheen. The sentiment was stamped in a black pigment ink and embossed with Clear Embossing Powder.
These tiny witches stir up trouble where ever they go. Now they are portable so who knows where they will show up!
Card Size: A2 (5.5 inches by 4.25 inches)
Project Two: Shaking Witches
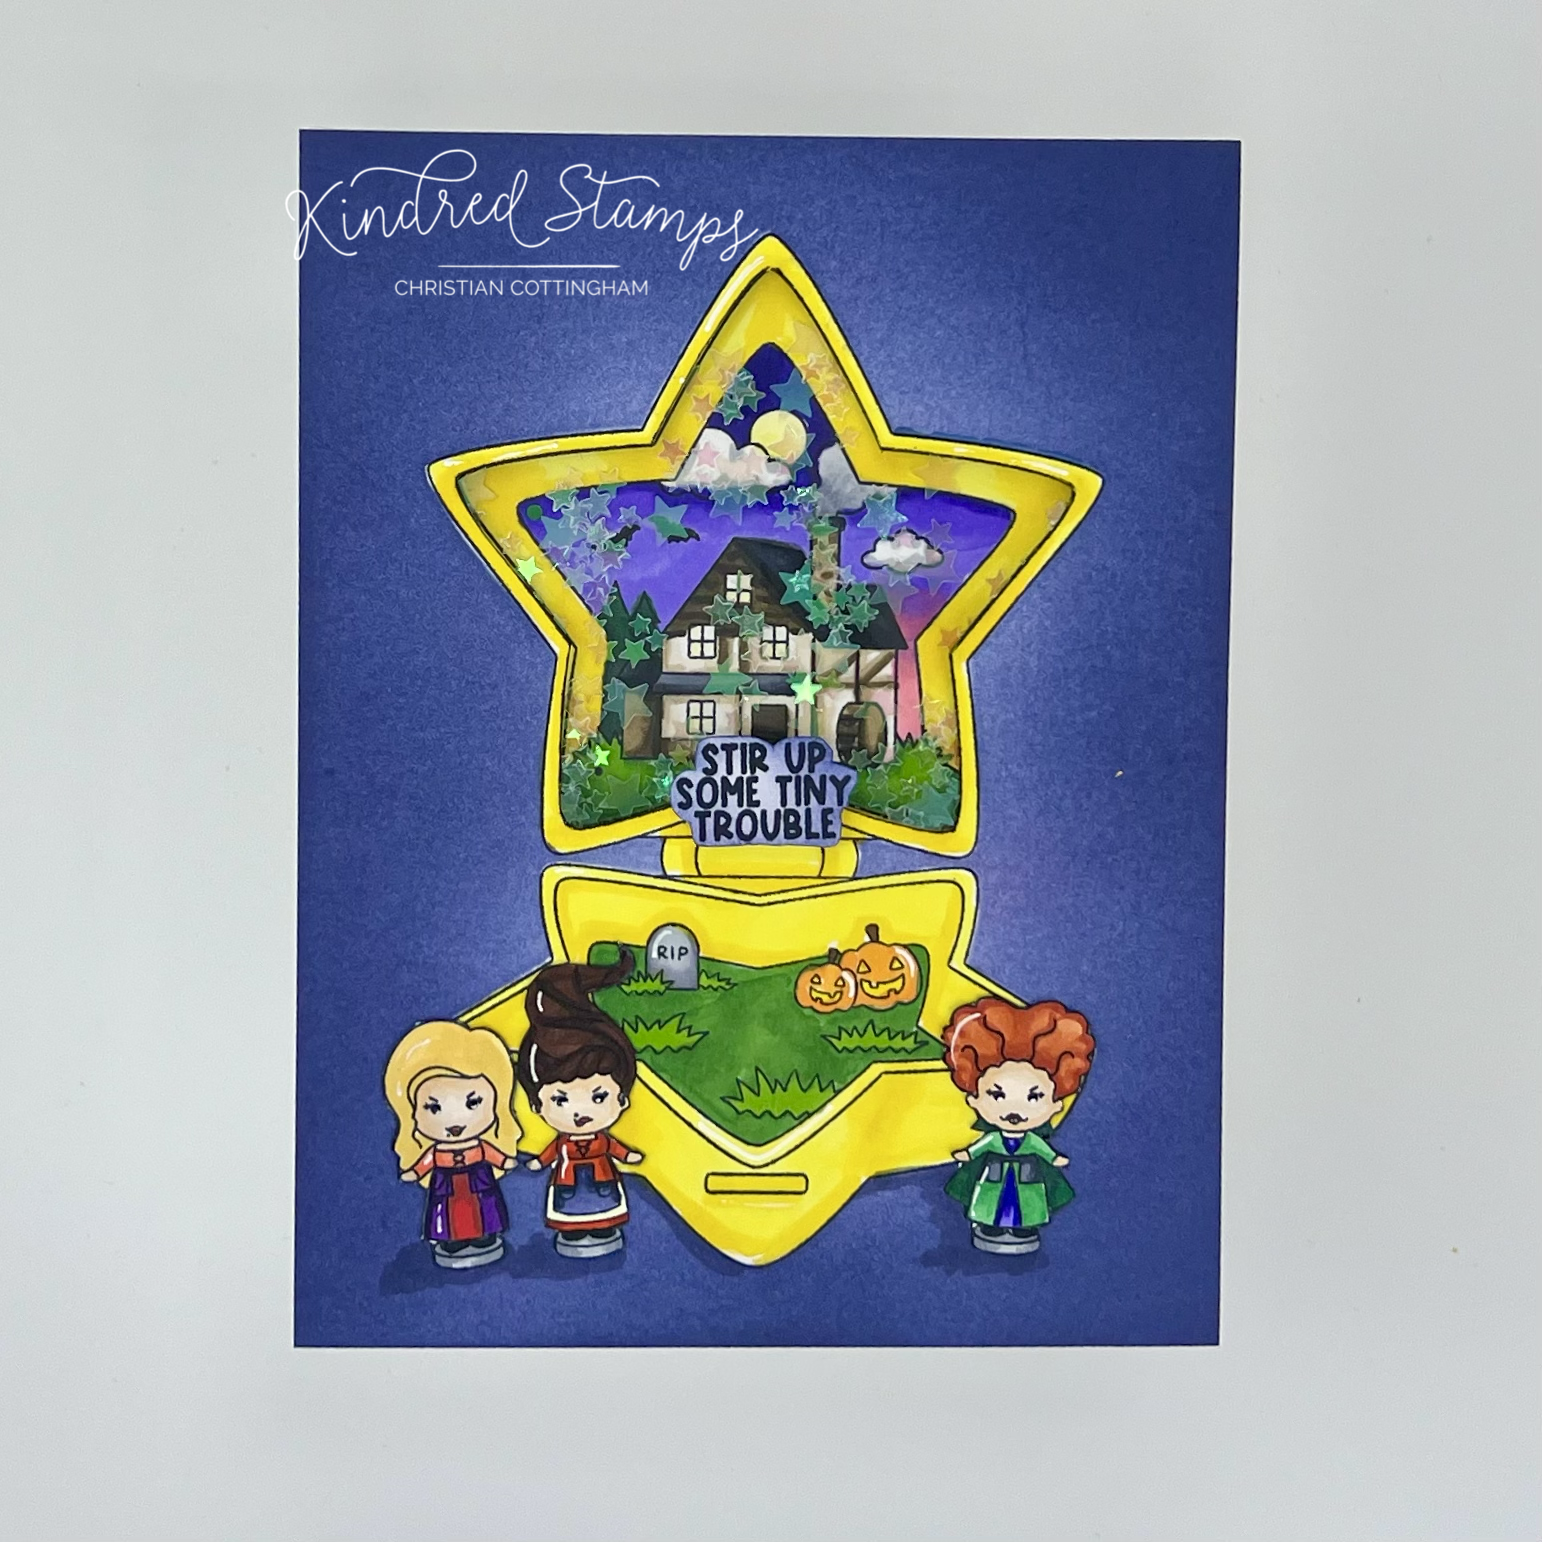
Pocket Witches, Kindred Stamps
The Pocket Witches are shaking things up with this fun card! Even though the stamp is one solid image you can still modify your approach to shake it up… Let’s drive in.
On an A2 panel (4.25 by 5.5 inches) of Neenah Classic Crest Solar White (80 pound) the main image of the Pocket Witches was centered and stamped in alcohol safe ink. Keeping the stamp in my stamping platform, the image was stamped in the exact spot on another A2 panel. This will provide the window image and the background image for the shaker itself. Pulling out the trusty craft knife and mat, the second star line from the outside edge of the upper pocket was cut out of one of the panels. At this point I realized that I should have done the background coloring before I cut out the star… don’t be me, make it easier on yourself… I didn’t stamp the bottom of the scene on the second panel and had already removed the stamp from the platform… So be cool and don’t cut out your panel until after the mask was applied to the panel. Utilizing Stargazer ink (Pinkfresh Studio) color was brought from the outside to the inside of the panel. This application allowed me to have a one color blend with the intensity on the outside edges and halo around the design. The mask was removed and it was time to color! The pocket was colored with Olo Markers (See Pocket Design I in the Color Guide) on both the top shaker window panel and the inside shaker scene. Make sure to add color outside the lines on the inside shaker panel. This will give you grace if you don’t like it up exactly when adhering the 2 panels.
A piece of stamp packaging was cut down and adhered to the backside of the window panel with a strong double sided adhesive Foam tape was applied with no gaps around the colored inside panel. Shaker bits were placed in the center well. Slowly and carefully remove the backing from the foam tape and align the top panel over the star image. Because the paper was exact, you can utilize your score board/ Misti/ or other right angle to align the image.
With the shaker complete, it was time to play with the Pocket Witches. The witches were stamped in alcohol safe ink and colored with Olo Markers (See Color Guide). They were then fussy cut out on the line so they look like they were part of the scene. Taking a brush tipped fine liner, the images were edged to hide any white line or bad cutting. The witches were adhered down with some liquid glue. Pulling out a CG3 Olo Marker, shading was placed below the witches and the base of the pocket.
Finally, the sentiment was stamped on a scrap piece of white card stock and fussy cut out. The brightness of the sentiment didn’t jive with the scene, so out came the Stargazer ink (Pinkfresh Studio) and the sentiment was blended in the same fashion as the background to provide the halo in the center of the sentiment. The sentiment was popped up with a thin foam tape on the center hinge. To complete the card, the front panel was adhered to an A2 top folding card base.
These Pocket Witches shake up everything they come in contact with and this card proves it!
Card Size> A2 (5.5 inches by 4.25 inches
Project Three: Pop-up Witches

Pocket Witches, Kindred Stamps
Tiny things come in tiny packages, and this card holds proves it. The front of the card gives a hint to what lies inside and the big surprise pops when they open the card! Let’s break down how the Pocket Witches are truly a big wow.

Pocket Witches, Kindred Stamps
The card base was prepped first. A piece of Neenah Classic Crest Solar White (110 lb) card base was cut down (5.5 inches by 8.5 inches) and scored at the 4.25 inch line to make a book fold card. Prior to folding, the pocket image from the Pocket Witches was stamped in alcohol safe ink with the design centered at the hinge on the score line. The pocket image was colored with Olo markers (Pocket Design III in the Color Guide). Masking paper was applied over the image and Tangerine Twist ink (Gina K Designs) was lightly blended from the center out. The card base was creased. To add a little sparkle, Wink of Stella was applied over the top house scene.
The 3 witches were stamped with alcohol safe ink and colored with Olo Markers (See Color Guide). After cutting out the witches on the line the were edged the with a black brush fine liner to finish the edges of the images. The pop-up mechanism was up next. A 4 inch by 2 inch piece of paper was placed onto the score board horizontally. The paper was scored at 0.5 inch marks 4 times. The score lines were reinforced and the top flap was glued to the base flap. This shaped a square tube. The square tube was cut into 0.25 inch piece. Three squares were prepped to be placed behind the witches and to the inside panels of the card base. With liquid glue the squares were glued to the back of the witches. Once dry, the witches were then glued into the crease of the card base.
With the inside complete, the card front needed some attention. A piece of black glitter card stock was trimmed to 5.5 by 4.25 inches. With the rectangle from the Card Basics Die, a piece of Cast A Spell pattern paper was cut out. Taking a piece of coordinating paper from the Cast A Spell paper pack, a strip was cut down and then run through the same rectangle die from the Card Basics Die. These papers were glued flat to the front of the card front. To make the appearance of the front of the pocket to mimic the look of the pocket opening, the top portion of the Pocket Witches was stamped on a piece of Neenah Classic Crest Solar White (80 lb) card stock. The star was cut out on the line and then flipped upside down. With the same pink Olo Markers, the blank star was colored. Thin foam tape was applied to the back of the star and centered on the card front. Finally, the sentiment was stamped in pigment ink and Clear Embossing powder was heat set. The sentiment was fussy cut out, thin foam tape was applied and the centered onto the card front.
The tiny surprises pop to life when the card is opened. Now, who won’t want to open this card!
Card Size: 5.5 inches by 4.25 inches
Color Guide (Olo Markers):
Red Witch:
Flesh> OR3.2/ OR7.1/ OR2.0
Hair> OR2.6/ OR2.3
Undercoat> BV1.7/ BV1.4
Gown> G1.5/ G1.4
Apron> CG7/ CG5
Robe> CG5/ Cg7
Base> CG5/ CG7
Shoes> CG9
Brown Witch:
Flesh> OR3.2/ OR7.1/ OR2.0
Hair> OR2.6/ OR2.3
Undercoat> BV1.7/ BV1.4
Gown> G1.5/ G1.4
Apron> BV4.7/ BV4.5
Skit> Y2.0/ OR2.6/ R0.5
Shirt> OR2.6/ OR2.5
Blonde Witch:
Flesh> OR3.2/ OR7.1/ OR2.0
Hair> YO2.3/ YO2.2
Base> CG3/ CG5
Undercoat> R1.7/ R1.5
Shirt> R0.4/ R0.3
Shoes> CG9
Base Coat> V2.8/ V2.6
Pocket Designs:
Moon> Y1.1/ Y2.0
Trees> G1.8/ G1.7
Grass> YG1.6/ YG1.4
Pumpkins> O2.4/ O1.3; Y2.3; OR3.7
Bats> CG7
Roof> CG9/ CG7/ CG5
House> O7.8/ O7.7/ O7.3/ O4.0
Tombstone> CG5/ CG3
Clouds> CG3/ CG1
Pocket Design I
Star> Y2.3/ Y1.2
Sky> BV1.7/ BV1.4/ RV0.2
Pocket Design II
Star> BV4.5/ BV4.4
Sky> B0.7/ B0.5/ B2.4
Pocket Design III
Star> RV1.5/ RV1.3
Sky> V2.8/ V2.7/ V2.6/ V2.4

Ghoul Girls: Kindred Stamps August Release
Ghoul Schools back in session! The Ghoul Girls from Kindred Stamps August Release will cause you to scream…
It’s back to school, I mean ghoul school season and the Ghoul Girls are rocking this fear year! This Kindred Stamps take on back to school is screaming not just cards, but other school related projects! A nod to Fear Books, bookmarks, and a composition notebook that can be used for so many thing. You’ll have a scream playing with this set in you craft space.
This blog utilizes affiliate links. If you choose to click on the links provided to purchase, you are supporting me as I receive compensation for your purchase. If purchasing is not in your books, no worries, I hope you find inspiration for projects you design. By clicking on the links, you are letting Kindred Stamps know that you like my content and to keep bringing me back. Thanks for your time now ghoul schools in session!
Project One: Fear Book

Ghoul Girls, Kindred Stamps
Nothing screams back-to-school season like a year book showcasing each of the students in your class. This card is a page from their Fear Book that these lovely ghouls attend!
The background was first up! A card panel (5 inches by 7 inches) was cut down and stenciling was to proceed. The panel was masked with the bottom 1/3 protected. The Harlequin stencil was inked with Blue Lagoon ink from Gina K Designs. The mask was then adjusted to cover the top 2/3 of the now stenciled card stock. With the Booya Box stencil (retired) I stenciled dripping slime in Passionate Pink ink from Gina K Designs.
To make the photos, a nesting square die was cut once with a larger and smaller die out of black card stock to create the frame, and a second panel with from the larger square from white card stock to be the photo background. Using a line stamp, I stamped alternating pink and black stripes with Gina K Designs Passionate Pink and Black Onyx ink on the white squares.
Pulling out the Adaline Alpha Dies, Fear Book was cut out of white card stock. The letters were ink blended in a gradient fashion utilizing Blue Lagoon ink from Gina K Designs. After some clean up it was time to color the ghouls.
The Ghoul Girls were stamped in alcohol safe ink and colored with Olo Markers, Prisma colored pencils, and the Altenew Fine Liner pen. (See Color Guide) The ghouls were fussy cut out and set aside.
To assemble the card, a A7 card base was prepped. To allow the background to pop, an 1/4 inch was cut off the edges. A 5 inch by 7 inch piece of black paper was attached to the card base. The stenciled panel was centered and adhered. The frames were up next! The Ghoul Girls were adhered flat within the frame parameters. The black frame was applied and any excess overhang was cut down.
The sentiment Fear Book was lined up and adhered to lower right corner. Sparkle was placed with a Wink of Stella brush pen and Glossy Accents applied. The Fear Book was finally complete!!
Card Size: A7 (5 inches by 7 inches)
Project Two: Composition Ghouls

Ghoul Girls, Kindred Stamps
Ghoul school will be in session soon and of course you need a composition notebook to keep all the notes! The Ghoul Girls are the perfect accessory for this notebook.
The Ghoul Girls were stamped in alcohol safe ink and colored with Olo Marker/ Prisma Colored Pencils, and the Altenew Fine Liner Pen. (See Color Guide). The ghouls were fussy cut out and set aside.
For the shield, I utilized the Nesting Shields Die (previous limited edition box). You could also draw and cut out a shield if you do not have the dies. If you have the dies from the limited edition set, you can make a frame by utilizing a larger and smaller die. A piece of shimmery blue card stock was die cut from the largest shield die. This panel was cut in half. The pink and black strips were cut at 1/4 inch and adhered to a piece of copy paper. The panel was die cut with the largest die and cut in half. The blue paper and the striped paper were adhered to the solid shield. A leftover black strip was centered and adhered over the top of the center junction. The top shield frame was glue to the top of the shield.
A piece of purple glitter card stock was centered over the composition label. The completed shield was adhered to the glitter card stock with liquid glue and left to dry while the remainder of the card was completed.
Pulling out Curiouser stamp set, the small heart was stamped multiple times in Passionate Pink (Gina K Designs) ink on a piece of white card stock and fussy cut out. These were set aside for assembly later. Since the ink was out, I stamped the sentiment “Slay All Day” and die cut the sentiment with a Sentiment Strip Die that was equally long on both sides of the sentiment. The sentiment strip was cut on both sides and thin foam tape was applied. The ends of the banners were then aligned and picked up with foam tape that was layered on the sentiment. The strip was set aside after the release paper was reapplied so it wouldn’t be stuck on the bottom of something and lost for all time… ask me how I learned this lesson….
The supportive sentiments were stamped in Blue Lagoon ink (Gina K Designs) and fussy cut out. These sentiments reminded me of things that I scribbled on the front of my notebooks so it felt fitting.
To assemble the cover of the composition notebook, the Ghoul Girls were arranged and glued flat to the cover. Ensuring that every part had adhesive so the images would not lift. With the ghouls in place, I added the hearts and support sentiments throughout the image. Finally, the sentiment banner got a dose of glue on the sections that did not have foam tape and the release paper was removed and positioned.
Ghoul school will be in session soon and this notebook can be used as a planner, to do list catcher, or note taker!
Size: Composition Notebook Half Size (7 1/2 inches by 4-7/8 inches)
Project Three: Coffin Ghouls

Ghoul Girls, Kindred Stamps
What better way to store your school supplies than some coffins at the ghoul school! The Ghoul Girls posed perfectly in front of their lockers to say “You Ghoul Girl”!
This single layer stamped design starts with an A7 panel (5 inches by 7 inches) of Neenah 80 pound card stock. With a pencil I sketched the horizon line for the floor vs. wall. The floor was sketched in to resemble checkered flooring. I didn’t feel like perspective thinking so all the tiles were just straight lines. The coffins were then sketched with simple connect the dots markings (smaller at the bottom wider at the mid top and I connected the dots).
With the base designed, the Ghoul Girls were up next. The ghouls were stamped on masking paper and cut out on the line. Tie Ghoul was stamped in the center. Her mask was applied. The Pigtail Ghoul and Egyptian Ghoul were then stamped and masked respectively. Finally, the Wolfy Ghoul and Aqua Ghoul were stamped and masked. Taking the Altenew Fine Line Pen 005) the sketched pencil lines of the coffin and floor were drawn into place. Pencil markings were erased (except for under the masked ghouls). A mask was placed along the floor line to allow ink blending. Using Gina K Designs Light Lilac, the background was shaded. To color in-between the coffins, sticky notes were utilized to maintain the crisp lines and to not alter the appearance of the pink coffins.
With the walls shaded, all masks were removed. The Ghoul Girls were colored with Olo Markers , Prisma colored pencils, and the Altenew Fine Liner pen. (See Color Guide). The coffins were colored flat with Altenew Artist Markers in C003 and C006. Vent lines on the top of the coffin were drawn in the Fine Line pen. Finally, the checkered floor was colored with Altenew Artist Markers in B201 and B204. The sentiment was stamped in black pigment ink, Clear Embossing Powder, and heat set. Finally, the panel was trimmed down to provide a frame to show case the panel.
To assemble, an A7 (5 inches by 7 inches) panel in deep eggplant colored card stock was adhered to a card base. The colored scene was popped up with foam tape and centered on the card base. These Ghoul Girls are cheering you on!!
Card Size: A7 (5 inches by 7 inches)
Project Four: Ghoul Markers

Ghoul Girls, Kindred Stamps
Ghoul School will be in session and you definitely need a bookmark. Not a traditional bookmark, but an origami bookmark customized for all the ghouls in your life. Making the origami paper with sentiments and then accessorizing with the Ghoul Girls, these bookmarks work great for the teacher planners, student planners, or actual real life printed books (Yes, they do exist…)
First up, let’s make some paper! Pulling out a couple pieces of smooth copy paper (Hammermill Premium Color Copy 32 lb), cut out a total of 5 square panels (5 inches by 5 inches). This can be adjusted to whatever size you would like. There are a couple ways that you can stamp the sentiments onto these square panels. You can pull out your blocks and go free-range stamping or you can make a jig in your stamping platform and stamp the first arranged sentiments on one panel, remove panel and repeat with the remaining 4. Then rearrange the stamps and repeat. Passionate Pink and Blue Lagoon (Gina K Designs) ink was utilized. I am a mass producer and found it easier to use a jig process… less time spend on cleaning (equals more time crafting….). When stamping the sentiments, make sure you are stamping off the side of the paper to give the illusion that this is patterned paper. To fill in some of the white space on the patterned paper, a few bats from the Unusual Ones stamp set were stamped in Black Onyx (Gina K Designs). Set the panels aside to allow complete drying of the ink.
Black card stock was cut to 2 1/4 inch squares. These will be utilized in the inside of the bookmark to provide stability, mask ink bleed from the sentiments, and provide a solid “white space” to showoff the Ghoul Girls. Set these aside.
The Ghoul Girls were stamped in alcohol safe ink and colored with Olo Markers, Prisma Colored Pencils, and Altenew Fine Liner Pen. The ghouls were then fussy cut out and set aside for assembly.
There are many tutorials on YouTube for the folding an origami bookmark. Here is one that I followed for these bookmarks (Easy Origami Bookmark Corner - How to make a Corner Bookmark DIY by Red Ted Art). Its may 2 minutes long. Easier to watch vs. me trying to type it out and you read it…
With my origami bookmarks folded and secured, the black squares were glued into the pocket and centered to allow the boarder to be equal. Finally, the Ghoul Girls were attached with thin foam tape only on the sections of the ghouls that layer on the top folded triangles. This allows the bookmark to be placed on the corner of the page.
With a set of Ghoul Girls bookmarks at the ready for the start of ghoul school my planner will never be the same!
Size> 2.5 inch square
The entire Kindred Stamps release will be available this Friday at 8am PST/11am EST. Be sure to subscribe to the Kindred Stamps blog to see a daily line up of sneak peeks from our amazing Design Team! Come join the Fan Club and release event to be part of the release fun, and you may just win some Kindred Stamps credit!!
Color Guide (Olo Markers):
Tie Ghoul:
Flesh> G1.4/ G0.1
Eyes> YG2.3/ B0.3
Lips> R0.6/ R0.5
Dress> B2.2/ B2.4/ White Gel pen/ Primsa Color Pencil 923
Hair> BK
Puffs/ Seams/ Shoes> Altenew Fine Liner 005
Egyptian Ghoul:
Flesh> O4.6/ O4.3/ O4.1
Lips> R5.7/ RV0.6
Top> BG0.4/ BG2.3
Wraps> YO2.5/ YO2.3/ YO2.2
Earrings> YO2.3
Eyes> BG2.1
Hair> YO2.2/ OR4.8/ OR7.6
Pigtail Ghoul:
Flesh> OR2.0/ OR1.0
Pen Work> Altenew Fine Liner 005
Vest> RV1.5/ RV0.4
Heart> RV0.4
Boots> RV0.2/ R2.2
Hair> RV1.5/ BK
Skirt/ Ruffels/ Caplet> CG3/ RV0.2
Eyes> BV4.2
Lips RV1.5/ RV0.4
Aqua Ghoul:
Eyes> B2.0
Flesh> BG7.2/ BG7.0
Hair> B2.0/ Y2.0
Leggings> BG7.0/ Prisma Colored Pencil 1027
Lips> V2.6/ V2.4
Flower/ Fish> RV0.2/ RV0.1
Bandana> CG3/ Zero
Shorts> BG2.3/ CG7
Fins> B0.3/ Zero
Water> B2.0
Jacket> CG3/ BG2.3/ CG7
Shirt> RV0.2/ RV0.1
Wolfy Ghoul:
Flesh> O4.3/ O4.0
Lips> R1.7/ R0.5
Eyes> Y1.2
Feathers> BV1.1
Shirt> R2.4
Skirt> BV1.7/ BV1.4
Boots> BV1.4/ Altenew Fine Liner Pen 005
Jacket/ Belt/ Collar> CG9/ CG7
Sock> R2.2
Hair> V2.6/ OR3.8

Kindred Stamps July Release: Unstoppable Hero
You too can be unstoppable! The Unstoppable Hero stamp set from Kindred Stamps June Release will give you the boom and pow to accomplish anything you want.
When you have love for humanity, nothing is unstoppable! The Unstoppable Hero sees the good in everyone and that empathy defines humanity. This stamp set showcase the Unstoppable Hero who will never give up no matter what is thrown at them. Let’s fly right into the making of these cards.
This blog utilizes affiliate links. If you choose to click on the links provided to purchase, you are supporting me as I receive compensation for your purchase. If purchasing is not in your books, no worries, I hope you find inspiration for projects you design. By clicking on the links, you are letting Kindred Stamps know that you like my content and to keep bringing me back. Thanks for your time now let’s be unstoppable!
Project One: Unstoppable Pinwheel

Unstoppable Hero, Kindred Stamps
When you can’t decide on just one scene, you have to make four!! This pin wheel card features all four of the characters from the Unstoppable Hero stamp set each on their own page. Let’s break down this simple by fun design!

Unstoppable Hero, Kindred Stamps
To make the card base pin wheel that the scenes will be on, I pulled out some heavy weight black card stock. The black card stock was cut down to 4 1/4 inches by 3 3/4 inches. The panels were then scored one inch from the left on the 3 3/4 side of the panel leaving two distinct areas (1 inch and then 2 1/4 inches). The one inch section was glued to the next panel by lining up one inch scored section with the the score line and the on another panel. This was repeated until all four pieces were attached and the the final connection was closed to form the box in the center of the pin wheel card. The pin wheel was set aside for some scene building.

Unstoppable Hero, Kindred Stamps
Four pieces of white card stock were cut to 4 inch squares. This will be the scenes that will be adhered to the pin wheel. To make life easier, the scene will be made than cut prior to assembly. Because I did not want added weight and bulk to the card, I choose to have my scenes drawn flat. I am not an artist and can barely draw a straight line even with a ruler… So I pulled out the City Scapes Die and die cut it from a piece of heavy weight 5 inch by 7 inch card stock. The die was centered in the middle of the card stock because I will be using this paper as a stencil and a mask.
To make the background, the homemade stencil was placed on the 4x4 inch panel. To ink the sky, the panel was inserted to have the buildings be on the front of the panel. Low tack tape masked the windows and held the panel in place on the back of the stencil. The sky was inked with Gina K Ocean Mist unevenly to give the appearance of soft feathery clouds. When the sky was completed, the stencil was repositioned and now the building were behind the panel and the sky was masked with the top of the building cut outs. The building was then inked with Altenew Limestone. I pulled out my fine liner pen and drew the lines around the stenciled areas. The windows were then colored with an Olo Marker (B2.0). I did not try for perfection on the lines, they are supporting characters in my scene.
Unstoppable Hero, Kindred Stamps
Each of the 4 panels were completed alternating where the buildings were placed and which buildings made it to the scene. On three of the four panels, a matching sentiment was stamped in pigment ink. The fourth panel was left blank for writing a personal greeting. With the four panels complete, the scene panels were cut at 1 1/2 inches. These panels were centered onto each of the pin wheel bases.

Unstoppable Hero, Kindred Stamps
The Hero Boy, Hero Girl, Villain, and Reporter were stamped in alcohol safe ink and colored with Olo Markers (See Coloring Guide). Each of the images were fussy cut out on the line and edged with a black marker. The Unstoppable Hero images were glued to their designated scenes. Who says you can only pick one image for a card, you to can be Unstoppable!
Card Size: A2 (5.5 inches by 4.25 inches)
Project Two: Comic Pages

Unstoppable Hero, Kindred Stamps
Reading the comics when I was younger was one of my favorite things to do. This card features all the characters from the Unstoppable Hero stamp set to create a comic style card. Newsflash…. It worked!
To start the planning the card, I took a 5 inch by 7 inch piece of white card stock and found the center…. This was a feat of its own because, math…. I penciled in the center line and then divided the card into 3rds. This gave me a total of 6 panels for the comic story to occur in. It was now time to start stamping.
The top left panel was up first. I masked off the surrounding boxes with sticky notes and was ready to start stamping… But I needed a monster for out Hero Boy to save us from. Pulling out the Dino-Mite stamp set I stamped the monster coming into the scene. With a pencil I sketched in some buildings in the background and then went over the lines with an alcohol markers safe fine liner pen. This box was then colored with Olo Markers. (Dino> YG2.5/ YG2.3/ CG3; Road> RK; Building 1> CG3/ CG5; Building 2> O7.3/ WG5/ WG3; Sky> B2.0).
The top right panel was up next! The monster needed a villain to be the mastermind behind the plot to kill our superhero and he had to have the secret gems in his possession. The gems from the Mine Workers stamp set were stamped on masking paper and cut out on the line. The gems were stamped with the points up to provide the jagged look that I wanted, masking as I stamped along. The Villain was then stamped over the masked gems so he appear behind the pile. The Villain was also stamped on masking paper and the masking was applied so I could have an ink blended background. The area around the gems were blended with Altenew Parrot fading up towards the top of the panel and then Jet Black ink from Altenew was applied from the top and outer panels into the center in a gradient application. Masks were removed and the gems were colored with Olo Markers (YG2.3/ YG1.2). The Villain was colored with Olo Markers (See Color Guide).
The masks around the panels were removed and the middle left panel was designated for our favorite Reporter. The sides of the panel were masked with some new sticky notes and the Reporter was stamped to the left of the panel to allow a space for her to call for help. She was also stamped on some masking paper, cut out, and applied to allow some ink blending on her panel. I also placed a piece of masking paper as the call out. This was traced with a fine liner pen. To ink up her scene, I used Blueberry ink from Concord & 9th. The masks were removed, and “help” was written with the fine liner. The Reporter was colored with Olo Markers (See Color Guide).
Our Hero Boy had to come in and kick some butt, and I felt that called for 2 panels. Masking paper was applied to the 3 completed panels and to the bottom right panel. The Boom and Pow from the Unstoppable Hero stamp set were stamped in their respective boxes with Gina K Cherry Red and Marigold ink. They were also stamped on masking paper and cut out. The masking paper was applied and the panel was ready to be stamped with a pin dot background stamp in black ink. All masks were removed and it was now time to finish up the last panel.
Masks were applied on 2 sides of the last panel. The sentiment and Hero Boy were stamped. A piece of masking paper was trimmed down to cover the sentiment and a mask was made for the Hero Boy. Utilizing the same Marigold ink, I applied a solid application to the panel. Prior to removing the sentiments mask, I traced the mask with a fine liner. All masks were removed and the Hero Boy was colored with Olo Markers (See Color Guide).
My comic page was trimmed down to 4 3/4 inches by 6 3.4 inches and foam tape was applied to the back. The panel was adhered to a black 5x7 inch panel which was then applied to a A7 card base.
Card Size: A7 (5 inches by 7 inches)
Project Three: Girl Power

Unstoppable Hero, Kindred Stamps
The Hero Girl from Unstoppable Hero is the floating focal point on this card. She just kicked some butt with the booms and pows and is flying away as the victor to tell you, you are amazing!
The Hero Girl was colored with Olo Markers (See Color Guide) and was fuzzy cut out on the line. A black marker was applied to the edges of the die cut to clean up the edges from my cutting abilities. She was set aside to make the pattern papers.
A piece of 5 inch by 7 inch white card stock (Neenah Classic Crest Solor White 80 lb) was placed in a stamping platform. Using the “Boom” and “Pow” exclamations, I stamped randomly around the boarder of the card panel. These were stamped intentionally off of the panel to give the illusion that the pattern was continuous. These sentiments were stamped in Gina K Design Cherry Red and Marigold inks and Concord & 9th Blueberry ink. Using an A7 die set, the inner portion of the paper was cut out, leaving the colorful paper as an inch frame. This panel was set aside for the preparation of the card base.
An A7 card base (5 inches by 7 inches) was prepped. Utilizing a pin dot stamp and black pigment ink the dots were stamped onto the front of the card base. The base was set aside to allow ink dry time while the sentiment was prepped. On a scrap of white card stock, the sentiment was stamped in the same Cherry Red ink from Gina K. This sentiment was cut down and a black mat was applied.
It was almost time to bring it together, but first I needed 2 strips of thick acetate to act as the bridge between the sides of the frame. These were approximately 0.5 inches by 4.5 inches. Using some double-sided tape, the acetate bridges were adhered to the frame sides. Foam tape was then applied over the edges of the frame. For stability, foam was applied over the entirety of the frame. The frame was attached to the card base. With liquid glue, the Hero Girl and the sentiment were placed on the acetate and allowed to dry. This does take longer than paper to paper, so don’t rush it. Finally a few shiny stars were scattered across the scene and POW we are unstoppable!
Card Size: A7 (5 inches by 7 inches)
Project Four: Flying High

Unstoppable Hero, Kindred Stamps
Our Hero Boy appears to be flying above the buildings in this fun box card! Having a card that is multi-dimensional makes the recipient feel so much more special. Let’s breakdown how to make this card featuring the Unstoppable Hero stamp set.
The Hero Boy was stamped in alcohol safe ink and colored with Olo Markers (See Color Guide). He was fussy cut out on the line to make his appearance be more eye catching. He was edged with a black marker to conceal the white edge of the paper and to crisp up his edges. He was set aside to work on his scene.
The Box Card die was cut out of heavy weight black card stock for the side, back panel, front panel, and one insert. All score lines were reinforced before assembly. The single insert was cut in half to drop the line of site and emphasize the flying nature of the Hero Boy. Because I have trust issues with sticky tape and tape runners, I used liquid glue to assemble the box card. While this dried, I cut out the front panel, side panels, the main background panel, and a piece of card stock for the back panel of the box card out of white card stock.

Unstoppable Hero, Kindred Stamps
The side panels were up first. They were stamped with “Boom” and “Pow” with Gina K Designs Cherry Red and Marigold ink. Without removing them from the stamping platform, I allowed the ink to dry a few minutes. The panels were then prepped with an antistatic tool and the stamps were inked again with embossing ink. Clear Embossing powder was applied and heat set. This provided a little shine and kept the images vibrant. This worked a lot better than my first brilliant idea… I used Glossy Accents over the die ink and lets just say it wasn’t pretty. The colors bled and the Glossy Accents tinted. They were thrown away… it’s just paper. Don’t be me, be patient and use Clear Embossing powder. The side panels were glued to their respective sides.
Unstoppable Hero, Kindred Stamps
Next up, the front panel. The sentiment was stamped using masking so there was a two-tone effect on the sentiment. The top portion of the sentiment was stamped in Gina K Cherry Red and the second line of the sentiment was stamped in Blueberry ink by Concord & 9th. It was finally time to create my back panel for the box card.
The City Scape Die was cut from black card stock and then cut again with the panel die from the Box Card Die. This was done so the stitching would be continuous. This was set aside for the coloring of the sky. To achieve this, I utilized the mask from the Pin Wheel card. I place tape over the windows and positioned the building mask at the level that I had die cut the City Scape at. Utilizing the Grass and Clouds Stencil, I placed the negative clouds on my scene. With the buildings and clouds masked off, the sky was ink blended evenly with Gina K Ocean Mist ink. The masks were removed leaving white space where the buildings will be placed. In the window sections, I tinted the paper with Olo B0.2 marker. Finally, the City Scapes die cut was glued to the sky panel. The complete scene was glued to the black card base. The white panel for writing the personal greeting was also applied to the back of the Box Card base.
The Hero Boy was almost ready to take flight! A piece of thick acetate was trimmed down and attached to the back of our hero. When the height was acceptable, the acetate was adhered to the base of the back side of the insert. To complete the card, a few shiny stars were arranged around the sentiment. The Hero Boy was now flying high!
Card Size: A2 (5.5 inches by 4.25 inches) when in envelope.
Project Five: Shaker Up
Unstoppable Hero, Kindred Stamps
Everybody has a weakness of some sort and this villain knows that you are mine! This card show case the villain in all his glory from the Unstoppable Hero set! Let’s shake it up and see how this card was made…
The Villain was colored with Olo Markers (See Color Guide), fussy cut out on the line, and then edged with a black marker so no white would show on the sides. He was set aside for the making of the shaker panel.
Pulling out the Flames Paper Pack, I picked of the green flames to match my sentiment. The card stock was cut to an A2 panel (4.25 inches by 5.5 inches). I pulled out the Card Basic die set and select the 3 sizes of the star. I placed my villain on the paper to judge where to place my stars. The stars were taped down with low tack tape and die cut out. Using the packaging that the stamp set came in, I cut down a panel of acetate that fit behind the stars. This was adhered with strong double sided tape. Foam tape was then applied around the stars to make each star it’s own shaker pocket. A piece of black glitter card stock was cut to fit behind the stars. Shaker bits were placed in all of the star wells and the cut down piece of glitter card stock was adhered to the foam tape around the stars. This encapsulated the shaker bits and made it easier to apply the card panel to my card base.
With the base attached, the front was finished. The sentiment was stamped with Embossing ink on a prepared piece of black card stock. Snowfall Embossing Powder was applied and heat set. When cooled, the sentiment was die cut with the Sentiment Strip Dies. The sentiment was positioned hanging off the page and the excess was trimmed off. This will act as the grounding for the villain. The colored villain was glued flat to the card panel. Finally, a few sequins from the shaker bits were adhered to add a little funk. I love the simplicity and unexpected shaker elements in all the stars.
Card Size: A2 (4.25 inches by 5.5 inches)
The entire Kindred Stamps release will be available this Friday at 8am PST/11am EST. Be sure to subscribe to the Kindred Stamps blog to see a daily line up of sneak peeks from our amazing Design Team! Come join the Fan Club and release event to be part of the release fun, and you may just win some Kindred Stamps credit!!
Coloring Guide (Old Markers):
Hero Boy:
Flesh> OR2.0/ OR3.2/ OR4.2
Belt> Y2.3/ Y1.2
Bodysuit> B0.7/ B0.5
Cape/ Boots/ Roos: R0.5/ R1.5
Hair> O7.8/ O7.7
Hero Girl:
Flesh> OR2.0/ OR3.2/ OR4.2
Hair> YO2.5/ YO2.3/ YO2.2
Belt/ Boot Tip> Y2.3
Shirt> B0.7/B0.5
Villian:
Flesh> OR2.0/ OR7.1/ OR7.2
Suit> B4.7/ B4.6/ B4.3
Shoes> OR4.8/ OR4.7
Reporter:
Flesh> OR2.0/ OR7.1/ OR3.2
Teeshirt> WG1
Belt> O2.7/ OR4.4
Pants/ Vest> B4.6/ B4.3
Hair> BK/ OR3.7

Kindred Stamps June Release: Cribmates
Cribmates are full of adventures! This set from the Kindred Stamps June Release screams party!
Adventure? Jokes? Romance? Inventing? Gaming? Anything can happen when you make believe! The Cribmates stamp set can be used in any setting or scene imaginable. You just have to close you eyes… Let’s deep dive into how these cards were made, but first a psa…
This blog utilizes affiliate links. If you choose to click on the links provided to purchase, you are supporting me as I receive compensation for your purchase. If purchasing is not in your books, no worries, I hope you find inspiration for projects you design.

Cribmates, Kindred Stamps
Project One: All Aboard
A fun-fold card showcases all the adventures that the Cribmates can go on! This card is a standard A2 card dimensions just folded a little differently. Let’s break it down!
The back was up first. A piece of 110 lb Neenah card stock was cut to 4.25 inches by 11 inches. Pulling out the Grass and Clouds Stencil, I was ready to ink! The grass was first up, this was colored with Gina K Grass Green ink. Relocating the stencil to cover the entire 11 inches as needed. Then the stencil negative was placed over the grass to prepare for the sky inking. The negatives from the clouds were also taped down to ensure their whiteness. Gina K Blue Sky ink was blended over the sky portion. This ink blended piece was set aside.
Time to die cut… the Cribmates will be enjoying their trip on the train with the Train Die. I cut out 3 train cars in red card stock. Then cut the train engine twice from red card stock. With strategic card stock placement, I die cut sections of the engine and the cars from black and mirror silver card stock. The wheels and the couplers were cut from black card stock. The engine was assembled in layers to get the design I was looking for. The cars got their black pin striping added. These items were set aside to dry whilst I did some coloring.
The Cribmates were colored with Olo Markers and fussy cut out (See Color Guide). The sentiment was stamped with masking over the stamp to allow each section of the sentiment to be stamped separately. These were cut down to be sentiment strips with one being applied to section of the train.
It was time to make some folds. The stenciled paper base was scored at the 3.25 inches and then at 8.25 inches. Then the card base was turned upside down so the pretty colors were on my score bored and I could see the 3.25 score line at the 3.25 marking. I then scored the paper at 5.75 inches. By doing this my score lines will bend the appropriate ways without having that weird bump or cracking show. I primed the folds for magic time.
To assemble the card, the Cribmates were paired up to fit within the engine and cars. Each pair was glued together and to the train. The coupler was attached to the engine and to the end of two cars. The sentiment strips were glued down to the respective cars in the arrangement.
The train was now ready to be assembled. The engine was adhered flat to the card base. In the next panel, a small dab of glue was placed onto the top of the coupler and then the car was adhered. This was repeated twice. Each panel had the car, their passengers, and their wheels glued flat to the card base. Oh the adventures these Cribmates go on!
Card Size: Displays as 4.25 inches by 11 inches (Folds to fit an A2 or A6 envelope).

Cribmates, Kindred Stamps
Project Two: Science, Oh Yeah
These science pals are always in the lab no matter what their age is! The Cribmates Scientist and Assistant may be small but they are mighty on this card.
The background was first up! A piece of black card stock was cut down with the large stitched rectangle from the Card Basics Die Set. A piece of matte silver card stock was trimmed down to fit inside the ledge of the large rectangle. With the layers cut, I was ready to get inky! A piece of Hammermill card stock was cut down to an A2 panel. A third of the way up the panel, I placed a strip of masking paper leaving the lower third exposed to stencil. Using the Harlequin Stencil and Silver Stone ink from Altenew, I inked in a solid application. The stencil was removed and the inked section was lightly blended with remaining ink on my blending brush. This removed the harshness of the white paper. Next up was the wall paper. I repositioned the masking paper so the top section of the card panel was exposed. The Bottles Stencil was centered and inked with Altenew Buttercream. The stencil was removed and then the remaining ink on the blending brush was blended over the wall to remove the harshness. This panel was cut down to fit inside the matte silver card stock panel.
The Scientist and Assistant were stamped with alcohol safe ink and colored with Olo Markers (See Color Guide). Pulling out my trusty scissors, I fussy cut the pair out leaving a heavier white boarder to provide a visual contrast against the flooring. These were set aside to work on the science table. The Science Labs Die Set provided the pieces. The rack, microscope, and magnifying glass were die cut from a glossy black card stock, whereas the bottles and flask with their fluids were cut from white card stock. Finally the magnifying glass was die cut from mirror silver card stock for the glass section. The glass containers were colored B2.0 Olo Marker. The fluids were colored with Olo Markers (G1.5/ G5.1; O2.4/O1.2; RV1.3/ RV0.1; BV2.3/ B0.2; BG0.4/ BG2.3). Finally, the table was colored with O7.8/ O7.7/ and O7.3 Olo Markers.
To assemble the card, the layers were adhered together with liquid glue. The table and all the science supplies were assembled and glued flat to the inked panel. The magnifying glass was assembled and adhered to the Scientist’s hand. The Scientist and Assistant were popped up with foam tape and placed on the lower third of the card. Finally, the sentiment was stamped with black pigment ink, Clear Embossing Powder was applied and set with heat. This was cut down and popped up in the top third of the card. The card was finished, and these two are always welcome to stay at my crib anytime!
Card Size: A2 (4.25 inches by 5.5 inches)

Cribmates, Kindred Stamps
Project Three: Fly Away
With a little imagination, you can fly away just like the Cribmates too! This single layer card utilizes masking to design the scene. Let’s dive in!
The images from the Cribmates stamp set were arranged on a 3.5 inch by 8.5 inch piece of Hammermill card stock. The images were stamped with alcohol safe ink. Masks were stamped, cut out, and applied over their respective stamped images. Pulling out a circle die, I cut out one circle for each of the images out of masking paper to act as the balloons. The balloons were placed above each of the images allowing some distance between the image and the balloon. Taking out a fine liner, I then traced about the masked circle so the black lines would reflect the black lines of the stamped images. With the same black fine liner, I used a ruler to draw the string between the hand and the balloon.
Now that the stamping was done, I could focus on the back ground. I pulled out a cloud stencil and inked up a happy cloudy sky with Blue Hyacinth by Gina K Designs. With the sky done, I removed all of the masks to reveal my scene. I touched up any of the lines that needed with the fine liner and sat down to color.
Using Olo Markers, each of the images came to life (See Color Guide). The balloons were colored with Olo Markers as well (R0.5/ R0.4; O2.4/ O1.3; Y2.3/ Y1.2; G1.7/G1.5; B0.7/ B0.5; V2.6/ V2.4).
Finally, the sentiment was stamped in black pigment ink. This colored panel was adhered to a Slimline card base. I look at this card and smile. The adventures never end!
Card Size: Slimline (3.5 inches by 8.5 inches)
Cribmates, Kindred Stamps
Project Four: Hey Baby
Sometimes when planning a card, it doesn’t always work out and you have bits that are screaming to be used. That is where this fun card design came from. It features the Pig from Cribmates and is a nod to the romance she is always seeking.
The background was a cast away from another design that just didn’t work but it sure works on this one! An A2 panel was centered on the Bottles Stencil and the ink was applied in a repeating rainbow order. I utilized Altenew Crisp Dye Inks in Puffy Heart/ Lavender Fields/ Buttercream/ Bamboo/ & Caribbean Sky. This panel was set aside.
Pulling out the Heart Layers Stencil, I stenciled the center heart in Puffy Heart ink. The negative mask was applied over the inked heart and then Lavender Fields was stenciled in the next open section on the stencil. This allowed me to have a two-tone heart that would be center on the background. When the ink was dry, the heart was prepped with antistatic tool. The sentiment was stamped in embossing ink and then Snowfall Embossing Powder was applied and heat set.
The Pig was stamped in alcohol safe ink and colored with Olo Markers (See Color Guide). The Pig was fussy cut out on the line and set aside. To assemble this simple colorful card, the stenciled paper was adhered to an A2 card base. Foam tape was applied to the back of the heart and was centered on the card base. Foam tape was applied to the overhang sections of the Pig and liquid glue was applied to the sections that overlapped the heart.
I just love how the failure from another design made this adorable card!
Card Size: A2 (4.25 inches by 5.5 inches)

Cribmates, Kindred Stamps
Project Five: Besties Since Diapers
The Science team from Cribmates have been besties since diapers and they always seem to shaking it up a little. So why not make a shaker and use the blackout technique with the Bottles Stencil. Let’s break it down.
A piece of Hammermill 100 lb card stock was cut down to 4 inches by 5 1/4 inches. The panel was ink blended with Altenew Crisp Dye Inks in Puffy Heart/ Lavender Fields/ Buttercream/ Bamboo/ Caribbean Sky. Utilizing my electronic die machine and the embossing mat, I placed the Bottle Stencil on the back side of the inked panel. This will cause the colored bottles to be indented vs. raised. I did have to add a shim to get the depth I wanted. (Tip: practice the embossing on the same weight scrap card stock to get the sandwich needed for your machine.). Now that the panel was ready, I pulled out some black ink and started rubbing the black ink over the panel. Next time I make this, I will try to utilize a brayer because the indentions were not as deep as I utilized a stencil for the embossing folder. This panel was set aside to dry as there was a ton of ink on it.
To have my besties connected, I stamped the Scientist first with alcohol safe ink. Then I stamped the same image on a piece of masking paper. This was cut out on the line and placed over the card stock stamped image. The Assistant was then stamped with overlap on the Scientist. The mask was removed. The two besties were colored with Olo Markers and fussy cut with a thin boarder. This will help them pop off of the card with so much darkness. (See Coloring Guide for the details)
The center panel was up next. A piece of black card stock was cut down to 1 3/8 by 5 1/4 inches and prepped with an antistatic tool. With embossing ink the sentiment was stamped, Snowfall Embossing Powder was applied, and the sentiment was heat set.
To assemble the shaker, the Cribmates packaging was cut down to 5 inches by 6 1/4 inches. Double-sided adhesive was placed onto the back of the embossed panel along the edges. The panel was centered on the acetate and the corners were trimmed to ease the assembly. Working one side at a time for 3 sides, I removed the adhesive backing and folded the acetate over the adhesive. The top side of the panel adhesive remains open to make the pocket for filling of the shaker bits. I pulled out some star shaker pieces and filled the pocket. When I had the amount I desired, I laid the panel flat and removed the double-sided adhesive backing and folded the acetate as prior. I now had a shaker!
To assemble the card, I had a couple more pieces of paper to prep. A black A2 panel was cut down and adhered to a white card base. A piece of holographic card stock was cut down with an A2 frame die set. This was adhered on top of the black panel. With my base ready, I placed extremely sticky double-sided adhesive to the back of the shaker panel and this was centered onto the card base. The black center strip was glued to the front of the acetate. Finally, the Science Besties were centered on the panel and adhered with glue.
Card Size: A2 (4.25 by 5.5 inches)
The entire Kindred Stamps release will be available this Friday at 8am PST/11am EST. Be sure to subscribe to the Kindred Stamps blog to see a daily line up of sneak peeks from our amazing Design Team! Come join the Fan Club and release event to be part of the release fun, and you may just win some Kindred Stamps credit!!
Color Guide (Olo):
Bear:
Jumper> Y1.2/ Y1.1
Hat> CG3/ Y1.2
Bow> CG3/ RV0.2
Mouth> RV0.2/ R1.5
Body> OR7.6/ OR7.4
Baby Bear> OR3.2
Furry Baby:
Bow/ Ruffle> CG3/ Zero
Teeshirt> Y1.2
Body> O1.3/ O1.2; RV1.5/ RV1.3
Mouth> R1.5/ BK
Shorts> R0.4/ R0.5
Drum> R1.5/ CG2/ CG1
Scientist:
Flesh> YO2.2/ YO2.0
Scarf> O2.4/ O1.3
Bunny> CG3
Beaker> YG2.3
Glass> Black fine liner pen
Shirt> B0.2/ B2.0
Assistant:
Shirt> BG2.3/ BG2.1
Shoes> V2.7/ V2.6
Flesh> OR2.0/ O2.2
Hair> O2.4/ O1.3
Nose> O1.3
Nosey Guy:
Body> B0.2/ B0.3/ B2.0
Bibs> R0.5/ R0.4; Y2.3
Shoes>Y2.3/ Y2.2
Eyes> YG1.4
Dog:
Body> OR4.7/ O2.7
Bib> CG3/ Zero; R0.5
Mouth> R1.5/ RV0.2
Nose> BK
Pig:
Body> R0.1/ R0.2; R2.2
Eye> R0.2
Hair> Y1.1/ Y2.0
Dress> RV0.4/ RV0.2; CG3
Mouth> RV0.2/ R1.5
Frog:
Body> G1.5/ G1.7
Mouth> R1.5/ RV0.2
Shirt> CG3/ Zero/ B4.3
Shorts>B4.3
Twin Boy:
Flesh> YO2.3/ Y2.2
Hair> OR2.5/ OR2.3
Shorts> BV4.5/ BV4.4
Shirt> BV2.2/ BV2.0; R5.5/ R5.3
Glasses> YG8.5
Shoes> R5.5
Mouth> RV0.2/ R1.5
Twin Girl:
Flesh> YO2.3/ Y2.2
Hair> OR2.5/ OR2.3
Glasses> V2.3
Shirt> YG2.3/ YG1.2
Shorts> B2.4/ B2.2
Shoes> RV0.4/ RV0.2
Mouth> RV0.2/ R1.5
Other Supply Links:
Amazon: https://amzn.to/4k1IxTX
Hammermill Card Stock: https://a.co/d/4rTS2wh
Neenah Classic Crest Solar White 110 lb Card Stock: https://a.co/d/dgMbCHb

Kindred Stamps May Release: Treasure Kids
Pirates? Booby Traps? Adventures? Yes please!! Treasure Kids to the rescue!
Pirates, rubies, diamonds, pearls, boobytraps, pipes, ocean, bullet holes… what you may ask do these things have in common??? Loyal friends and adventures! The Treasure Kids from Kindred Stamps May release reflects the power of friendship and how even kids can be heroes.
This blog utilizes affiliate links to the Kindred Stamps products that I utilized. If you choose to click on the link to purchase your own stamp-sets I receive compensation that I use to purchase even more supplies. Thank you for your support if you choose to, and if you choose not, I respect that as well. Now let’s begin our adventure on search for our Kindred treasure!
Treasure Kids, Kindred Stamps
Project One: Come On…
Awwwww Come On…. Just do it! This card features four of the gang from the Treasure Kids stamp set. To design the scene, I sketch with pencil the house, steps, fence and tree. The Belly Dancer and the Inventor were stamped with alcohol safe ink. Using masking paper, the sections of the house and fence were masked. The Little Brother was stamped and then masked. Big Brother was then stamped. All masks were removed and the pencil lines were then traced with an alcohol safe fine liner pen. The four friends were colored with Olo Markers (See Color Guide).
Utilizing Altenew Artist Markers the remainder of the background was colored. The sky was colored with BG3. The tree was colored with Y762/ Y932/ G425/ G503/ G515. The fence was colored in WG05/ WG03/ WG01. The house was colored in TG03/ TG02/ Y908/ TG07/ TG05. Finally the roof and cable were color with C026/ C017.
The sentiment was centered in the sky section and prepped with an antistatic tool. Utilizing embossing ink, the sentiment was stamped and Snowfall Embossing Powder applied. After being heat set, the card front panel was adhered to a card base.
Card Size: A7 (5 inches by 7 inches)

Treasure Kits, Kindred Stamps
Project Two: Loyal Friends
Your gang of friends are there for you on all your adventures. This simple card shows the bonds of the friends with a nod to ocean. Clean and simple for the win with the Treasure Kids stamp set.
The friends were stamped in alcohol safe ink, colored with Olo Markers and fussy cut out (See Color Guide). Determining my card size was the difficult part. Originally, I pulled out my A2 template and immediately said nope! Then came out the A6 template, again, I didn’t like the how constrictive the friends were on the panel. So, then the Slimline template came out. I didn’t like the friends all lined up in a row. There was no depth and it looked like a prison picture line up. So in desperation, I pulled out the A7 template. When I arranged the friends by overlapping, and giving some height on the A7 template, I was sold. They felt connected yet had room to breathe.
A 5 inch by 7 inch card base was prepped and set aside. A separate 5 inch by seven inch panel was cut out. The friends were popped up with foam tape and applied to the lower ledge of the card stock panel. Because I didn’t want to get out masking paper to protect the inside of the card base, I choose to pull out a scrap of card stock that was 7 inches long to complete my ink blending on. Using 3 shades of blue a gradient panel was blended to fade to white (Altenew Desert Night/ Dusk/ Ocean Waves).
When the ink blending was dry, the gradient strip was prepped with an antistatic tool and stamped with embossing ink. Snowfall Embossing Powder was applied and heat set. The complete panel was adhered flat to the card base. A thin strip of gold card stock was adhered as a nod to the treasures the friends see on their adventure.
Foam tape was placed on the back side of the friends card panel and attached to the card panel with no concern for the paper overhang on the top of the card. Pulling out my scissors, I trimmed down the overhanging paper. Looking at the final card, I reflected on bonds of friendship that I have with my friends of childhood and today. They are my greatest treasures.
Card Size: A7 (5 inches by 7 inches)

Treasure Kids, Kindred Stamps
Project Three: Friendship Gift Card

Best friends make us a who we are. Someone who know us better than we know ourselves. This simple gift card holder showcases the girls from the Treasure Kids set.
The Cheer and Prep Girls were stamped in alcohol safe ink and colored with Olo Markers (See Color Guide). These ladies were fussy cut out and foam tape applied so they were ready for assembly.
Pulling out the Gift Card Die, it was time to start cutting! With a heavy weight piece of card stock, I die cut two of the base template. The base template was then also cut from a deep red card stock and a piece of yellow striped paper from the Emotional Paper Pack. These will serve as the front and inside layers for the gift card holder. The gift card holder mechanism was die cut from white card stock. The topper to the gift box was cut from glossy white card stock. The outside bow was cut from a yellow glitter card stock, while the inside bow topper was cut from the Emotional Paper Pack.
With all my pieces ready, I could start the assembly. The base of the template was up first. Using my scissors I cut off one of the tabs off of the die cut. Because I wanted my hinge to be hidden, I adhered the tab to the inside of the base die. The yellow striped paper (Emotional) and red die cuts were prepped by removing the tab with a scissors and adhered to the front and inside of the gift card holder respectively.
The inside bow was up next for assembly, but I needed to place the gift card holder mechanism inside the base. I stamped the die cut with a sentiment that would be seen after the gift card is removed. The mechanism was then glued to the panel on the outside edges only to ensure the gift card when placed was able to fit and hold the card. The yellow striped bow was assembled and glued flat to the the inside of the gift card holder.
Time to focus on the front. The box topper was cut from white glossy card stock and glued flat to the front. The ribbon die cut was centered and then glued to the gift. Finally, the bow assembly was started. The ribbon was adhered flat. The ribbon tails were adhered with only glue at the top of the bow to allow the ribbons to have movement. Thin foam squares were placed on the outside edges of the bow topper. Liquid adhesive was placed in the center of the bow topper sections and adhered to the paper. I pulled out my reverse tweezers to pinch the center only so the edges were allowed to remain elevated with the foam squares. This little dimension makes the bow so much more realistic.
Now that my gift card holder was assembled, the besties were placed on either side of the ribbon. When I was designing this gift card holder, I wanted to have my sentiment hidden so when the gift card is removed, a hidden treasure is found.
Card Size: Gift Card Die

Treasure Kids, Kindred Stamps
Project Four: The Key of Kindred Treasure Kids
I found the key! Now lets frame it up in a shaker panel and all of the gang from Treasure Kids!
Each of the friends were stamped in alcohol safe ink and colored with Olo Markers (See Color Guide) and then fussy cut out. The sentiment was stamped in black and fussy cut out raggedly to give the look of an old torn and battered map. The sentiment was inked randomly with Altenew Mocha ink. These components were set aside to make the shaker panel.
On a piece of card stock, a skeleton key was drawn in pencil and then outlined in a black fine liner. The panel was die cut down with a A7 nested dies. Using the same Mocha ink, the panel was inked up unevenly to give it texture. Water spatters add to the distressed look of the panel. Some of the jewels and coins (a.k.a. embellishments) were adhered to the panel so if the treasure settles, there is still some bling on the panel.
The packaging that the Treasure Kids came in will act as my shaker panel. I cut it down to be larger than my panel. Using ultras sticky tape on all side leaving the backing on the tape. Removing 3 sides of the sticky tape were removed and the packaging was attached. The shaker pocket was filled with treasures and then sealed shut.
The card base needed some contrast so a piece of metallic satin brown card stock was cut to 5 inches by 7 inches and glued to the panel to the card base. The shaker pack was centered on the panel. Each of the friends were arranged around the edges and foam tape was placed on the outer edges only to even out the height of the shaker element. The sentiment was popped up onto the shaker element. Now my Treasure Kids have the key in their grasps, there is no stopping the adventures they may go on!
Card Size: A7 (5 inches by 7 inches)

Treasure Kids, Kindred Stamps
Project Five: Hey Guys!
Who would have thought an A9 card would come out of these little stamps!! I needed the space for a pirate ship. The Treasure Kids get to take a dip in the ocean while the Adopted Brother is ready to walk the plank… Let’s break it down.
The group of friends were stamped in alcohol ink safe ink and colored (See Color Guide). They were then fussy cut out and set aside. The easy part was done. Now I had to become inventive in how to make a pirate ship.
I pulled out a wood panel die and inked it up with Nutmeg ink (Concord & 9th). Randomly leaving areas darker or blotchy gave the wood an aged look. On a piece of copy paper, I lined up and adhered the planks in an alternating pattern. Pulling out my craft knife I cut out a section on the deck where my Adopted Brother could stand and jump. The bow was cut out with scissors. Using portions of the left over planks, I cut down a few pieces to make the mast. The sails were freehand cut from a piece of card stock. The sails were tinted with Sun Dune ink (Altenew) and some detailed shading was sketched in with Prisma PC1080 Beige Sienna colored pencil. The ship was assembled and set aside.
The background was up next. Wanted a dark dingy looking cave without the stenciling or drawing was my priority. On a 8.5 inch by 5.5 inch card stock panel, the top portion was ink blended randomly and without care with Altenew Moon Rock/ Evening Gray/ and Lava Rock inks. The lower portion was then inked with Altenew Ocean Waves ink. This was just applied, and not even nicely. It won’t be seen when looking straight on. I added this for the side views. Since I had the gray inks out, I free hand cut out some boulder shaped rocks that will be at the base of the ship, holding it time.
It was time to get my sentiments ready. I stamped “Hey Guys” on a piece of card stock and free hand cut out a thought bubble. Foam tape was applied and this was set aside. Pulling out the Art Frames Die, I picked a frame that fit the sentiment “Our Friendship Is My Greatest Treasure.” This was stamped in pigment ink and Clear Embossing Powder was heat set. The frame was die cut a second time out of a matte gold card stock to give a nod to the antique richness of treasure. Foam tape was applied and this was set aside.
The water was the last to do before I could assemble the card. Card stock was inked in a gradient fashion with Altenew Desert Night/ Dusk/ and Ocean Waves ink. To make the waves, I pulled out my scissors and cut my normal straight line (*wink*…just kidding… sort of) and layered the waves flat with some glue.
With all my pieces ready, it was time to assemble. The ship and boulders were adhered flat to the ink blended panel. The Adopted Brother also was adhered flat to give the illusion that he was further away. “Hey Guys” was popped up with foam tape. The friends were all lined up in a row leaving a space where the Adopted Brother was jumping into. The wave panel was set onto of the line up and a piece of Post-it Tape was placed on the top to hold the kids and the wave together. This piece was flipped over and foam tape was applied. Having one piece to handle, the waves with bobbing heads was stuck down to the card base. Finally, the framed sentiment was attached.
I can’t get over how cute this scene turned out! AND IT’S HUGE!! It is the perfect tribute to these Treasure Kids!!
The entire Kindred Stamps release will be available this Friday at 8am PST/11am EST. Be sure to subscribe to the Kindred Stamps blog to see a daily line up of sneak peeks from our amazing Design Team! Come join the Fan Club and release event to be part of the release fun, and you may just win some Kindred Stamps credit!!
Color Guide:
Little Brother:
Flesh> OR7.2/ OR7.1/ OR2.0/ R0.2
Hair> OR3.8/ OR3.7/ OR3.4
T-shirt> CG3
Raincoat> Y2.3/ Y1.2
Jean Jacket> B4.3/ B4.6
Jeans> B4.6/ B4.7
Map> 0.41/ O4.0
Big Brother:
Flesh> OR7.2/OR7.1/ OR2.0/ R0.2
T-shirt> CG5/ CG3
Sweats> CG5/CG3
Shorts> CG9/ CG7
Shoes> CG9/ CG7
Hair> OR3.8/ OR3.7/ OR3.4
Bandana> R0.5/ R0.4
Inventor:
Flesh> OR7.4/ OR7.2/ OR7.1/ R0.2
Hair> BK/ O7.8
Jacket> YG8.7/ YG8.5
Shoes> CG3/ CG1
Shirt> CG5. CG3
Jeans> B4.3/ B0.2
Sash/ Belt> YO2.7/ YO2.5
Sassy One:
Flesh> OR3.2/ OR7.1/ OR2.0/ R0.2
Hair> O7.8/ O7.7/ O7.3
T-shirt> CG9/ CG7
Jacket> CG3/ CG1
Pants> CG7/CG5
Shoes> CG7/ CG5
Belly Dancing:
Flesh> OR3.2/ OR7.1/ OR2.0/ R0.2
Hair> O7.8/ O7.7/ O7.3
T-shirt> CG9/ CG7
Jacket> CG3/ CG1
Pants> CG7/ CG5
Shoes> CG7/ CG5
Adopted Brother:
Flesh> OR3.2/ OR7.1/ OR2.0
Shirt> B0.7/ B0.5
Pants> B4.7/ B4.6
Shoes> CG9/ CG5
Suspenders> R0.6/ R0.5
Hair> YO2.5/ YO2.3/ YO2.2
Mouth> R5.3/ R5.1
Cheer Girl:
Flesh> OR4.2/ OR3.2/ OR2.0/ R0.2
Skirt> WG3/ WG1/ WG5
Shirt> WG3/ WG1
Vest> WG0
Sweater> YO2.2/ Y2.2/ WG9/ WG5
Hair> OR4.7/ OR4.4/ OR4.2
Prep Girl:
Flesh> OR4.2/ OR3.2/ OR2.0/ R0.2
Hair> YO2.5/ YO2.3/ YO2.2
Pants> CG3/ CG1
Undershirt> CG0
Shoes> RV1.5/ R2.4
Sweatshirt> R5.7/ R1.5
Scarf> R1.5
Belt> RV1.5/ R2.4
Lamp> CG5/ CG3/ O7.3/ B0.2/ Y2.0/ Y1.2