Pocket Oz: Kindred Stamps January Release
Pocket Oz, Kindred Stamps
Come away with me on a tiny adventure to land that that’s full of life and color! The Pocket Oz stamp set from Kindred Stamps January release takes you on an adventure through a story of finding strength from within to stand for those without a voice and coming of age. It felt like home making these projects.
This blog utilizes affiliate links. If you choose to click on the links provided to purchase, you are supporting me as I receive compensation for your purchase. If purchasing is not in your books, no worries, I hope you find inspiration for projects you design. By clicking on the links, you are letting Kindred Stamps know that you like my content and to keep bringing me back. Thanks for your time! Now let’s take a trip to a far off land…
Project One: Dimensional Pocket Oz Overload
Pocket Oz, Kindred Stamps
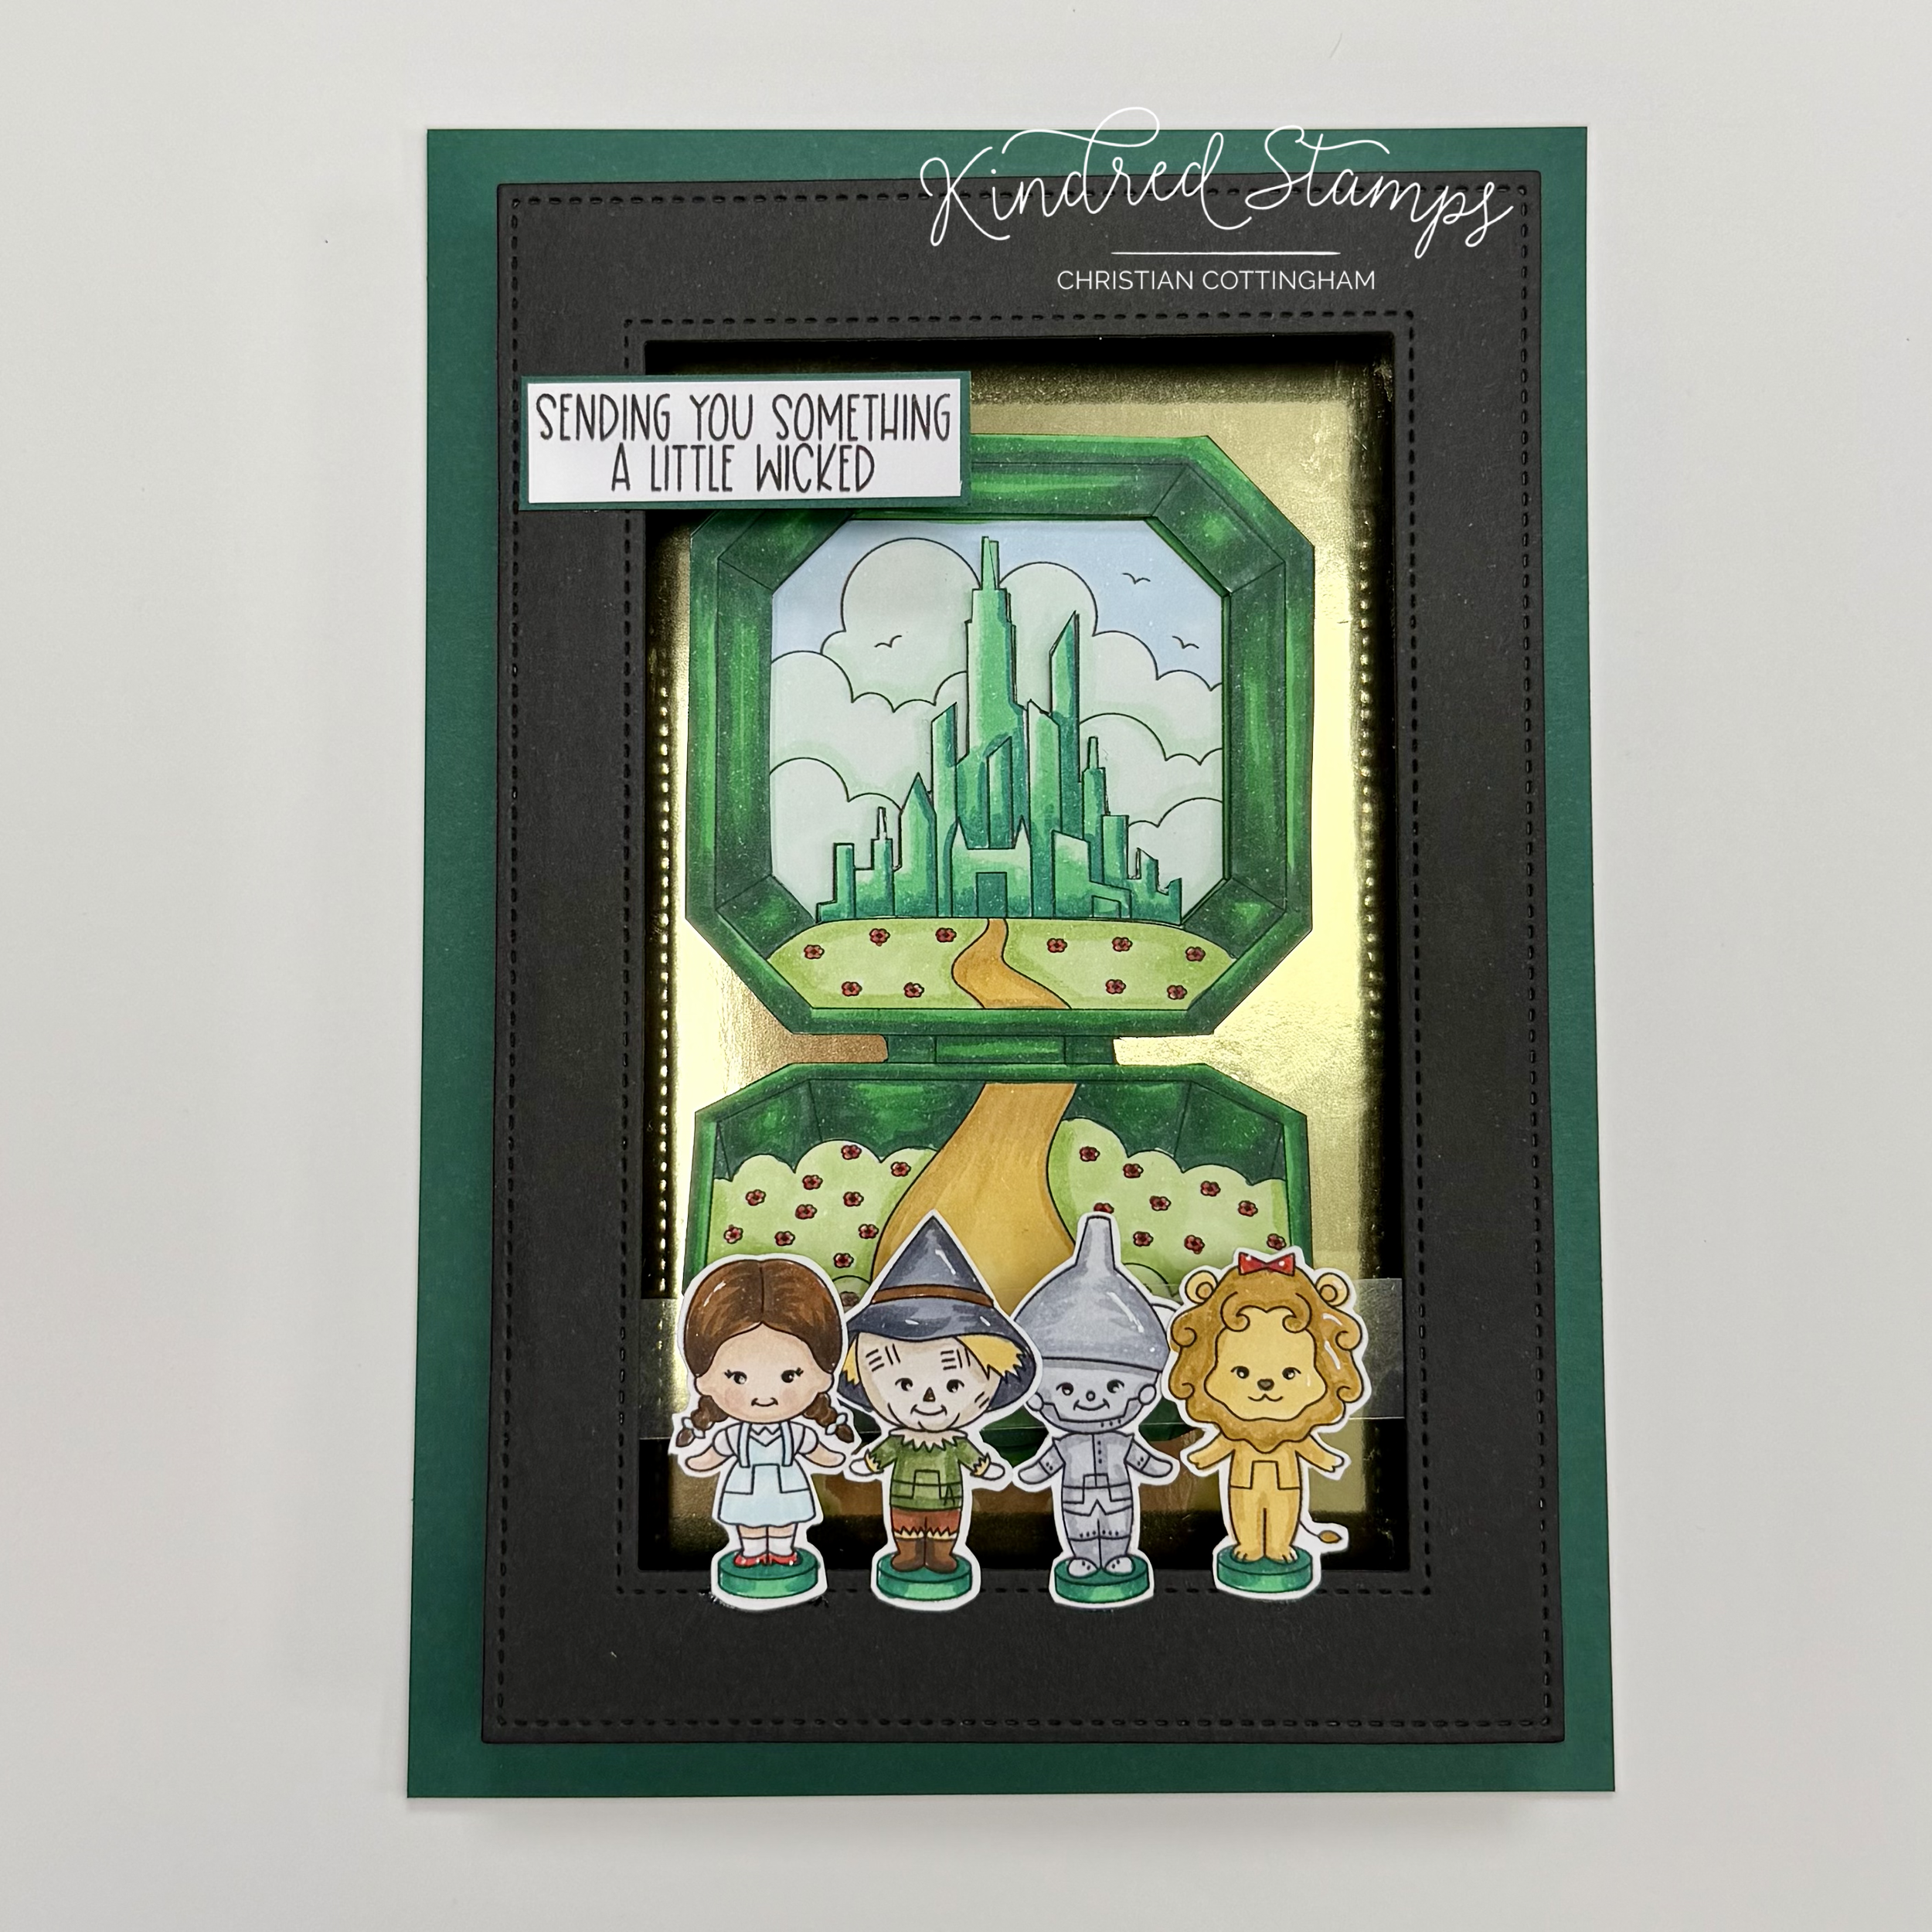
This card started as a home decor piece. It was going to go into a shadow box frame. I still think this would be amazing as such, but then I thought how can I make this into a card that can be sent to someone who can frame it themselves. This allows the recipient to have the frame that matches their own decor. Let’s breakdown how I accomplished the dimension with still be able to send it in the mail.
For ease of framing for the recipient, an A7 card base was prepped. An A7 panel was cut from a deep green cardstock and adhered flat to the card base. This was set aside. The black frame was prepped. Using a set of A7 dies, a frame was made by cutting 2 dies at the same time. Two pieces of black cardstock were cut at 1.25 inches by 4 inches. These panels were scored at 0.25 inch increments. The 1.25 inch side of the paper was aligned into the corner of the scoring tool with the lines going down the 4 inch length. The panels were accordion folded and adhesive was applied to on end of the mountain folds and these were adhered to the back side of the frame on the long sides. These will be the springs that can be smooshed down for mailing. A piece of gold cardstock was cut out of the largest frame die. The frame with springs attached was then adhered to the gold die cut. The framed panel was centered onto the card base. With the paper prep done it was time to get stamping!
With alcohol safe ink, the entire pocket was stamped once. Then the top scene only was stamped 2 more times. Finally, the four figurines and the sentiment were stamped. The images were colored with Olo Markers (See Color Guide). Because the image will be cut out in layers, don’t waste your markers. For example, when I colored the entire pocket, I did not color the inside scene on the top scene. This section will be cut out at the grass line. For the second layer, I only colored the the castle and did a swipe of green on the grass just to camouflage any alignment mistakes. The scene was cut out on the line of the castle. Finally, the last scene was colored with only the sky and a swipe of green around the castle and the frame.
Thin foam tape was placed behind the castle panel. This panel was aligned on top of the base sky panel. Thin foam tape was then placed on the back of the grass on the entire pocket scene and aligned with the castle scene. Because I used the thin foam tape, the total thickness of this section is standard foam tape depth. The standard foam tape was placed only on the base section of the pocket. Adhesive was placed on the top of the pocket scene. The dimensional pocket was centered in the frame.
Finally, a piece of acetate was trimmed to fit between the frame side. This will act as a support for the figurines to prevent sagging as the piece ages. The figurines were lined up and adhered to the frame base and the acetate bridge.
To complete the card, the sentiment was matted with a piece of green card stock and attached to the side of the frame. The dimension is multilayered and can easily be inserted into a 5 inch by 7 inch shadow box or larger depending on the recipient’s liking. Pocket Oz is the perfect home decor that can be mailed!
Card Size: A7 (5 inches by 7 inches)
Project Two: Pocket Oz Emblem
Pocket Oz, Kindred Stamps
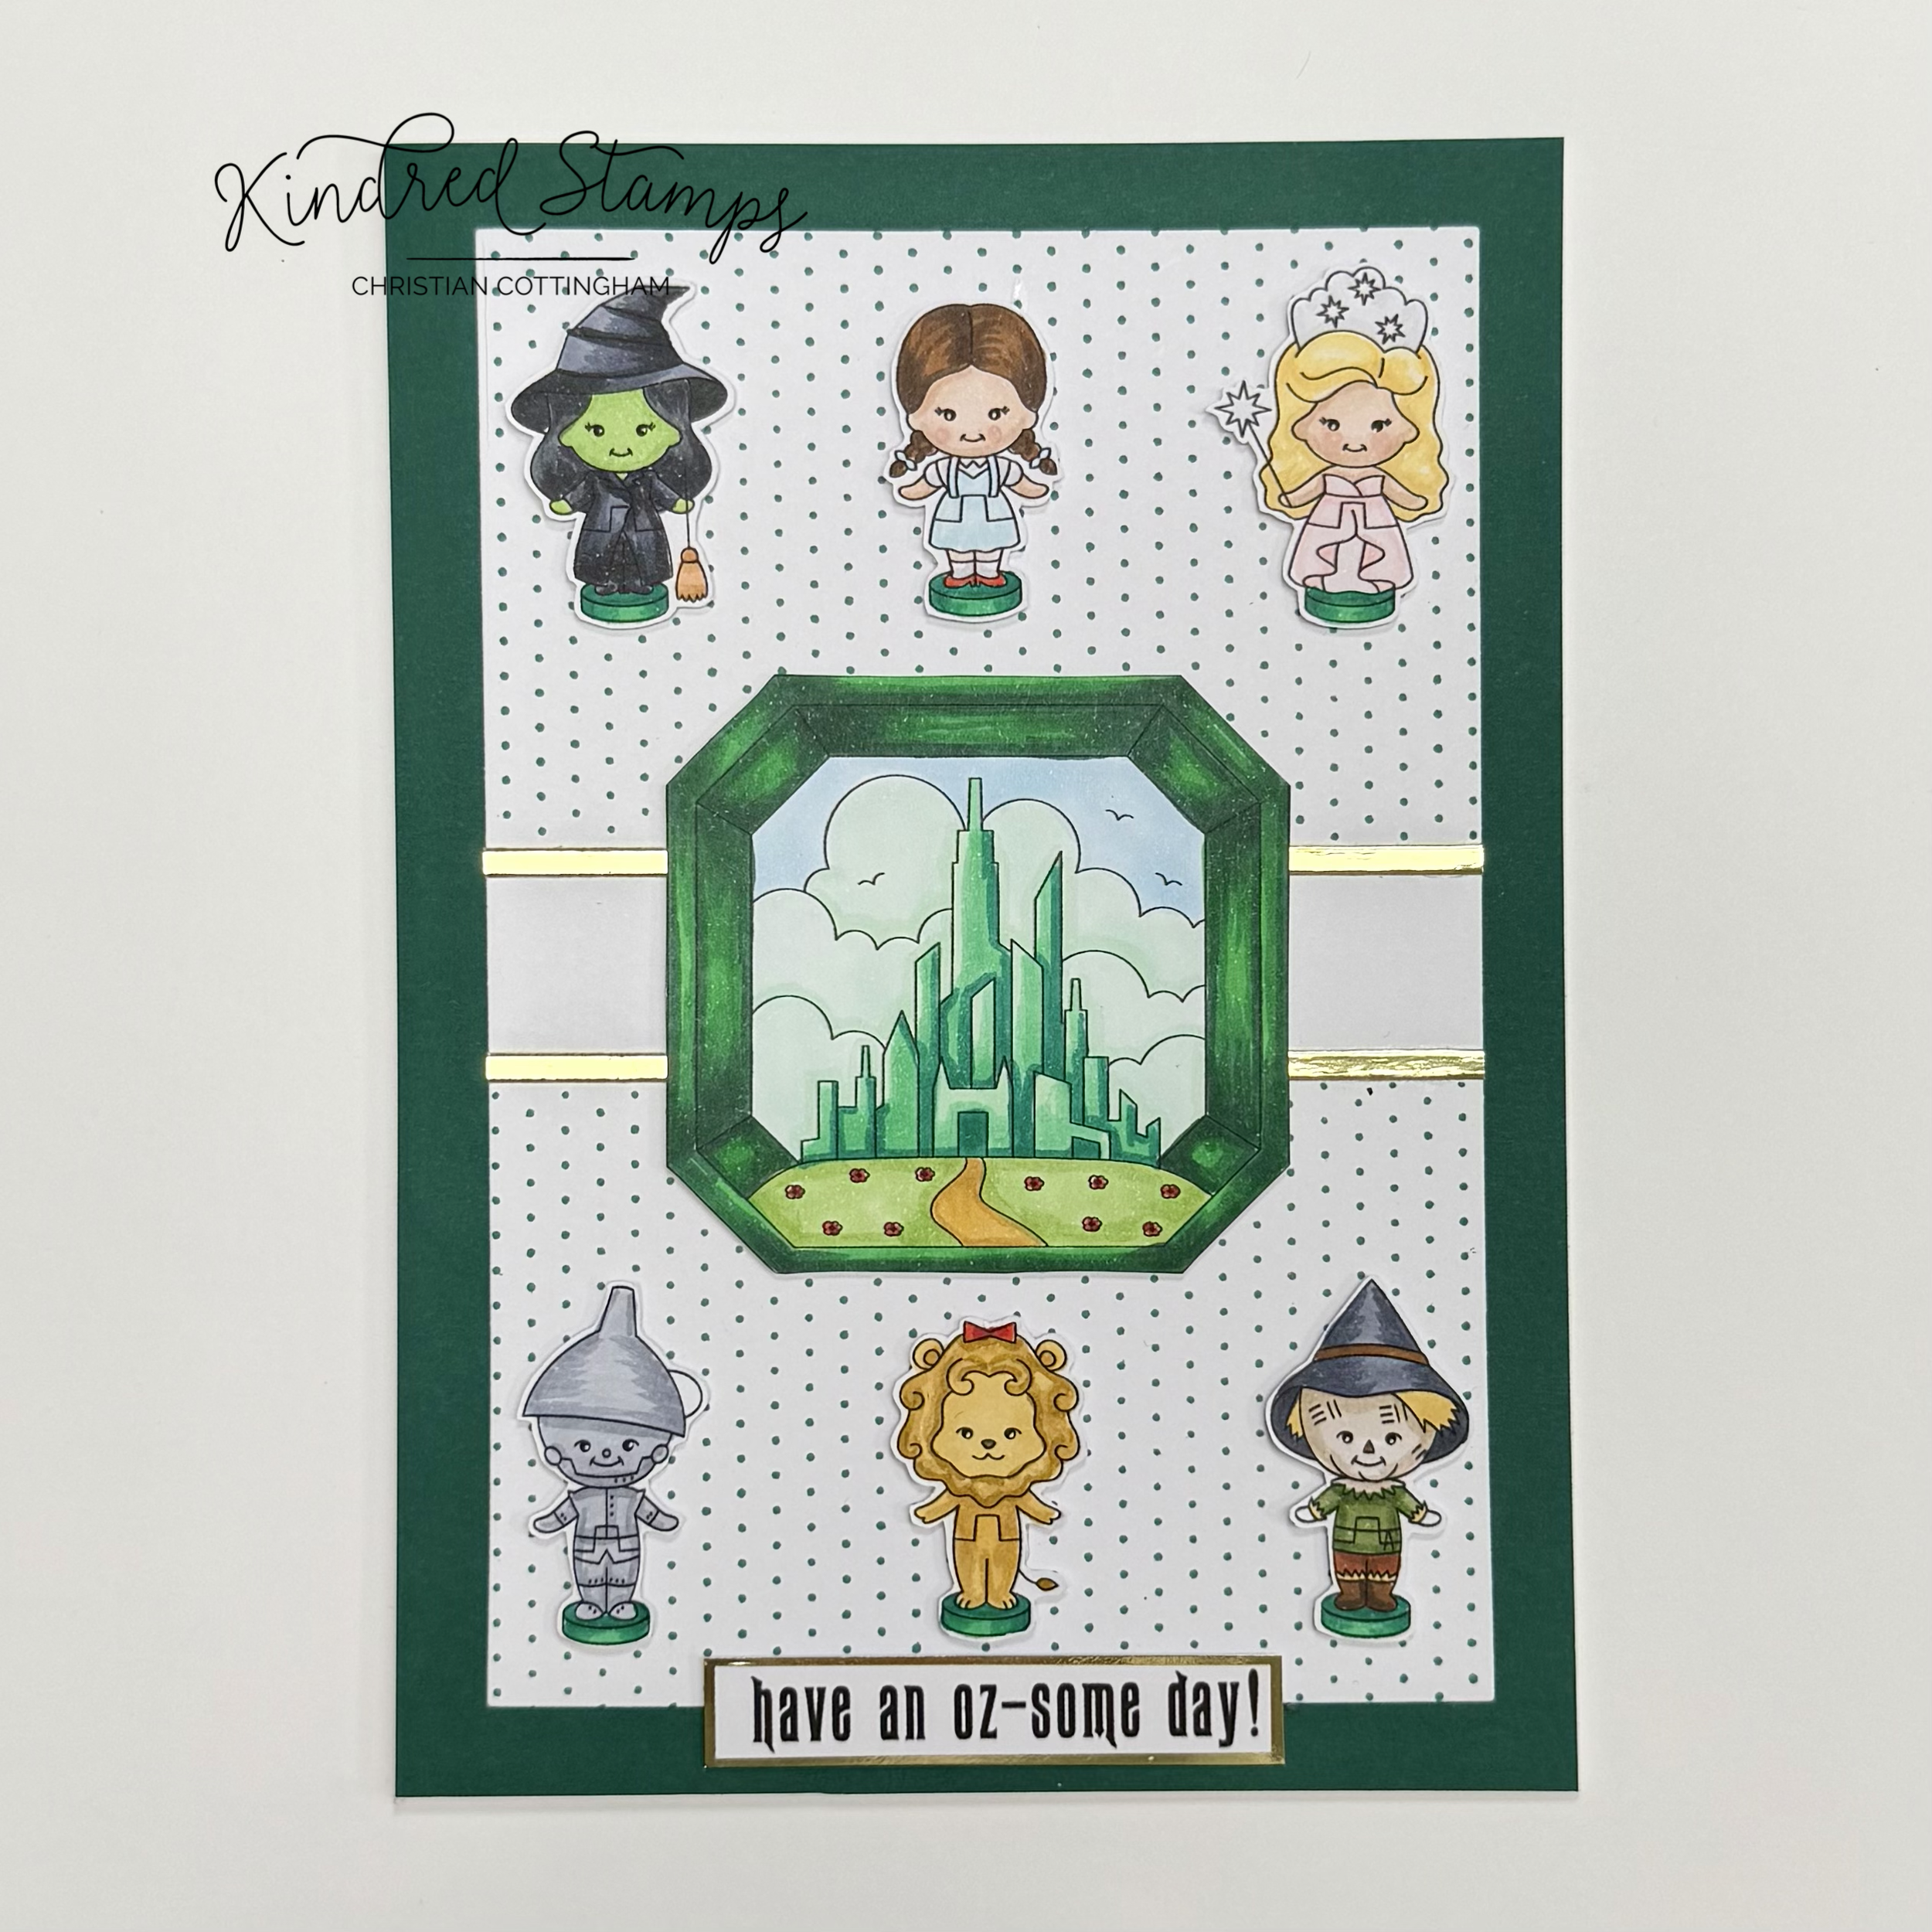
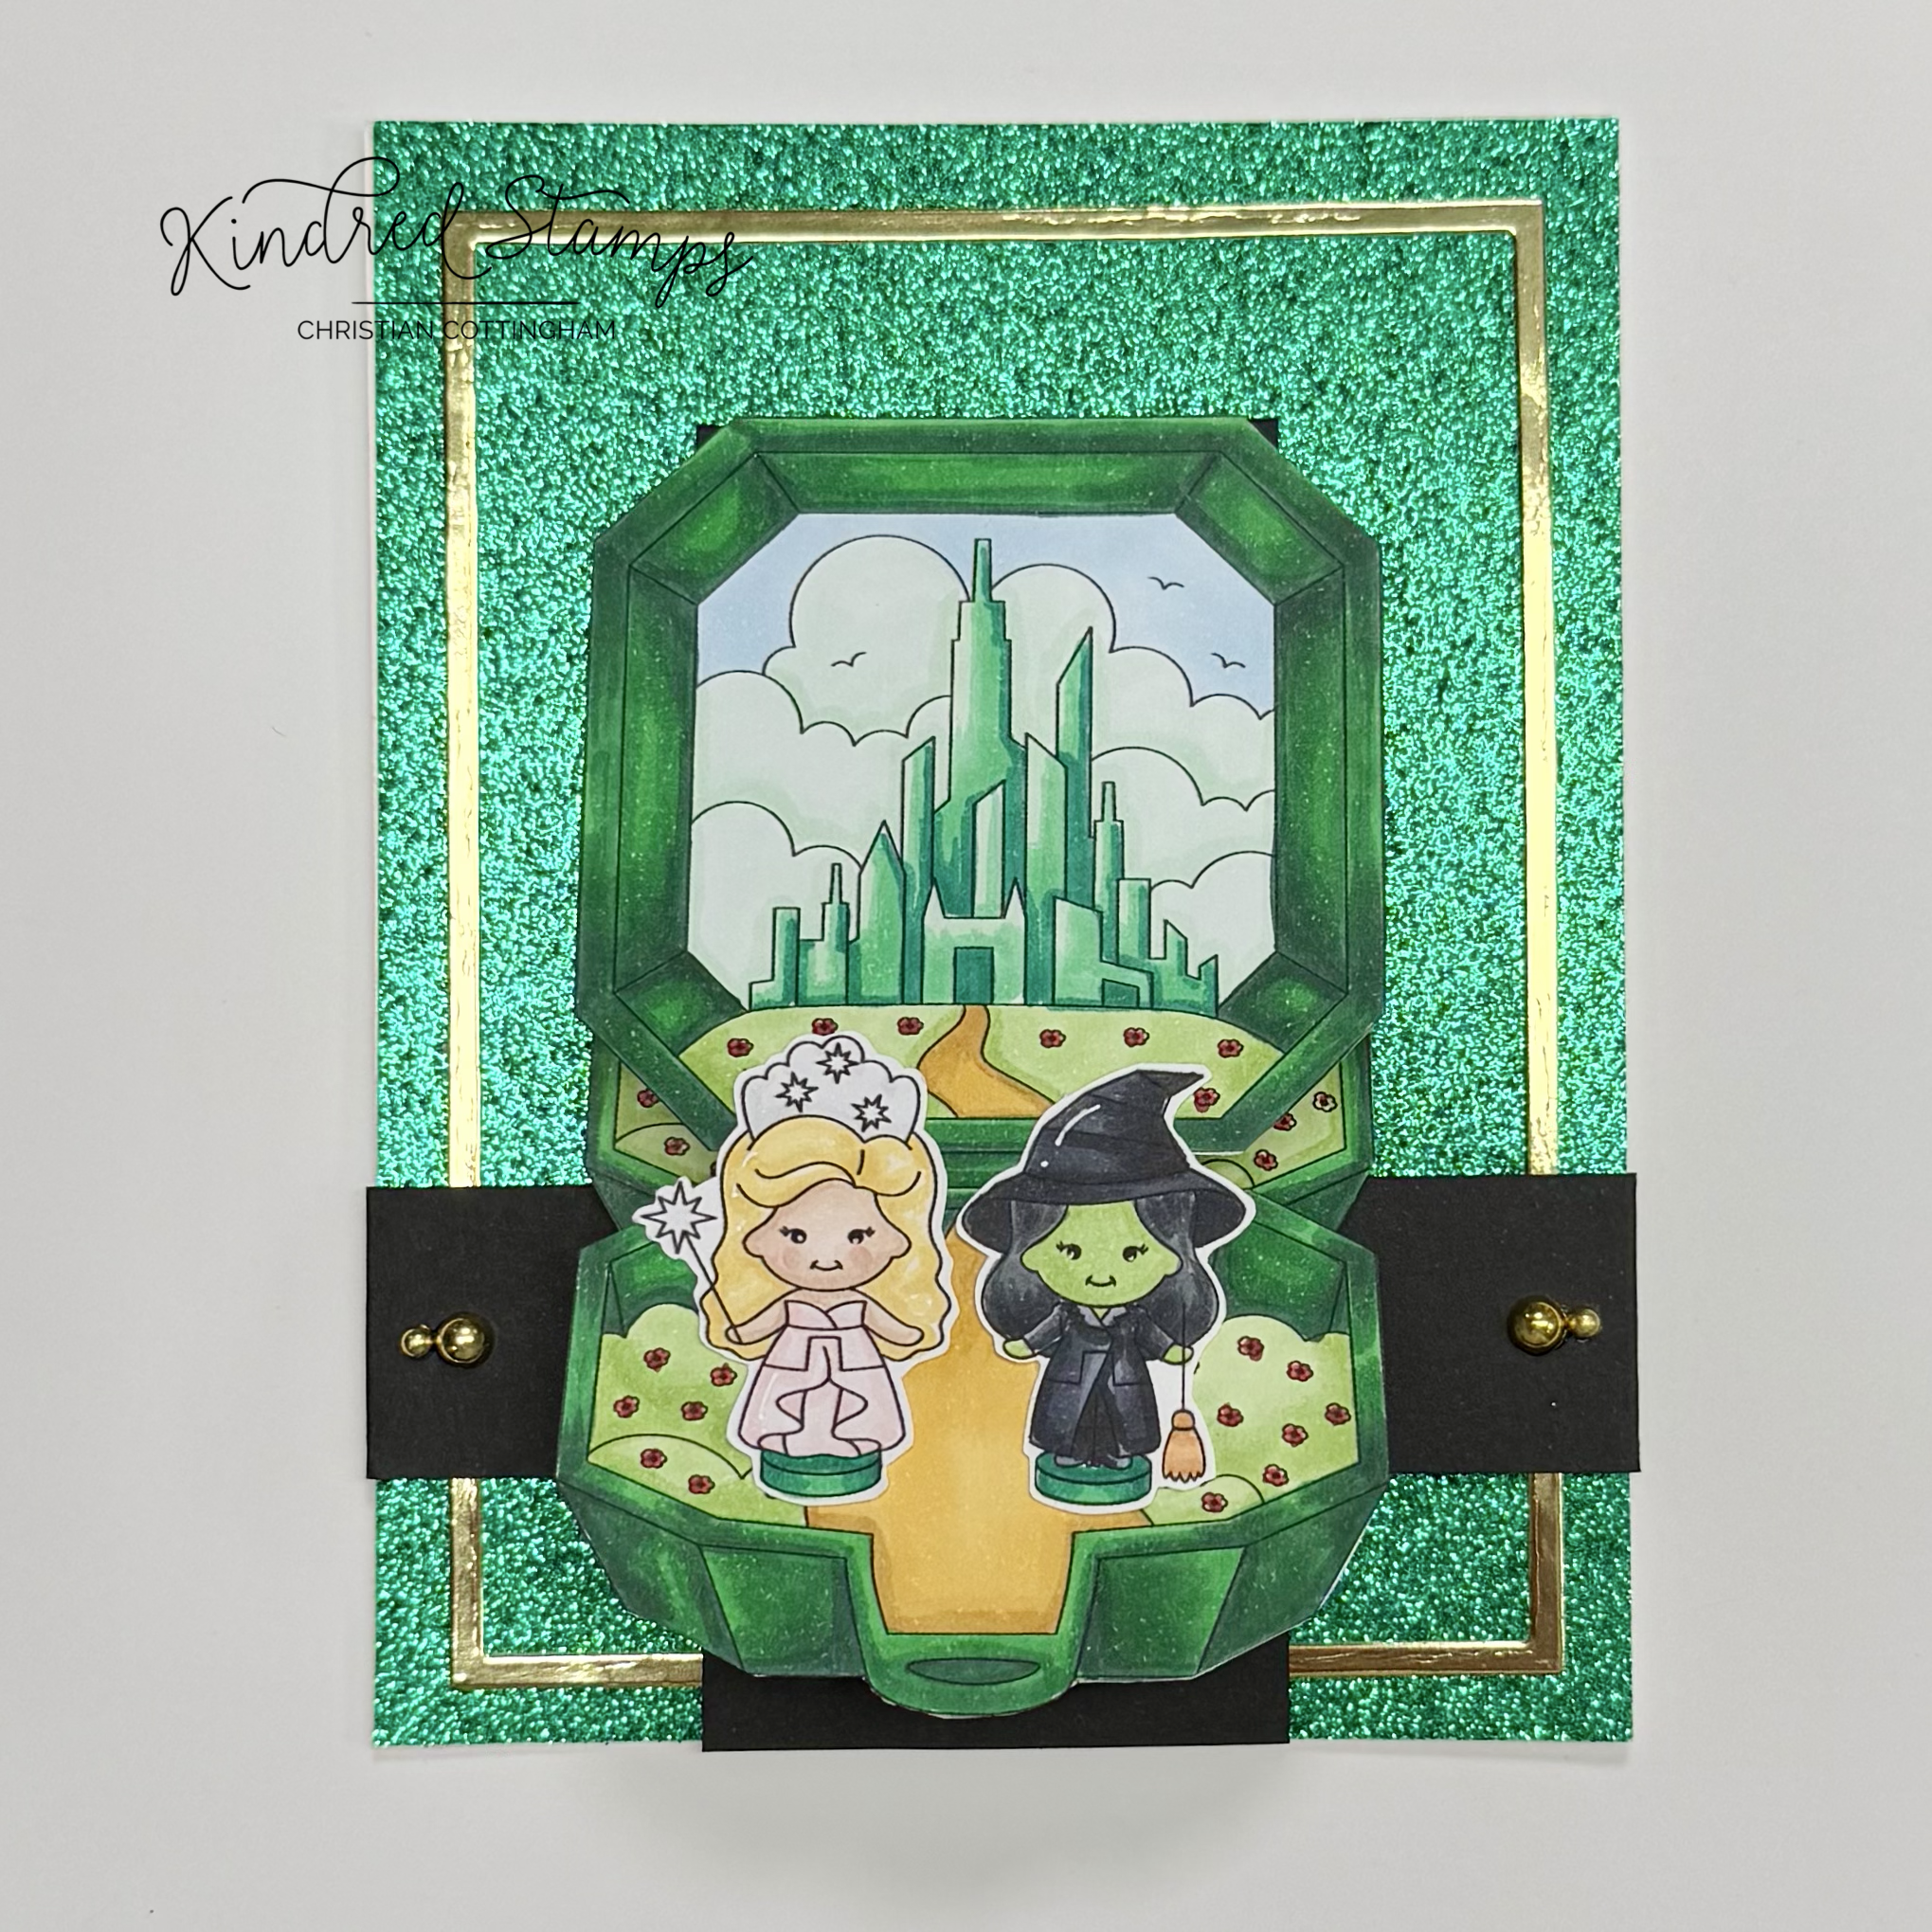
When I saw the top of the Pocket Oz scene, I instantly saw an emerald that needed to be center stage on a card. It only needed it’s supporting cast to accent the card. Let’s breakdown this simple but sticking card.
The top scene and mini-figures were stamped in alcohol marker safe ink. The top scene and figurines were colored with Olo Markers and fussy cut out on the line. A black fine liner brush pen was used to edge the images to hide my cutting mistakes. The sentiment was stamped and cut into a sentiment strip. The same gold cardstock was utilized as a mat for the sentiment. These were set aside to make way for the card panels.
The background of the card panel was cut from a deep green cardstock to a 5 inch by 7 inch panel. Using a A7 card front die set, a piece of white cardstock was cut to provide a nice frame around the panel. A piece of 1 inch masking paper was centered on the white cardstock. With a tiny dot background stamp and Gina K Design Christmas Pine ink, a pattern was stamped onto the white panel. The masking paper was removed to reveal a white split in the pattern. Two pieces of gold cardstock were cut to 1/8 inch strips and glued to the white panel.
With all the pieces ready, it was time to assemble. An A7 card base was prepped and the green card panel was adhered to the base. The white panel was popped up with thin foam tape and centered on the card. The figurines and top pocket scene had thin foam tape applied and then were adhered to the card front. This emerald looking scene is star of this card and forces your eye to analyze the adorable scene. I just can’t even!
Card Size: A7 (5 inches by 7 inches)
Project Three: Gift Tag Gift Box
Pocket Oz, Kindred Stamps
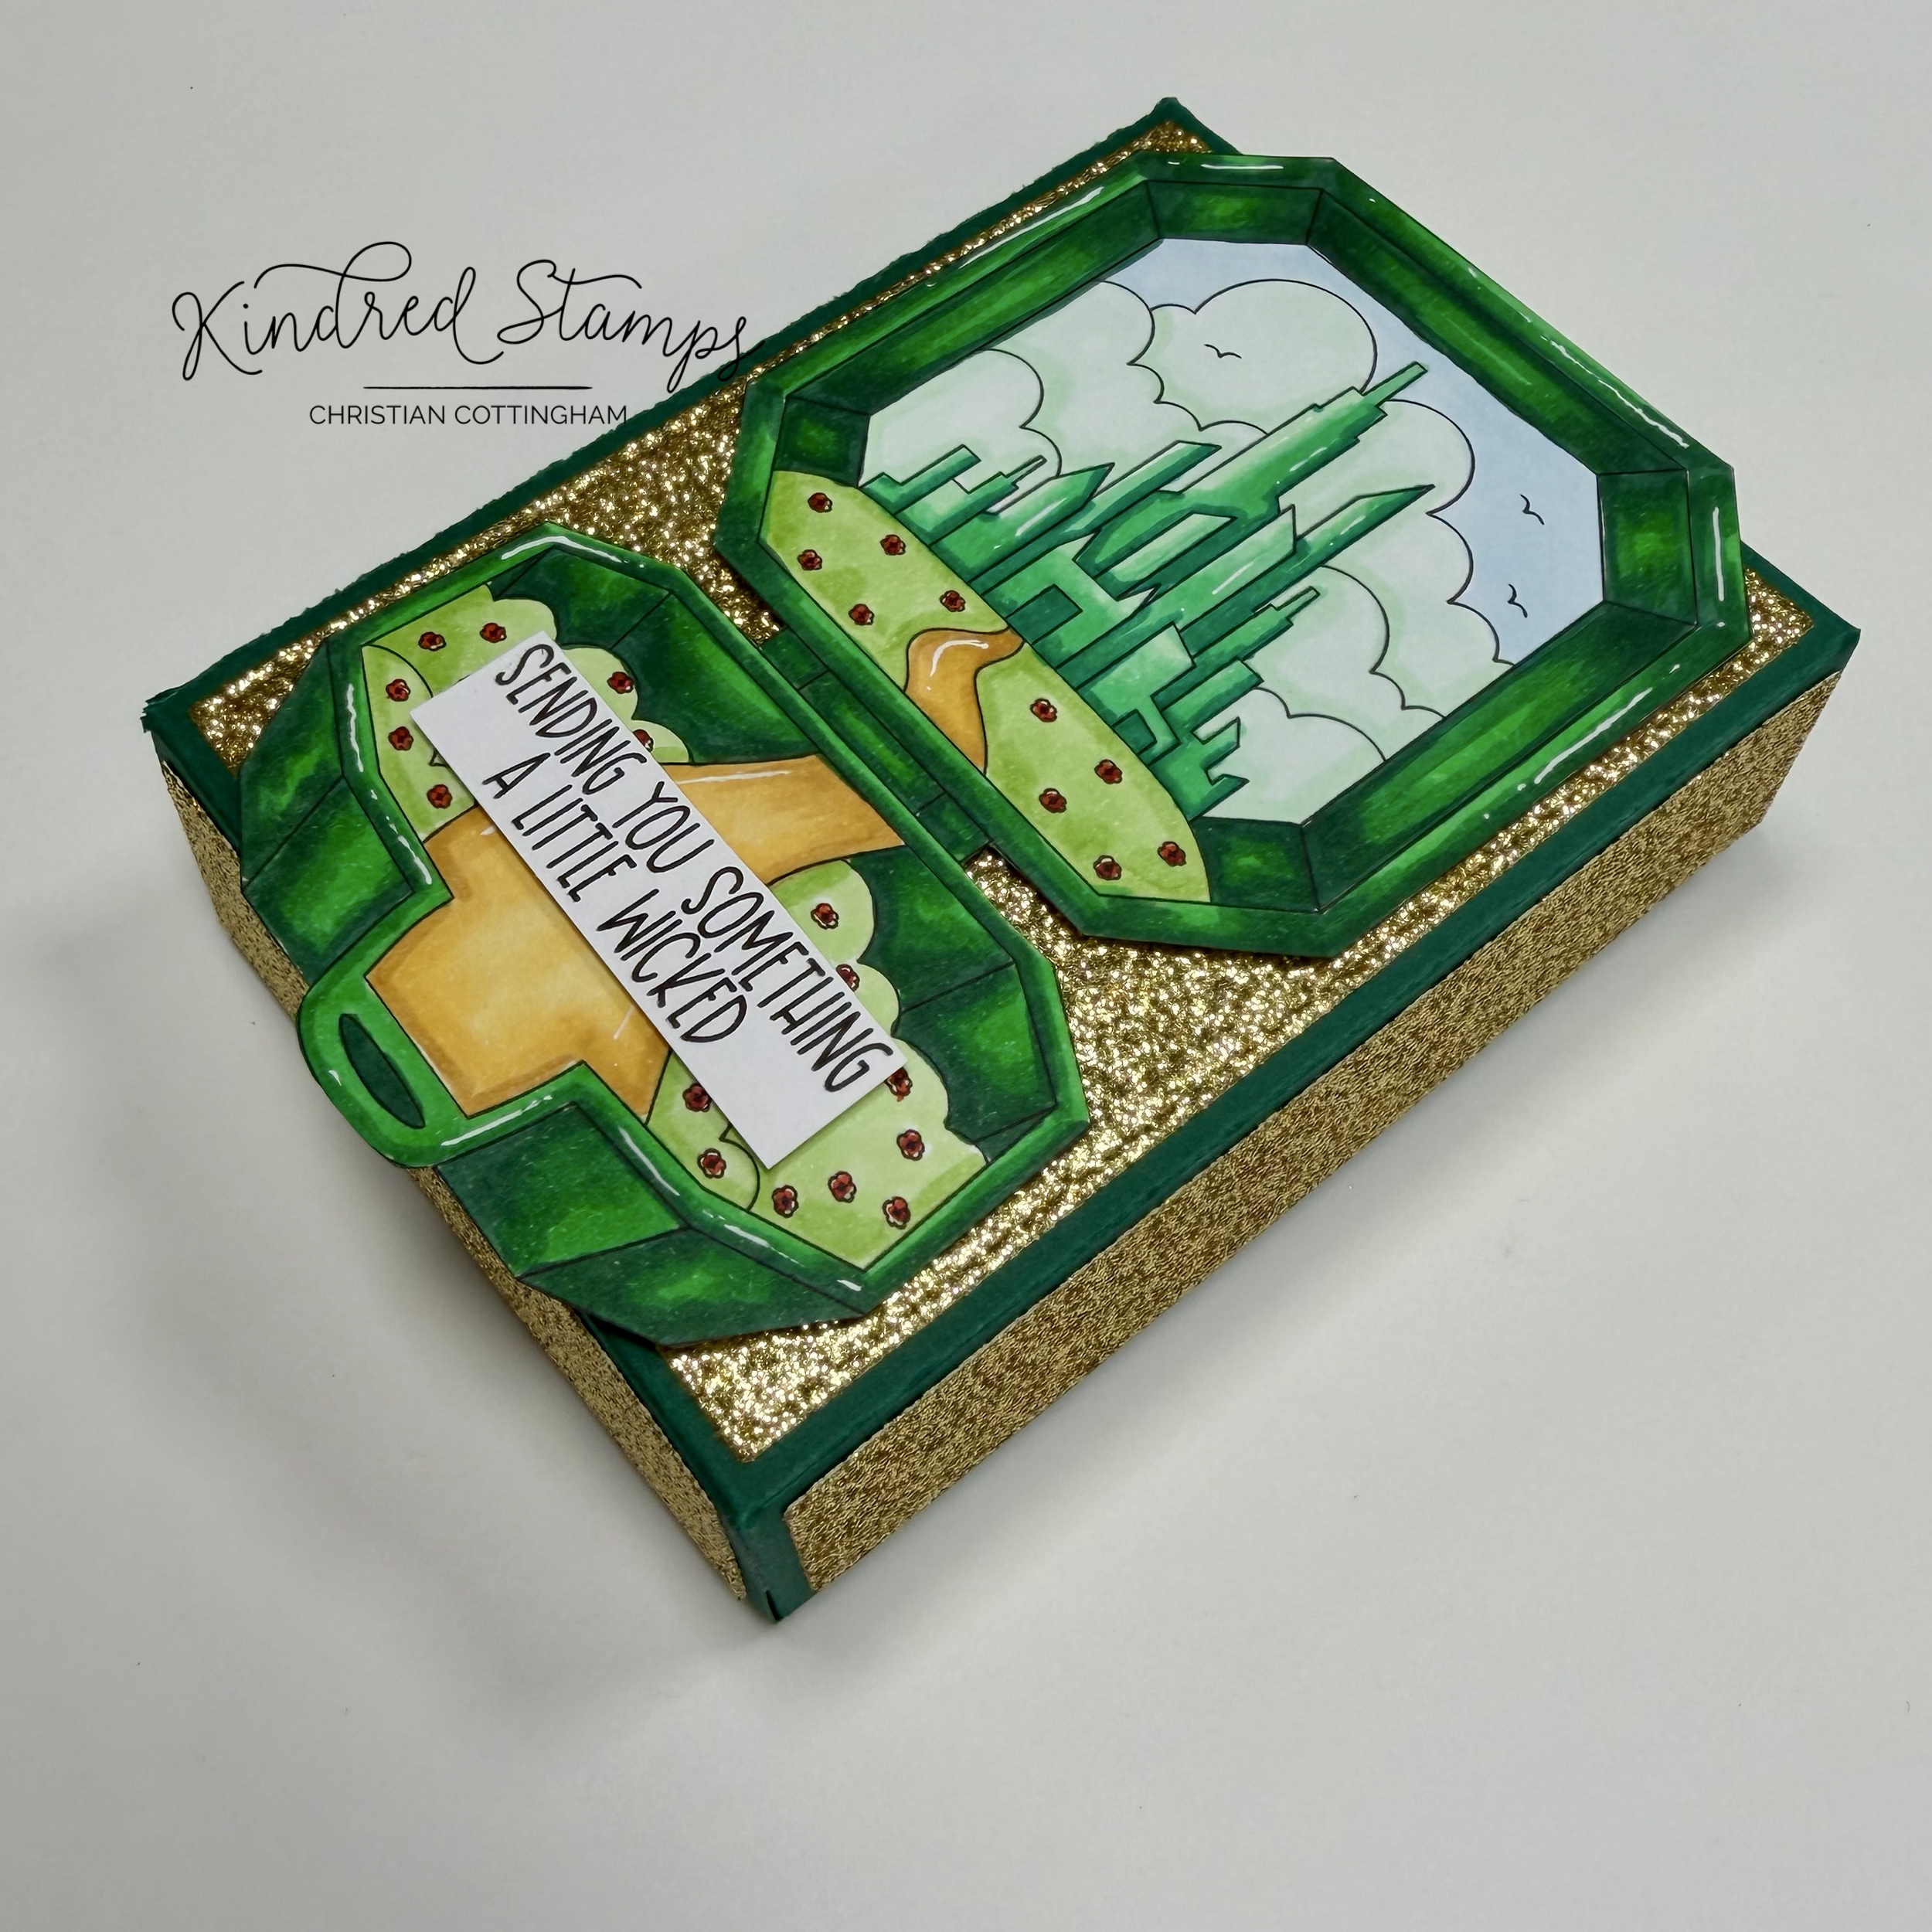
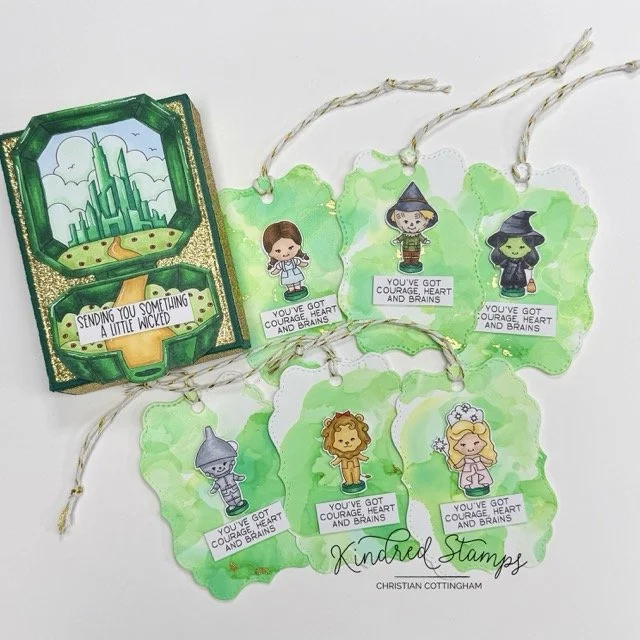
The Pocket Oz set works perfect for a gift set! I am always trying to find ways to give a homemade gift that have a pop of whimsy and don’t take me forever to make. Pairing Pocket Oz with the Treat Box die set made this gift set come together in a quick.
The Pocket Oz images were stamped with alcohol safe ink on white cardstock. Using Olo Markers, the individual pieces and the Pocket scene were colored (See Color Guide). The stamped images were fussy cut out and the edges inked with a fine liner brush to hide any mistakes in my not so stellar cutting skills. The sentiment was stamped 6 times and then cut into sentiment strips. These pieces were set aside.
Pocket Oz, Kindred Stamps
To make the box that will hold the gift tags, the main die from Treat Box die set was cut from green card stock and assembled. The side panels and the front rectangle were die cut from gold glitter cardstock. These pieces were adhered to the box itself. The pocket scene was adhered with foam tape and liquid glue to ensure contact with the rough texture of the glitter card stock. The box was set aside to dry.
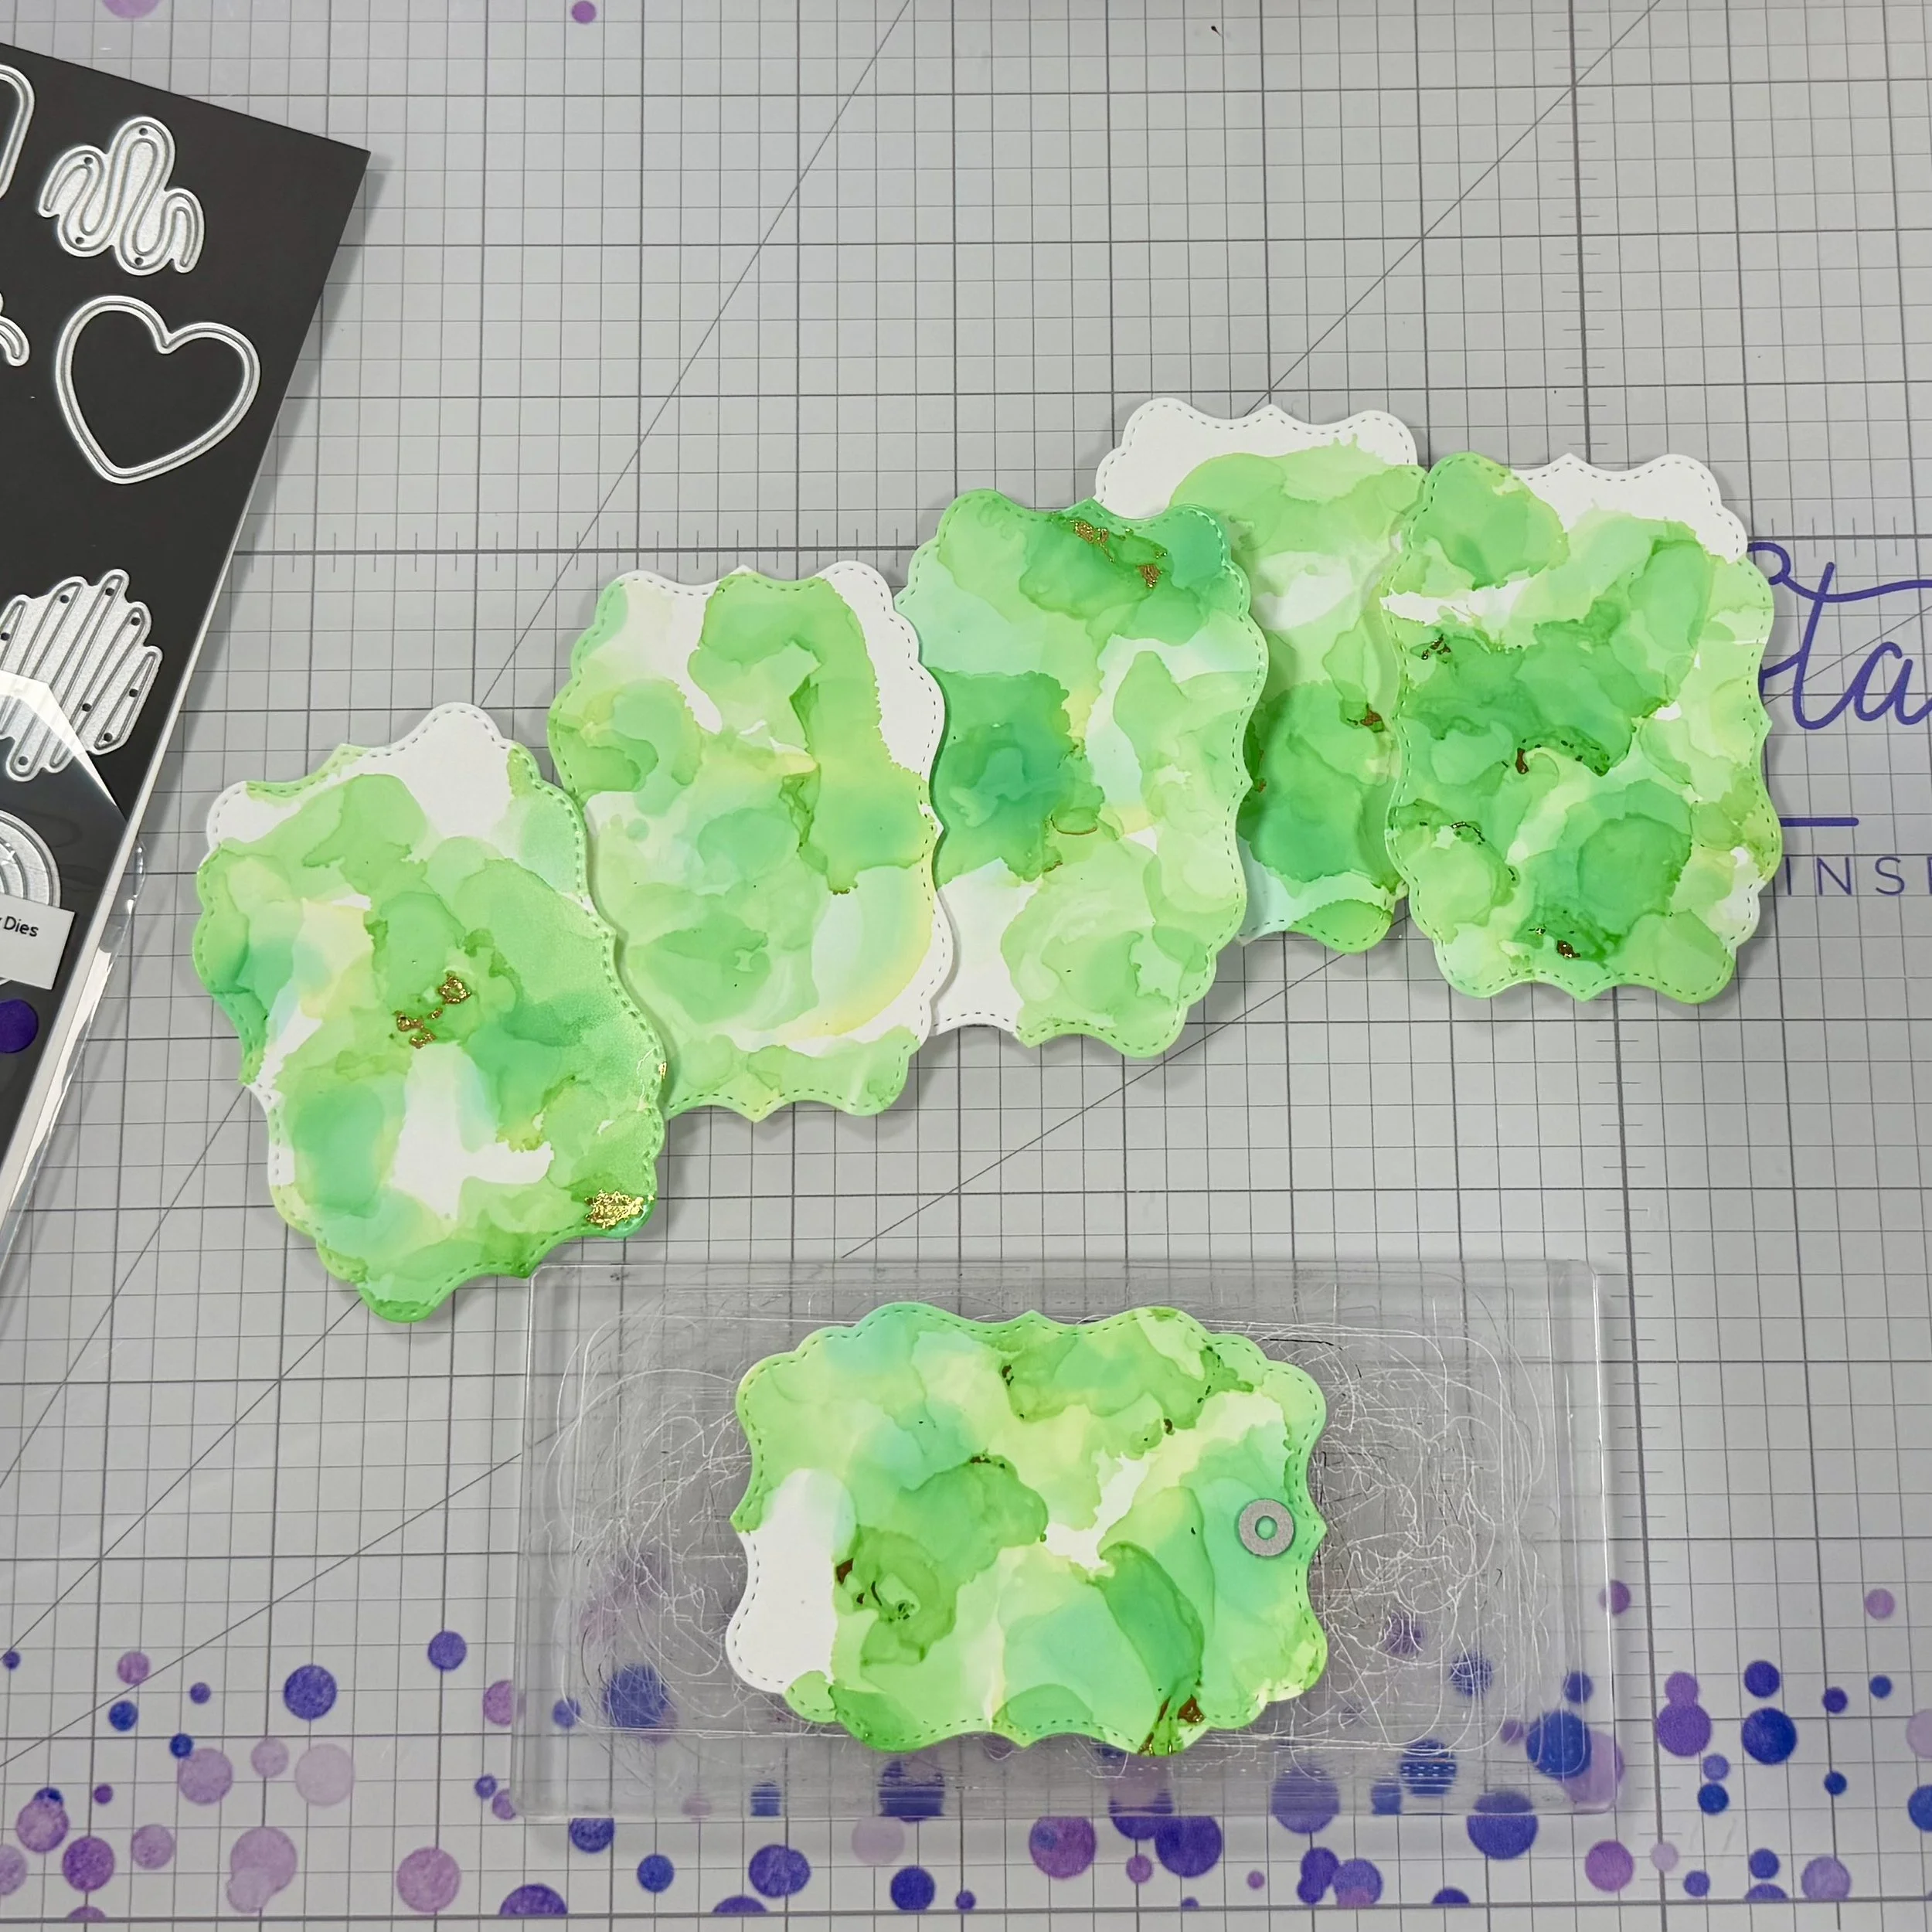
I wanted the tags to be simple but have lots of character and alcohol ink with some foil was the perfect pairing. To make the alcohol ink background, I pulled out some coated paper. In this instance, I dug in my hoarder stash and came across some old photo paper (remember when you printed photos at home on your printer???). Using Altenew Artist Alcohol Ink in Minty Mint (G201), some 91% alcohol, and the hand held blow tool, the design came to be. Thermoweb Decofoil in Gold D’or was pressed into the tacky areas of the alcohol inked background.
Pocket Oz, Kindred Stamps
Pulling out the Treat Box die, the ornate label was used to die cut 6 tags from the alcohol inked paper. The tags needed some holes, so I pulled out the Chocolate Candy Dies for the small circle. You can use any small shape for this hole. I didn’t want to distract from the simplicity of the tag so the circle was my choice.
Each of the tags were assembled with a pocket piece and a sentiment. These were popped up with some foam tape. Finally a piece of twine was tied around each tag. The tags fit perfectly inside my Pocket Oz box and I can’t wait to give this gift to someone soon!
Card Size: PUT MEASUREMENTS HERE
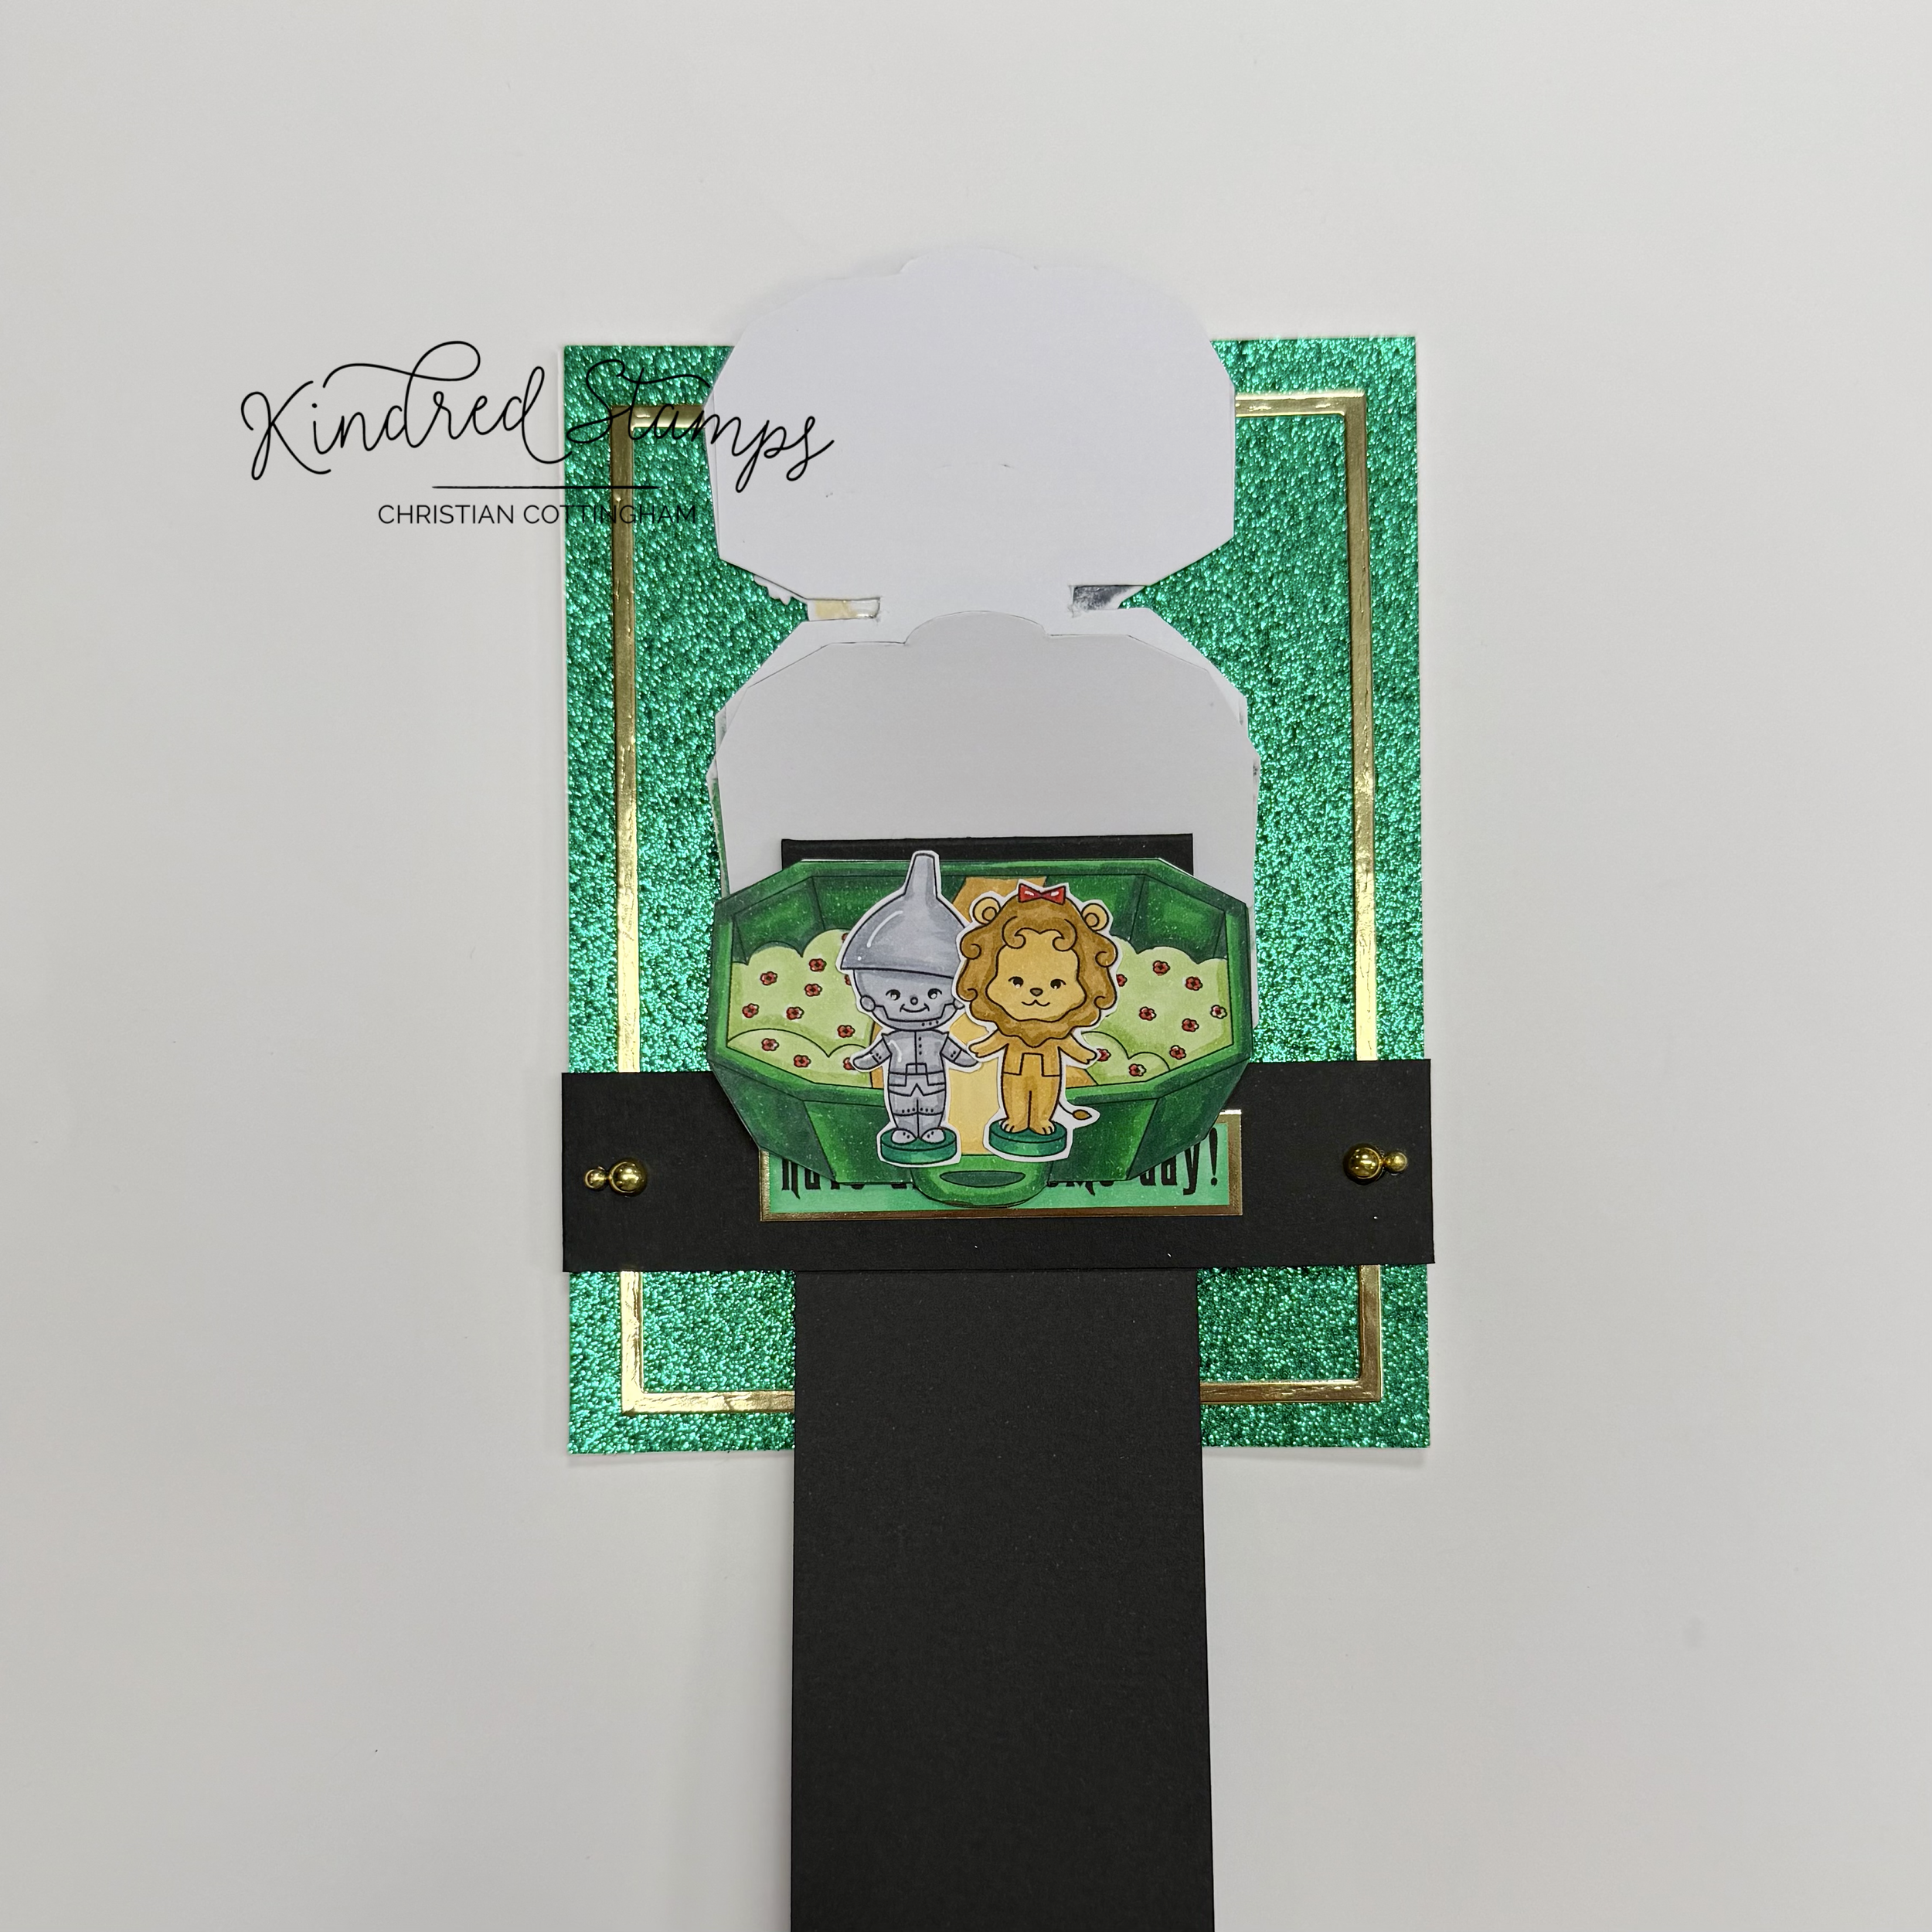
Project Four:Pocket Oz Waterfall
Pocket Oz, Kindred Stamps
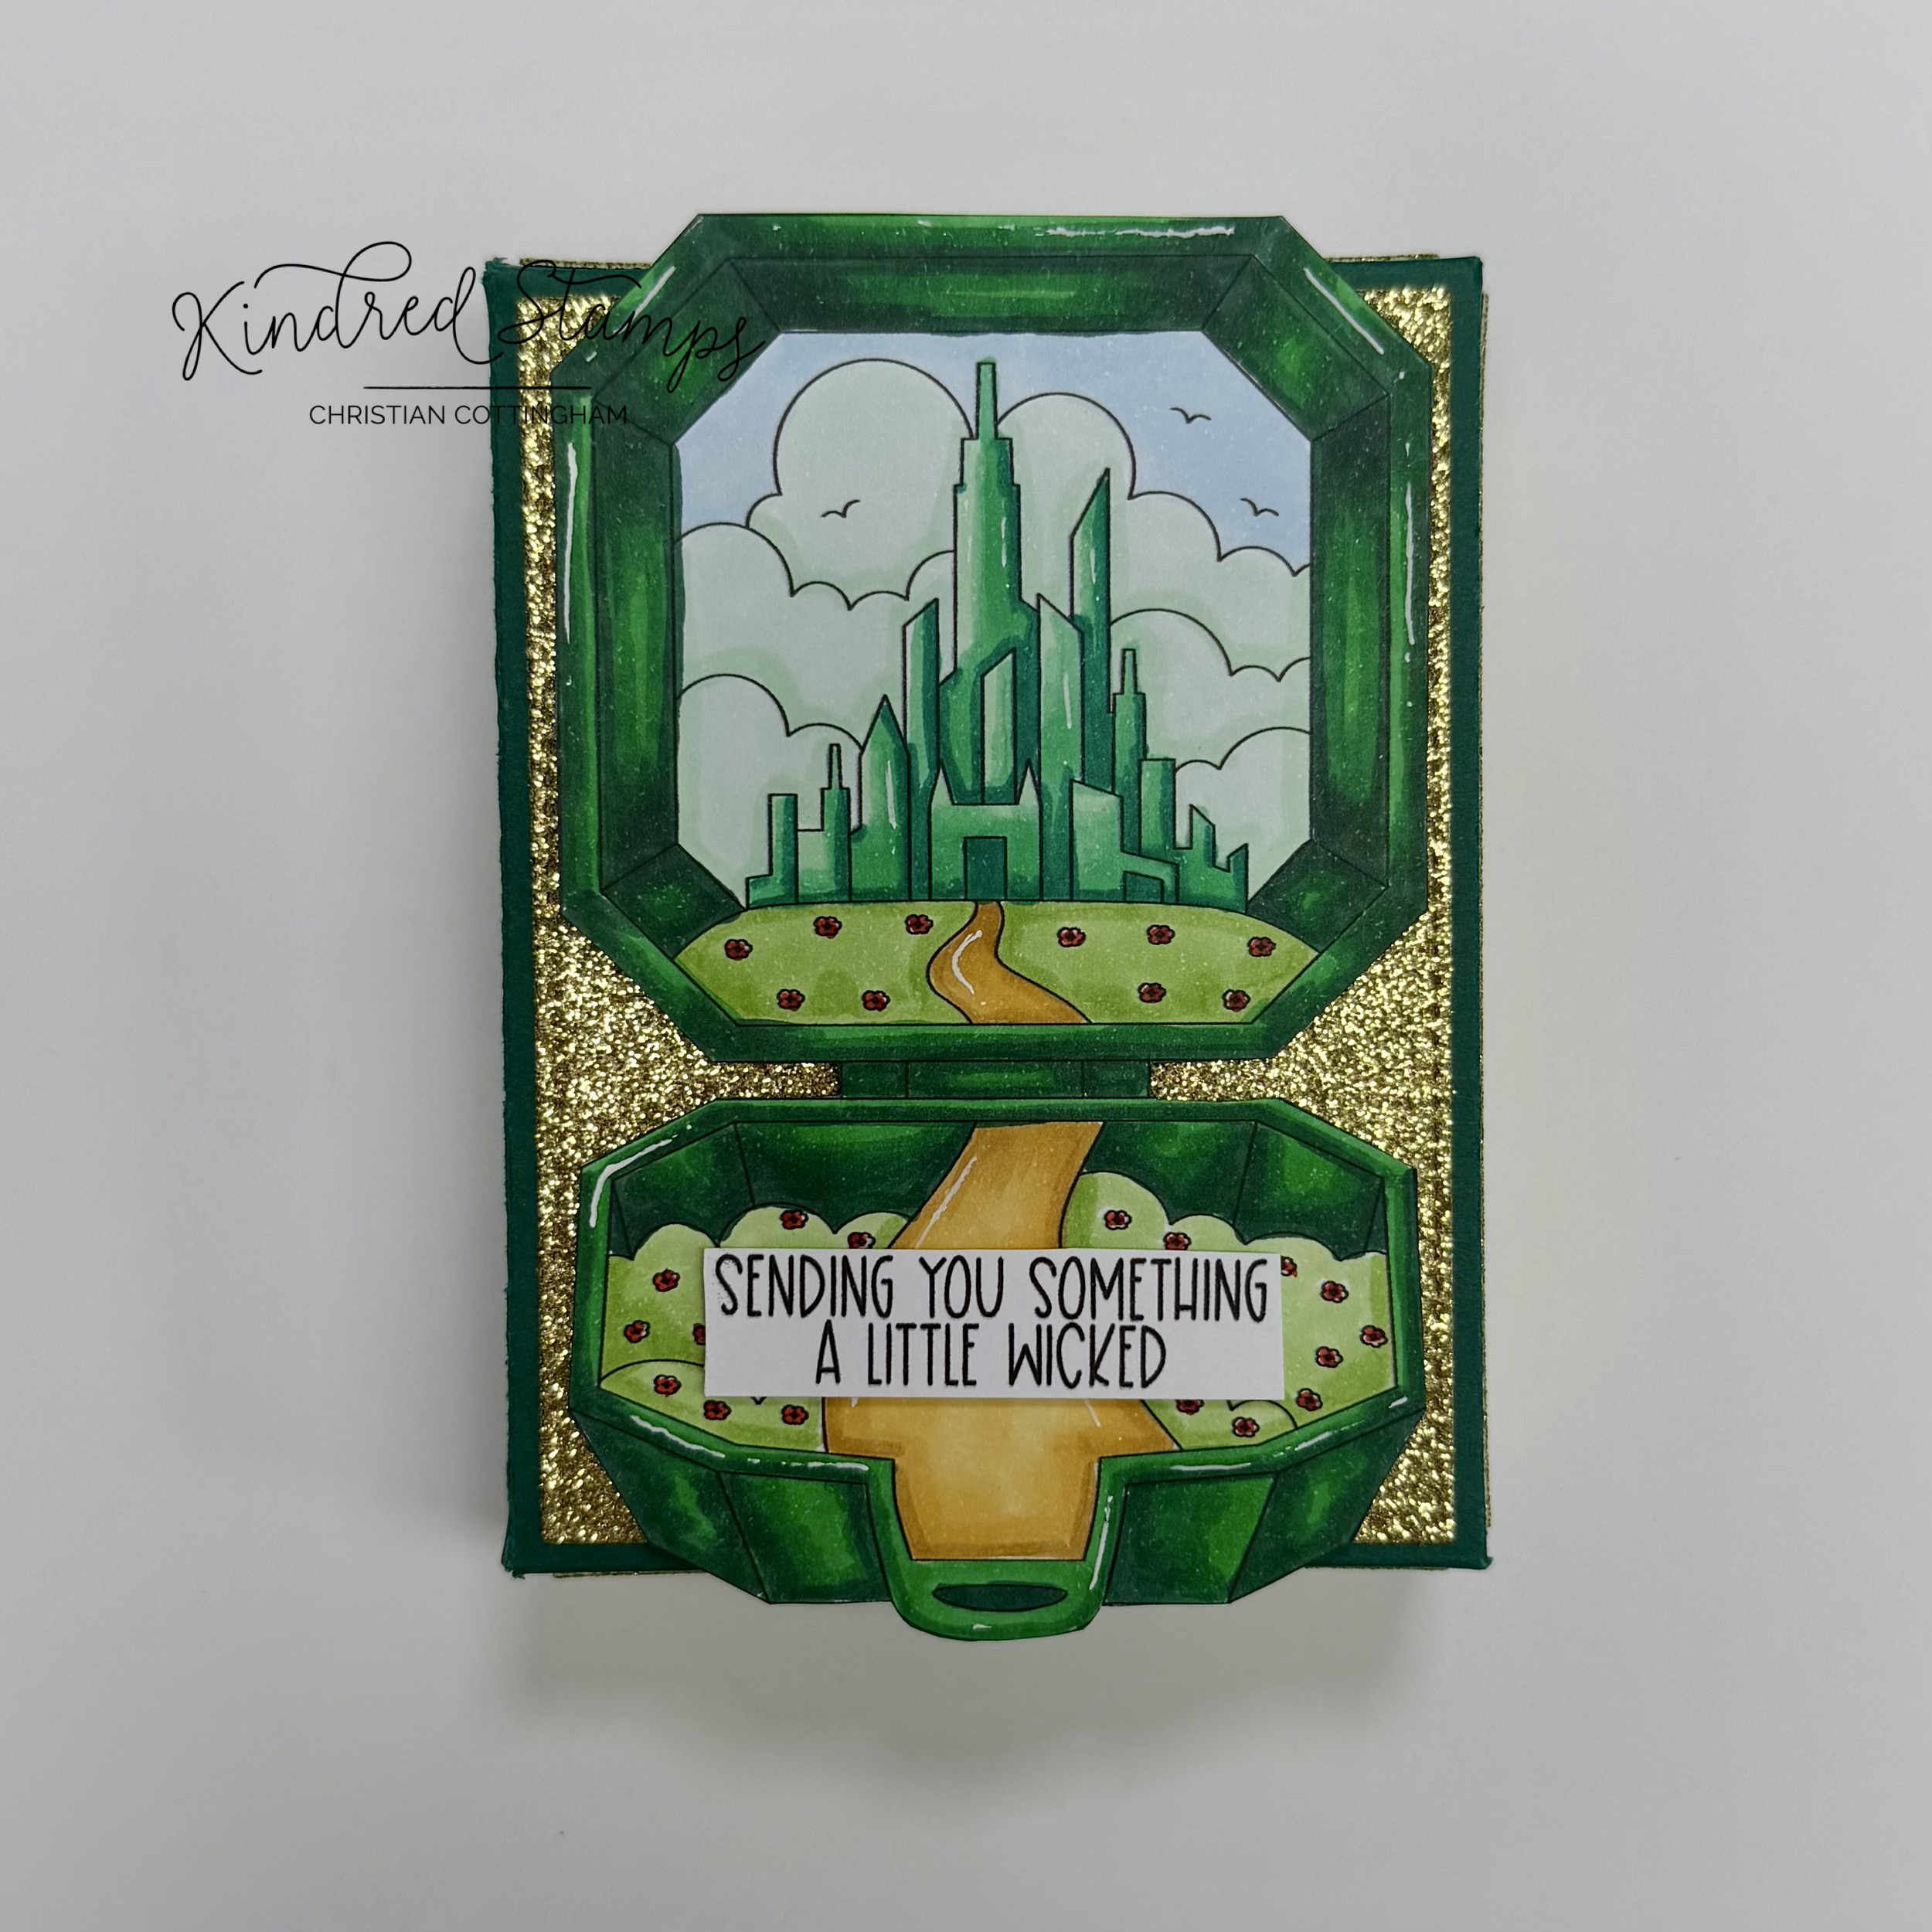
This interactive card makes the Pocket Oz set come to life! With a simple mechanism, you are able to flip through the scenes and see the pocket come to life. Let’s flip in…
The Pocket Oz scene was stamped 3 times with alcohol safe ink. One full pocket scene was colored and fussy cut out on the line. The 2 other scenes were colored on the base of the pocket only and fussy cut out on the line. The remaining stamps were stamped with alcohol safe ink, colored, and also cut on the line. All images were colored with Olo Markers (See Color Guide). The sentiment was stamped on a piece of white card stock, trimmed to a strip and colored with Olo G0.4. All pieces were set aside to work on the mechanism.
With a piece of black card stock (2 inches by 10.5 inches) was scored at 2.75 inches, 3.5 inches/ 4.25 inches/ and at 5 inches. The folds were reinforce by folding each score line with a mountain fold and a bone folder. A piece of double sided strong tape was placed on the front side of the mechanism. The tape is on the base of the same side as the 2.75 score line. This mechanism was set aside. The base of the mechanism was up next. A piece of black card stock 1 inch wide by 6.25 inches long was scored at 1 inch and at 4.25 inches. These pieces were set aside until the remainder of the card base was prepared.
Pocket Oz, Kindred Stamps
A piece of green glitter card stock was cut into an A2 panel (4.25 inches by 5.5 inches). A piece of shiny gold cardstock was die cut with a frame die and adhered with liquid glue to the glitter cardstock. Using the magnets on the Craft Mat, the frame was allowed to dry completely with pressure to the glitter cardstock. Once dry, it was time to start assembly.
The mechanism and belly band will be assembled first. Using the glitter card base as a guide, position the belly band towards the lower portion of your card. Fold the mechanism at the 5 inch score line with the scored pre-folded mountain folds facing up with the sticky tape also facing up. Center the mechanism on the card. Adhere the mechanism to the inside of the belly band. Use a strong adhesive not tape runner. This is the only thing holding your mechanism to your card. Adhere the tabs on either side of the belly band to the back side of the glitter card panel. The panel can be adhered to the A2 card base (4.25 inches by 5.5 inches). There will be over hang that comes out under the belly band. This will be trimmed down when the card is assembled.
Pocket Oz, Kindred Stamps
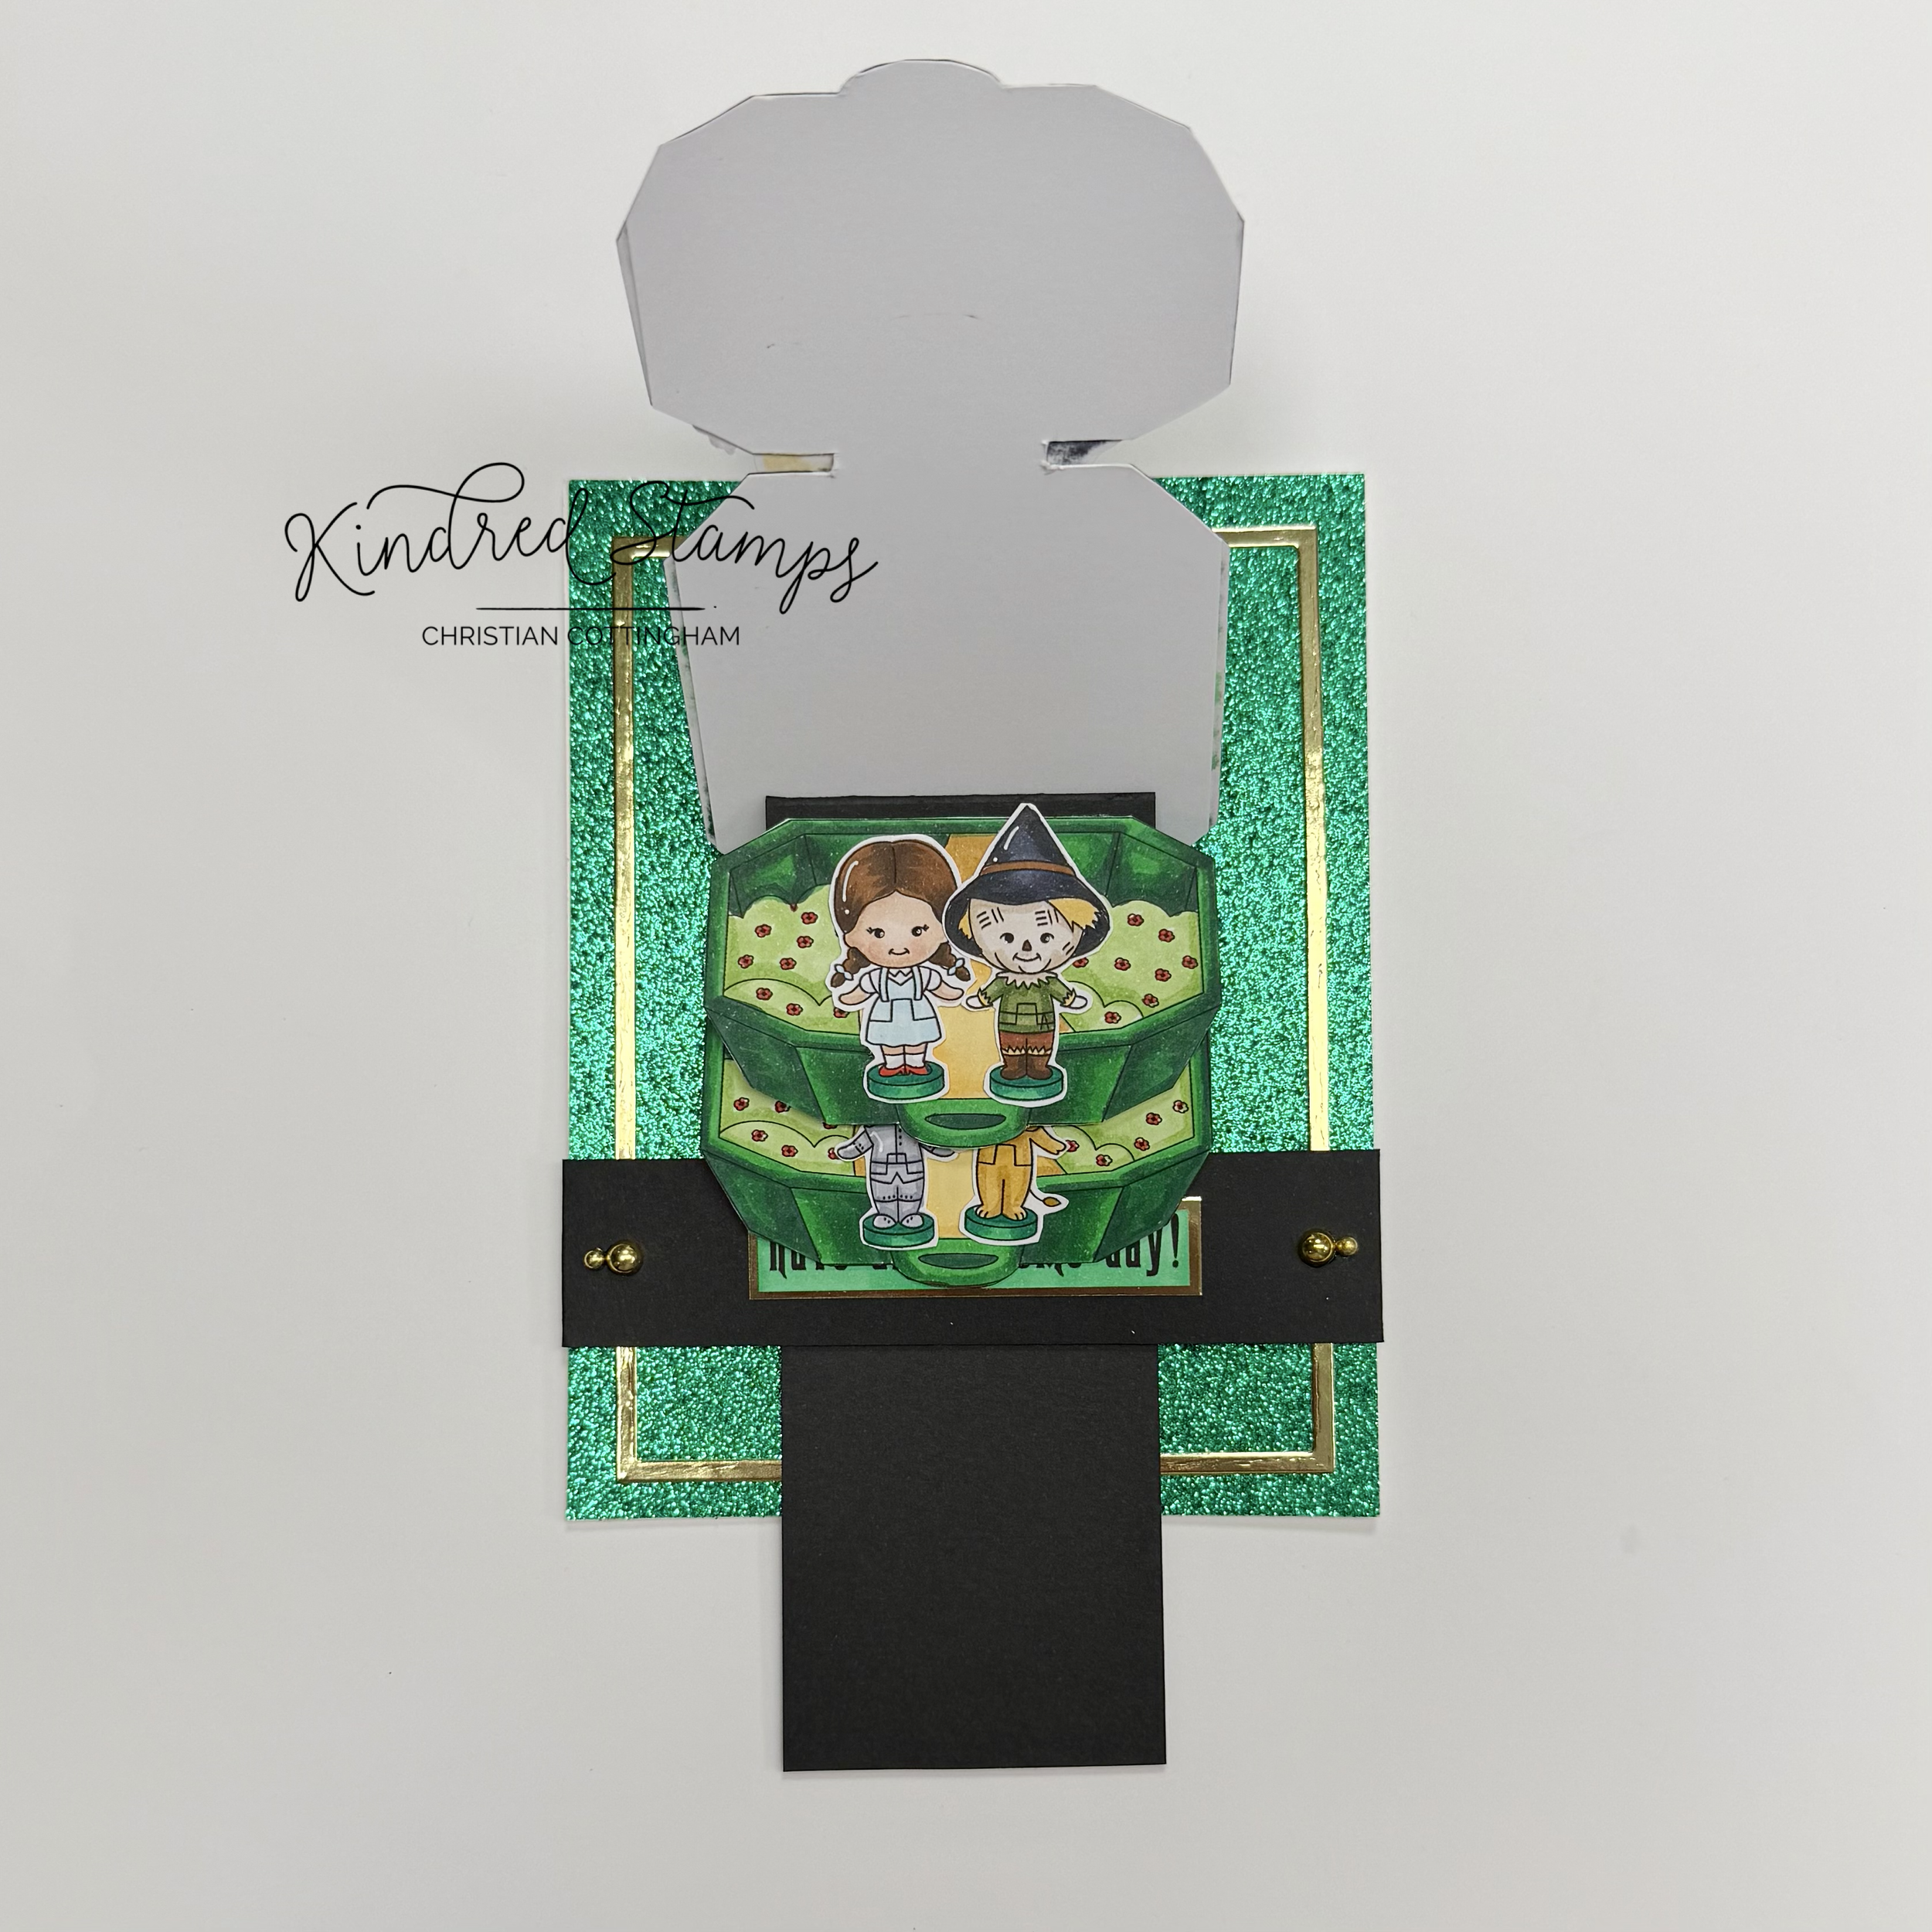
Now it is time to make the flipping magic. You may not be bothered by the alcohol ink bleed on the back of your images that will be seen when flipping the card. I didn’t like it. I glued my images onto a piece of card stock and then fussy cut them… again… Your OCD may let you skip this and I am so happy for you! I wish I could have. With the images all cut out again, it was time to assemble. A piece of shiny gold paper was cut down to frame the sentiment strip. The matted sentiment strip was centered and adhered to the belly band.
To place the images onto the mechanism, it is important that the images are only adhered to the individual sections between the score lines. This is what will lift and flip the image. If you adhere to all of the sections, you will have no flip just a flop. Working from the bottom section, adhesive was placed in-between the third section of score lines from the top of the mechanism. One of the base only designs was lined up without going over the top of the score line. The Metal Man and Lion were adhered to the base without going over the top of the score line. This process was repeated with the second base on the section of score lines and the Girl and Scarecrow. Finally, the complete pocket was adhered to the top section of the score lines. The two witches were adhered to the design. The remainder of the mechanism was trimmed to be flush with the card. I chose not to decorate this mechanism, but a “pull” stamp would be great to give instruction. Finally a couple shiny gold bits were placed on the sides of the belly band because why not!
Now you can flip open the scenes that can be played out in the Pocket Oz! Flip to your heart content!
Card Size: A2 (4.25 inches by 5.5 inches)
The entire Kindred Stamps release will be available this Friday at 8am PST/11am EST. Be sure to subscribe to the Kindred Stamps blog to see a daily line up of sneak peeks from our amazing Design Team! Come join the Fan Club and release event to be part of the release fun, and you may just win some Kindred Stamps credit!!
Color Guide:
All images were stamped on Express-It cardstock
Girl:
Flesh> OR7.2/ OR7.1/ OR2.0; R5.3
Socks/ Shirts> CG1
Dress> B1.1/ B1.0
Hair> OR3.8/ OR3.7
Shoes> R0.5
Scarecrow:
Face> O7.3/ OR7.1; OR3.7
Straw> YO2.3
Shirt> YG8.7/ YG8.5
Hat> CG7/ CG5; OR3.7
Pants> OR3.7/ O2.7
Shoes> OR3.8/ OR3.7
Lion:
YO2.7/ YO2.5/ YO2.3; O7.7
Bow> R0.6/ R0.5
Metal Man:
CG5/ CG3
Good Witch:
Flesh> OR7.2/ OR7.1/ OR2.0; R5.3
Hair> YO2.3/ YO2.2/ YO0.1
Dress> R2.0/ R2.2
Crown> NG1/ NG0
Bad Witch:
Broom> OR3.4/ OR3.2
Flesh> G5.3/ G5.2/ G5.1
Hat/ Jacket> CG9/ CG7/ CG5
Hair> NG9/ NG7
Pocket Scene:
Road> YO2.5/ YO2.3/ YO2.2
Castle> G0.6/ G0.4/ G0.1
Clouds> G0.1/ G0.0
Sky> B0.2
Walls> G1.8/ G1.7/ G1.5
Grass> G5.3/ G5.2
All Bases:
G0.6/ G0.4