Sparkle Friends: Kindred Stamps April Release
Sparkle Friends, Kindred Stamps
Are you searching for happiness? The Sparkle Friends, Sparkle Friends Die Cuts, and Sparkle Dot Stencil are a perfect way to find and share your happiness. I just couldn’t stop making with the set! I had so much joy making everything. A memory game, a gift set, and some overall fun cards. I hope you find happiness in these projects!
This blog utilizes affiliate links. If you choose to click on the links provided to purchase, you are supporting me as I receive compensation for your purchase. If purchasing is not in your books, no worries, I hope you find inspiration for projects you design. By clicking on the links, you are letting Kindred Stamps know that you like my content and to keep bringing me back. Thanks for your time and let’s get sparkly!
Project One: Sparkle Pizza
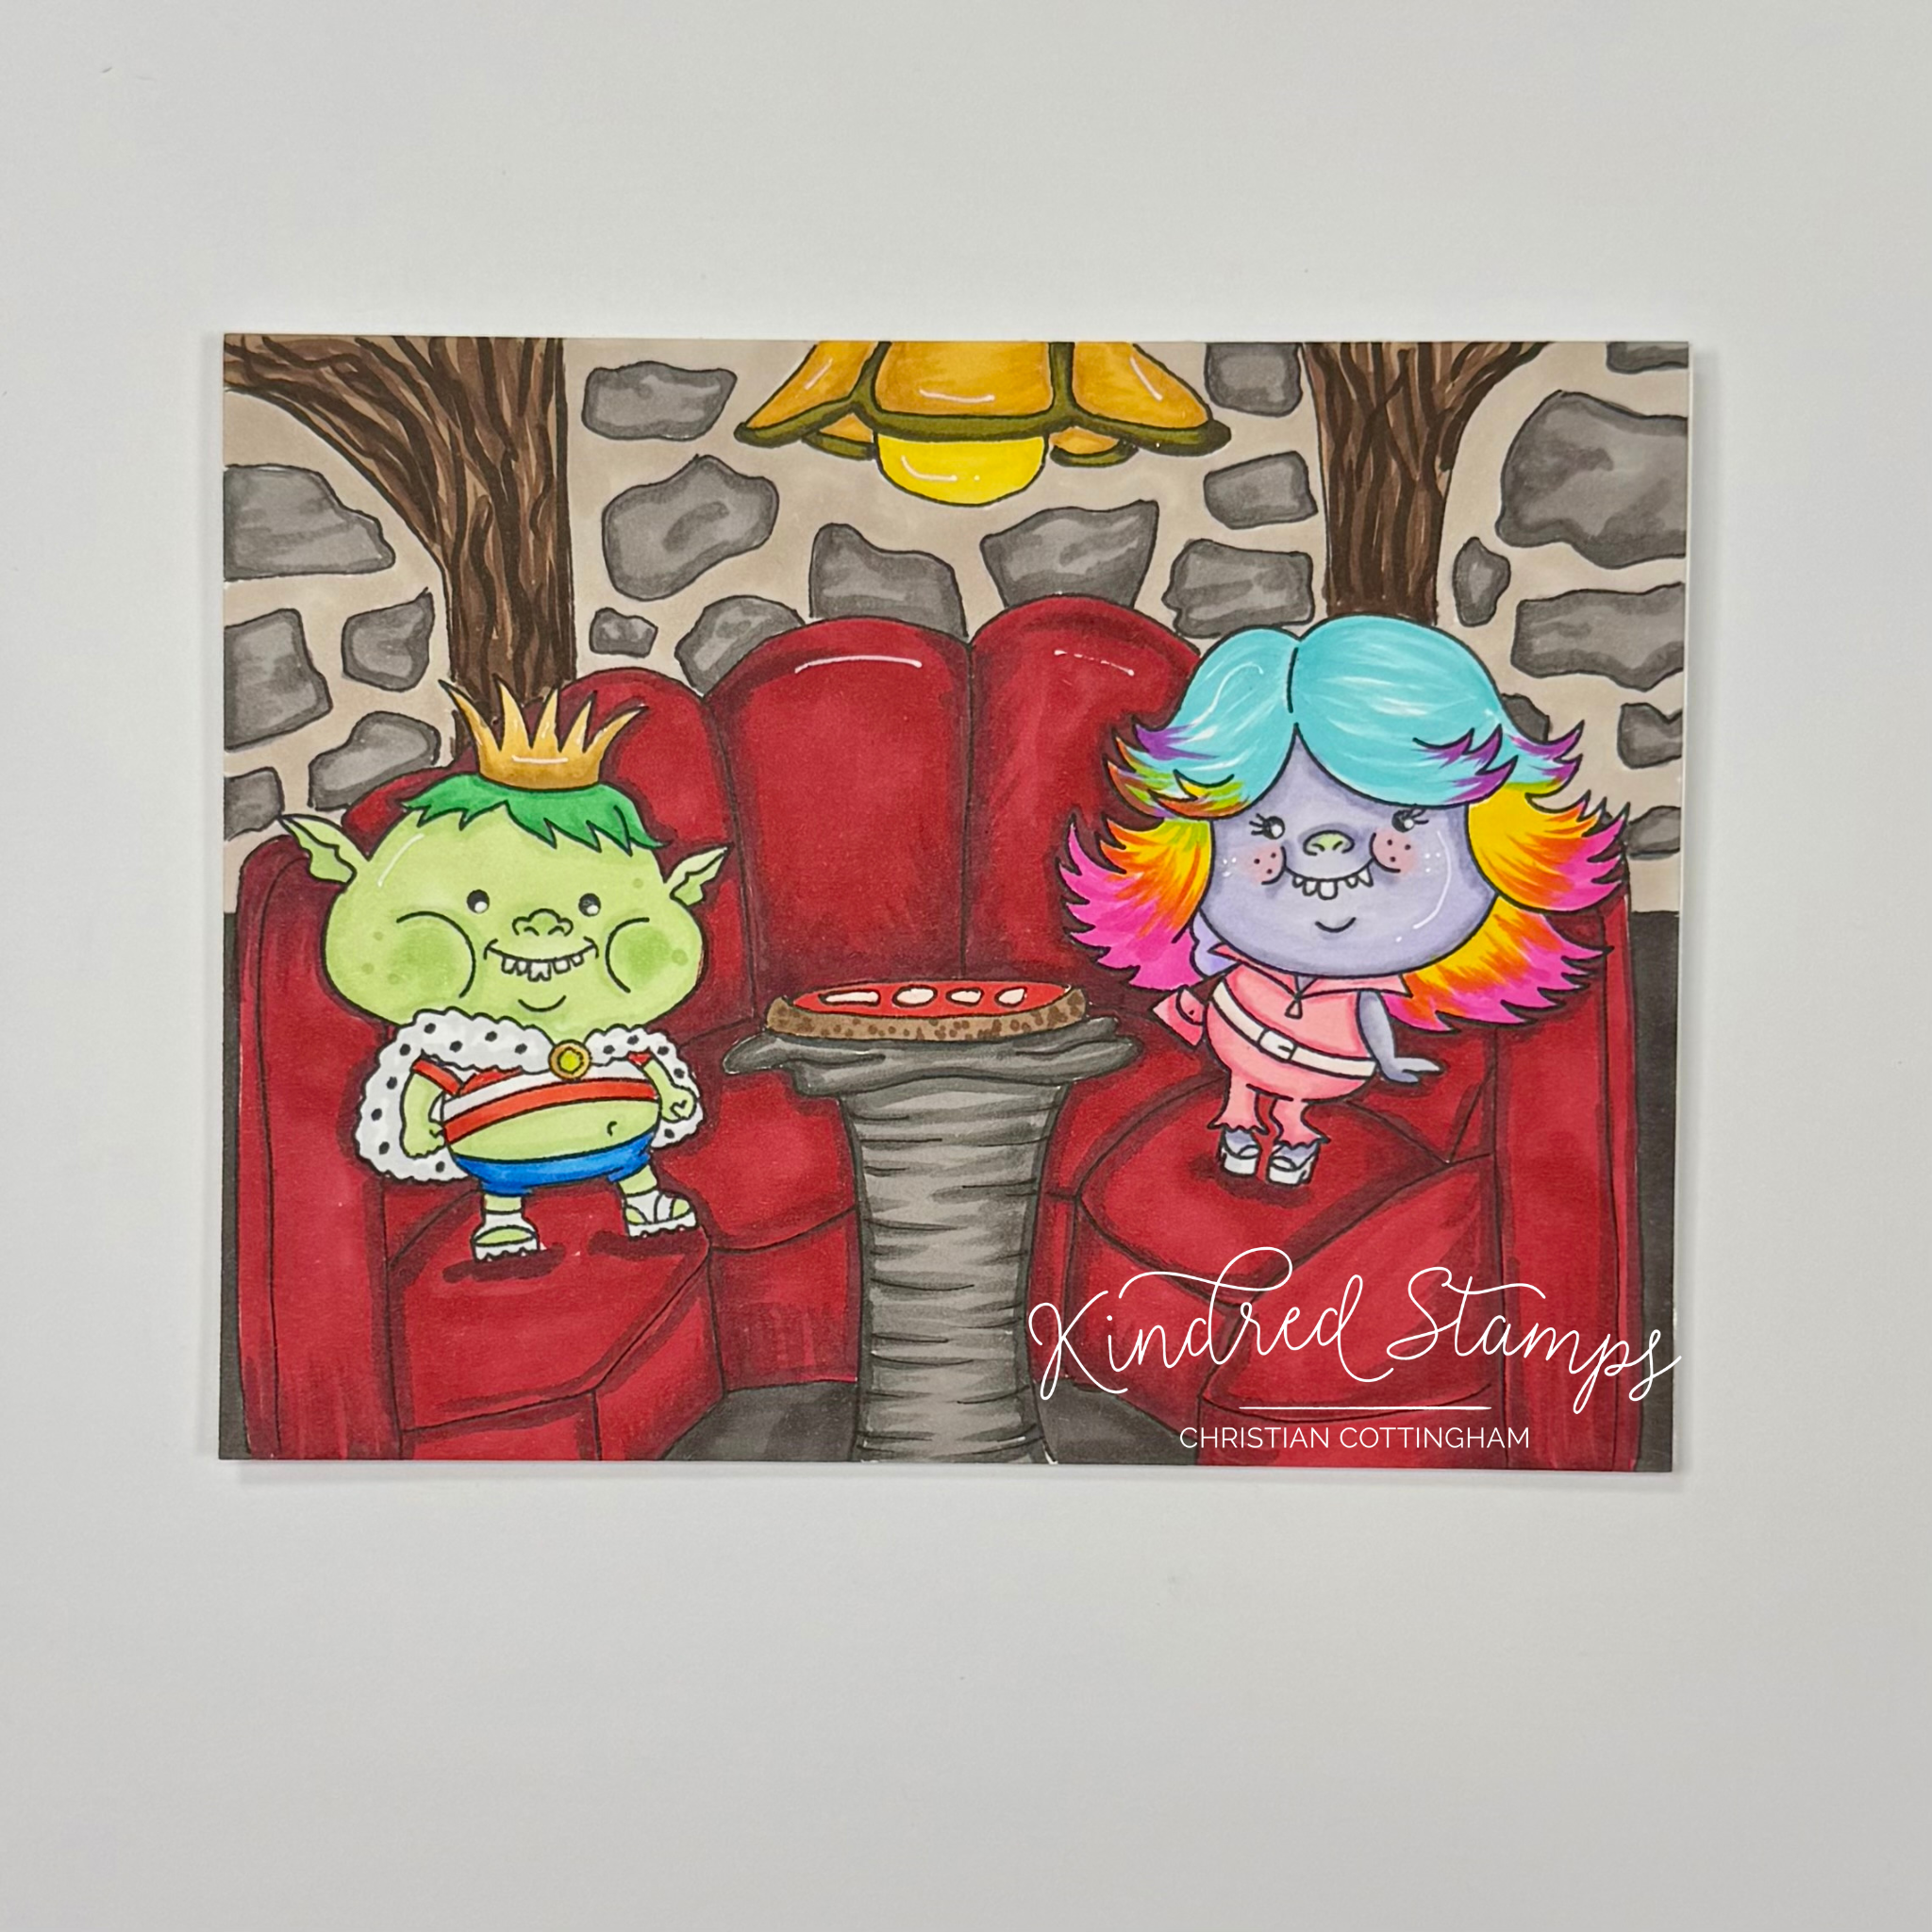
Sparkle Friends, Kindred Stamps
Was your first date in pizzeria? The Rainbow Girl and King Boy from the Sparkle Friends stamp set found happiness devouring some ‘za and so can you. Let’s break down this single layer card.

A piece of 80 pound white card stock was trimmed down to 4.25 inches by 5.5 inches. The scene was sketched in pencil. The couch was first, the wood beams, light, and stones second, and finally the table with the pizza on it. The two images were stamped with an alcohol safe ink on the sketched panel. With a fine liner alcohol safe pen, the solid lines were traced making sure I did not draw through the King Boy or the Rainbow Girl. All pencil lines were erased which left a page like from a color book to fill in.
Sparkle Friends, Kindred Stamps
The Sparkle Friends were colored with Olo Markers (See Color Guide). The scene was then colored in with Altenew Artist Markers (See Color Guide). The colored panel was glued to a card base to hide the bleed through of the alcohol markers. The sentiment was stamped in the inside of the card. White gel pan and black fine liner pen were utilized to add some accents to the images.
Card Size: 5.5 by 4.25 inches (A2 Card)
Project Two: Sparkle Shaker
Sparkle Friends, Kindred Stamps
Nothing scream confidence more than a shaker and the Rainbow Girl from Sparkle Friends is beaming on this bright shaker cards. Let’s break it down!
The Rainbow Girl was stamped in alcohol safe ink and colored in Olo Markers (See Color Guide). She was fussy cut out on the line and then edged with a fine liner pen. The sentiment was stamped in a black pigment ink and fussy cut out. These images were set aside to make the shaker components.
The Strawberry House Die is the supporting element in the shaker pocket. An unexpected floral pop that will shake up the happiness is a great way to use small dies from supplies you already have. The strawberry flowers were die cut from 80 pound card stock. The flowers were placed on a stamping sticky mat and Wild Dandelion (Gina K Designs) ink was blended in the center only. The center of the flower also go a deeper dot of color with the Maple Yellow (Y207 Altenew Artist Marker). These were set aside to finish the prep.
The Sweets Paper Pack will provide the color pops for this card. The rainbow striped card piece was cut down to 4.25 by 5.5 card panel. Then the rainbow polka dot paper was trimmed down to 5 inches by 3.75 inches. Finally, a piece of acetate packaging was trimmed down to 6 inches by 4.75 inches.
The striped card panel was glued to the front an A2 top-folding card base. The shaker was assembled next. A strong double-sided adhesive was applied to the back side of the polka dot cardstock panel. This panel was centered on the piece of acetate. The acetate was adhered to three sides of the shaker, leaving a pocket for placement of the shaker elements. Iridescent confetti, iridescent glitter, and the colored florals (pretty side up) were placed into the pocket. The pocket was sealed shut. The now contained shaker packet was adhered to the center of the card base.
Finally, The Rainbow Girl and sentiment were adhered with liquid glue to the front of the shaker element. The card panel was allowed to dry completely before gel pen accents were applied. Nothing screams happy like this bright playful card that comes together super fast.
Card Size: 4.25 inches by 5.5 inches
Project Three: Sparkle Rainbow
How could you not have a Sparkle Friends rainbow?? This fun rainbow card covers all the standard rainbow colors with lots of bling, including a decorated inside panel. Let’s break it down!
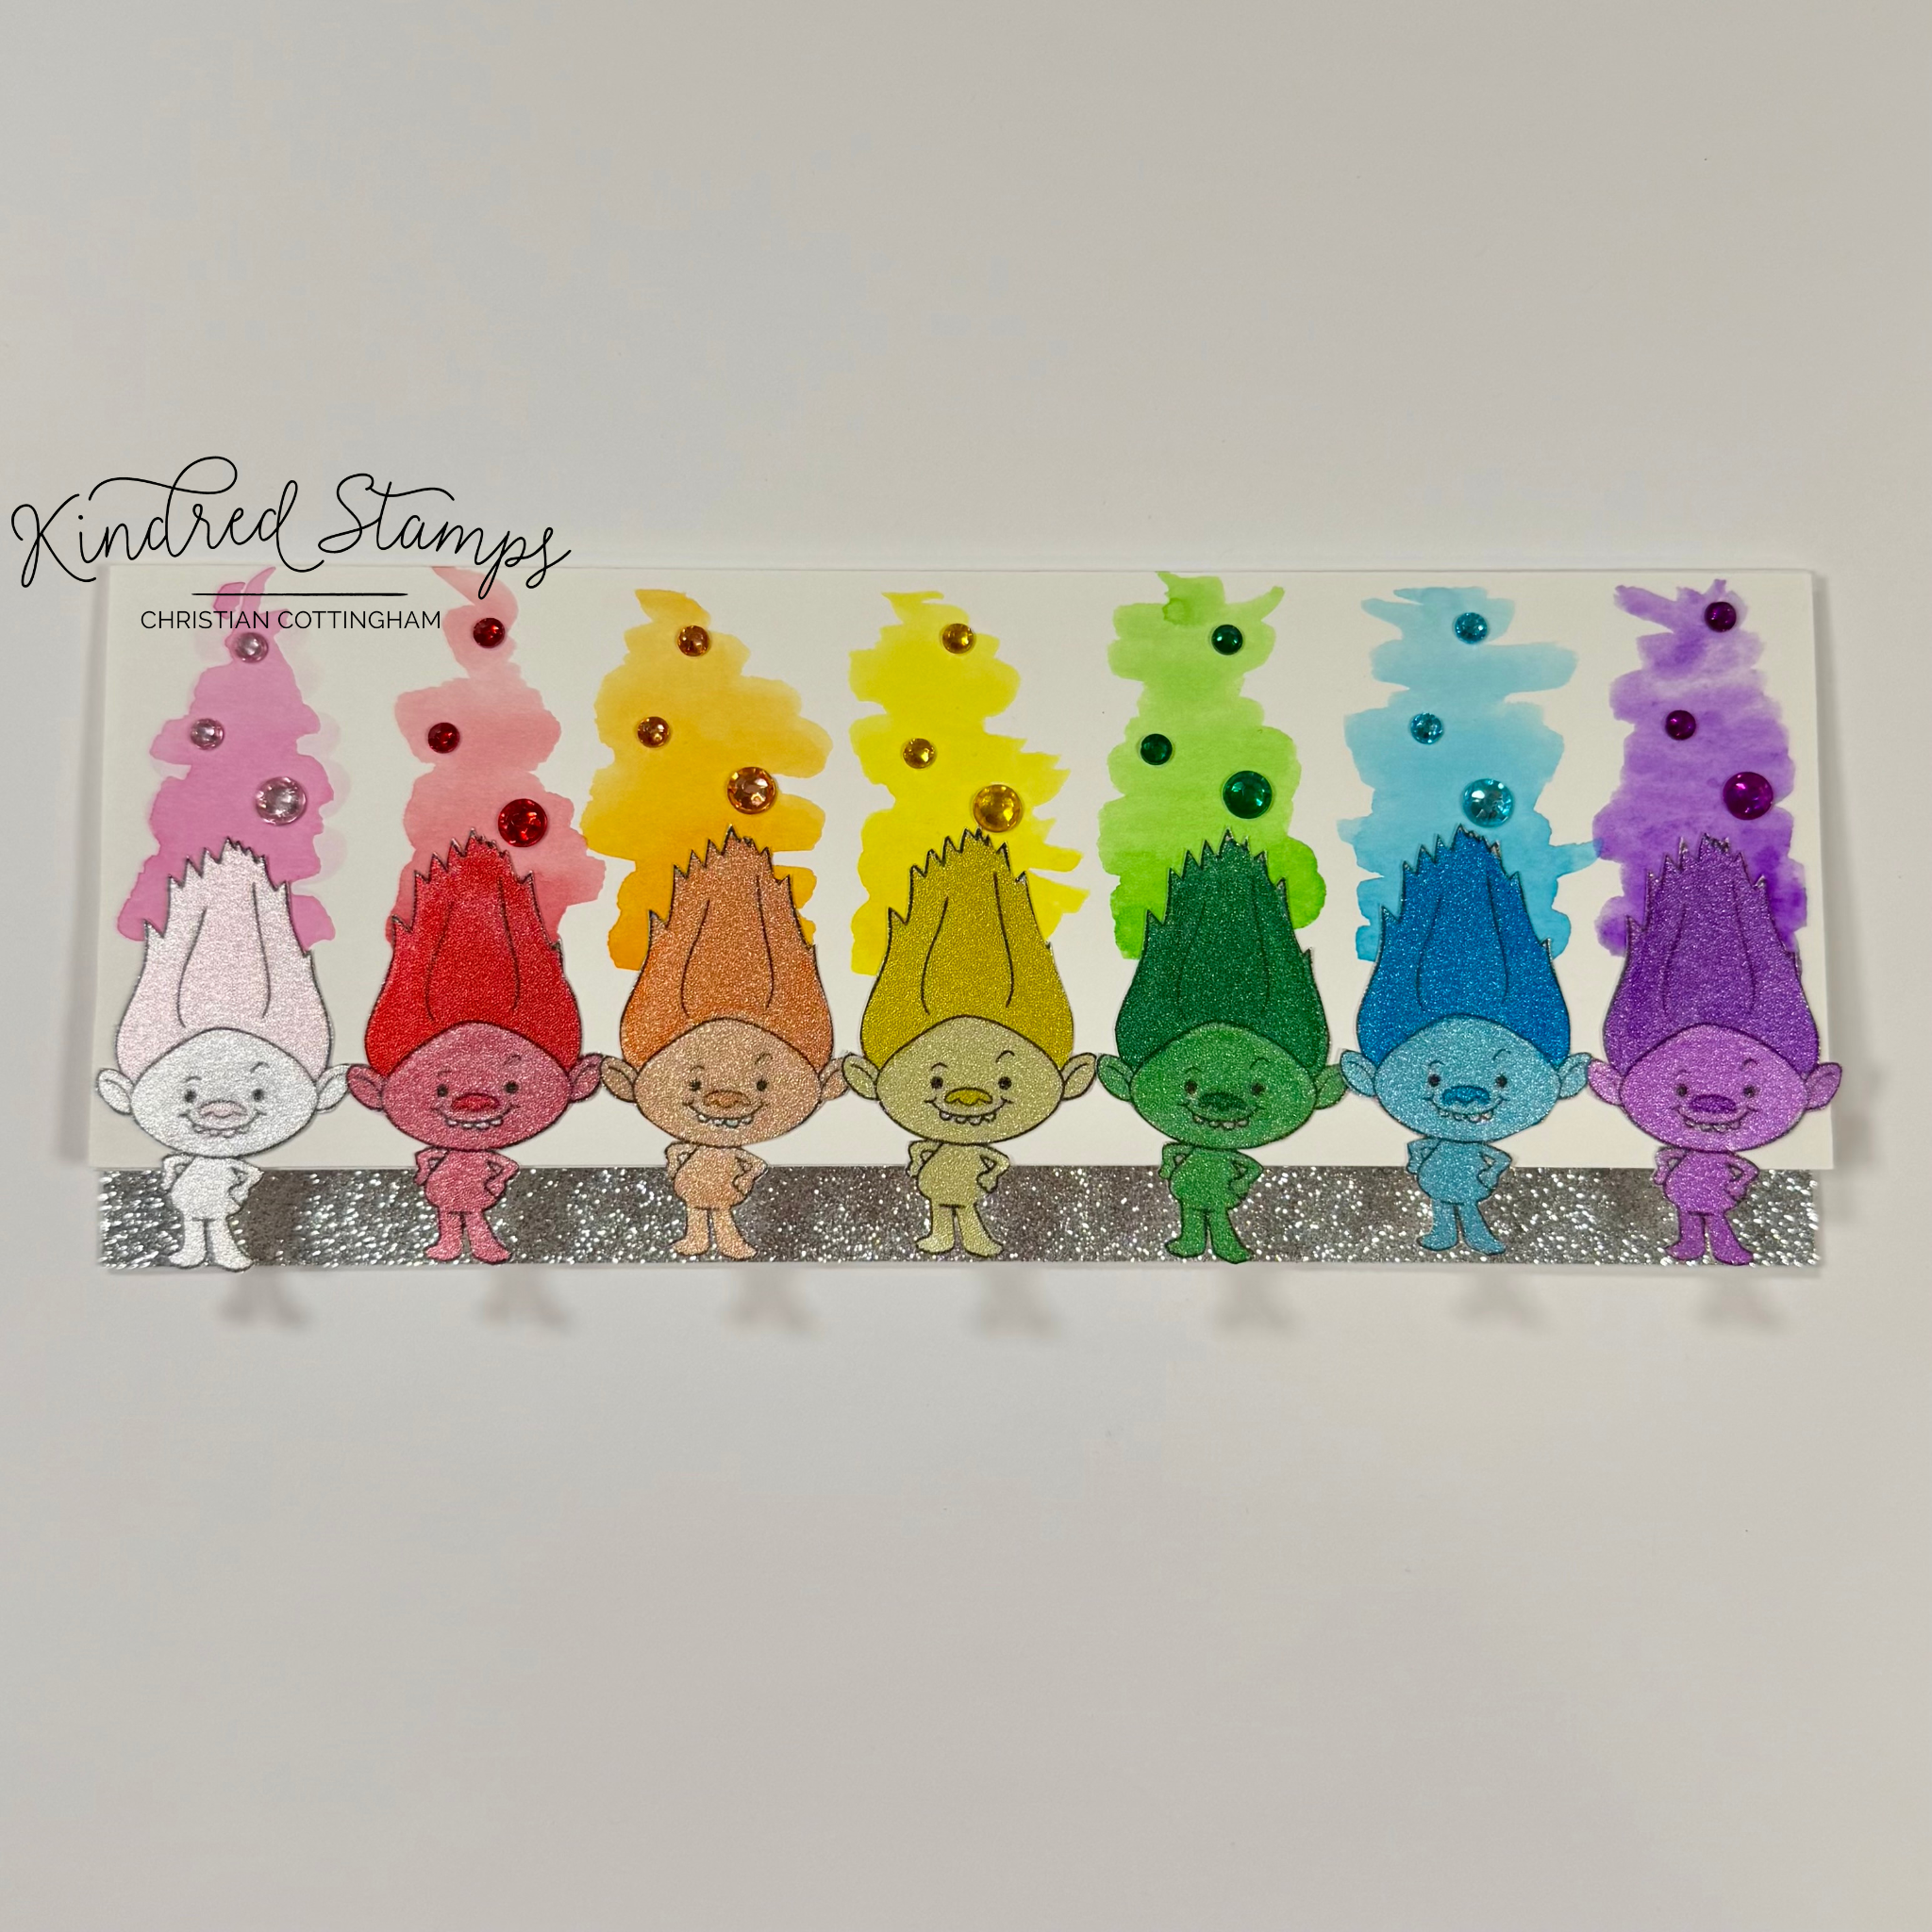
Sparkle Friends, Kindred Stamps
A Slim Line card base was prepped and the score line enforced. The front panel of the card base was trimmed down by 0.5 inches. The card base was set aside while the remain prep was completed.
The Silver Guy from the Sparkle Friends was stamped with alcohol safe ink on Ranger Silver Sparkle Alcohol Ink Paper. When dry the images were colored with Olo Markers in a light tone on the body, and a dark tone in the same color way on the hair and nose (See Color Guide). These were set aside to dry completely.
A piece of water color paper was trimmed to 8.5 inches by 3 inches. Using a wet-to-wet technique a rainbow swatch was painted across the paper with thicker concentration on the base of the swatch and skinner on the top of the swatch. Altenew Cherry Blossom/ Red Cosmos/ Fiery Sun Set/ Pocket Full of Sunshine/ Green Hills/ Crystal Water/ and Shades of Purple watercolors were diluted to achieve the color intensity that I wanted. The panel was set aside to dry.
The colored images were fussy cut on the line and set aside. Finally, a piece of silver glitter cardstock was cut to 0.5 inches by 8.5 inches. It was time to assemble. The glitter cardstock was adhered to the inside panel of the card base. The sentiment was stamped and the teal colored character was glued flat to the base.
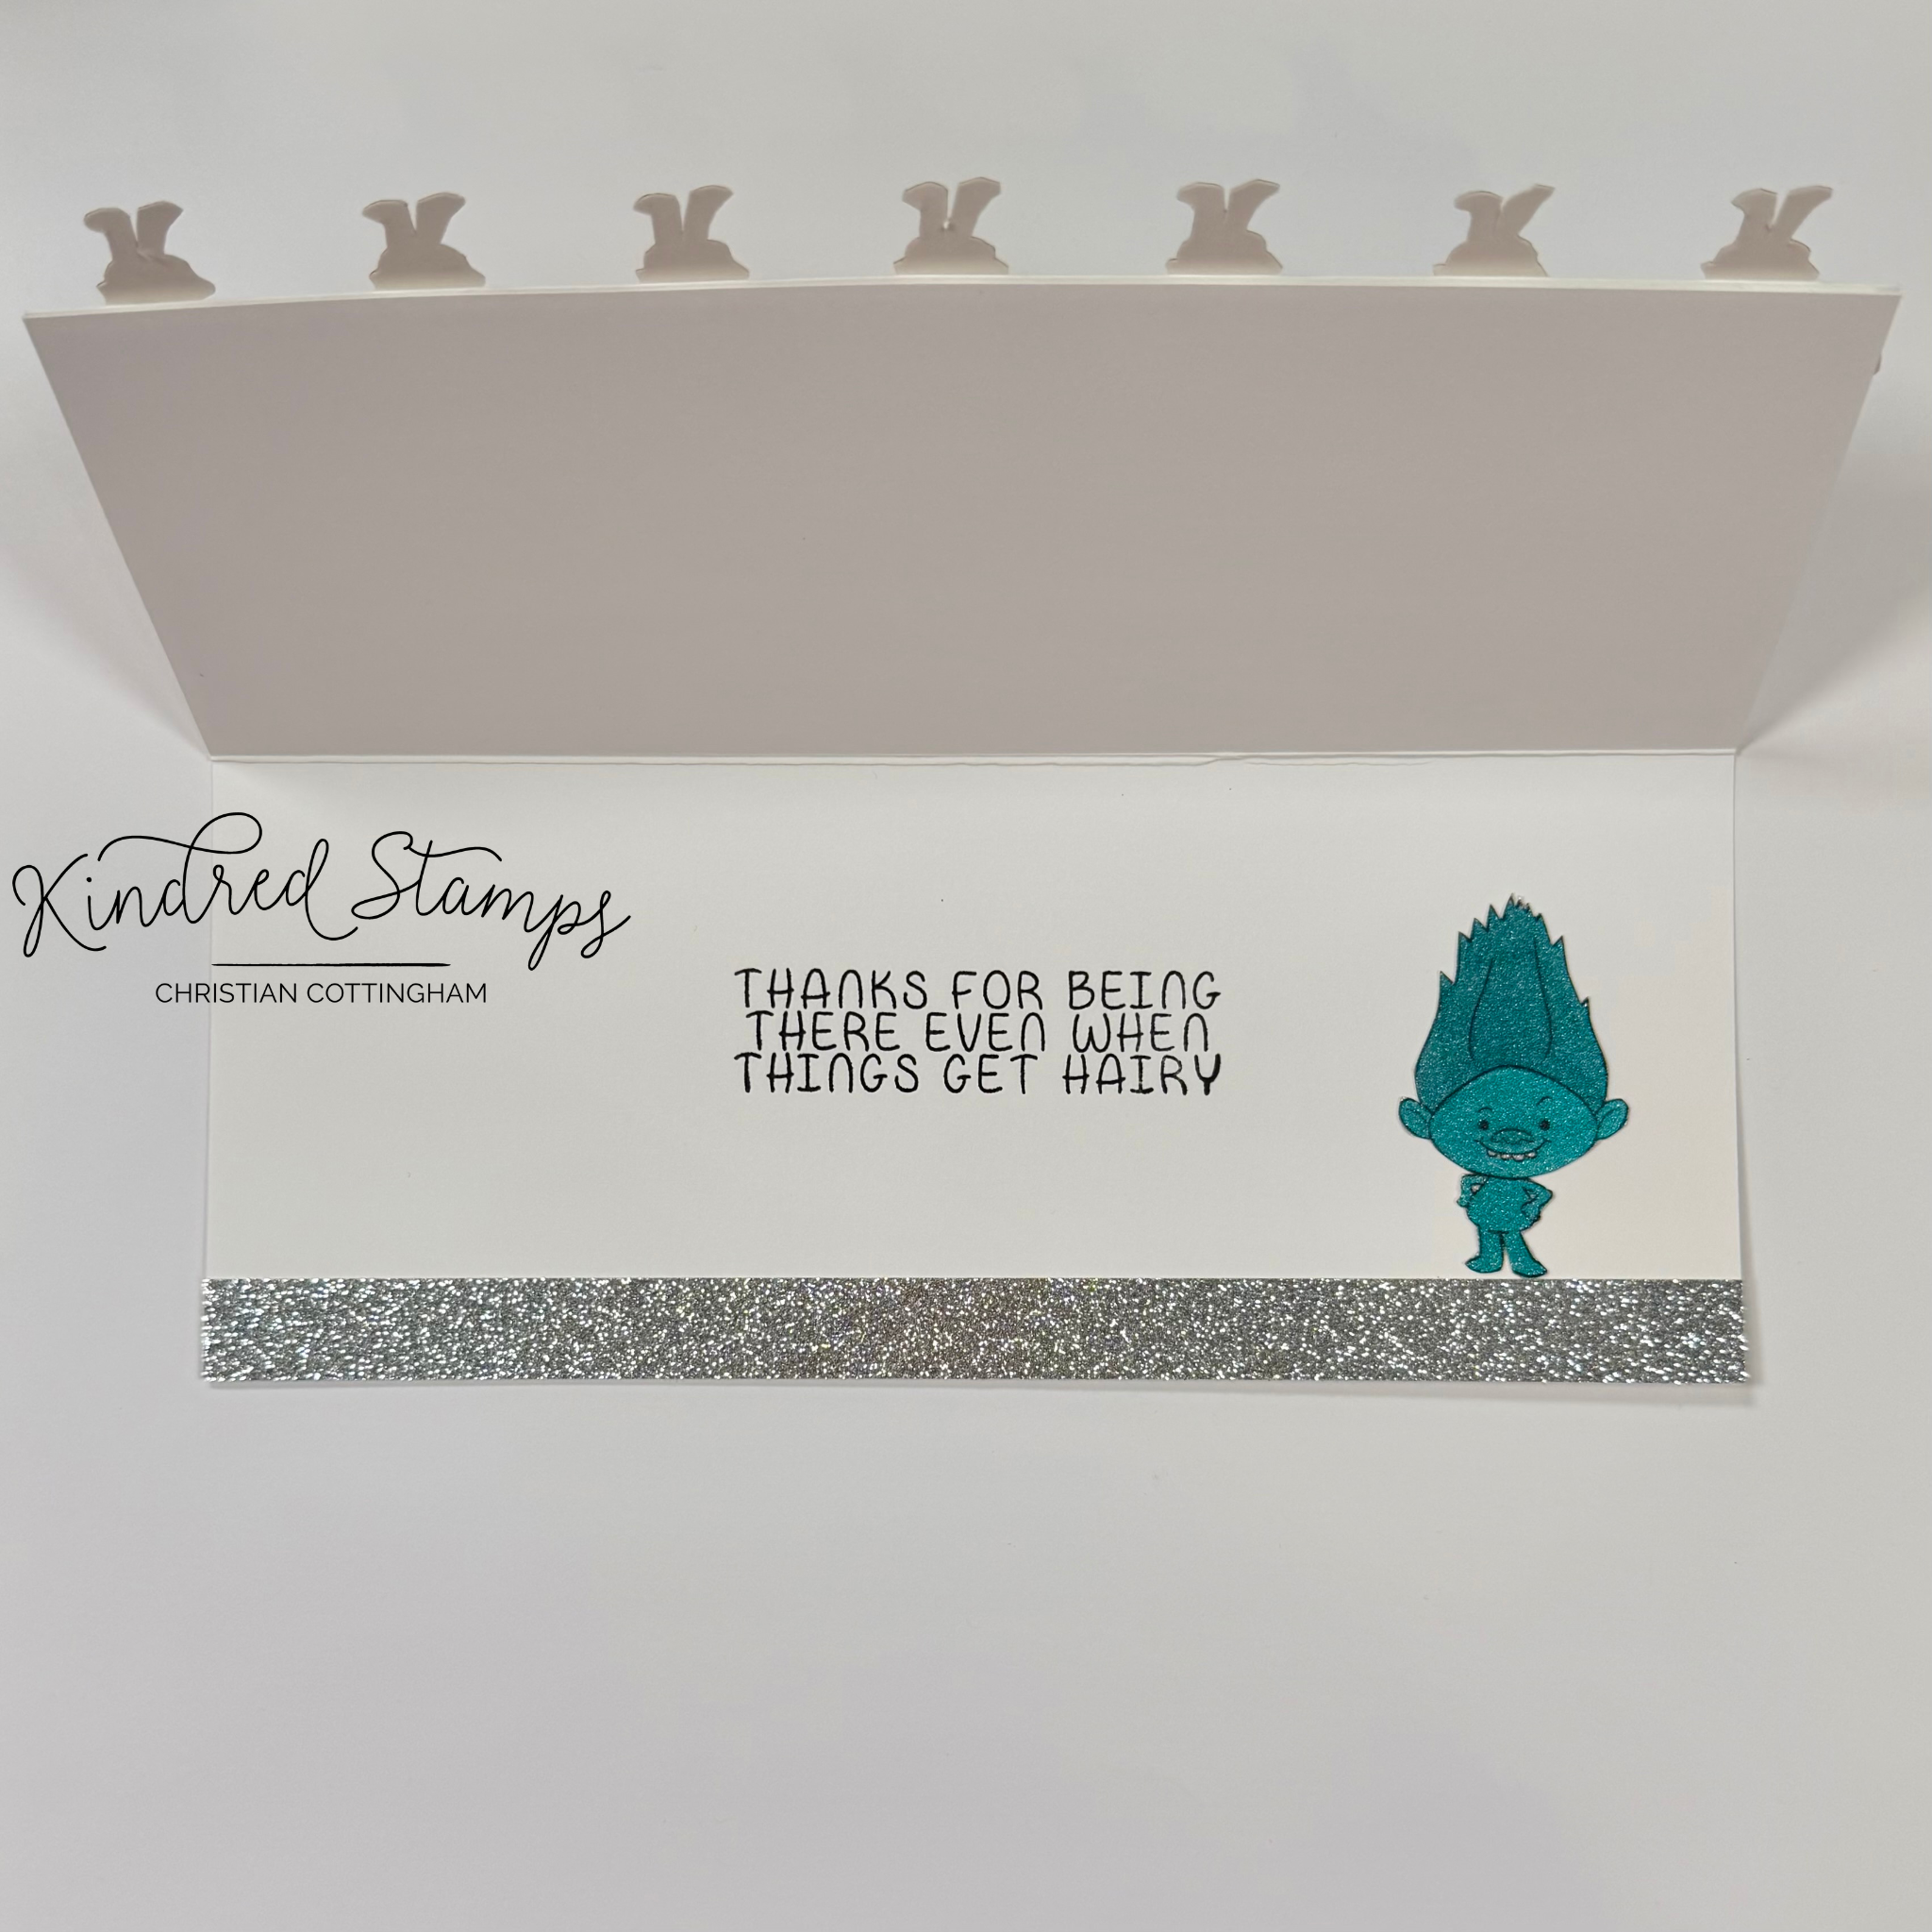
The water color panel was glued flat to the front panel of the card base. Using the grid on my Glass Mat, the Silver Boys were arranged in rainbow order in a straight line the width of the card. The Silver Boys were picked up with a piece of low tack tape to keep them in line. Liquid glue was applied to the head and hair only. The Silver Boys were adhered to the front card base with their feet lining up with the bottom card base. This will allow the card to stand propped open and give the card a little unexpected design flair. To finish the card some rainbow gems were placed above the images in corresponding rainbow colors.
Card Size: 3.5 inches by 8.5 inches (Slim Line)
Project Four: Sparkle Rave
Ready for a party? This card is ready and is gender neutral and comes together in no time at all!
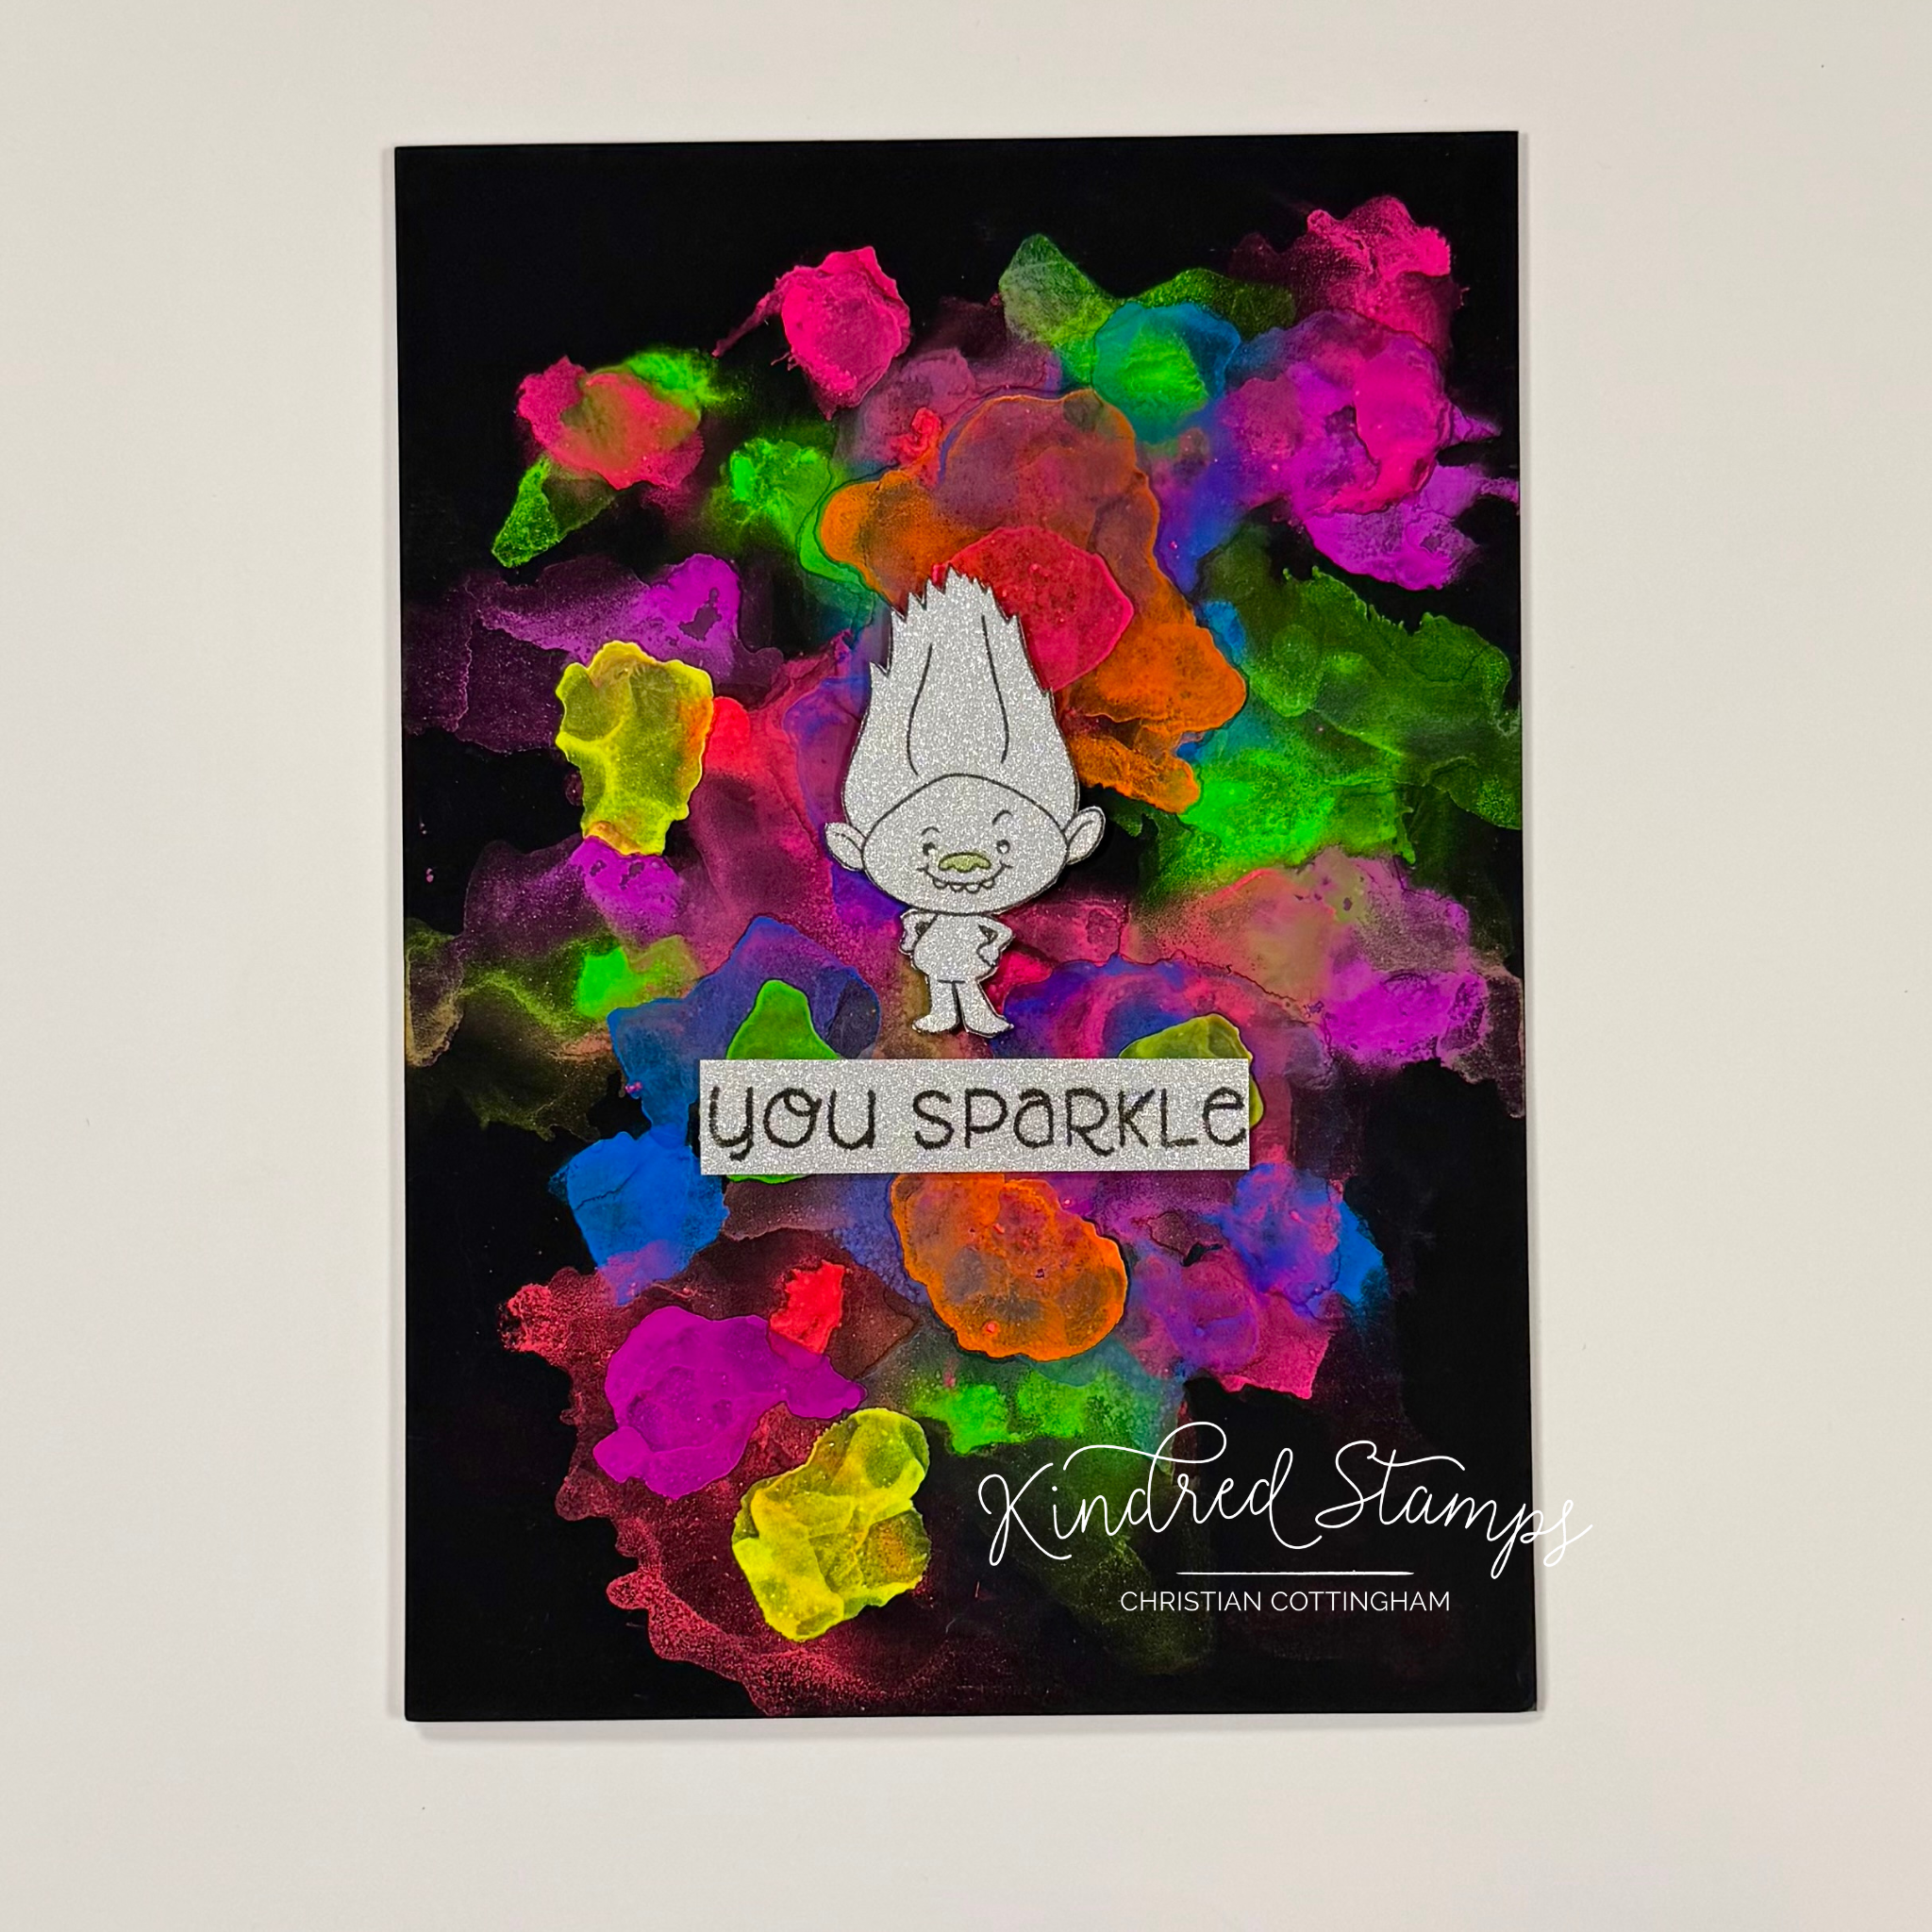
Sparkle Friends, Kindred Stamps
The Silver Boy from the Sparkle Friends stamp set was stamped with alcohol safe ink on a piece of Silver Sparkle Ranger Alcohol Ink Cardstock. When dry, the Silver Boy nose was colored with an Olo Marker. He was then fussy cut out on the line and edged with a black fine liner pen. The sentiment was stamped on the same Silver sparkle card stock.
To make the psychedelic background, a 5 inch by 7 inch piece of Matte Black Ranger Alcohol Ink Cardstock was pulled from the stash. The deep matte finish of this card stock makes the neon inks pop off the paper. The background was “colored” with Ranger Fluorescent/ Radioactive/ Ignite/ Razzle/ Hyper/ Atomic/ Electric/ and Caution alcohol inks.
The alcohol ink background was adhered to an A7 card base. The Silver Boy and sentiment were popped up with black thin foam tape and placed onto the alcohol background.
This card took about 15 minutes from start to finish because of the limited coloring and allowing the sparkling Silver Guy reflect the neon color on the saturated matte black background. Shine a little black light on this card and you are at the rave with the Sparkle Friends.
Card Size: 5 inches by 7 inches (A7)
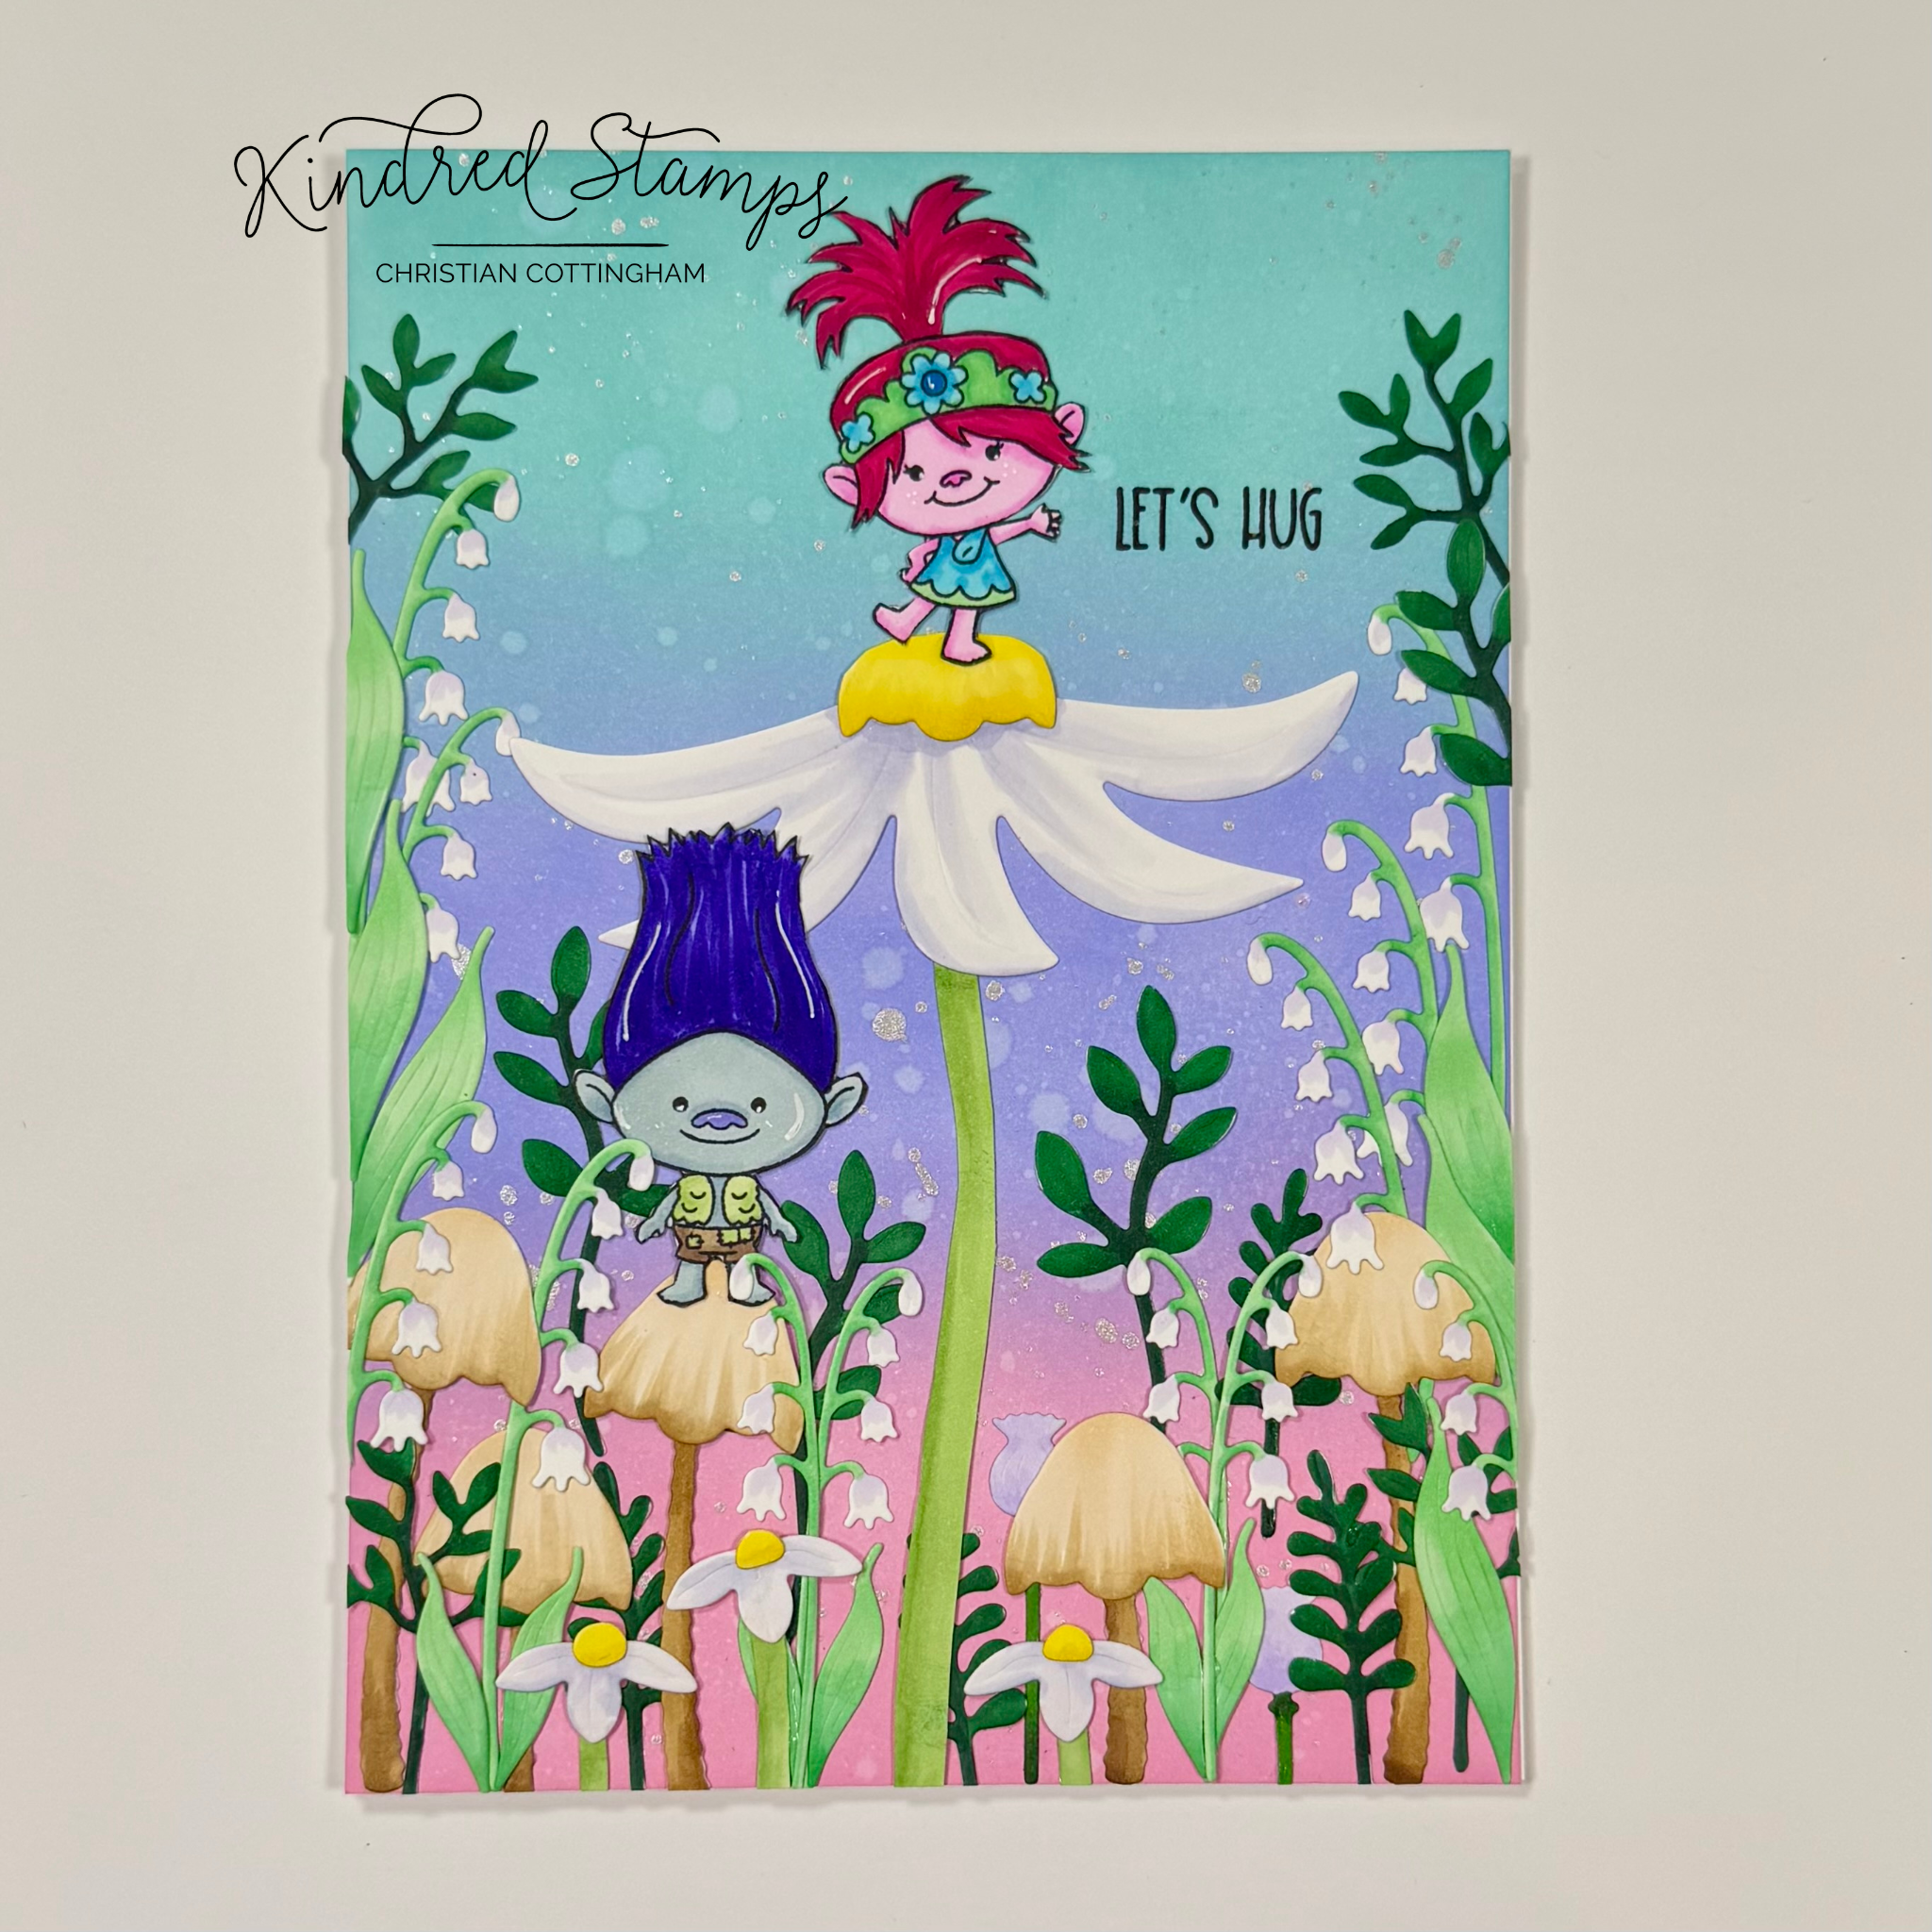
Project Five: Forest Hug
Just because you are small doesn't mean you can’t do anything you believe in especially when you have friends there to support you! This card scene shows off two of the Sparkle Friends in a forest scene that utilizes some unusually dies that you may already have in your stash. Let’s break it down.
Sparkle Friends, Kindred Stamps
The background was up first because of the dry time needed for the inky background. An A7 panel (5 inches by 7 inches) of white card stock was ink blended with Distress Oxide Inks (Kitsch Flamingo/ Shaded Lilac/ Salvaged Patina). When the blend was to my liking, I spattered the background with water. Picked up any moisture left with a paper towel and then spattered the background with Perfect Pearls in the color way Perfect Pearls. The background panel was set aside to dry completely.
From the Sparkle Friends stamp set, I stamped the Blue Boy and Pink Girl in alcohol safe ink. The images were colored with Olo Markers (See Color Guide) and cut out on the line. The images were then edged with a black Fine Liner pen to hide any cutting mishaps. These 2 friends were set aside to start the components of the forest scene.
To make the forest flowers and mushrooms, the following die sets were re-imagined: Strawberry House Die/ Fairy Cloche/ Bakery Treats Add-On/ and Entrance Gate Die. This sounds like an unusual pairing, but it meets all my needs!
From the Fairy Cloche Dies, all foliage was cut multiple times from white card stock. From the Strawberry House Dies the strawberry stem was cut out from white card stock and the stem was trimmed with scissors. From the Bakery Treat Add-Ons dies the chocolate for the chocolate dipped strawberries were cut multiple times as well as the stems to the strawberries. The chocolate chips were cut out of the same white card stock. Finally, the palm trees were cut out from the Entrance Gate Die out of white paper.
With all the piece it was time to start coloring (Olo Markers). The lily of the valley were colored with G1.4/ G1.2 for the leaves and then BV1.1 for some light color at the base of flower. The thistle was colored with BV1.2/ BV1.1 flower and YG1.7/ YG1.6 stem. The greenery was colored with G1.8/ G1.7 on all versions of stems. One piece of chocolate covered strawberry was trimmed down to act as the center of the flower for the Pink Girl to stand on. This piece was colored with Y1.4/ Y1.2. The strawberry stems (large and small) were colored with BV2.2/ BV2.0. To make stems for the daisies, I trimmed down some scrap paper to resemble the stems and colored with G5.3/ G5.2. The remainder of the chocolate strawberry pieces were colored with )4.1/ O4.3/ and O4.6 to now become mushrooms. The palm trees got a little haircut and the tree bark was colored with the same colors as the mushroom to be the stems. Finally, a few of the chocolate chip pieces were colored with Y1.4/ Y1.2 for the small daisies.
The scene was arranged and then adhered to the blended card panel with liquid glue. Finally, the sentiment “Let’s Hug” was nestled into the scene and stamped with pigment ink with a stamping block. The card panel was glued to an A7 card base. This card really showcases how a little imagination and a can do attitude can make something big!
Card Size: 5 inches by 7 inches (A7)
Project Six: Sparkle Memory Game
Need a quick gift for that is full of Sparkle Friend fun?? Or maybe a birthday party swag bag? This project comes together so fast and only used one stamp! The Sparkle Friend Die Cuts are a perfect way to “cheat” at making a project. Let’s break it down.
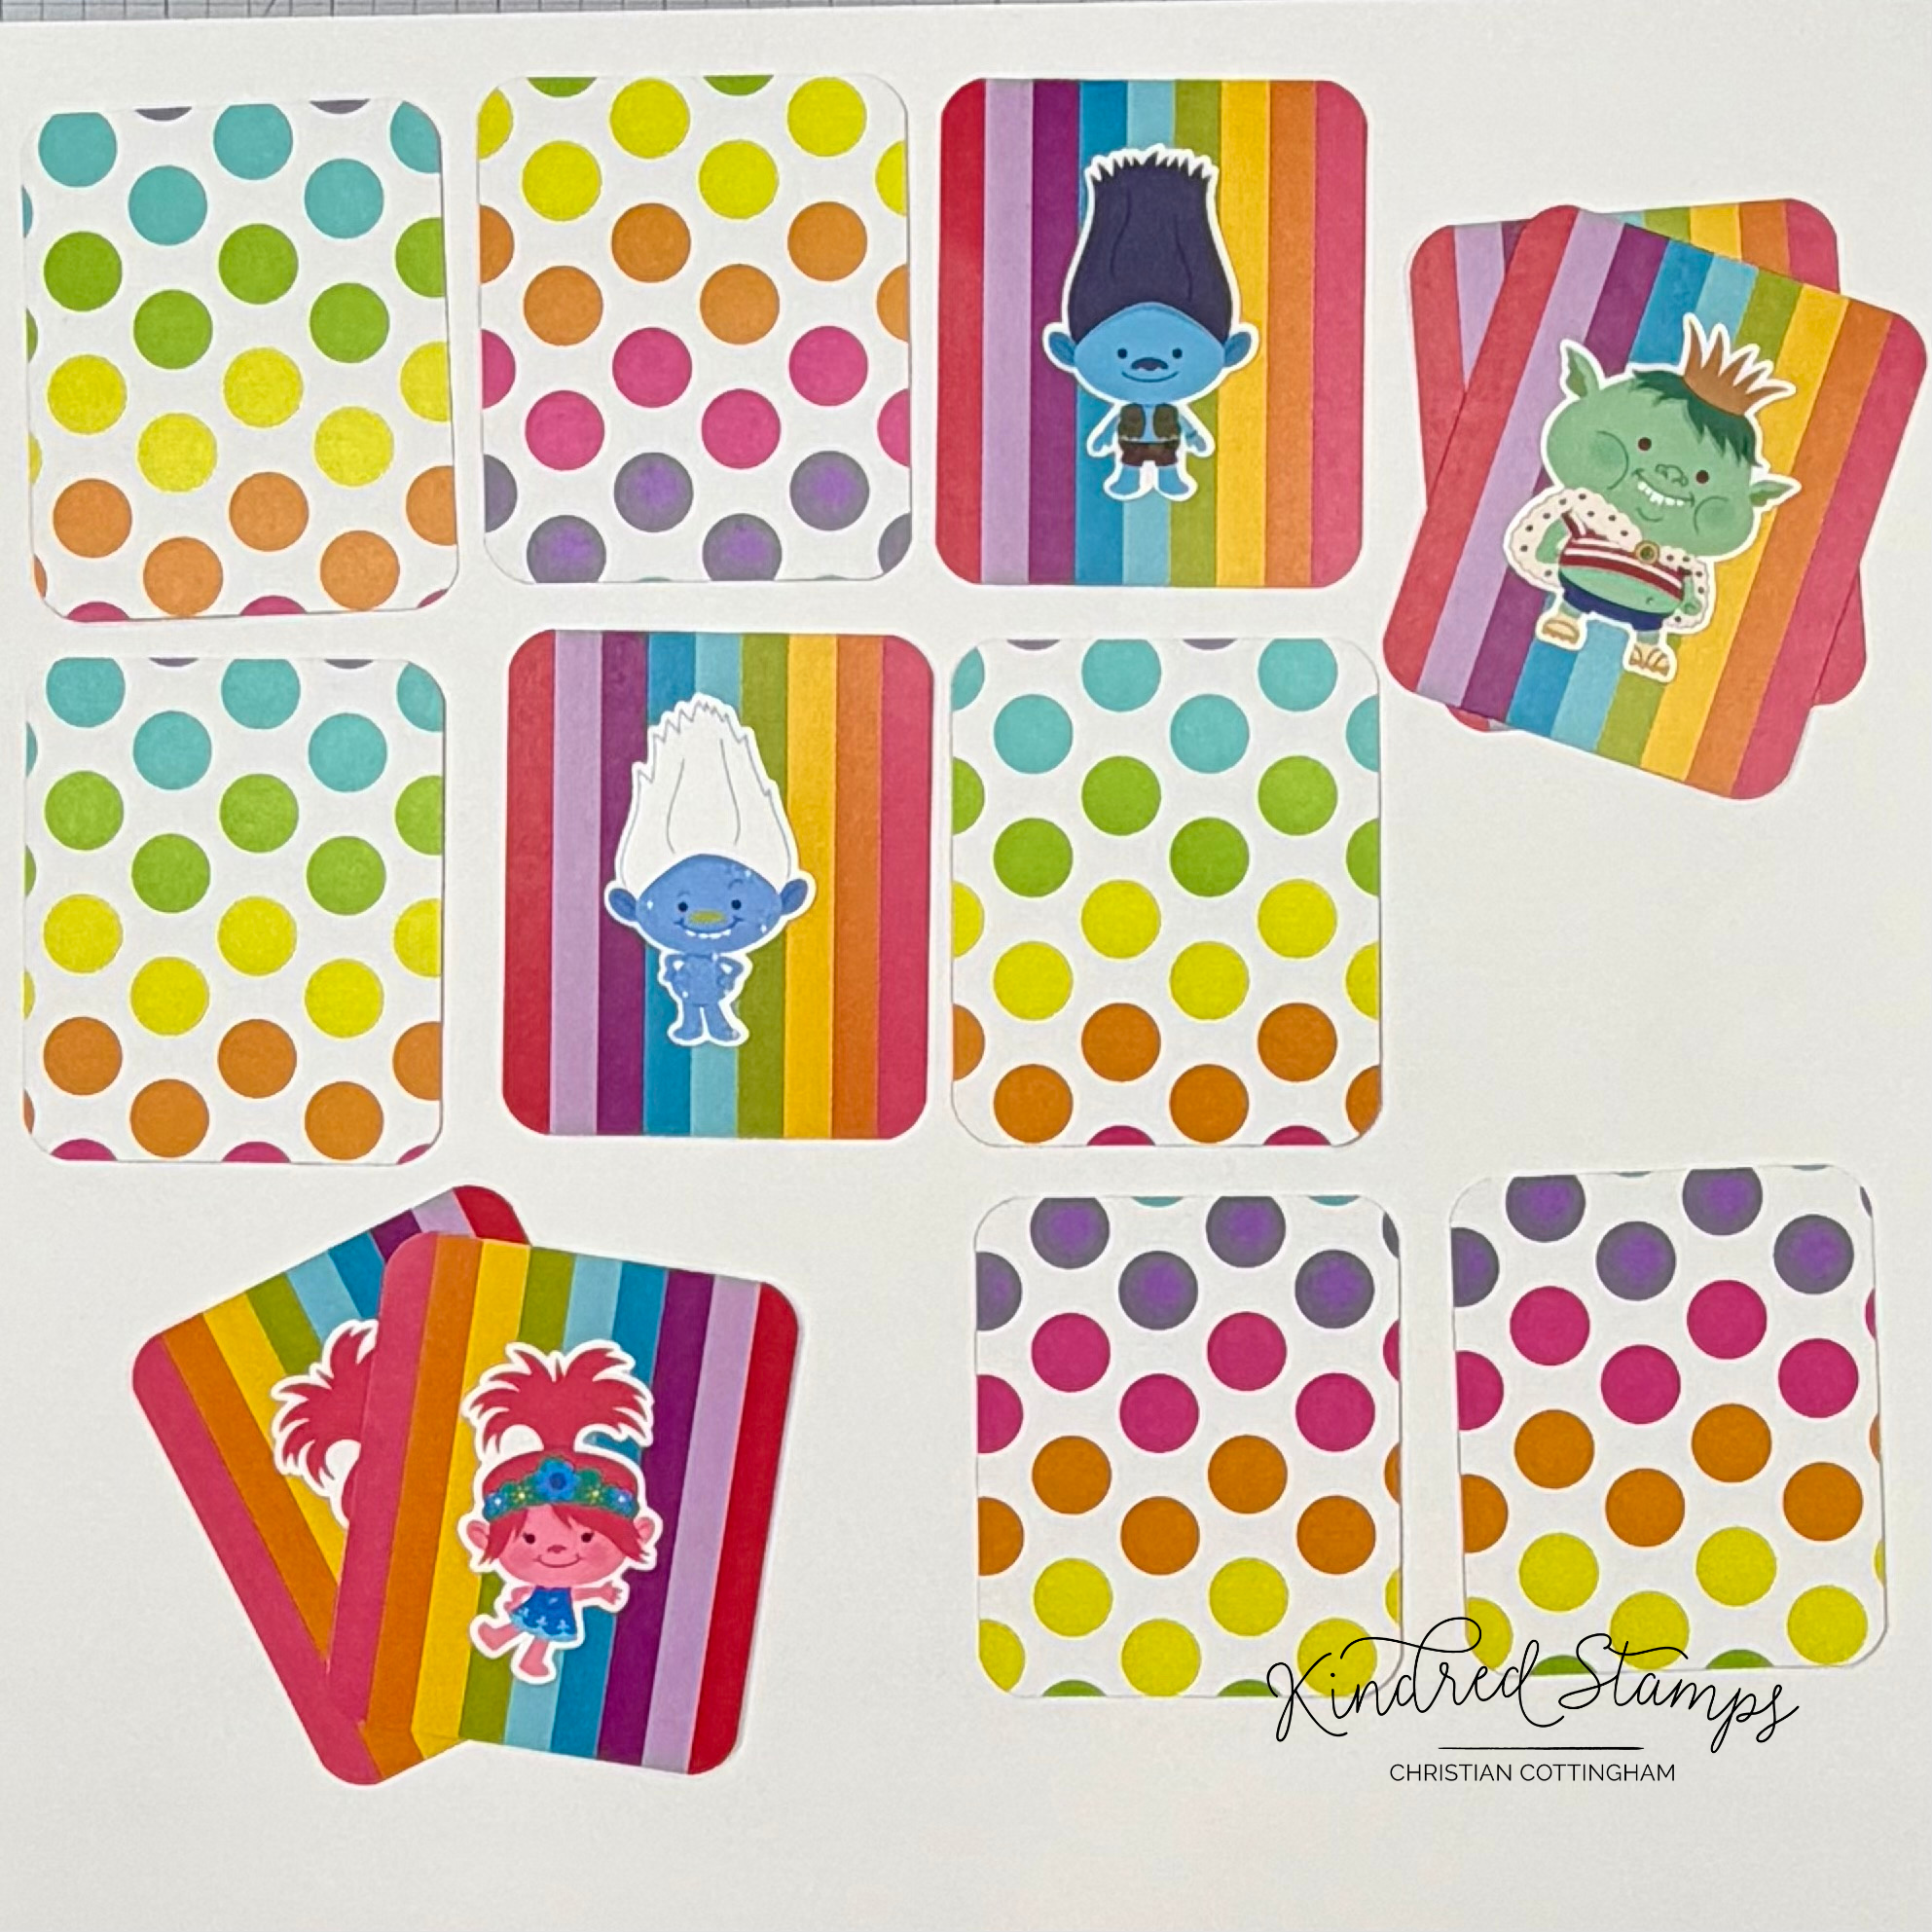
Sparkle Friends Die Cuts, Kindred Stamps
The Sweets Paper pack was utilized to decorate the inside of the box and for the memory cards. The cards were trimmed out of the same piece of pattern paper in the same direction to 3 inches by 2.5 inches. (Quantity: 12) The corners were round with a corner round punch. Two of each of the Sparkle Friend Die Cuts were pulled from the package and adhered with liquid glue ensuring that the opposite side of the card did not match each other (yes… I made sure you could cheat when you are playing the game). The cards were set aside to dry.

The card box was cut from the Treat Box die twice out of holographic card stock. The box was assemble and set aside to dry. The inside panels were lined with a pieces of Sweets Paper Pack. On a scrap of white cardstock, the sentiment was stamped in pigment ink and attached to a coordinating piece of pattern paper. This was attached with foam tape to the inside lid of the box. A thin strip of pattern paper was adhered to the top of the box and along the sides to give the illusion of ribbon on the box.
To finish decorating the box, the bow from the Gift Card Dies was die cut from white card stock and colored with Olo Markers (RV1.7/ RV1.5). The bow was assembled and glued flat to the bow to help protect the bow from little fingers peeling it off.
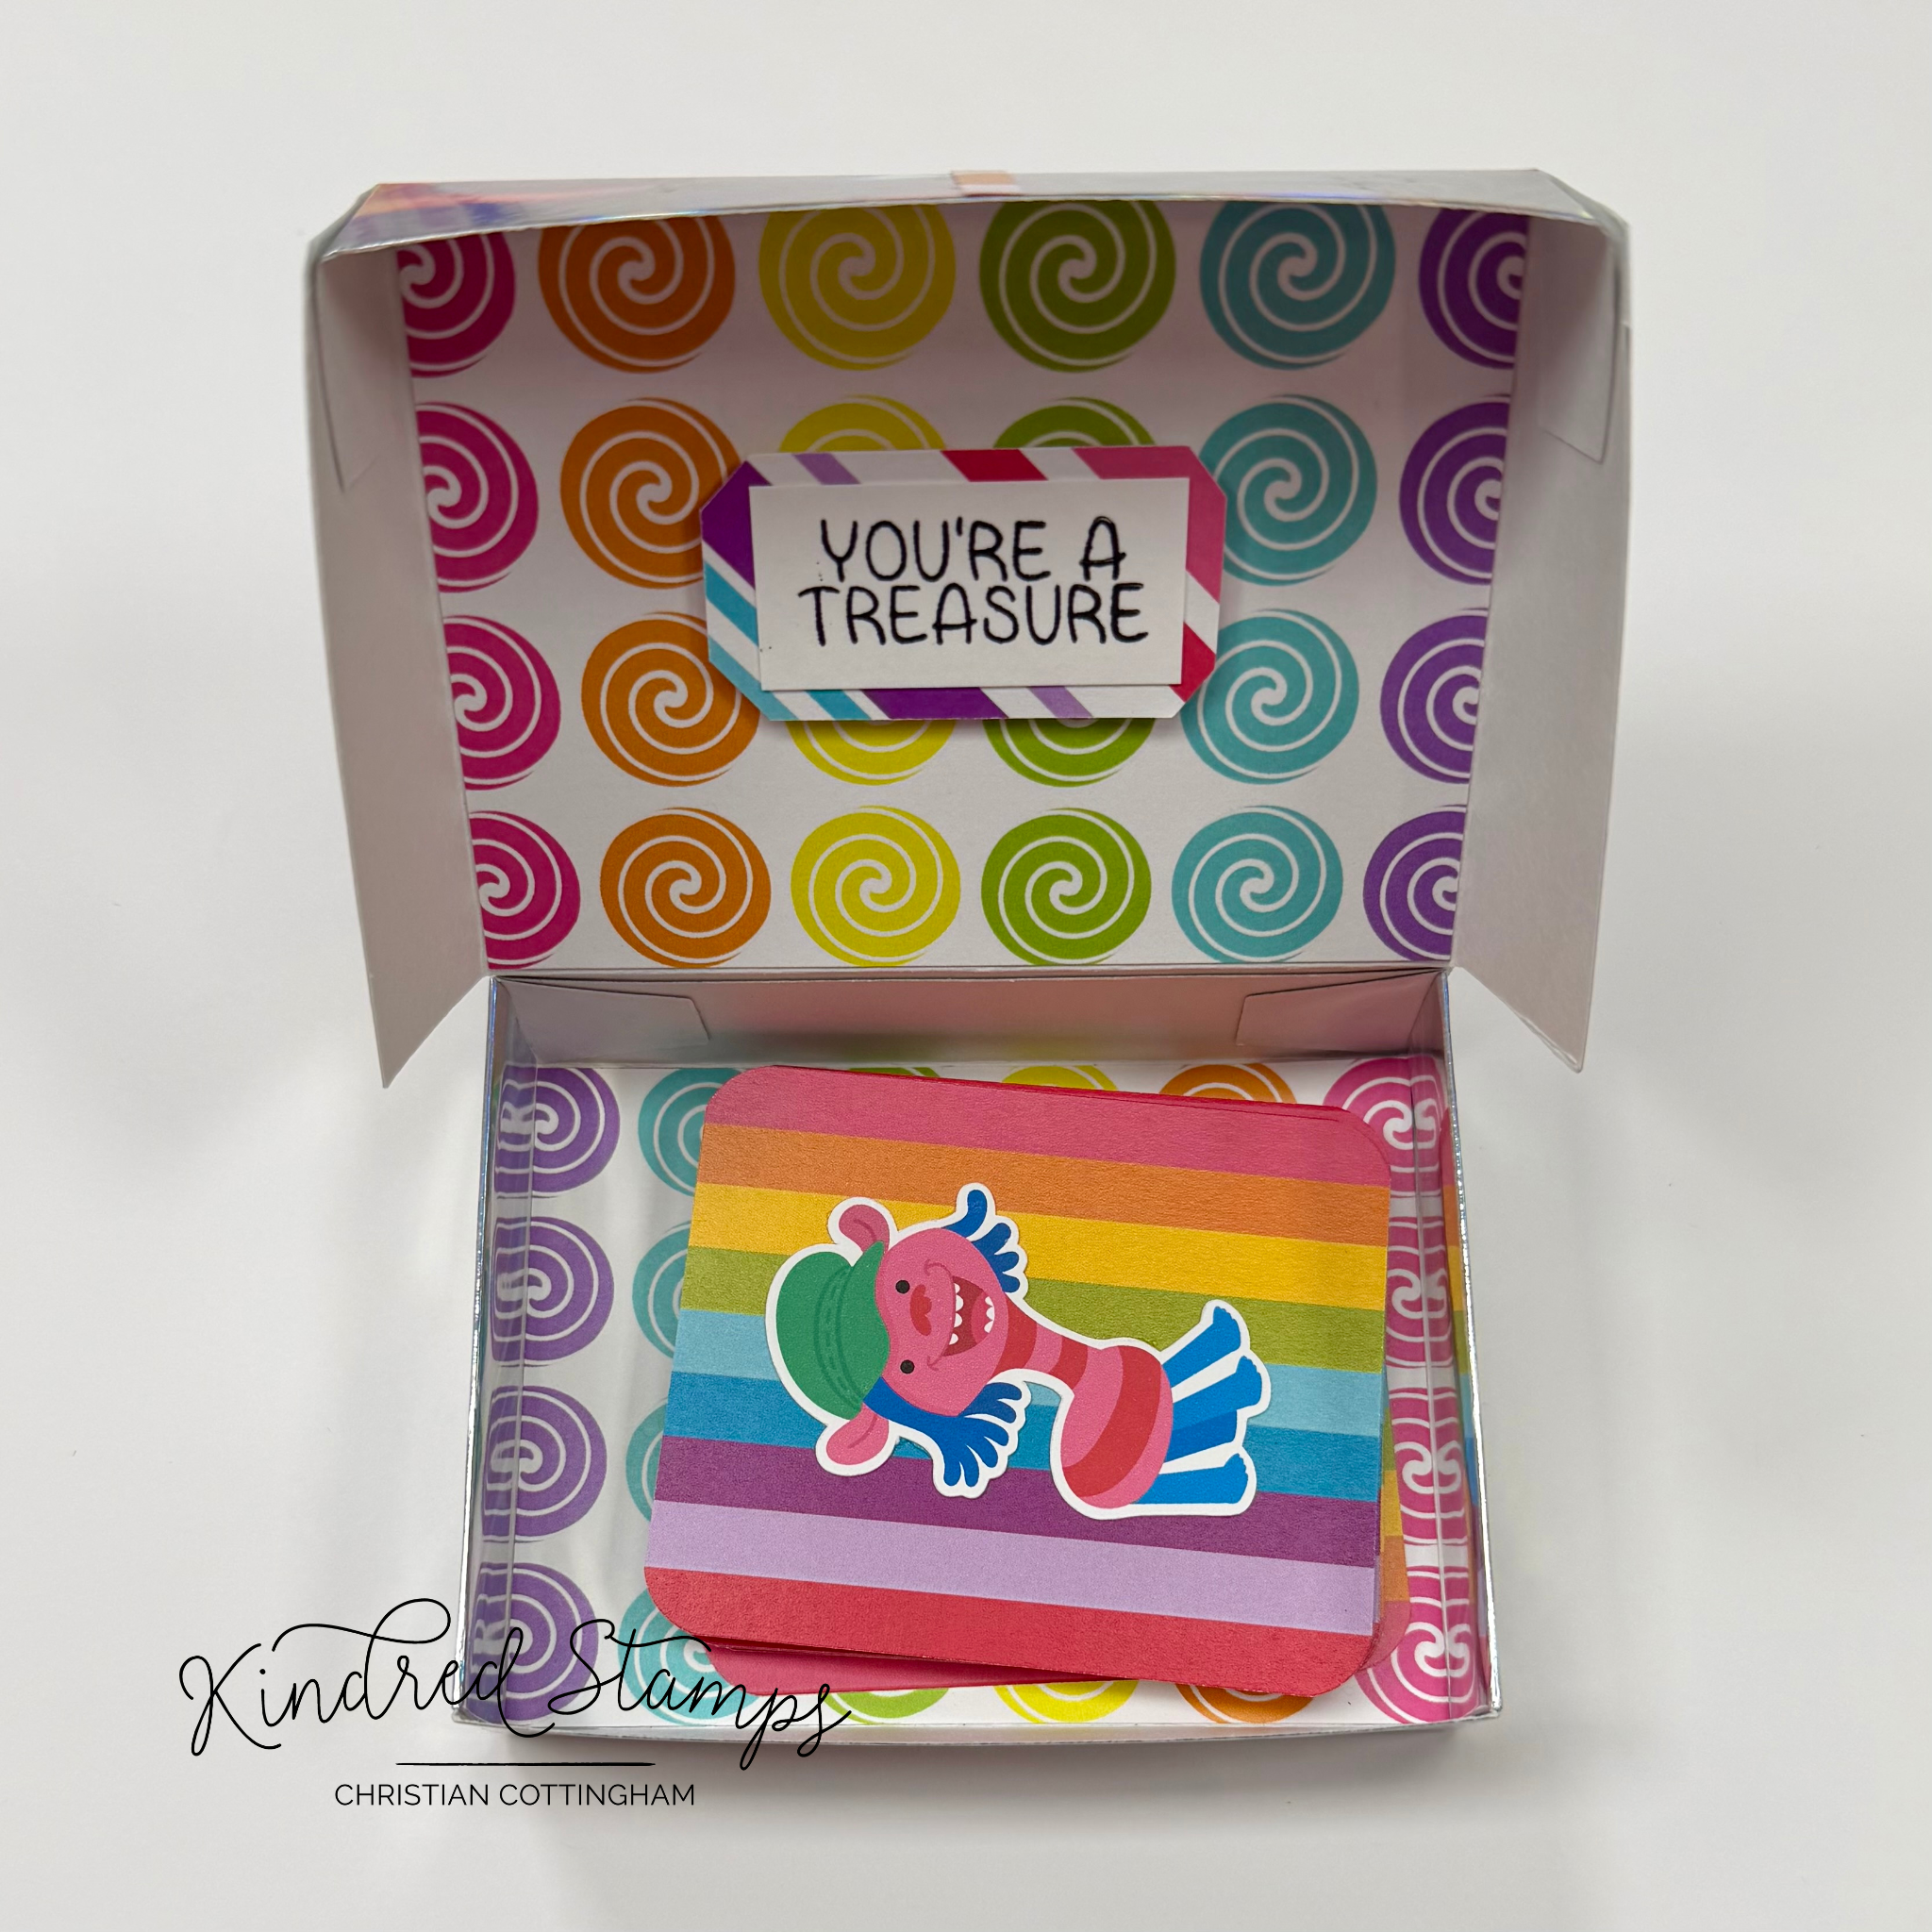
This project took just a few minutes to make and has a hit of nostalgia of playing this memory game and always wanting to have one that was in what ever obsession I was in at that time.
Project Seven: Dance Party
Nothing like a Happy Dance to send some birthday cheer! The Sparkle Friends are having a dance off and want you to join in. Let’s breakdown this card…
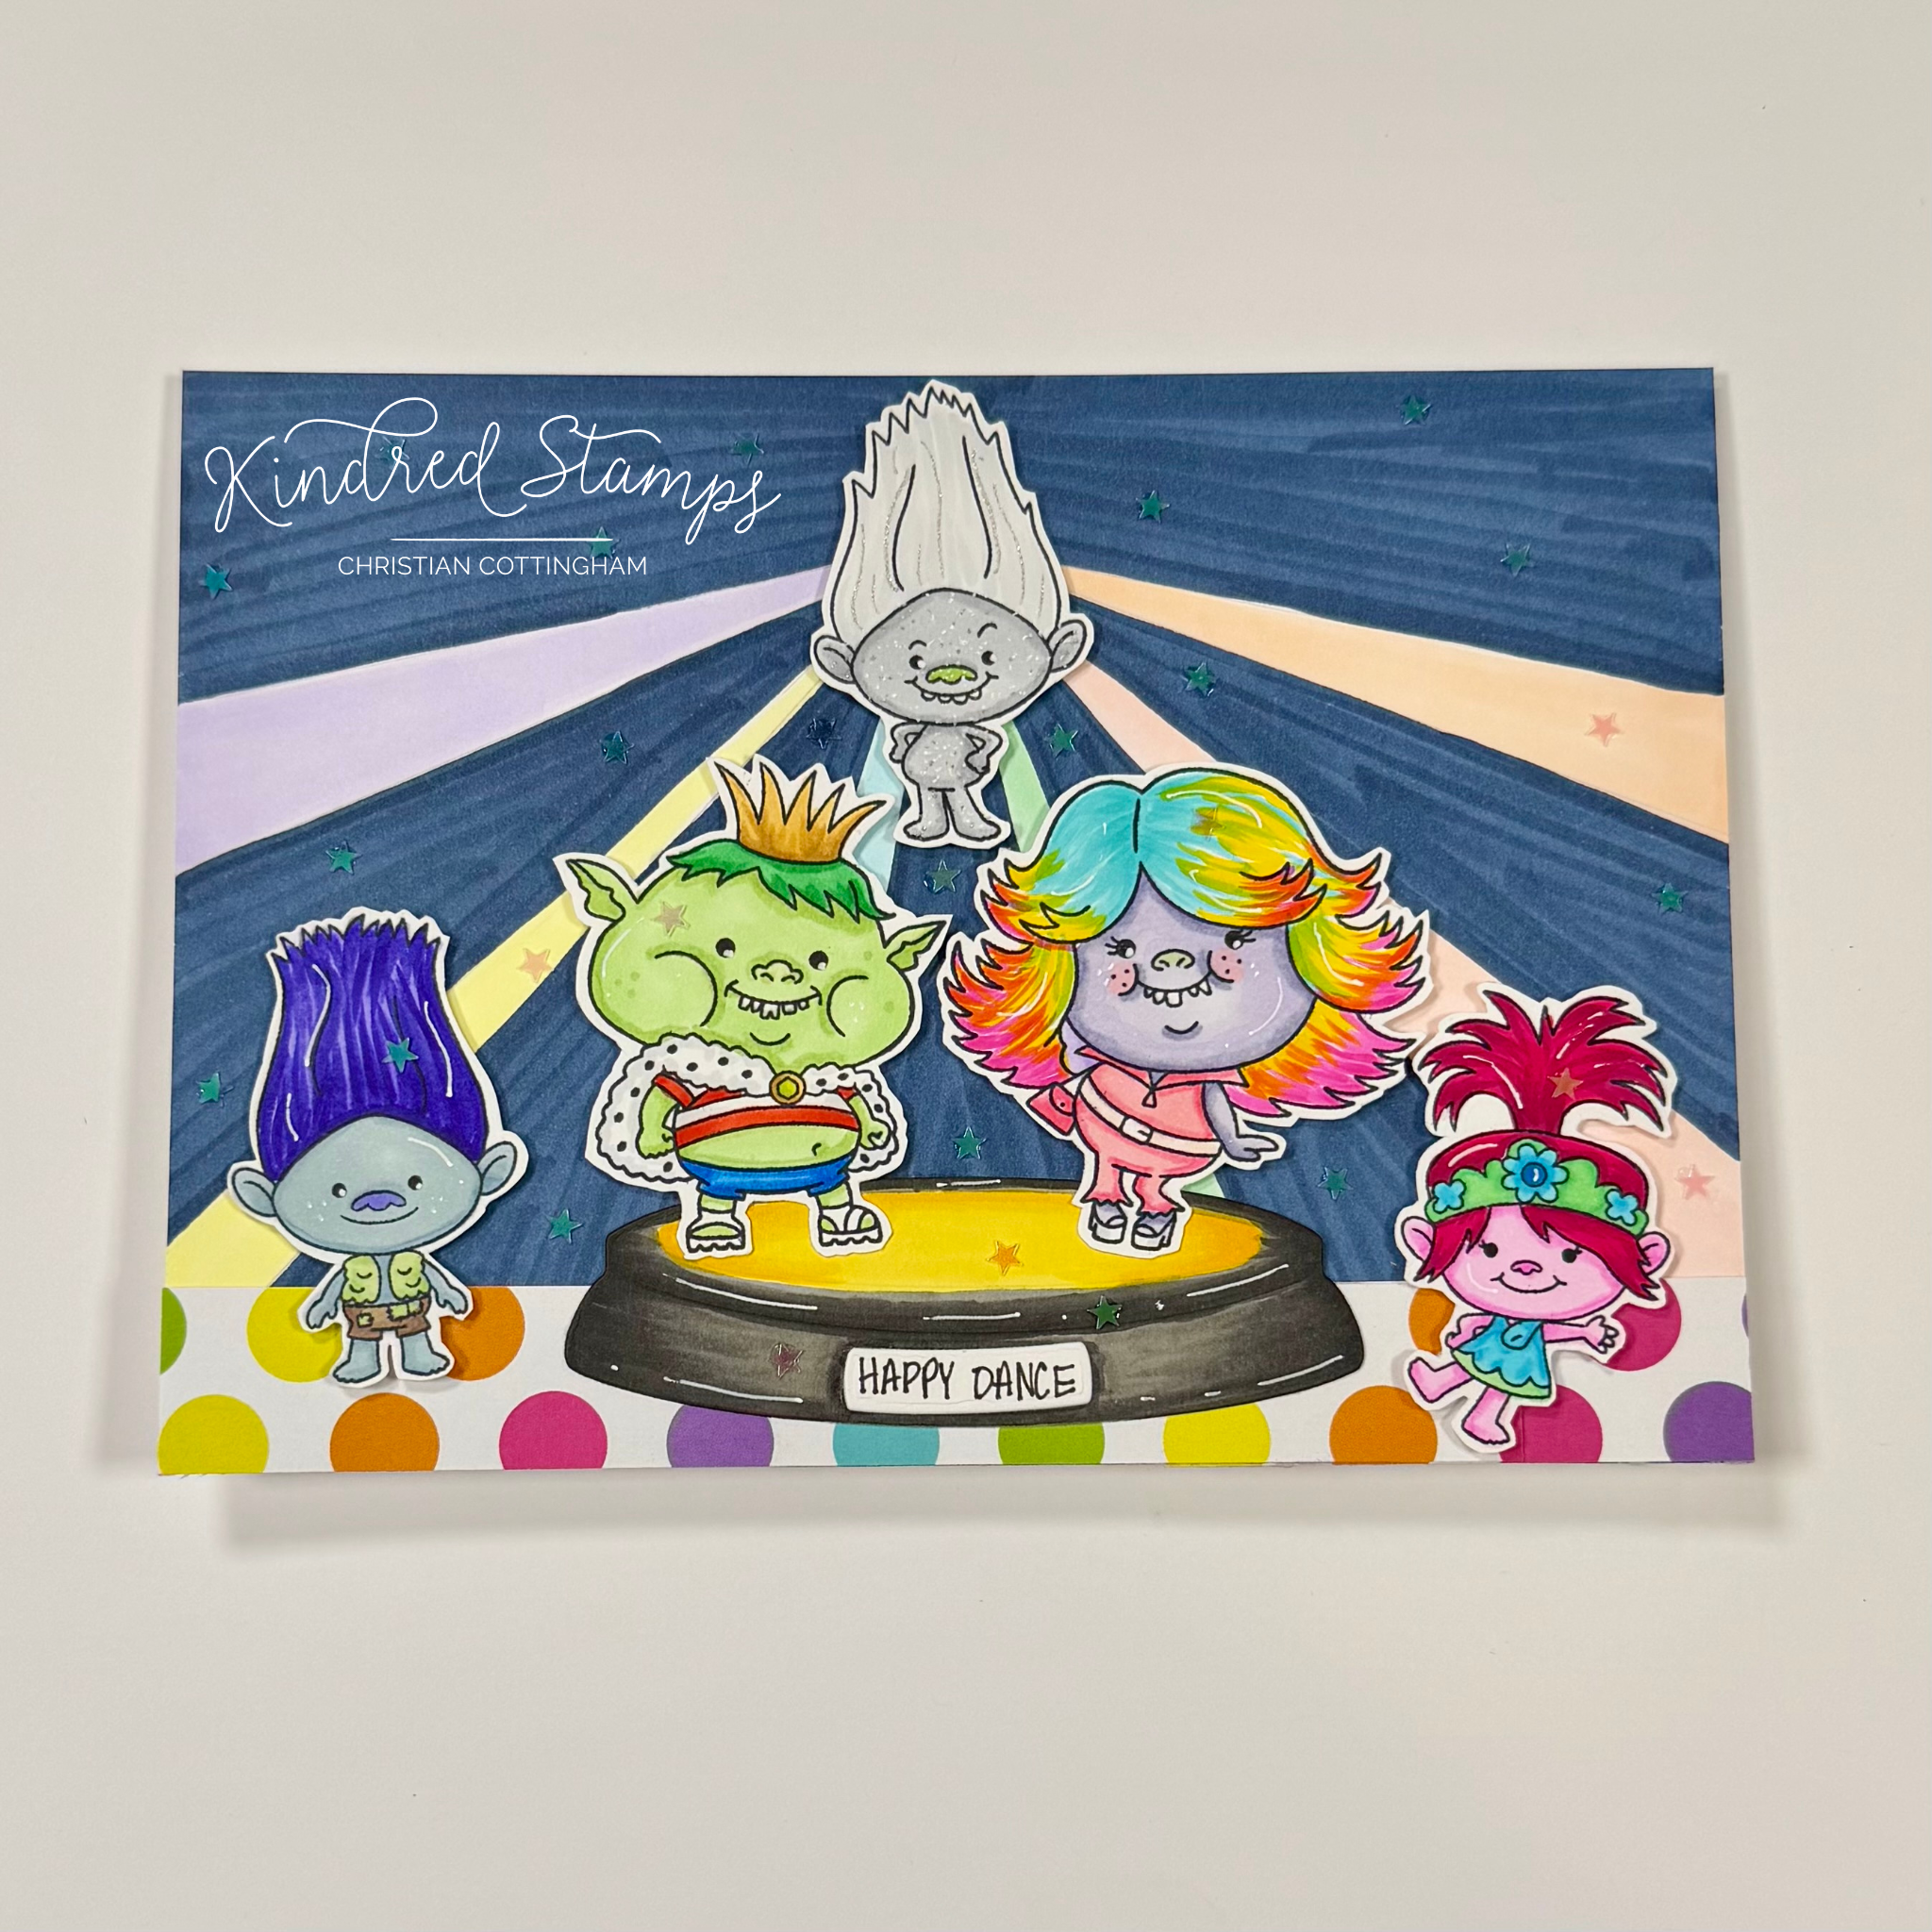
Sparkle Friends, Kindred Stamps
An A7 panel was trimmed down to 5 inches by 7 inches. Six stripes were sketched in with a pencil with a center point 1 inch below the edge of the panel. The stripes were colored in a pastel rainbow with Olo Markers (Y1.1/ G0.1/ B1.1/ R0.1/ O2.1). To achieve the same line texture, the spacing above and between the rainbow strips we colored in a burst pattern with an C018 Altenew Artist Marker.
All images from the Sparkle Friends stamp set were stamped in alcohol safe ink and colored with Olo Markers. (See Color Guide) The images were fussy cut on the line and edged with a fine liner marker.
The dance floor taps into the Sweets Paper Pack. A strip of the pattern paper was adhered to the bottom of the colored card panel. I wanted a dance floor to also have a light up stage just like the dance shows of years gone by. So, I dug through my stash and found the Fairy Cloche Die. The base was the perfect dimensions and size for the Sparkle Friends to dance on!
The base was cut from white card stock and colored with Altenew Artist Markers (TG07/ TG05/ TG03; Y207/ Y106/ C004). The dance floor assembled and the feet of the Rainbow Girl and King Boy were adhered. On the label, I wrote Happy Dance with a black gel pen.
To assemble, the card, the dance floor was adhered with thin foam tape behind the dancing pair only. This allowed the dance floor and their bodies to be flush. The Blue Boy and Pink Girl were popped up with foam tape and applied to either side of the dance floor. Finally, the Silver Boy was dotted with white gel pen and Star Dust gel pen, ensuring I placed dots on the stamped lines to give the appearance of sparkle. He then had thin foam tape applied and centered above the dance floor scene. The finished panel was adhered to an A7 card base. The sentiment “Sending you a super sparkly birthday wishes” was stamped in pigment ink in the inside of the card with a stamping block.
To add even more retro nod to dance show of days gone by, I added iridescent stars scattered throughout. This happy dance that is a perfect way to celebrate a friends or family members birthday.
Card Size: 5 inches by 7 inches (A7)
Project Eight: Card Set
Bring in some bling by using Sparkle Dots Stencil! This gift set is the perfect way to spread some shiny sparkly cheer! Let’s break it down.
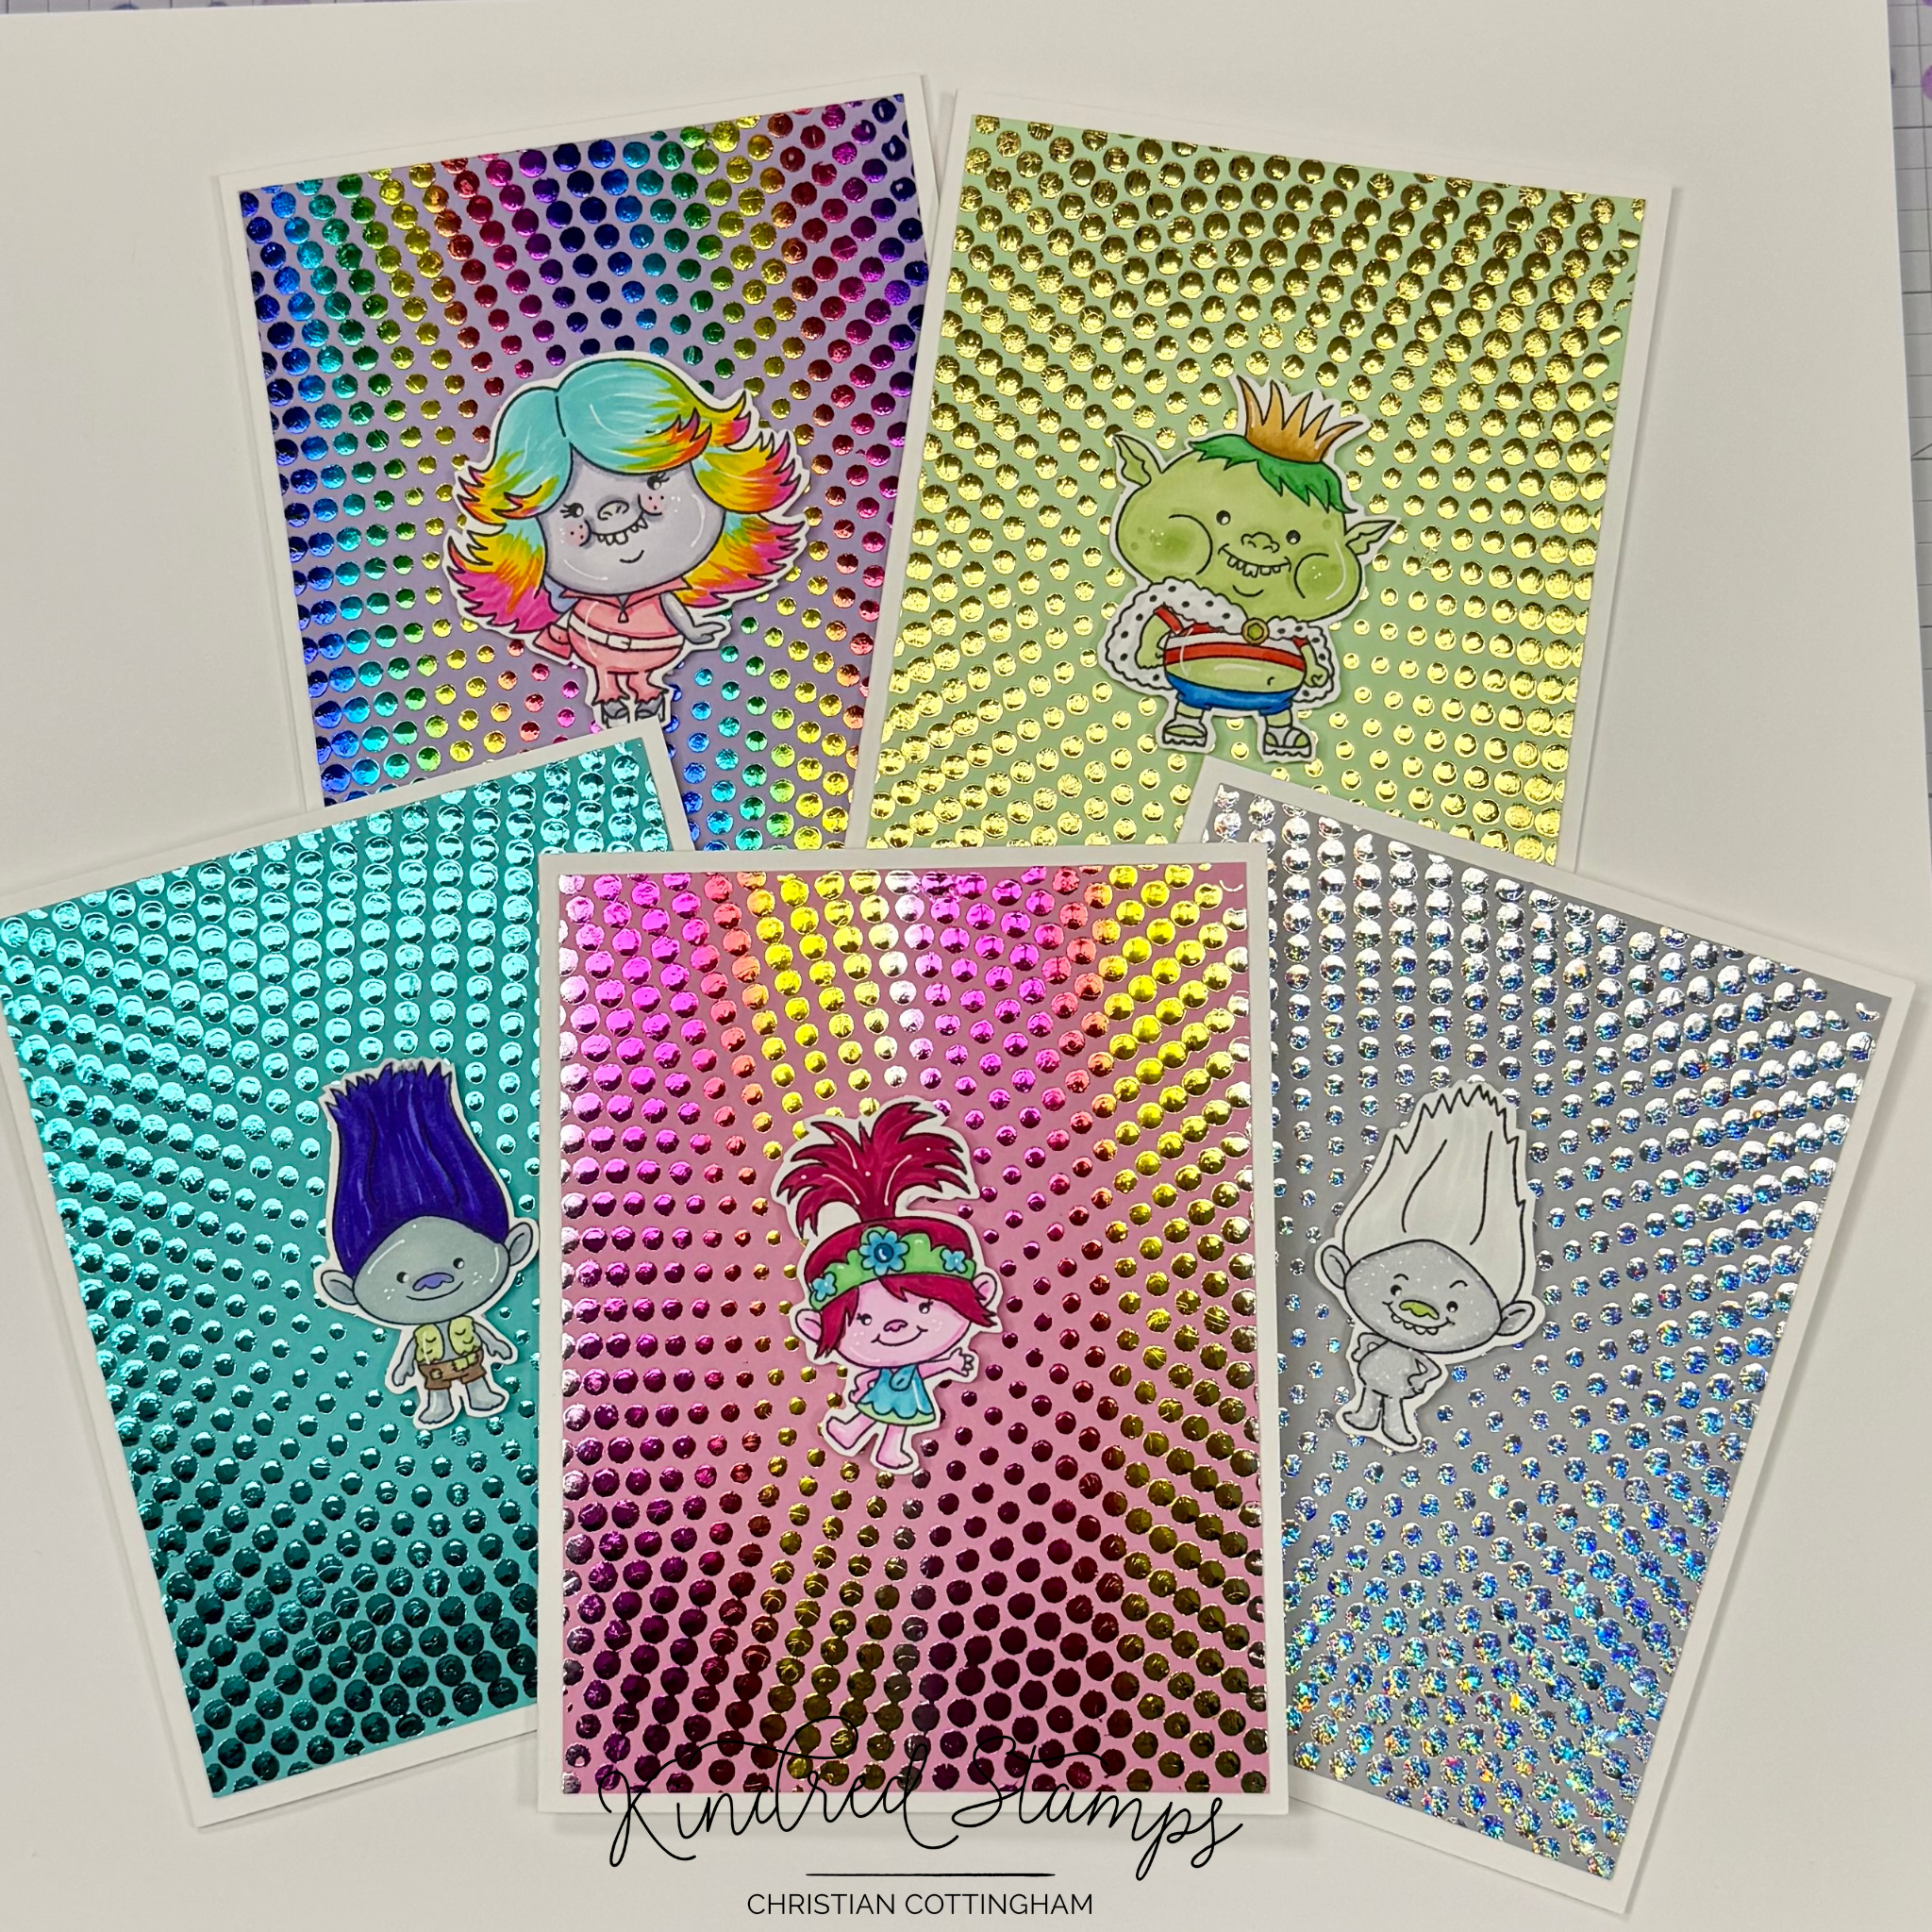
Sparkle Friends, Kindred Stamps
Colored cardstock that complimented each character was trimmed to an A2 panel (4.25 inches by 5 inches). On the Glass Mat, the stencil was taped with low tack tape on the left side only. This will act as a hinge for the gel placement. A piece of colored cardstock was centered under the stencil and 2 more piece of tape were applied to the Glass Mat to create a jig where the colored cardstock can be aligned with. Using Decofoil Transfer Gel Duo, a thin layer was applied to the first piece of cardstock. The stencil hinge was lifted and the colored cardstock removed. The next piece of colored cardstock was lined up with the tape jig and the stencil hinge closed. The gel was applied. This was repeated for all 5 panels.
While the gel dried, the Sparkle Friends images were stamped in alcohol safe ink and colored with Olo Markers (See Color Guide). The images were fussy cut out and foam tape applied to the back of the images. These were set aside.
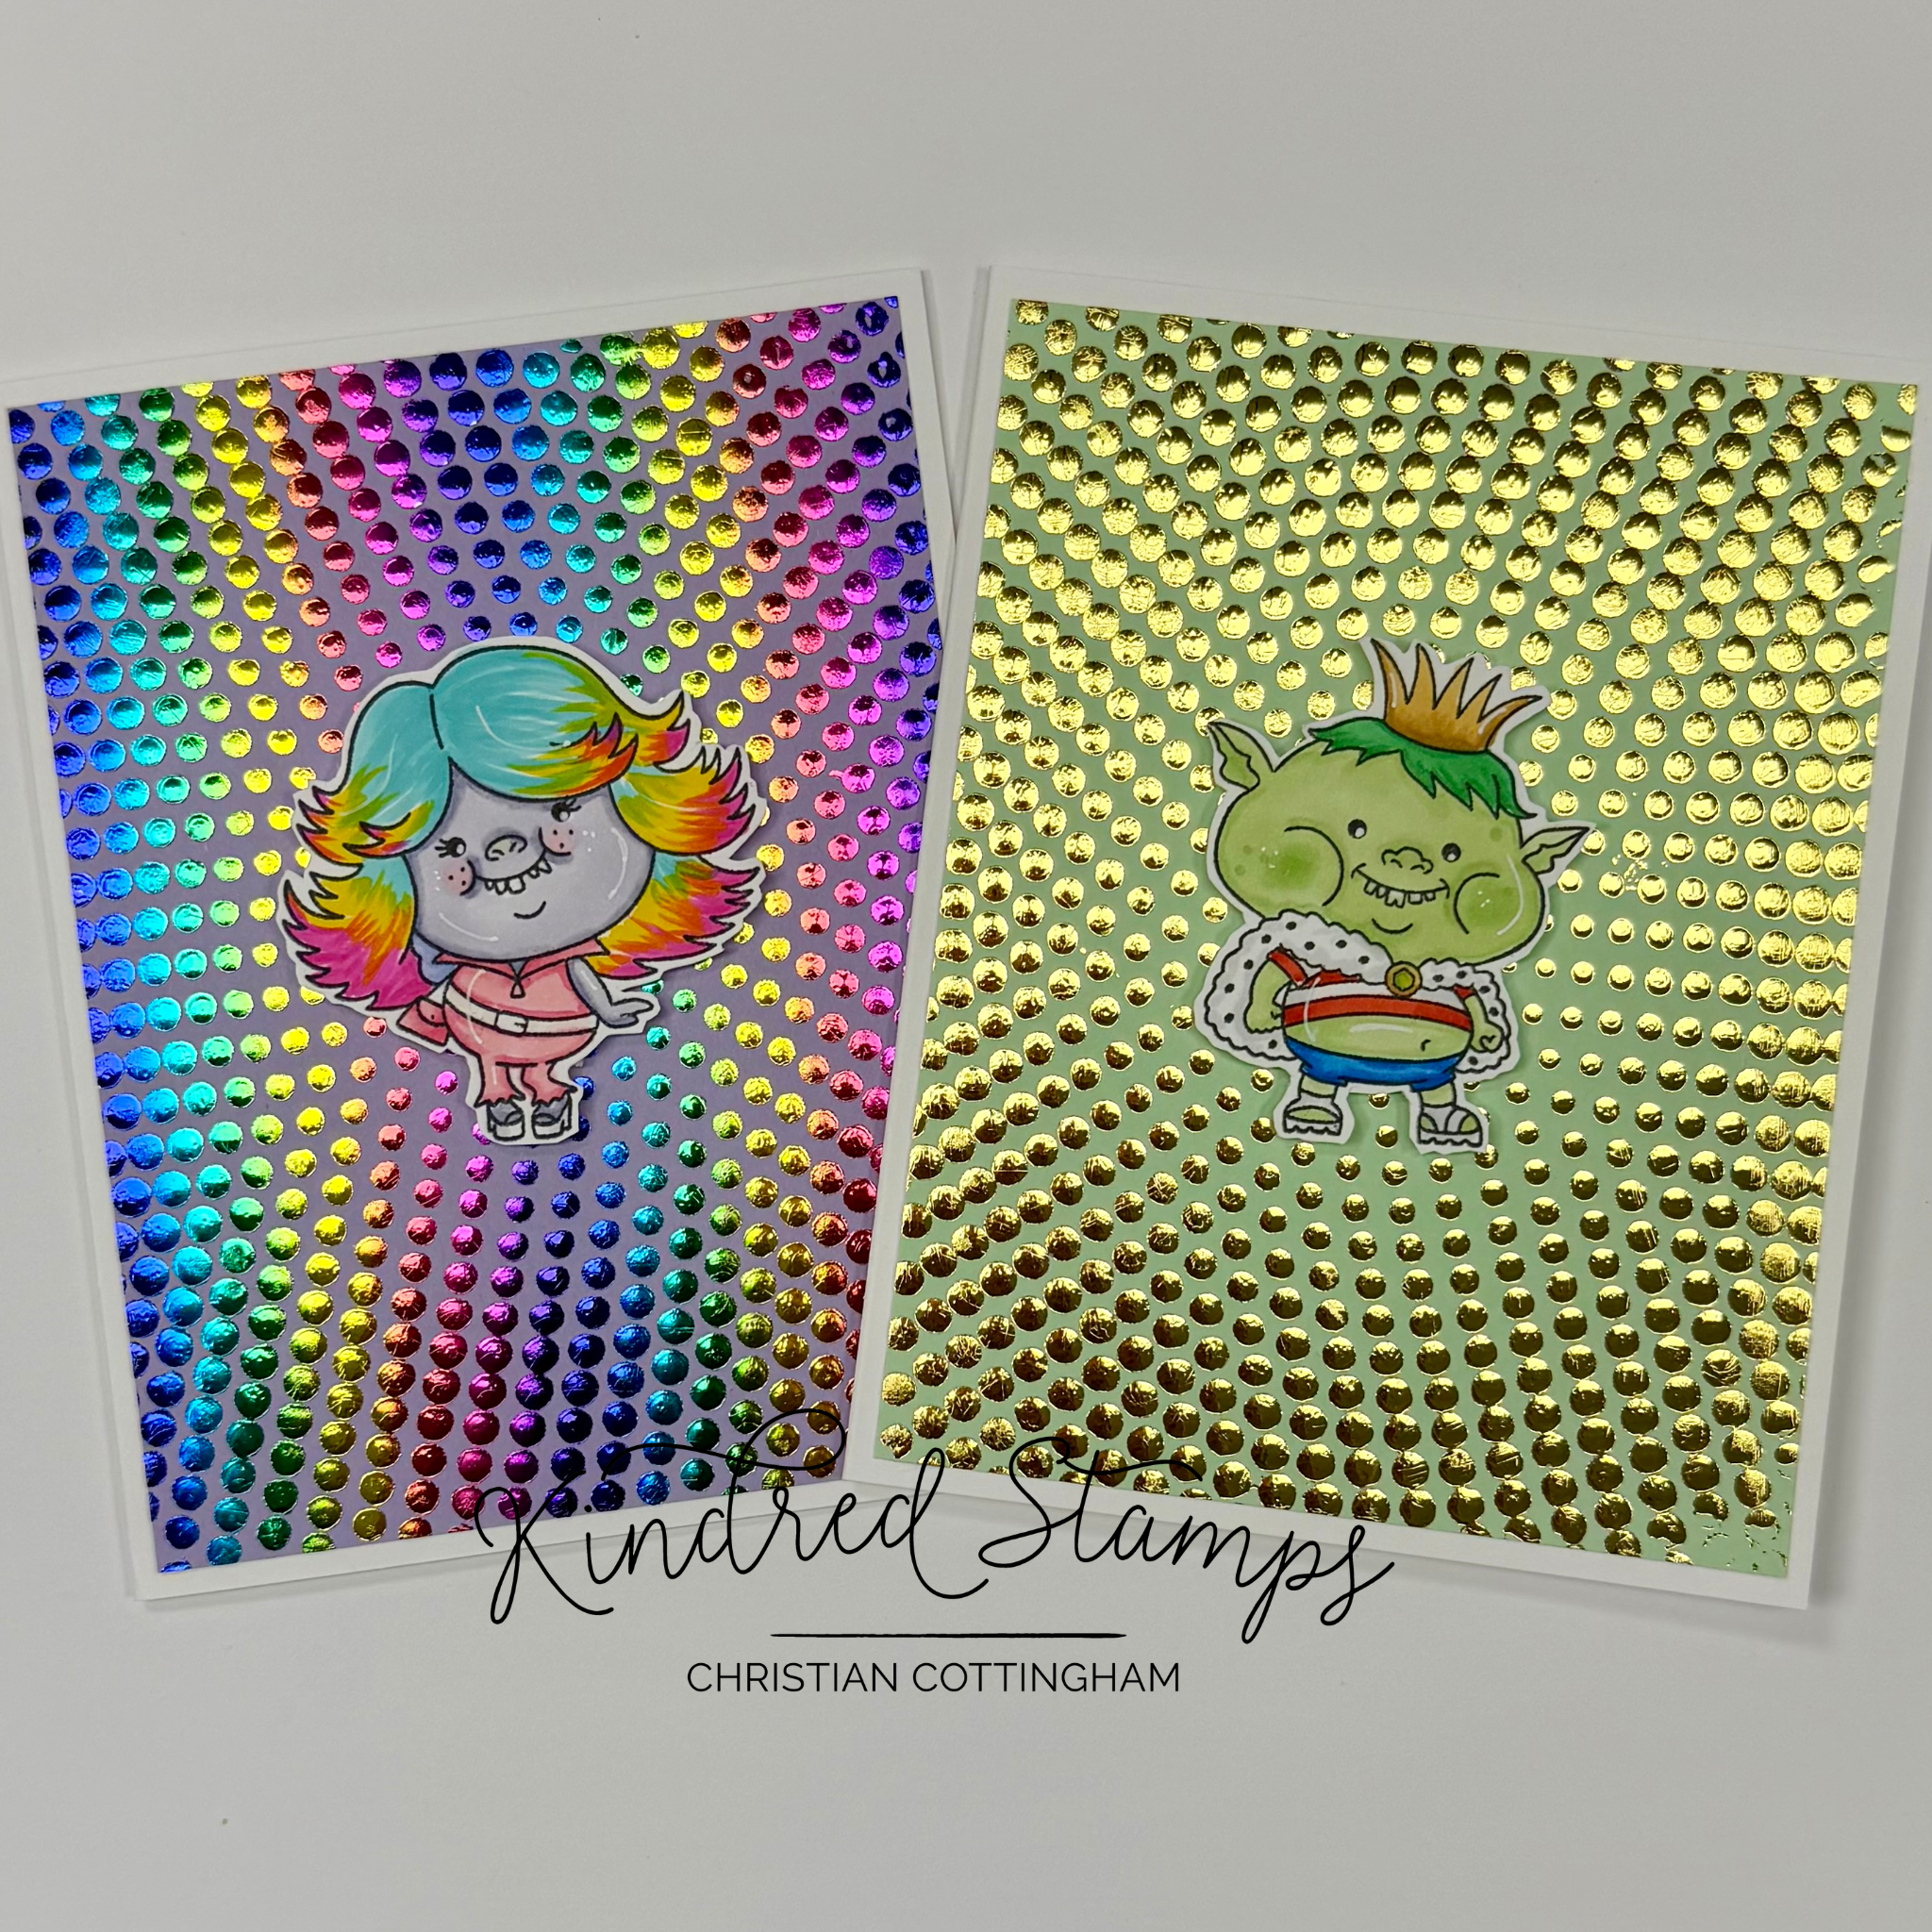
Sparkle Friends, Kindred Stamps
Panels of foil were trimmed to just larger than the A2 card panel with a coordinating color for each of the images. I utilized Decofoil in Gold D’or, Summer Rainbow, and Rainbow. I also utilized Gina K Fancy Foils in Sparkling Silver and Turquoise Sea. The foil was applied to the colored cardstock (pretty side up). Though not required, I did utilize the Fuse foiling system to heat set the foil. Any laminator would work for this process.
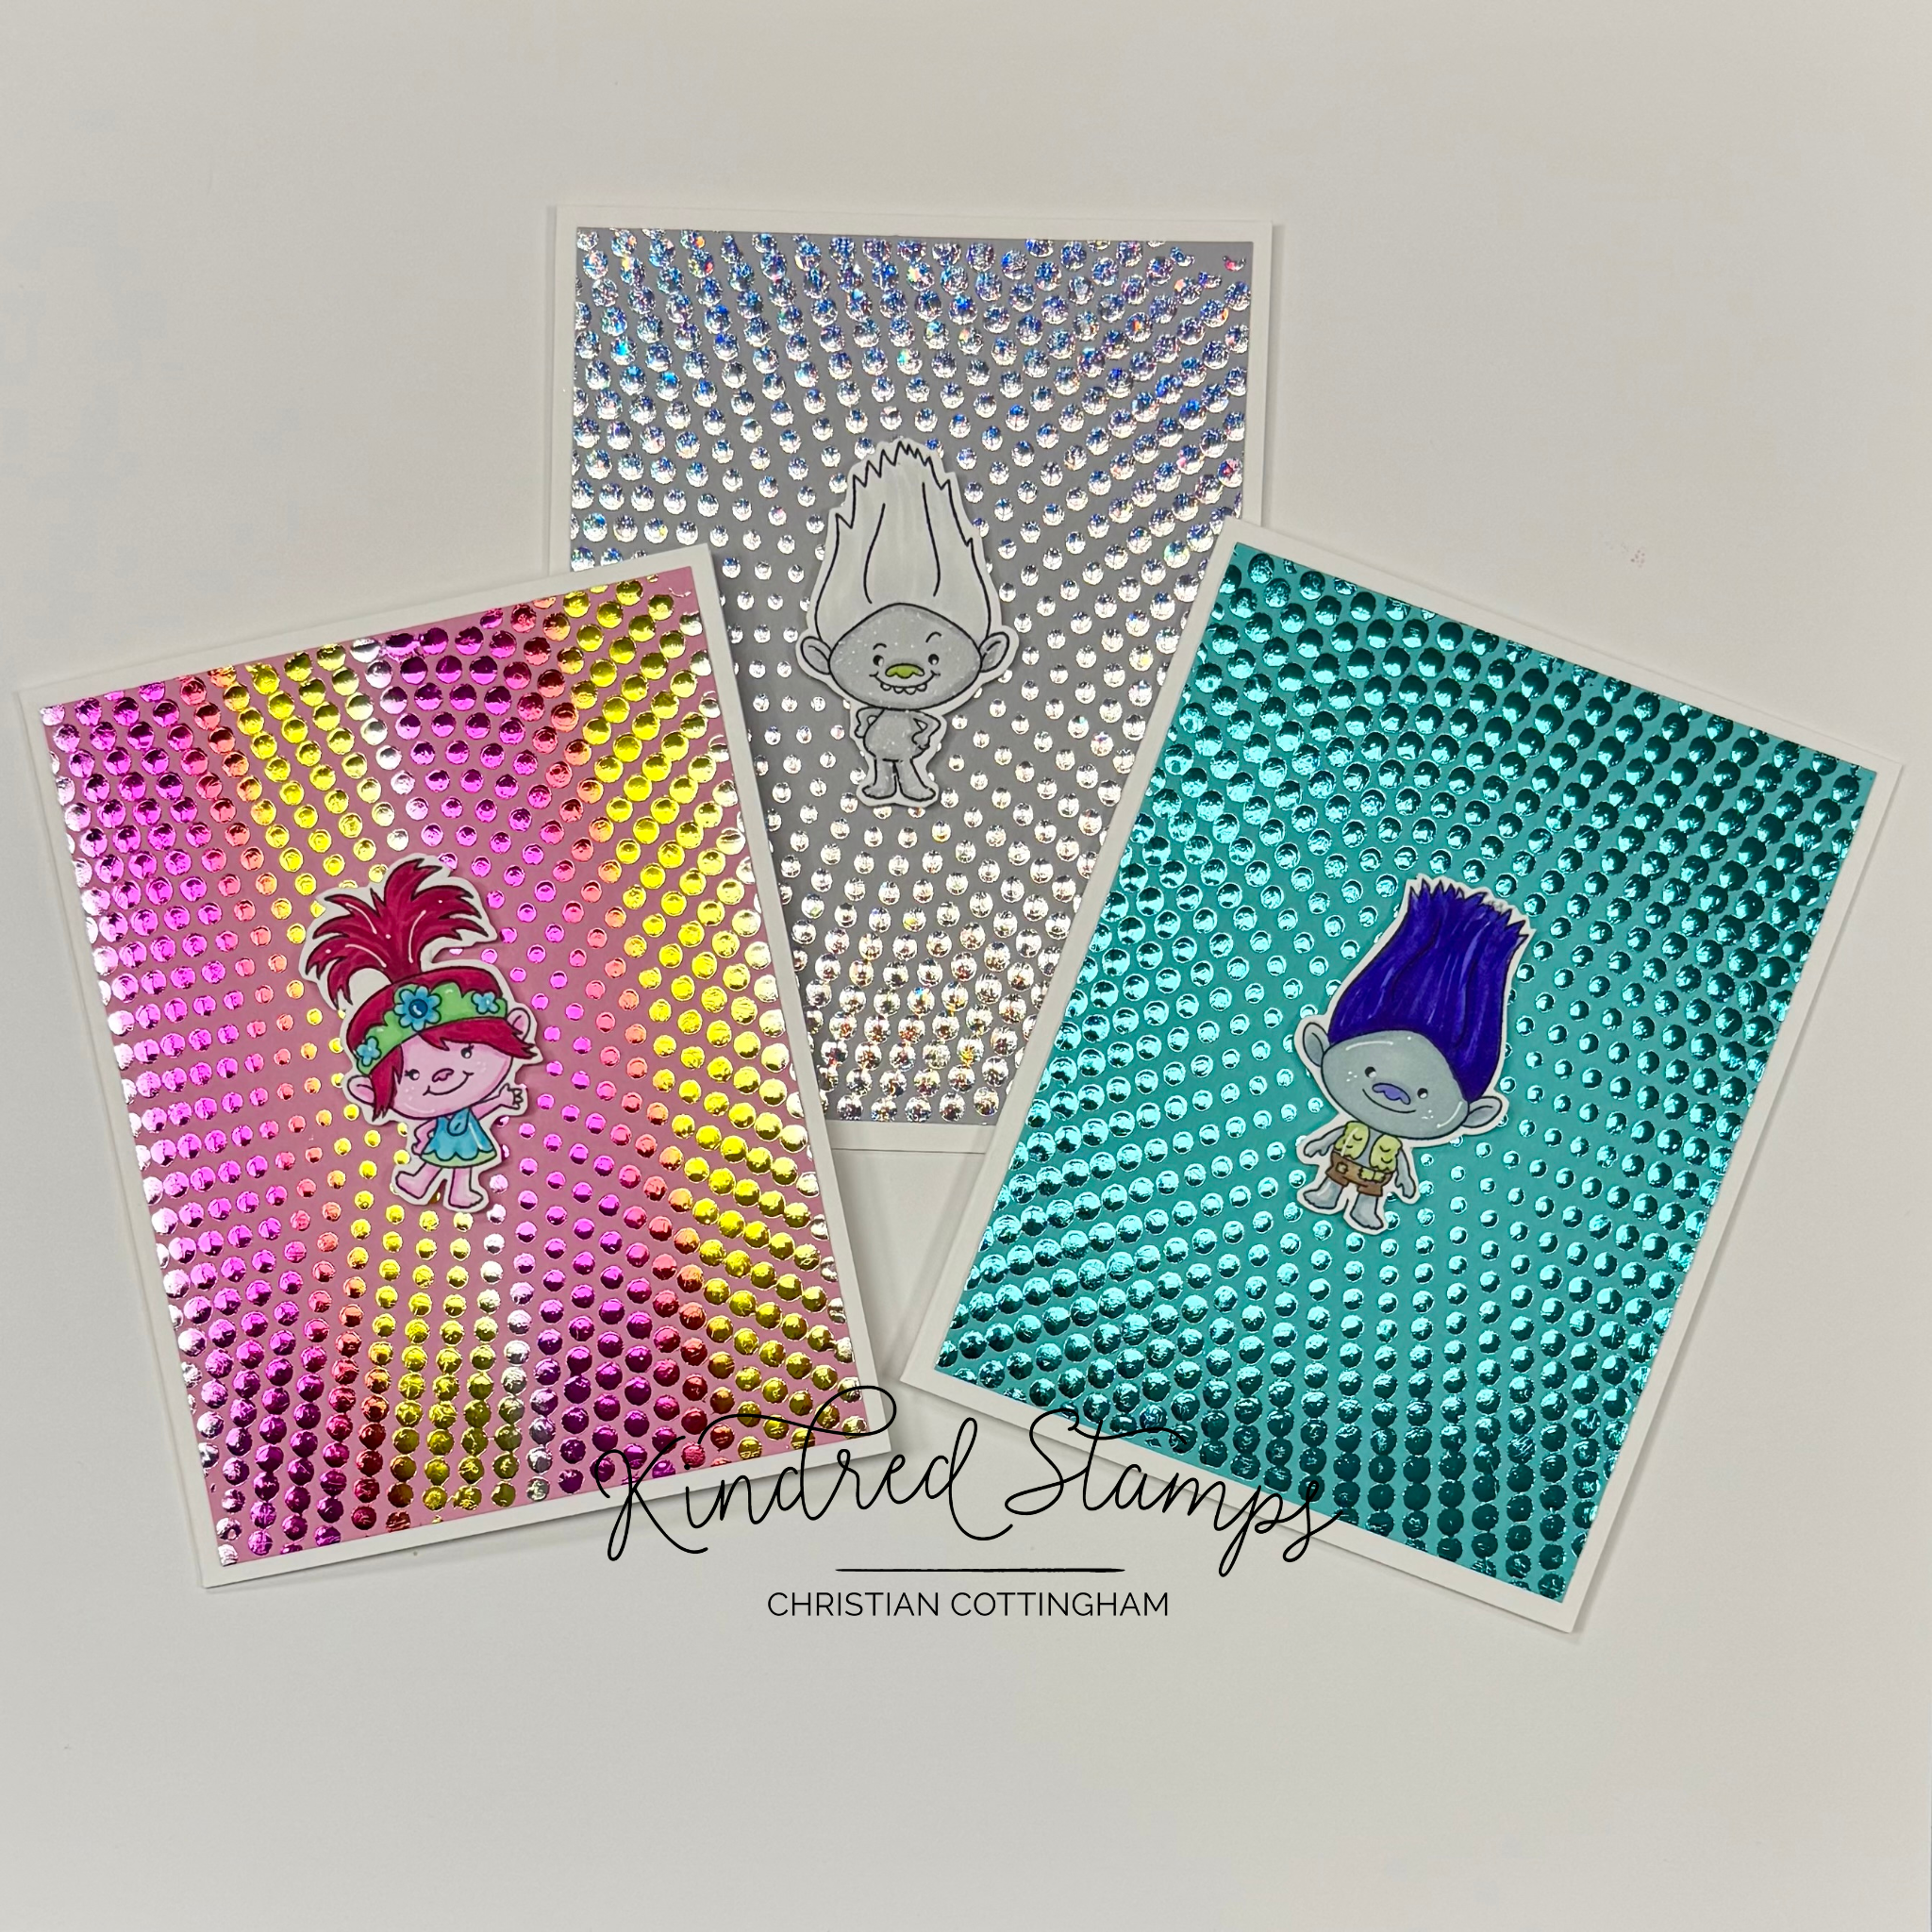
Sparkle Friends, Kindred Stamps
The now sparkling panels were trimmed down to 4 inches by 5.25 inches. The panels were adhered flat to the prepared side-fold card bases. The colored images were placed in the center of the radiating Sparkle Dot Stencil. Finally the sentiment was stamped in the inside panel of the card.
This set of cards will be paired up with matching envelopes and placed in a little box for gift giving.
Card Size: 4.25 inches by 5.5 inches (A2)
The entire Kindred Stamps release will be available this Friday at 8am PST/11am EST. Be sure to subscribe to the Kindred Stamps blog to see a daily line up of sneak peeks from our amazing Design Team! Come join the Fan Club and release event to be part of the release fun, and you may just win some Kindred Stamps credit!!
Coloring Guide:
Pink Girl:
Hair: RV1.7/ RV1.5
Flesh: RV1.2/ RV1.1 (one in RV1.3/ RV1.2)
Headband: G1.4/ G1.2; B2.4/ B2.2; B2.6
Dress: G1.2; B2.4/ B2.2
Blue Boy:
Hair: BV1.7/ BV1.4
Flesh: BG7.3/ BG7.2
Vest: G5.2/ G5.1
Shorts: O7.5/ O7.3
Silver Boy:
Hair: NG1/ NG0
Nose: YG3.4
Body: NG3/ NG1; While gel pen/ Star Dust gel pen
Rainbow Silver Boys:
R2.2/ R2.0; R1.5/ R1.4; OR1.3/ OR1.4; Y2.3/ Y2.2; G1.7/ G1.5; BG2.7/ BG2.5; B2.6; B2.4; V2.6/ V2.4
Rainbow Girl:
Hair: BG1.4/ RV1.3/ Y2.3
Flesh: BV4.4/ BV4.2; R2.2; YG3.2
Jumpsuit: R2.3/ R2.2
Belt: OR1.0
Shoes: NG1
Purse: R2.3/ R2.2
King Boy:
Crown: YO2.5/ YO2.3
Hair: G1.5/ G1.4
Flesh: G5.2/ G5.1
Cape: NG; YG2.3/ G5.3; YO2.3/ YO2.5
T-shirt: NG; R0.5/ R0.4
Shorts: B0.5/ B0.4
Shoes: NG1
Pizza Scene (Altenew Artist Markers)
Wall: WG05/ WG03; WG 01
Booth: R335/ R318
Table: C026/ C025/ C017
Pizza: Y932/ Y821/; Y803; R107
Wood Beams: Y762/ Y932/ Y821
Floor: WG07
Light: C004/ Y106; C013/ C014; Y260/ Y025