Super Family & Super SideKicks: Kindred May Kit
Nothing screams family time like a little family style crime fighting! The limited edition Super Family kit is available now and soon your crime fighting super hero hearts can be making your projects too! The limited edition kit can be ordered from the Kindred Stamps Website.
Now we interrupt this super kit with a PSA…This blog utilizes affiliate links. If you choose to click on the links provided to purchase, you are supporting me as I receive compensation for your purchase. If purchasing is not in your books, no worries, I hope you find inspiration for projects you design. By clicking on the links, you are letting Kindred Stamps know that you like my content and to keep bringing me back. Thanks for your time now lets show off some super powers!
Project One: Baby Bubble
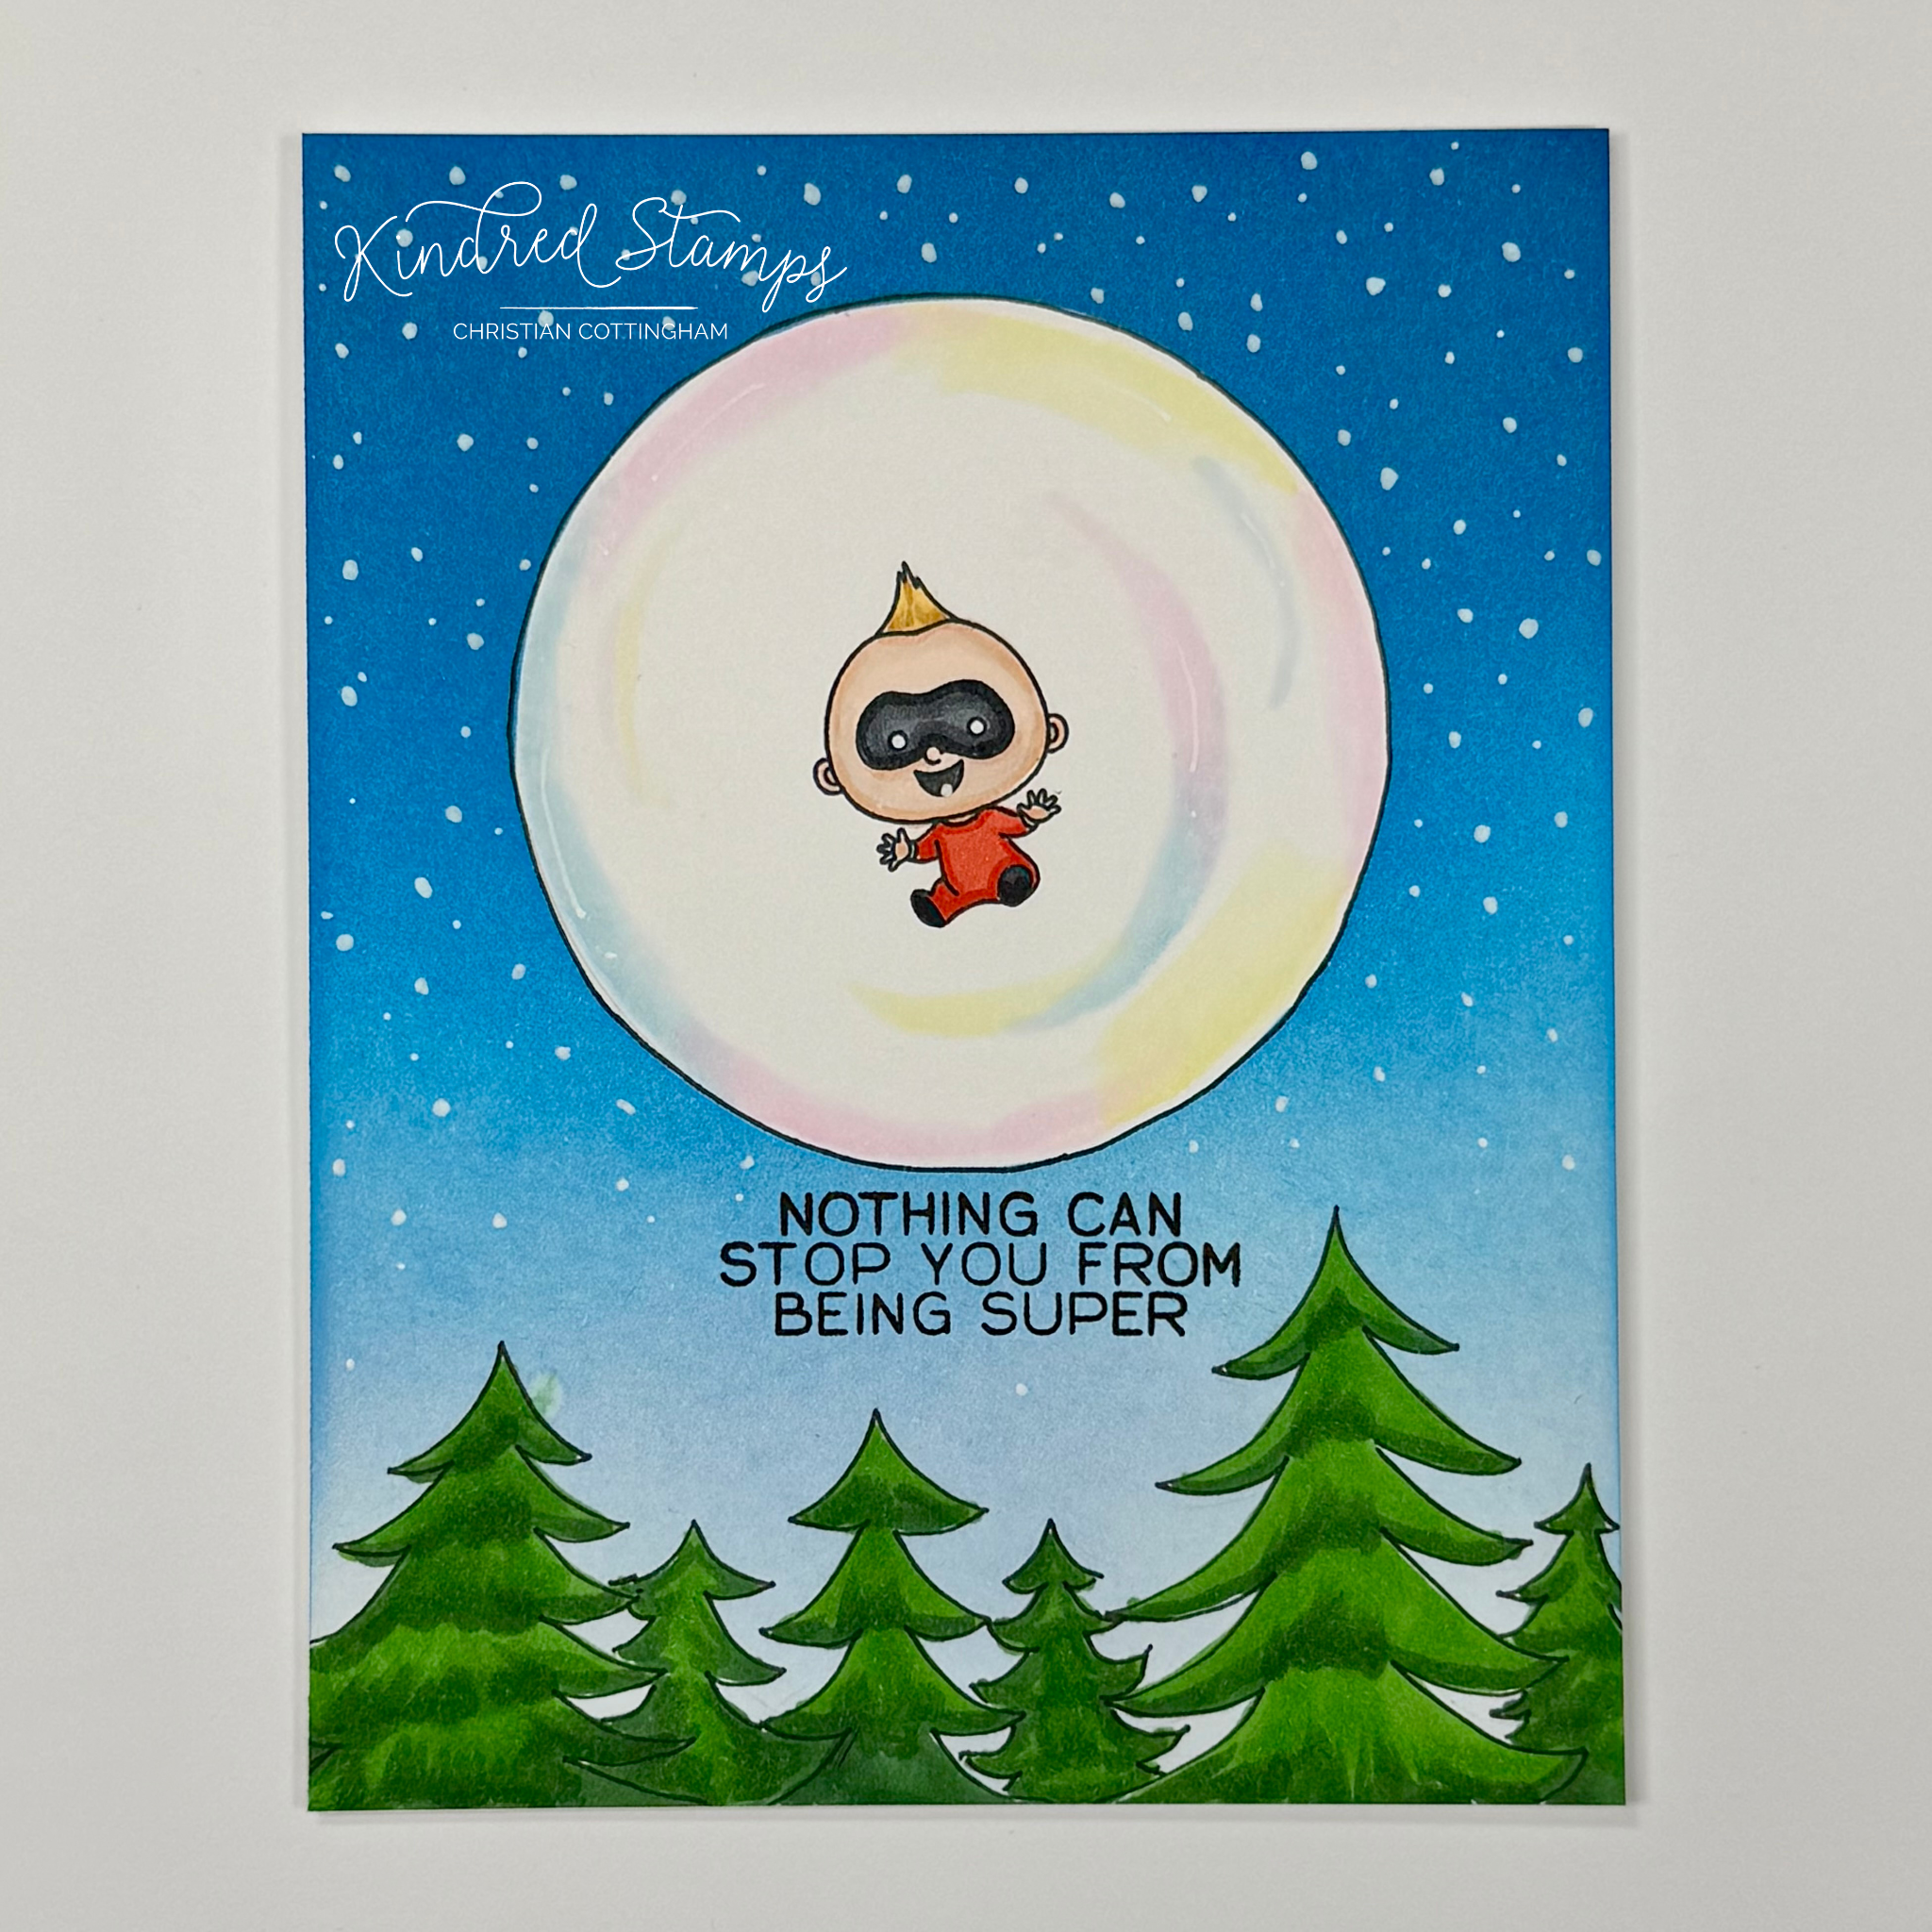
When I saw this little guy in the stamp set I knew instantly that he needed to fly and the means of lift off had to be a bubble! I also wanted the card to be a single panel card. So let’s break it down.
An A2 panel was placed into my stamping platform. The Super Baby was centered in the top-ish middle of the card (technical math there…). He was stamped in alcohol marker safe ink. It was now time to sketch the rest of the card. With the circle from the Card Basic Dies, I traced the outer edge of the die with a pencil. Then I sketched some simple pine trees on the lower portion of the card. These pencil lines were then traced with a fine liner pen and all pencil lines were erased.
On a piece of masking paper, I traced the same circle from the Card Basic Die. The circle was fussy cut out on the line and then applied over the corresponding circle with the Super Baby. The trees were not masked because I knew my sky color was going to be blue. Blue and green are friends on the color wheel so I was not concerned if some of my blending got into the whites of my trees. The panel was inked from top to bottom with the concentration of color being on the top of the card and lighter on the tree line. Using three blues, the ink was blended from top to bottom with each color change stopping before the other ended. Meaning, the first color (Gina K Designs Blue Sky) was blended heaviest at the top and lightest to the tree line. The second blue (Gina K Designs Blue Raspberry) was blended heaviest at the top of the card and lightest to just below the masked circle. Finally, the third blue (Gina K Designs Blue Denim) was applied heaviest at the top and then lightest to the top third of the circle mask. This was repeated again to even out any blemishes.
The circle mask was removed and it was time to do some coloring. The bubble was colored with Olo Markers (B0.2/ RV0.1/ Y0.1/ Zero). The Super Baby was then colored with Olo Markers (See Color Guide Below). Finally, the trees were colored with Olo Markers (YG1.7/ YG1.6).
The sentiment was then stamped in black ink. I debated if I wanted white heat embossing, but decided on the black ink because my bubble, trees, and stamped image had a black line. To finish the card panel, the white gel pen got a workout. Lots of stars were dotted and highlights applied to the bubble and the Super Baby’s tooth.
With everything in place, it was time to adhere my finished panel to an A2 card base. My Super Baby was flying the sky’s in his own bubble and I couldn’t adore it more!
Card Size: 5.5 inches by 4.25 inches (A2)
Project Two: Super Shaker
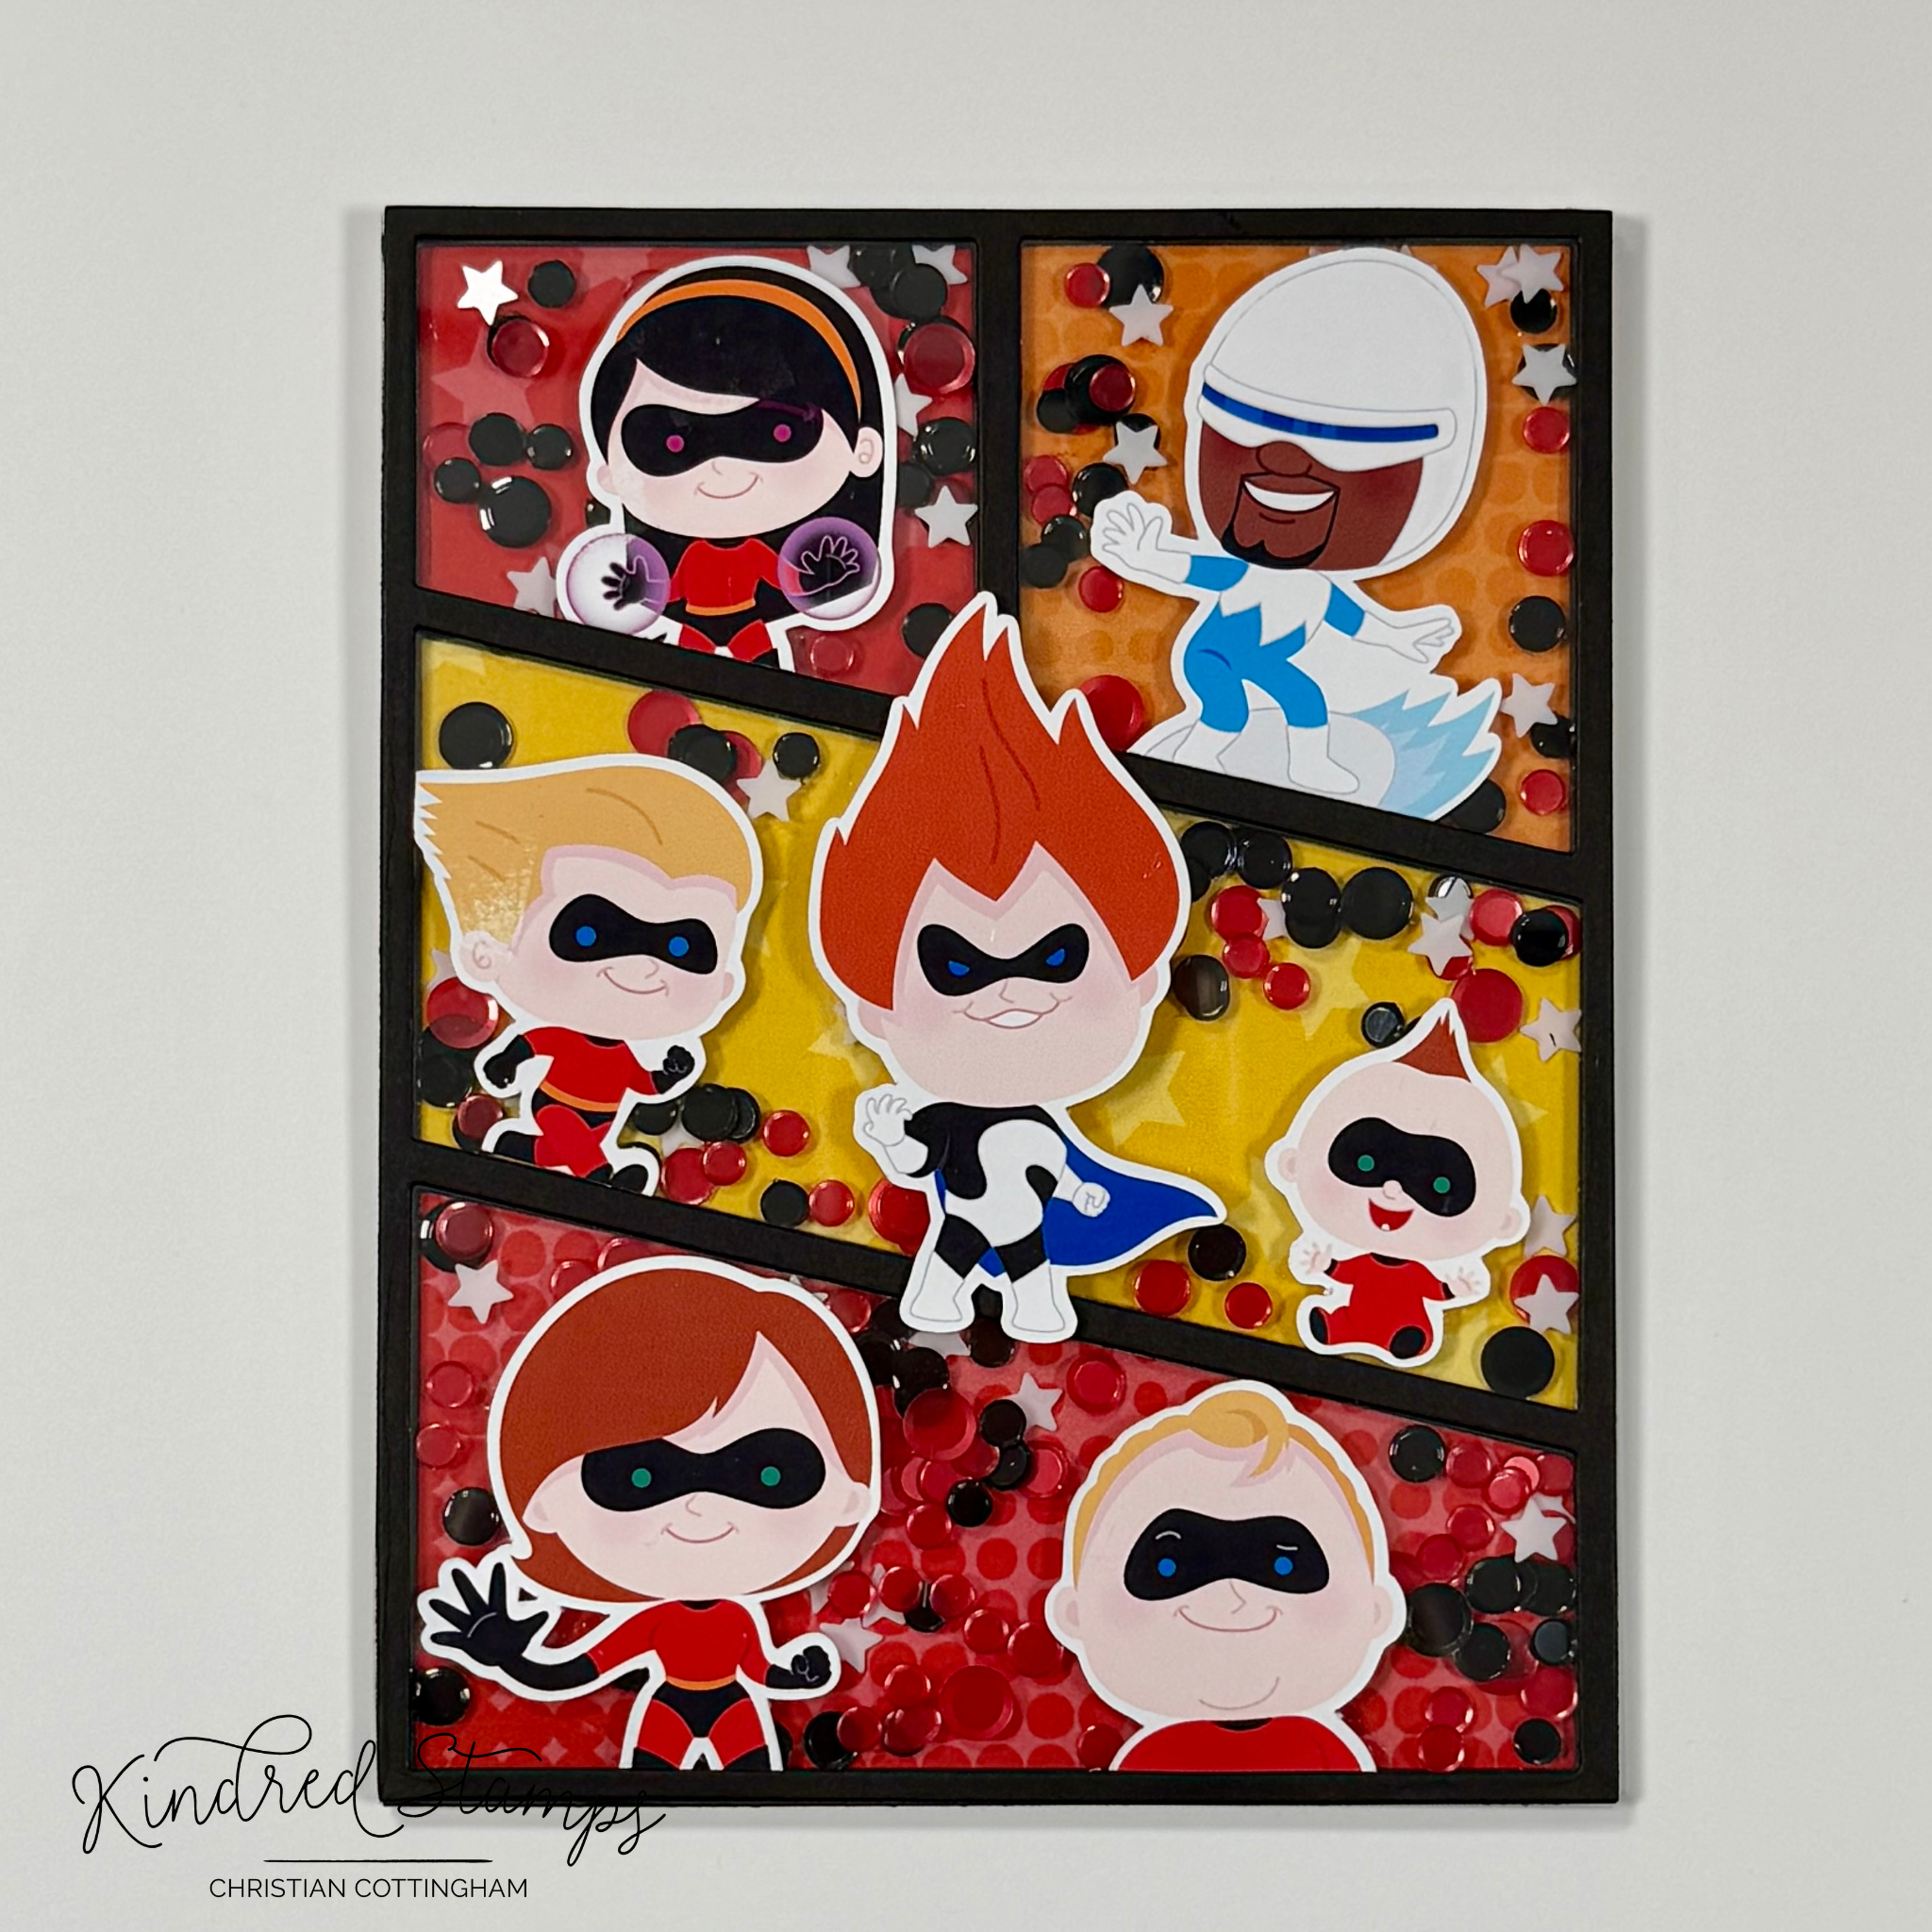
How can you not make a shaker card when you instantly see a frame?? To boot, the card comes together so quickly because of the Super Family Die Cuts that come in the kit… NO COLORING!! Let’s break it down…
The cover plate die from the kit was die cut 5 times from black cardstock. Four of the die cuts were glued together and set aside to dry. This will be the walls for the shaker cards. The fifth die cut will be used as a guide and then later used as the top to the shaker. But I am ahead of my self…
The cover plate die was then cut three pieces of pattern paper from the Power Paper Pack. The negatives from the cover plate will be put to use for this card. The die cuts were saved for another project. An A2 card base was prepped and the sentiment “Hope your birthday is super- cape or no cape” was stamped inside the card base.
Using the fifth black frame as a guide, the pattern paper negatives were paper pieced into the sections of the die cut frame. The die cut was then removed leave the pattern paper in the perfect positioning on the card base. The stacked cover plate die cuts were then adhered to the card base by centering over the pattern paper pieces. This method was used because of the sheer thickness of the walls of the shaker. Less chance I would get sticky stuff on the shaker walls.
A piece of acetate was cut down to an A2 size. The final black cover plate die cut was glued to one side of the acetate and set aside to dry while picking out the die cuts and layout that fit almost all of the characters. The pre-colored die cuts were trimmed to fit in the windows and adhered with liquid glue with the exception of the villain who had thin foam tape applied to his backside.
It was time to fill the shaker. The sequin pack from the kit was then sprinkled into each window of the cover plate die on the prepared card base. Glue was then applied to the die cut shaker wells and the acetate decorated topper was centered over the base. This was allowed to dry completely before the villain was adhered.
This shaker took no time at all by using the pre-colored die cuts! If you wanted to mass produce this card, you don’t have to make a shaker. Utilize the all the negative die cut pattern paper in different arrangements and add the colored die cuts and accents in each of the windows with some sequences. This would be cheaper for mailing and still will look super!
Card Size: 5.5 inches by 4.25 inches (A2)
Project Three: Father’s Day
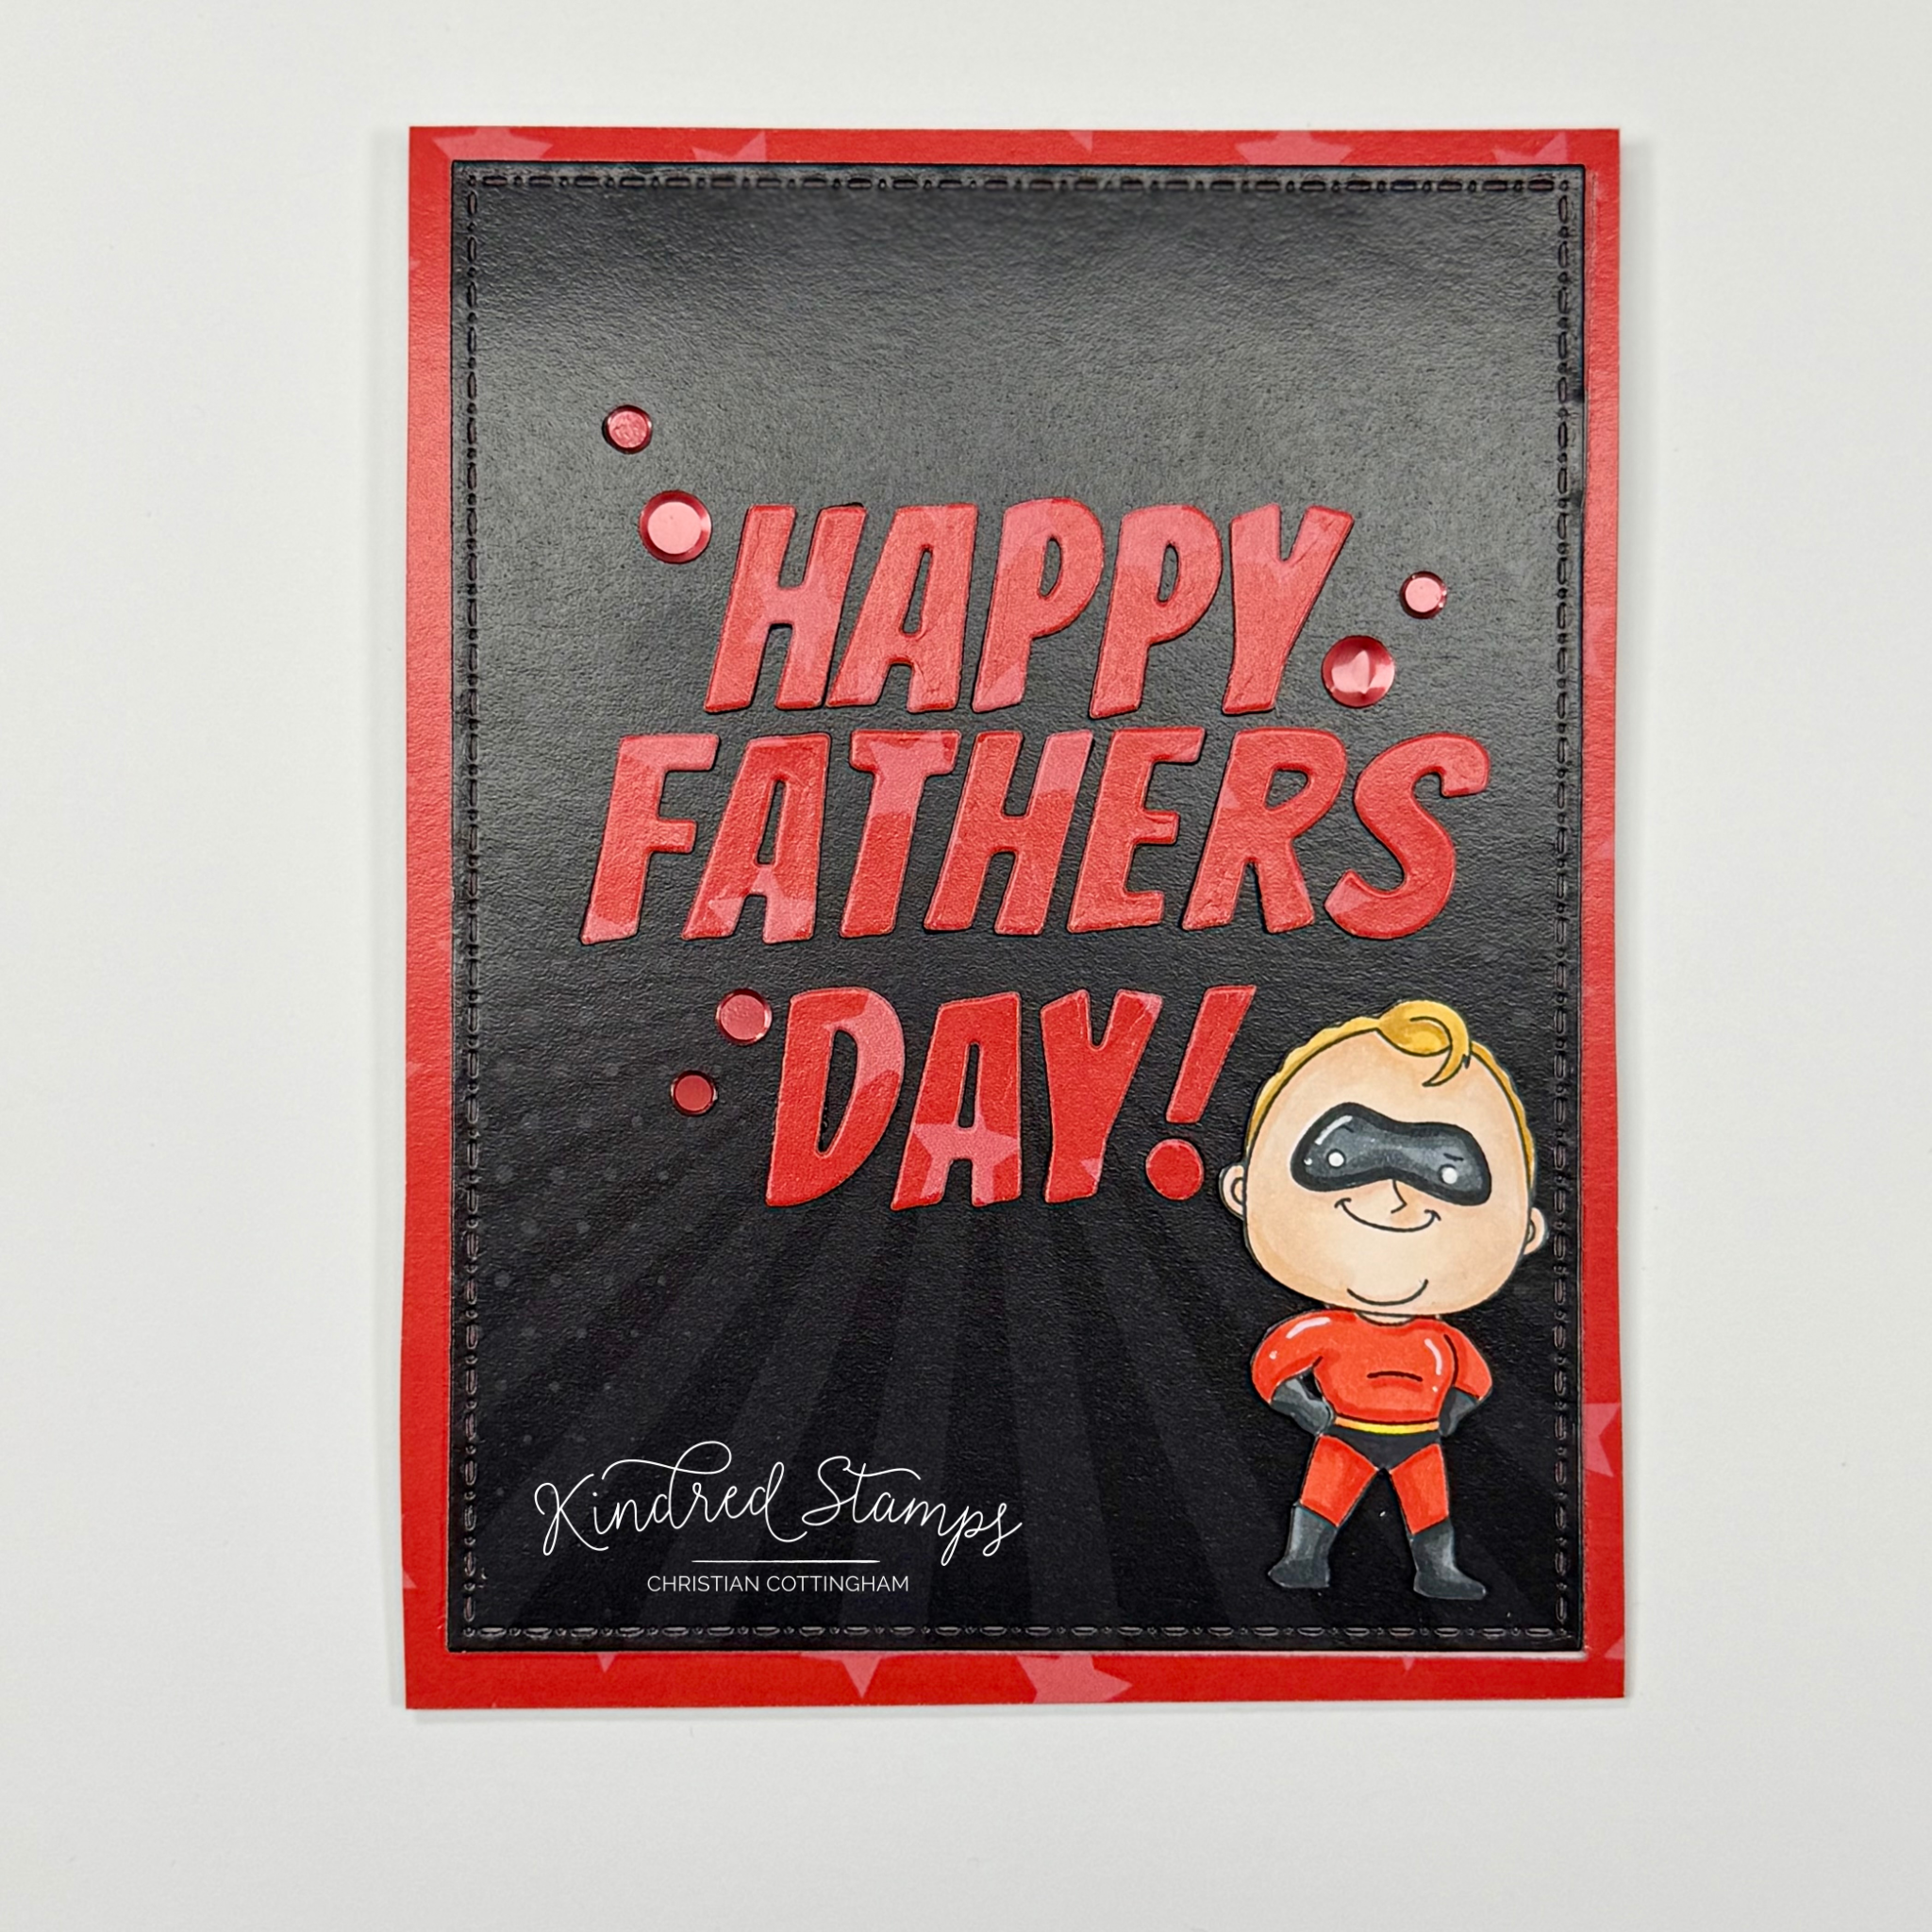
What a great way to wish a happy father's day to a super dad! This card was a breeze to come together with the supplies from the kit and one other staple die. Let’s break it down!
The Super Dad was stamped in alcohol safe ink and colored with Olo Markers (See Color Guide). He was then cut out on the line and edged with a black fine liner brush marker. A piece of thin foam tape was applied to the back and the dad was set aside.
A piece of pattern paper from the Power Paper was selected for both the front and the backside properties. Knowing that I wanted the burst to come from the center of the soon to be sentiment, the piece had to be cut first. Using the Card Basic Dies large rectangle, I cut from the center of the pattern paper. Thin foam tape was applied to the back of this panel. The remaining pattern cardstock was then flipped so the red side was facing up. The pattern paper was centered and adhered to a prepared A2 card base (5.5 inches by 4.25 inches). The excess paper was then trimmed off with scissors. These scraps were saved for something I am sure. The foam taped rectangle panel was centered over the big white empty spot on the card base and smooshed down. The panel was set aside to do some die cutting.
Pulling out the super alphabet dies, the word Happy Fathers Day was die cut from black cardstock three times, and from a piece of same pattern paper as the background. These letters were all stacked and glued together. Using the grid on my Glass Craft Mat, the letters were lined up and a piece of low tack tape was applied to the top of the letters as a group. Liquid glue was applied to each letter. The entire letter unit was then centered on the card base and the low tack tape was pressed onto the card base until the glue had dried.
Once dry, the low tack tape was removed and the Super Dad was adhered to the lower left hand side of the card. Using the sequence from the kit, the red sequins were placed in a grouping around the sentiment to give an accent to draw the eye in.
Finally, the sentiment, “You don’t need a super suit to be my hero” was stamped in the inside of the finished card. Perfect sentiment to celebrate the dad/ father- figures in your life.
Card Size: 5.5 inches by 4.25 inches (A2)
Project Four: Super Birthday
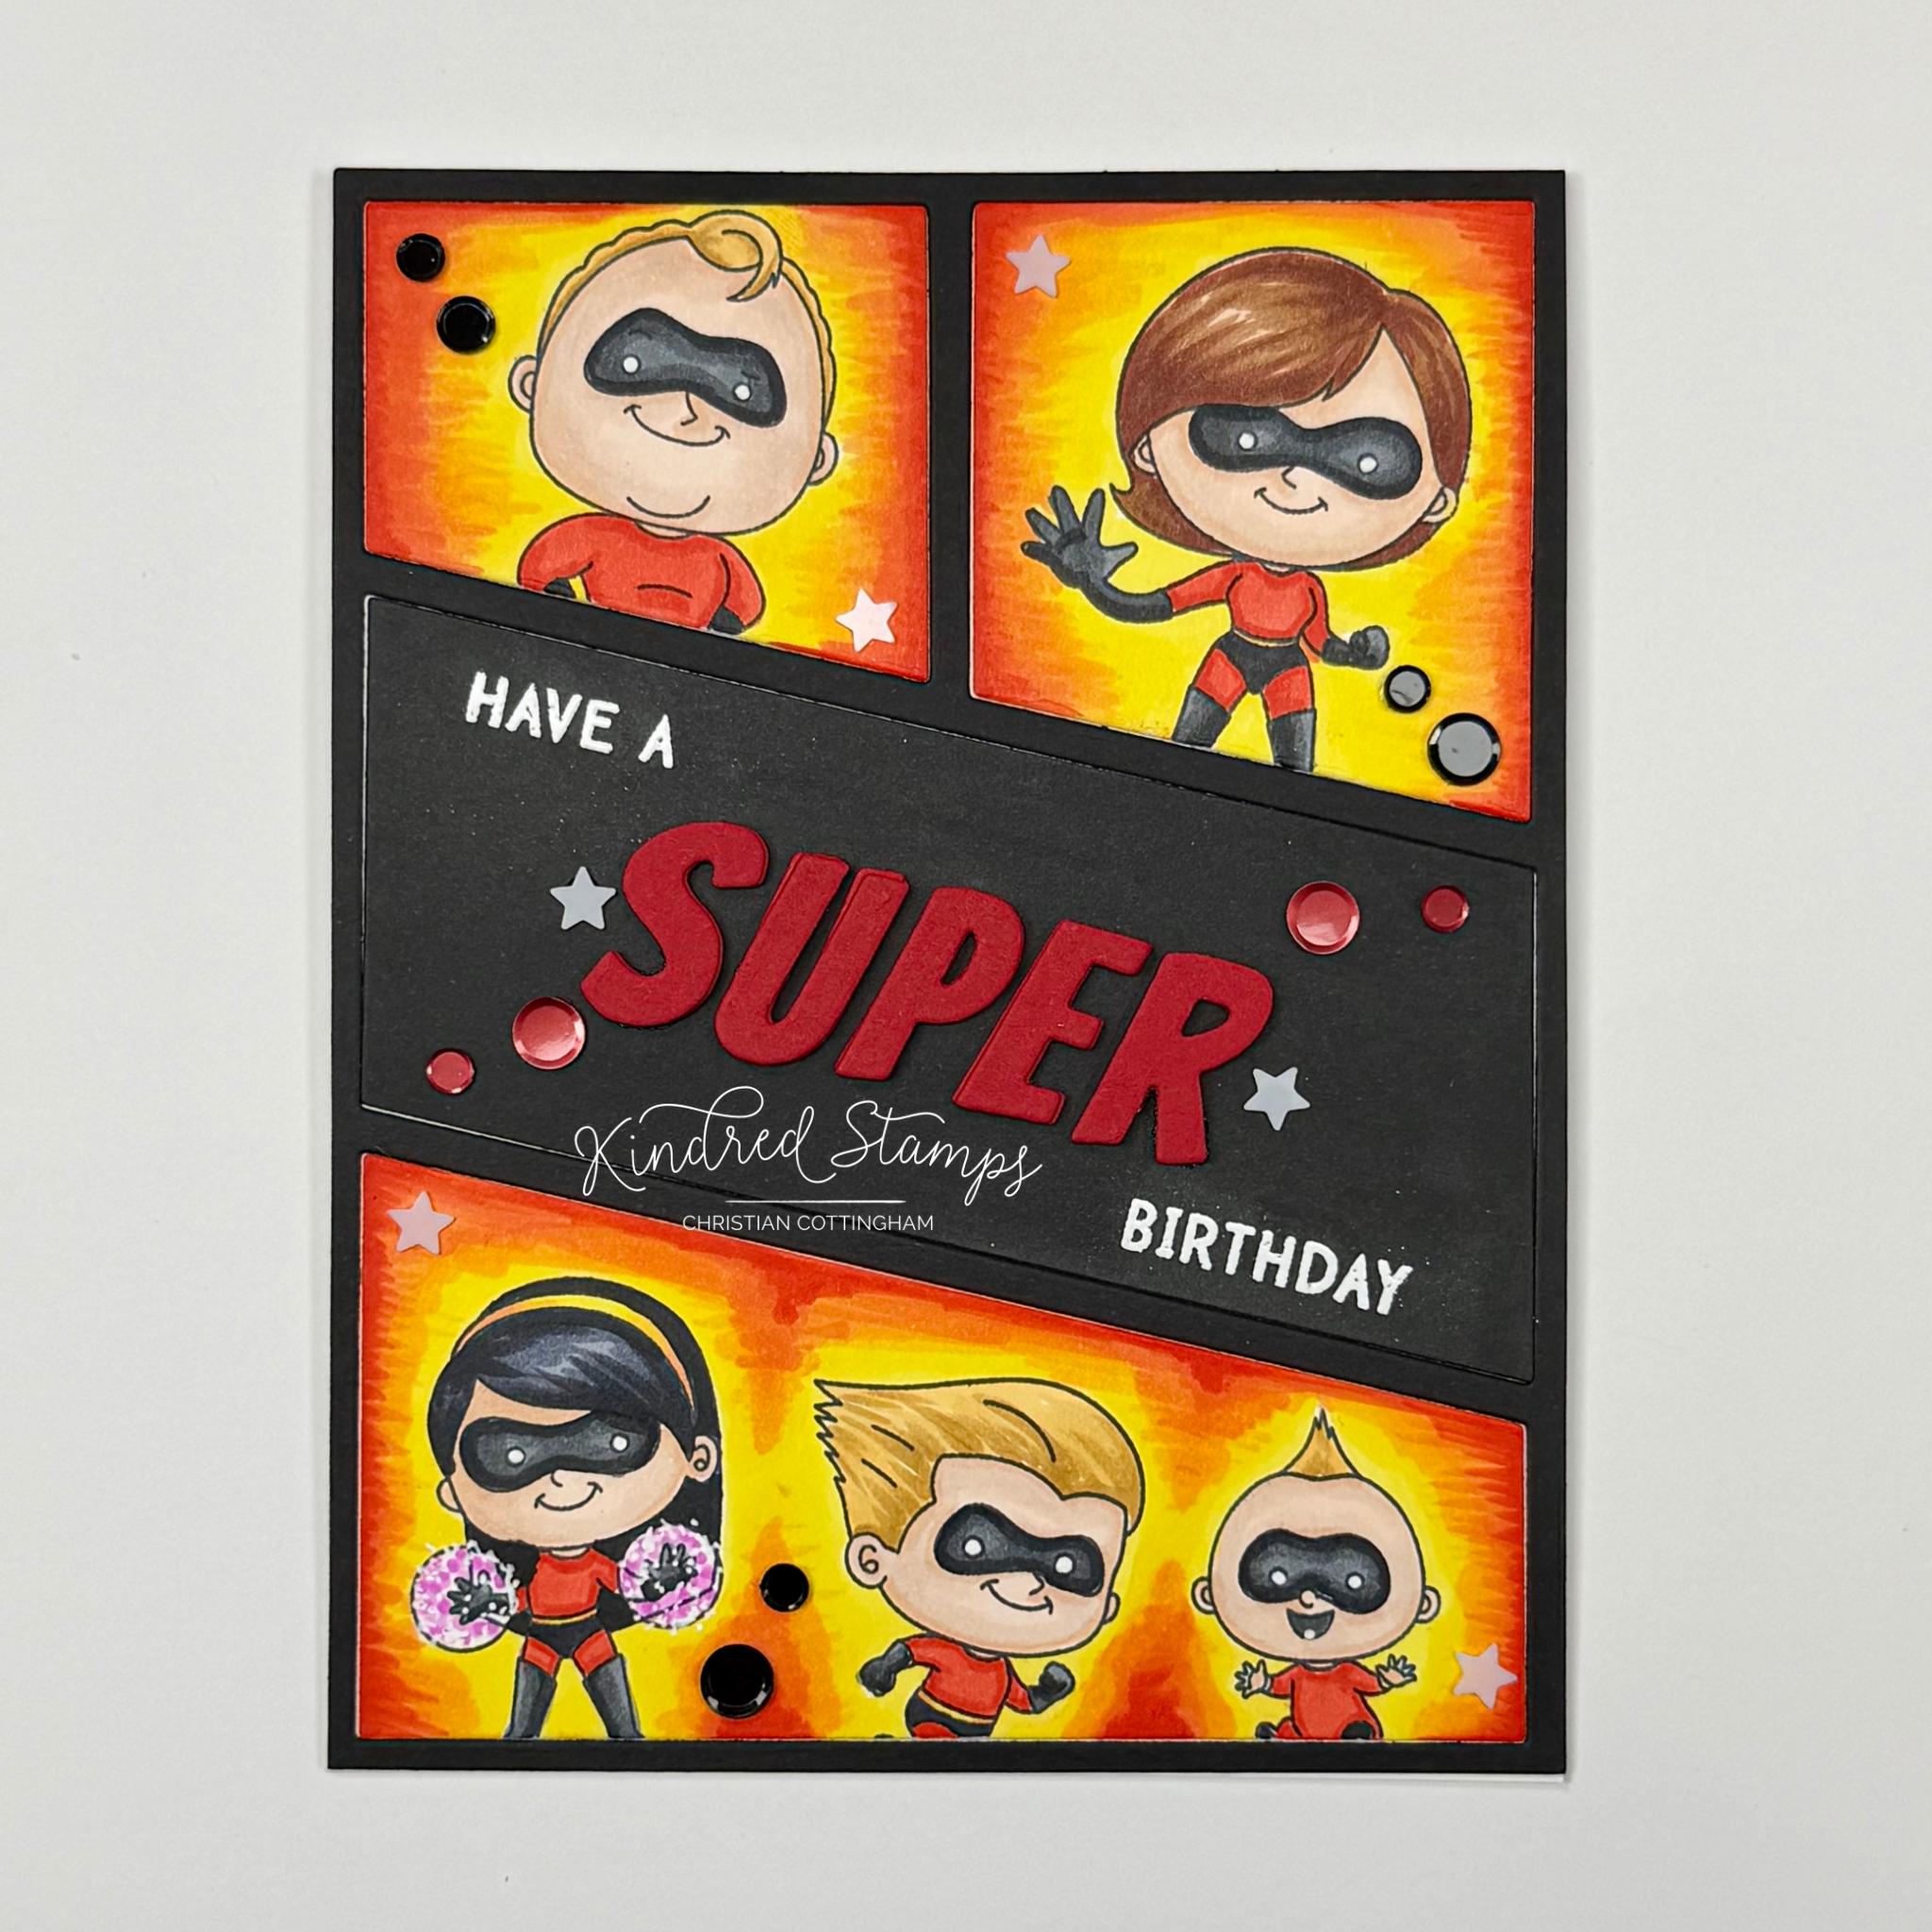
The Super Family has their signature color so why not show it off?? This birthday card shows each family member in a fun graphic design! Let’s break it down.
The cover plate die provides all the geometrical pieces needed for this card. The cover plate die was cut from black card stock, and white card stock. The negative pieces will be inlaid into the cover plate die cut. Keep the center black panel, and the two top and the bottom panels from the white cardstock. On the white negative pieces, the Super Dad was stamped on the smallest top panel and the Super Mom on the larger panel. The Super Daughter, Super Son, and Super Baby were stamped on the bottom white panel.
Since I was stamping, the pulled the sentiment “ Have a super birthday” and positioned it on the top left angle of the black cardstock negative. The panel was prepared with an antistatic tool, and the sentiment was partially masked to only have “have a” exposed. This was inked with embossing ink. The sentiment stamp was cleaned and then placed on the lower right side of the panel. Partial mask was again applied and “birthday” was inked with embossing ink. The panel then was sprinkled with Snowfall embossing powder and heat set. The antistatic powder was buffed when he panel was cooled.
The word “SUPER” was die cut three times from red cardstock utilizing the alphabet dies in the kit. These were stacked and glued together. Using the grid on my Craft Glass Mat, the sentiment was lined up and with low tack tape, the letters were picked up and glue applied to the back of the letters. Finally, the word super was applied to the black panel and this was set aside to dry.
The white stamped panels were up next for coloring. The backgrounds were colored first on each of the panels. This was a conscious choice because I wanted the yellow to stay vibrant and did not want to risk touching the red from the suits and dragging it into the yellow. For the backgrounds, Olo Markers were blended from yellow to red with Y1.2/ OR1.3/ R0.4/ and R0.5. With the backgrounds complete, each of the images were then colored with Olo Markers and white gel pen accents (See Color Guide Below).
It was now time to assemble the card. An A2 card base was prepped. The black cover plate die cut was glued to the card base. Each panel was then glued into the respective gap. The sequins from the kit was placed on the contrasting colored areas (red on the black… black on the red). This family signature colors show off each member perfectly!
Card Size: 5.5 inches by 4.25 inches (A2)
Project Five: Save the Cake
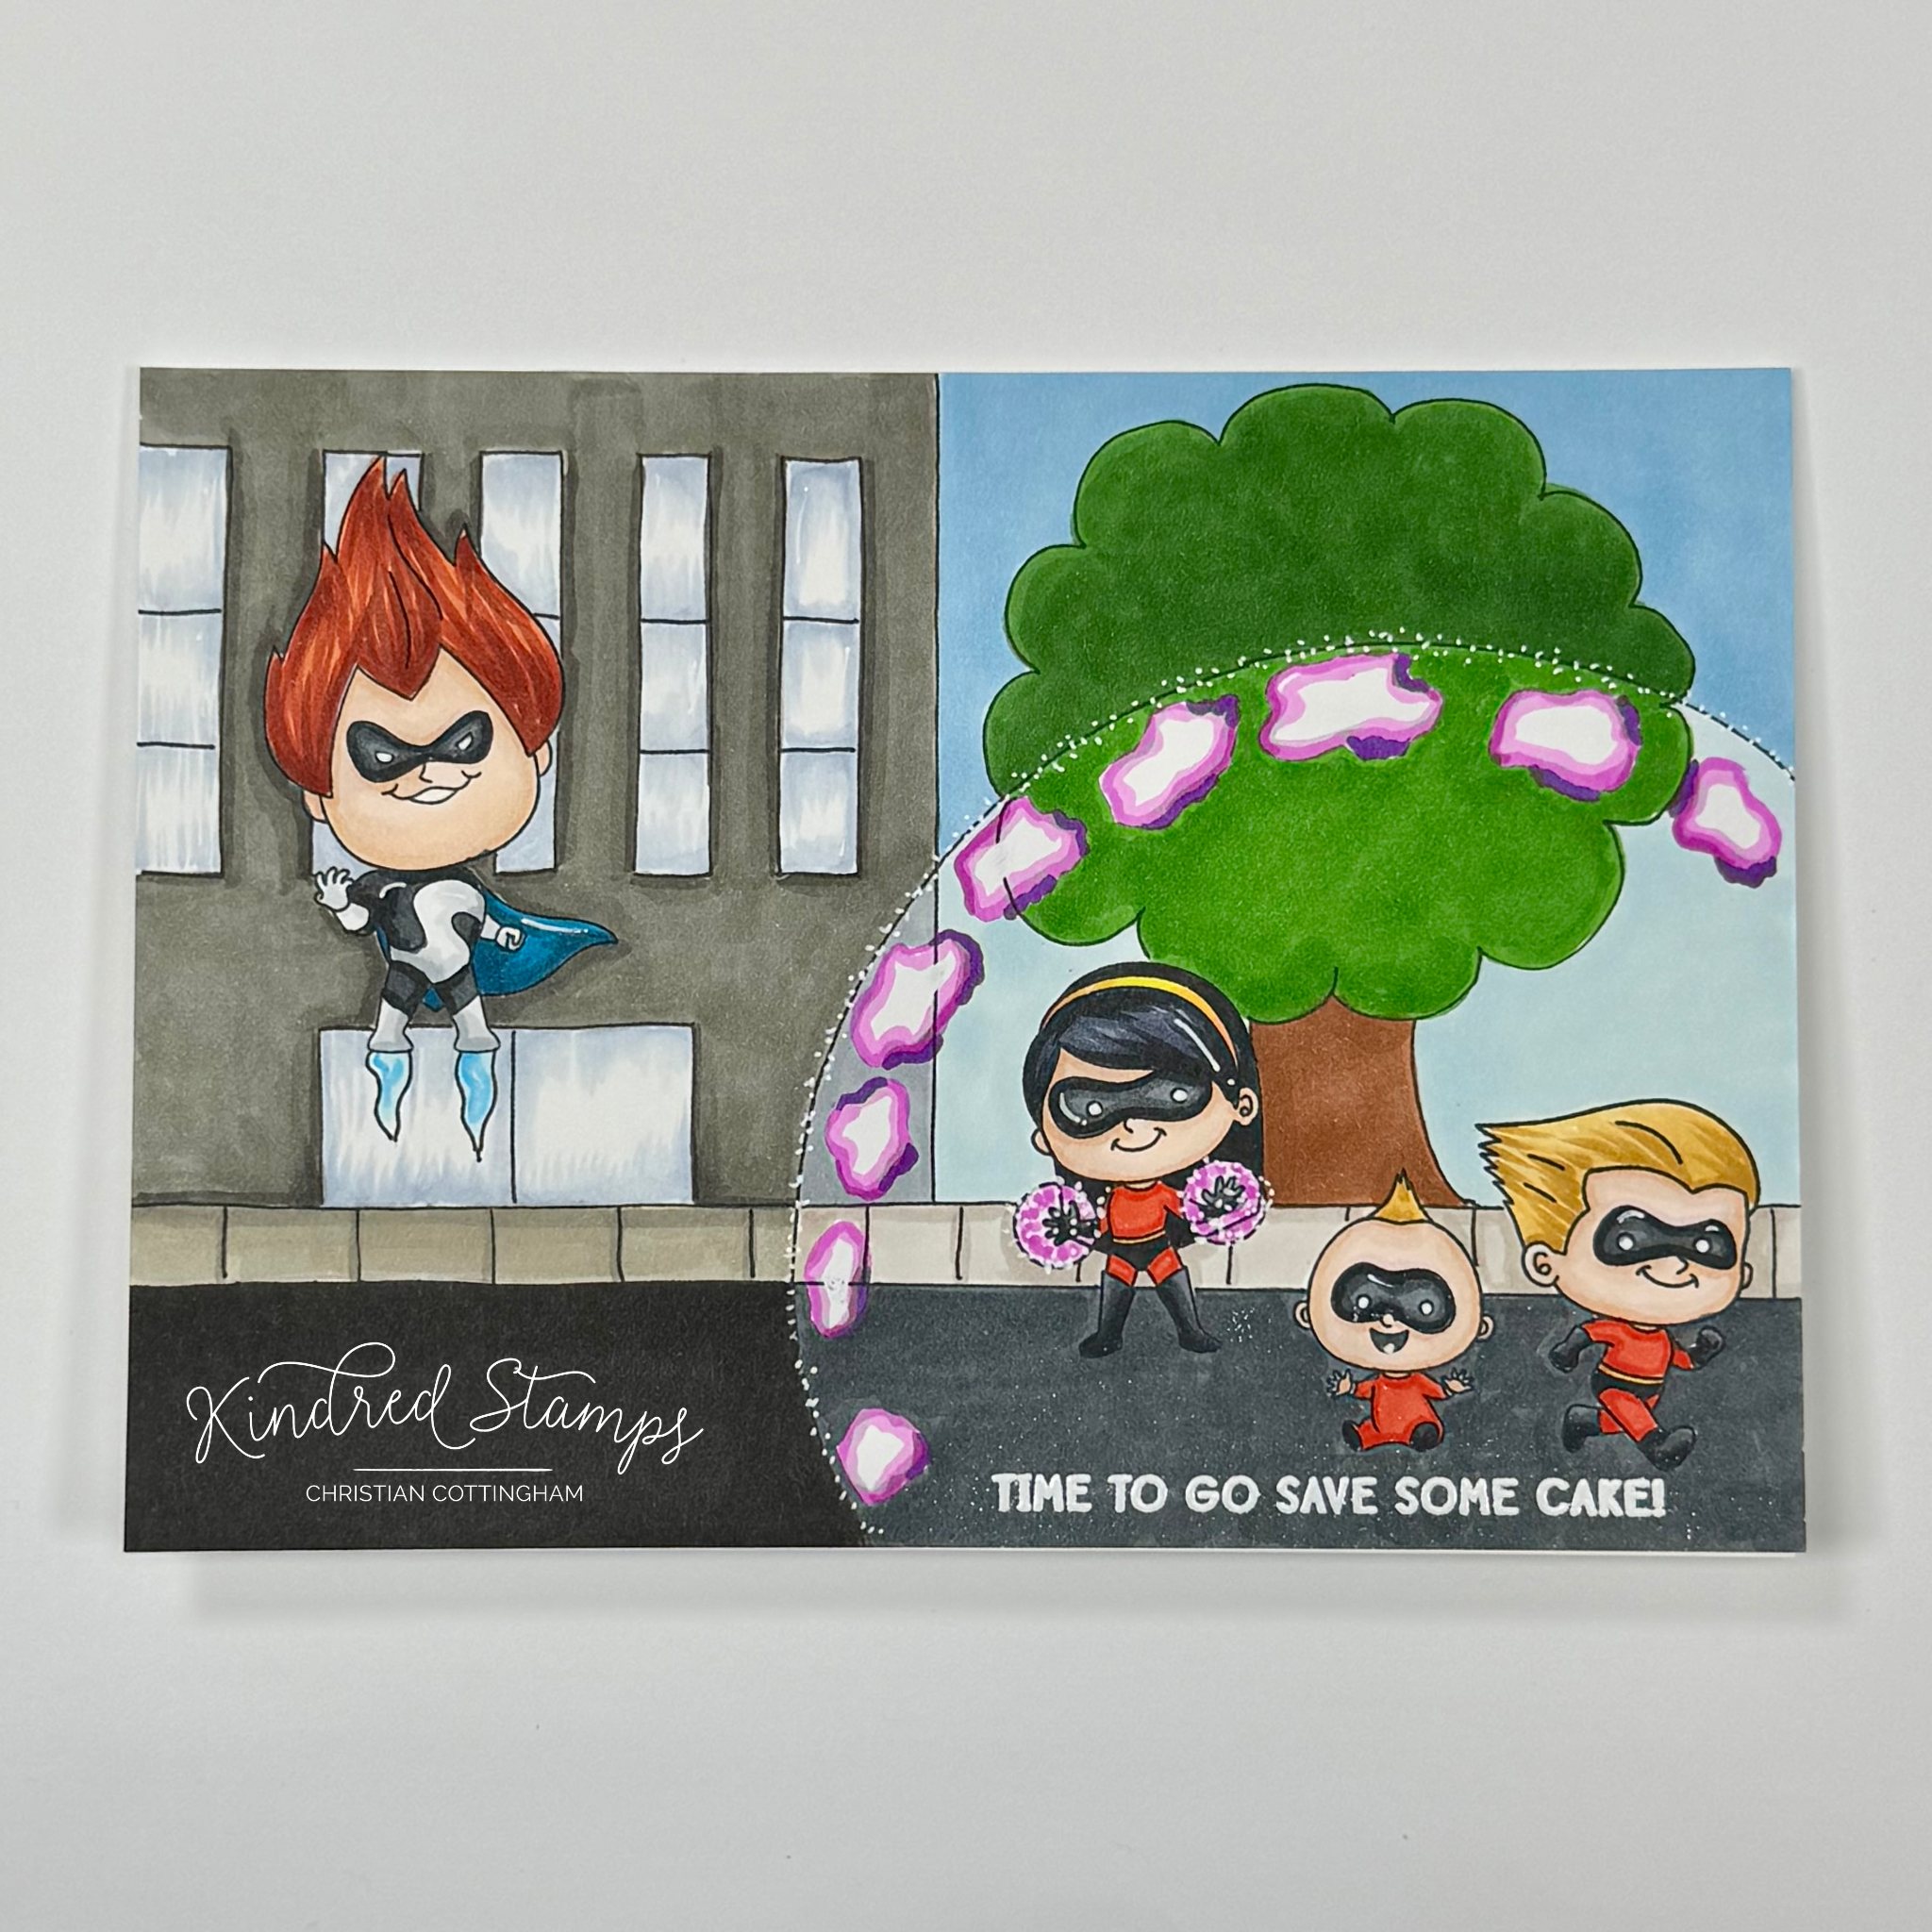
If you have super powers one must have priorities…SAVE THE CAKE!! This card showcases the Villain and the three super kids in an epic battle. Let’s breakdown how this single layer card was made.
On a piece of cardstock was trimmed to 5 by 7 inches (A7) panel. The Villain and the three siblings were stamped in alcohol marker safe ink. With a pencil the remaining scene was sketched and then outlined in a fine liner marker. All pencil lines were then erased.
With the card panel now looking like a color book page, it was time to color in the scene. The coloring was done in two different tones to give the illusion of the force field. The Villain, Super Daughter, Super Son, and Super Baby were colored with Olo Markers (See Color Guide below). The steam on the Villain’s feet were colored with Olo Markers B1.5/ B1.1/ Zero.
The scene outside the force field was colored with Altenew Artist Markers: Sky (B001); Tree (G245); Building (CG01/ Zero/ TG03/ TG05); Sidewalk (TG02/ TG03); Road (TG08/ TG07). Whereas the force field scene was colored with Olo Markers: Blobs (V2.6/ V0.6/ V0.3); Sidewalk (WG3/ WG1); Road (NG7); Tree (OR7.6/ YG1.6); Sky (B4.1).
The alcohol marker coloring was allowed to dry completely. The panel was then prepped with an antistatic tool and the sentiment was stamped with embossing ink. Snowfall Embossing Powder was applied and heat set. The colored panel was then adhered flat to an A7 card base. The white gel pen was the last hero on this card. To give the illusion of shimmer and warping, the white gel pen was stippled around and on the drawn black line of the force field.
The card was finally complete and fingers crossed the cake was saved!
Card Size: 5 inches by 7 inches (A7)
Project Six: Twist Pop Birthday
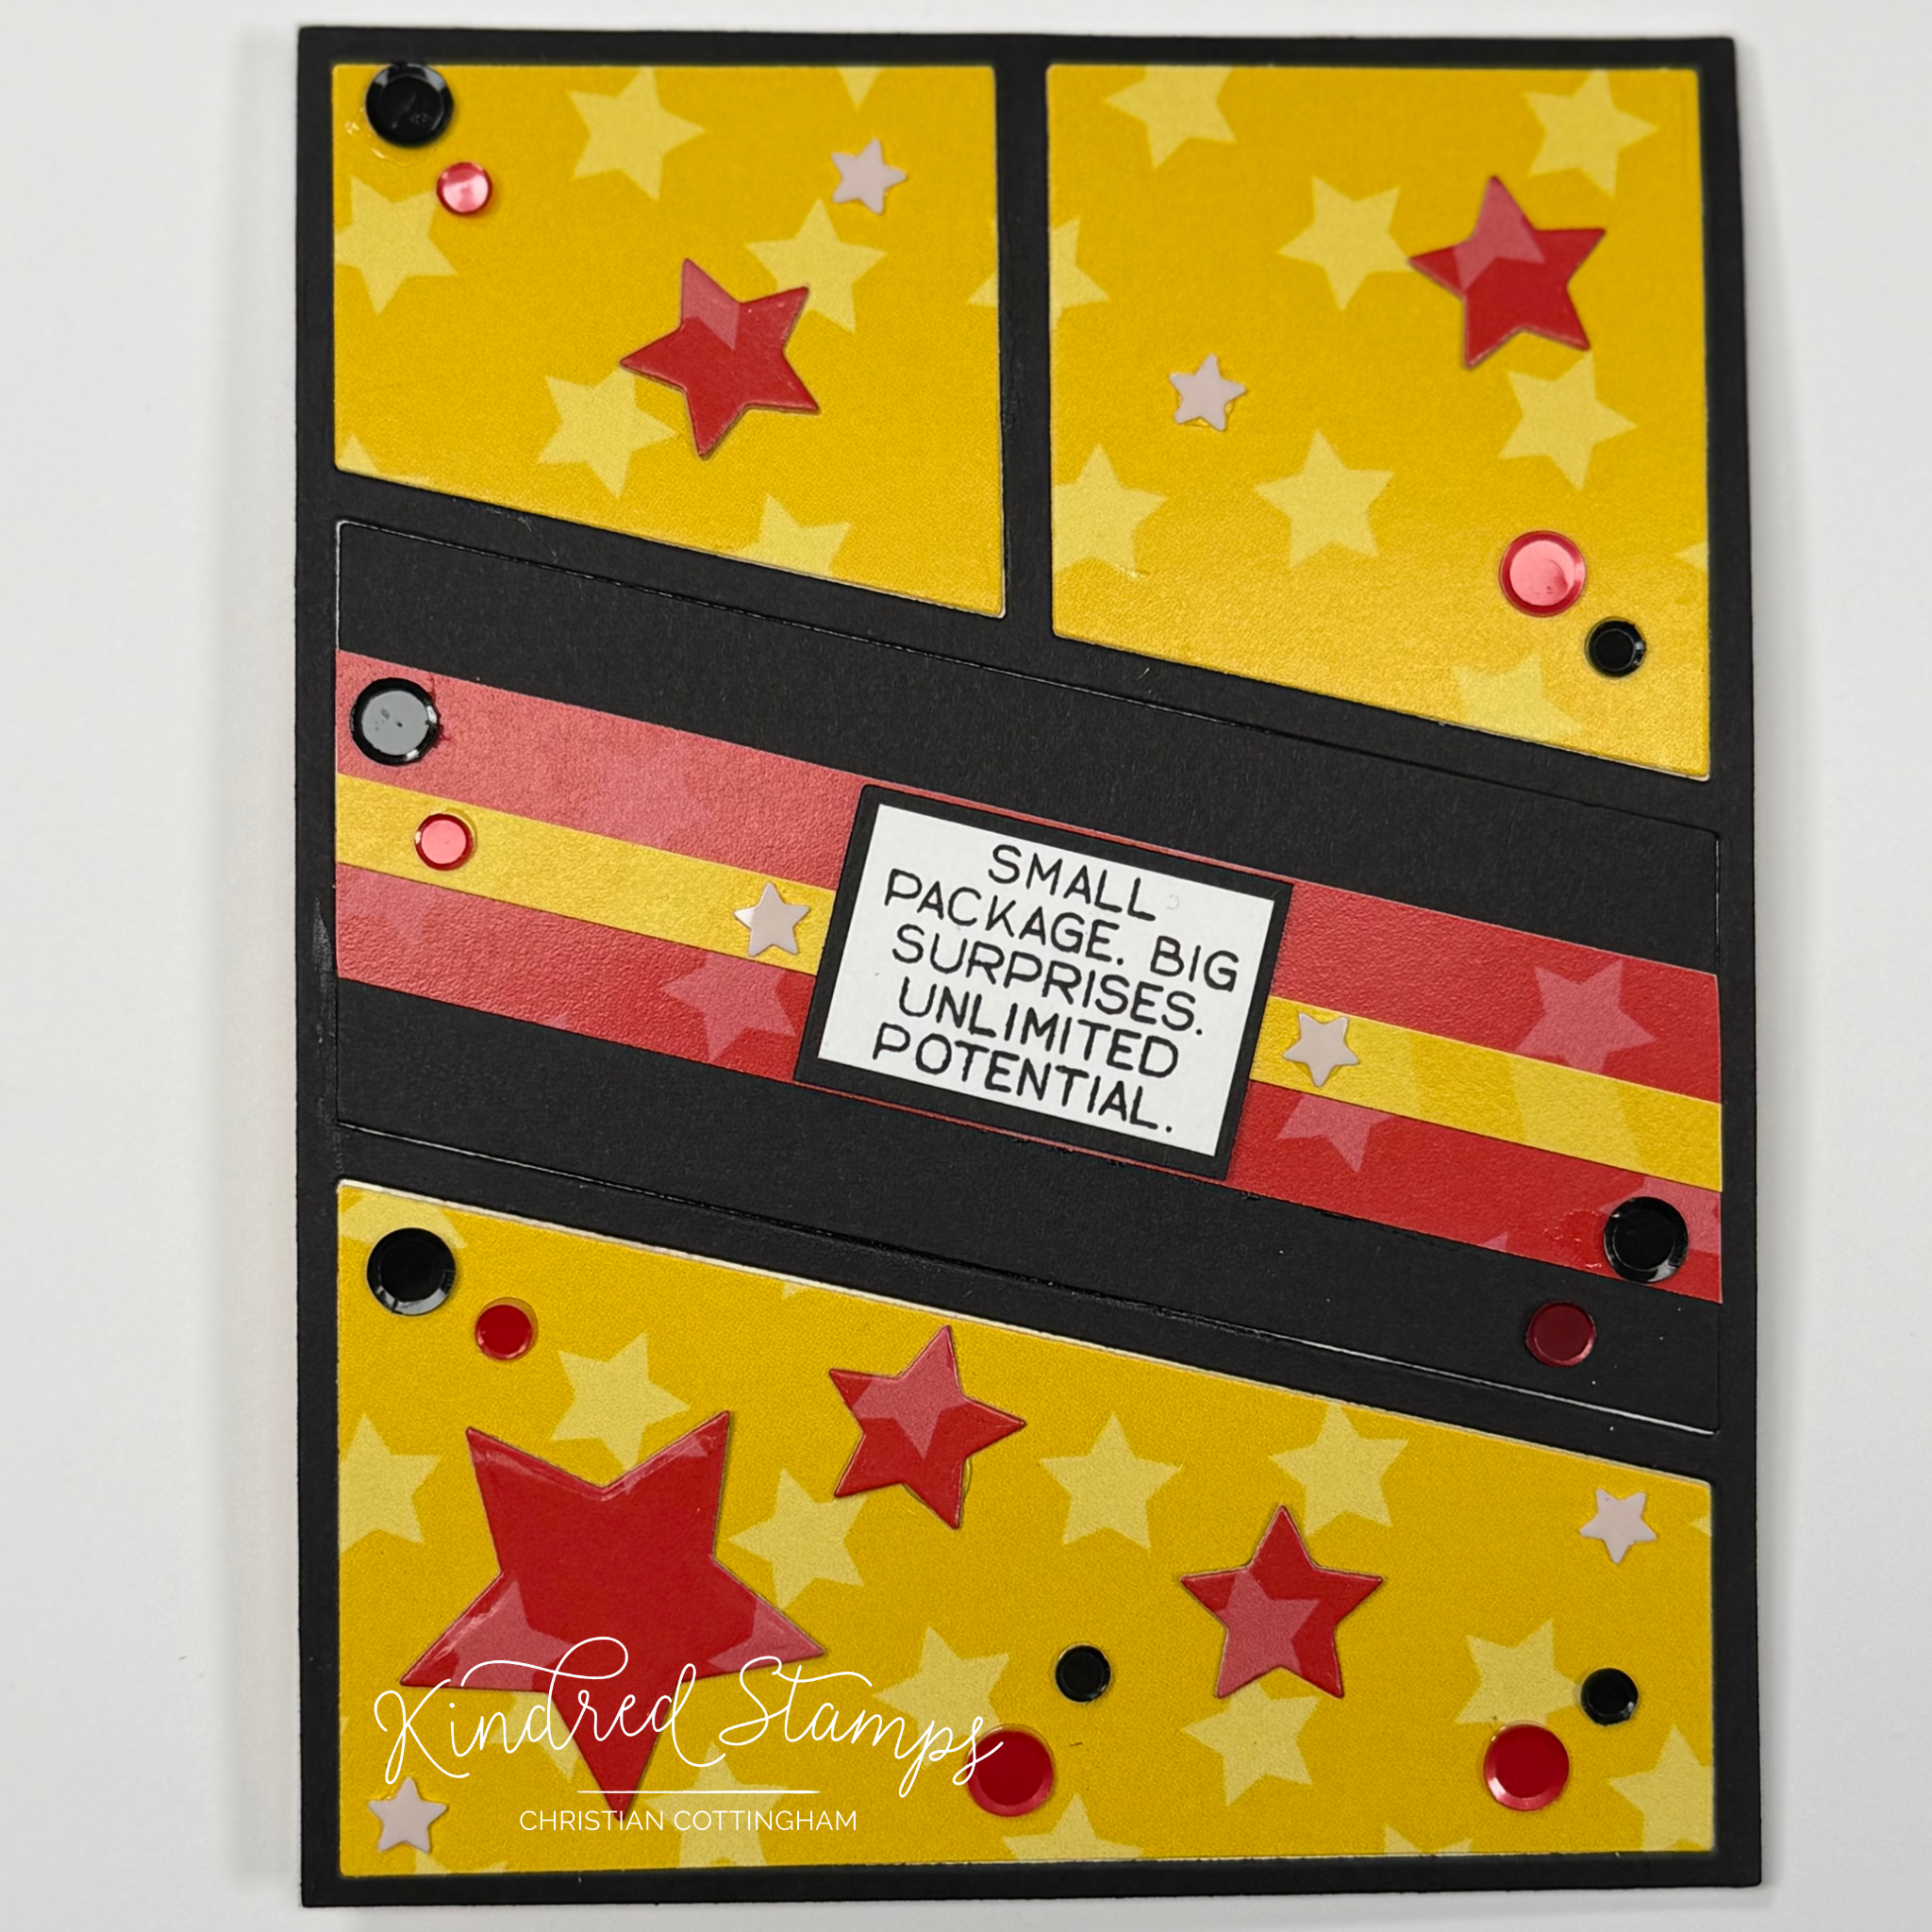
Just because the card is small doesn't mean it’s not full of surprises, especially when it comes to birthdays! This interactive twist and pop card is easy to make and you don’t need any special dies. Let’s break it down.
The front card panel was first up. The cover plate die was cut out of black cardstock and then out of a piece of yellow pattern paper from the Power Paper pack. A second piece of pattern paper was trimmed to create a red banner that will spread across the center panel of the cover plate. A thin strip of leftover yellow pattern paper was trimmed down. Utilizing the Card Basic Dies, a few red stars were cut from the pattern paper. Finally the sentiment was stamped in black on a scrap of white cardstock and matted on a small piece of black card stock.
To assemble the front of the card an A2 top-folding card base was prepped. The cover plate die cut was glued to the front of the card. The top and lower panels were paper pieced with the patterned paper. The center panel utilized a negative piece from the black cardstock. The pattern papers were layered and adhered to the black negative piece and the sides were trimmed. This panel was then adhered to the middle of the card front. The sentiment was adhered to the center of the card. Sequins from the kit were adhered in each section.
The inside was up next! The city scene paper and contrasting red pattern paper were trimmed to 5.25 inches by 4 inches and glued to the inside of the card. The card was set aside to dry while the remainder of the card was prepped.
The mechanism was up next! A piece of white cardstock was cut to 8 inches by 3 inches. On the short side, score at 1.5 inches (lengthwise down the center). With a ruler and a pencil, place a small mark at 2.5 inches and 5.5 inches measuring across the 8 inch side. You will need to mark on both the top and bottom of the front side of this strip. Score connecting the lines diagonally across from each other (it will look like an X). Fold on the score lines. The mechanism will fold in on itself when you make valley folds along the length of the strip. The mechanism will look like an arrow with a triangle and to flappy folded barrels.
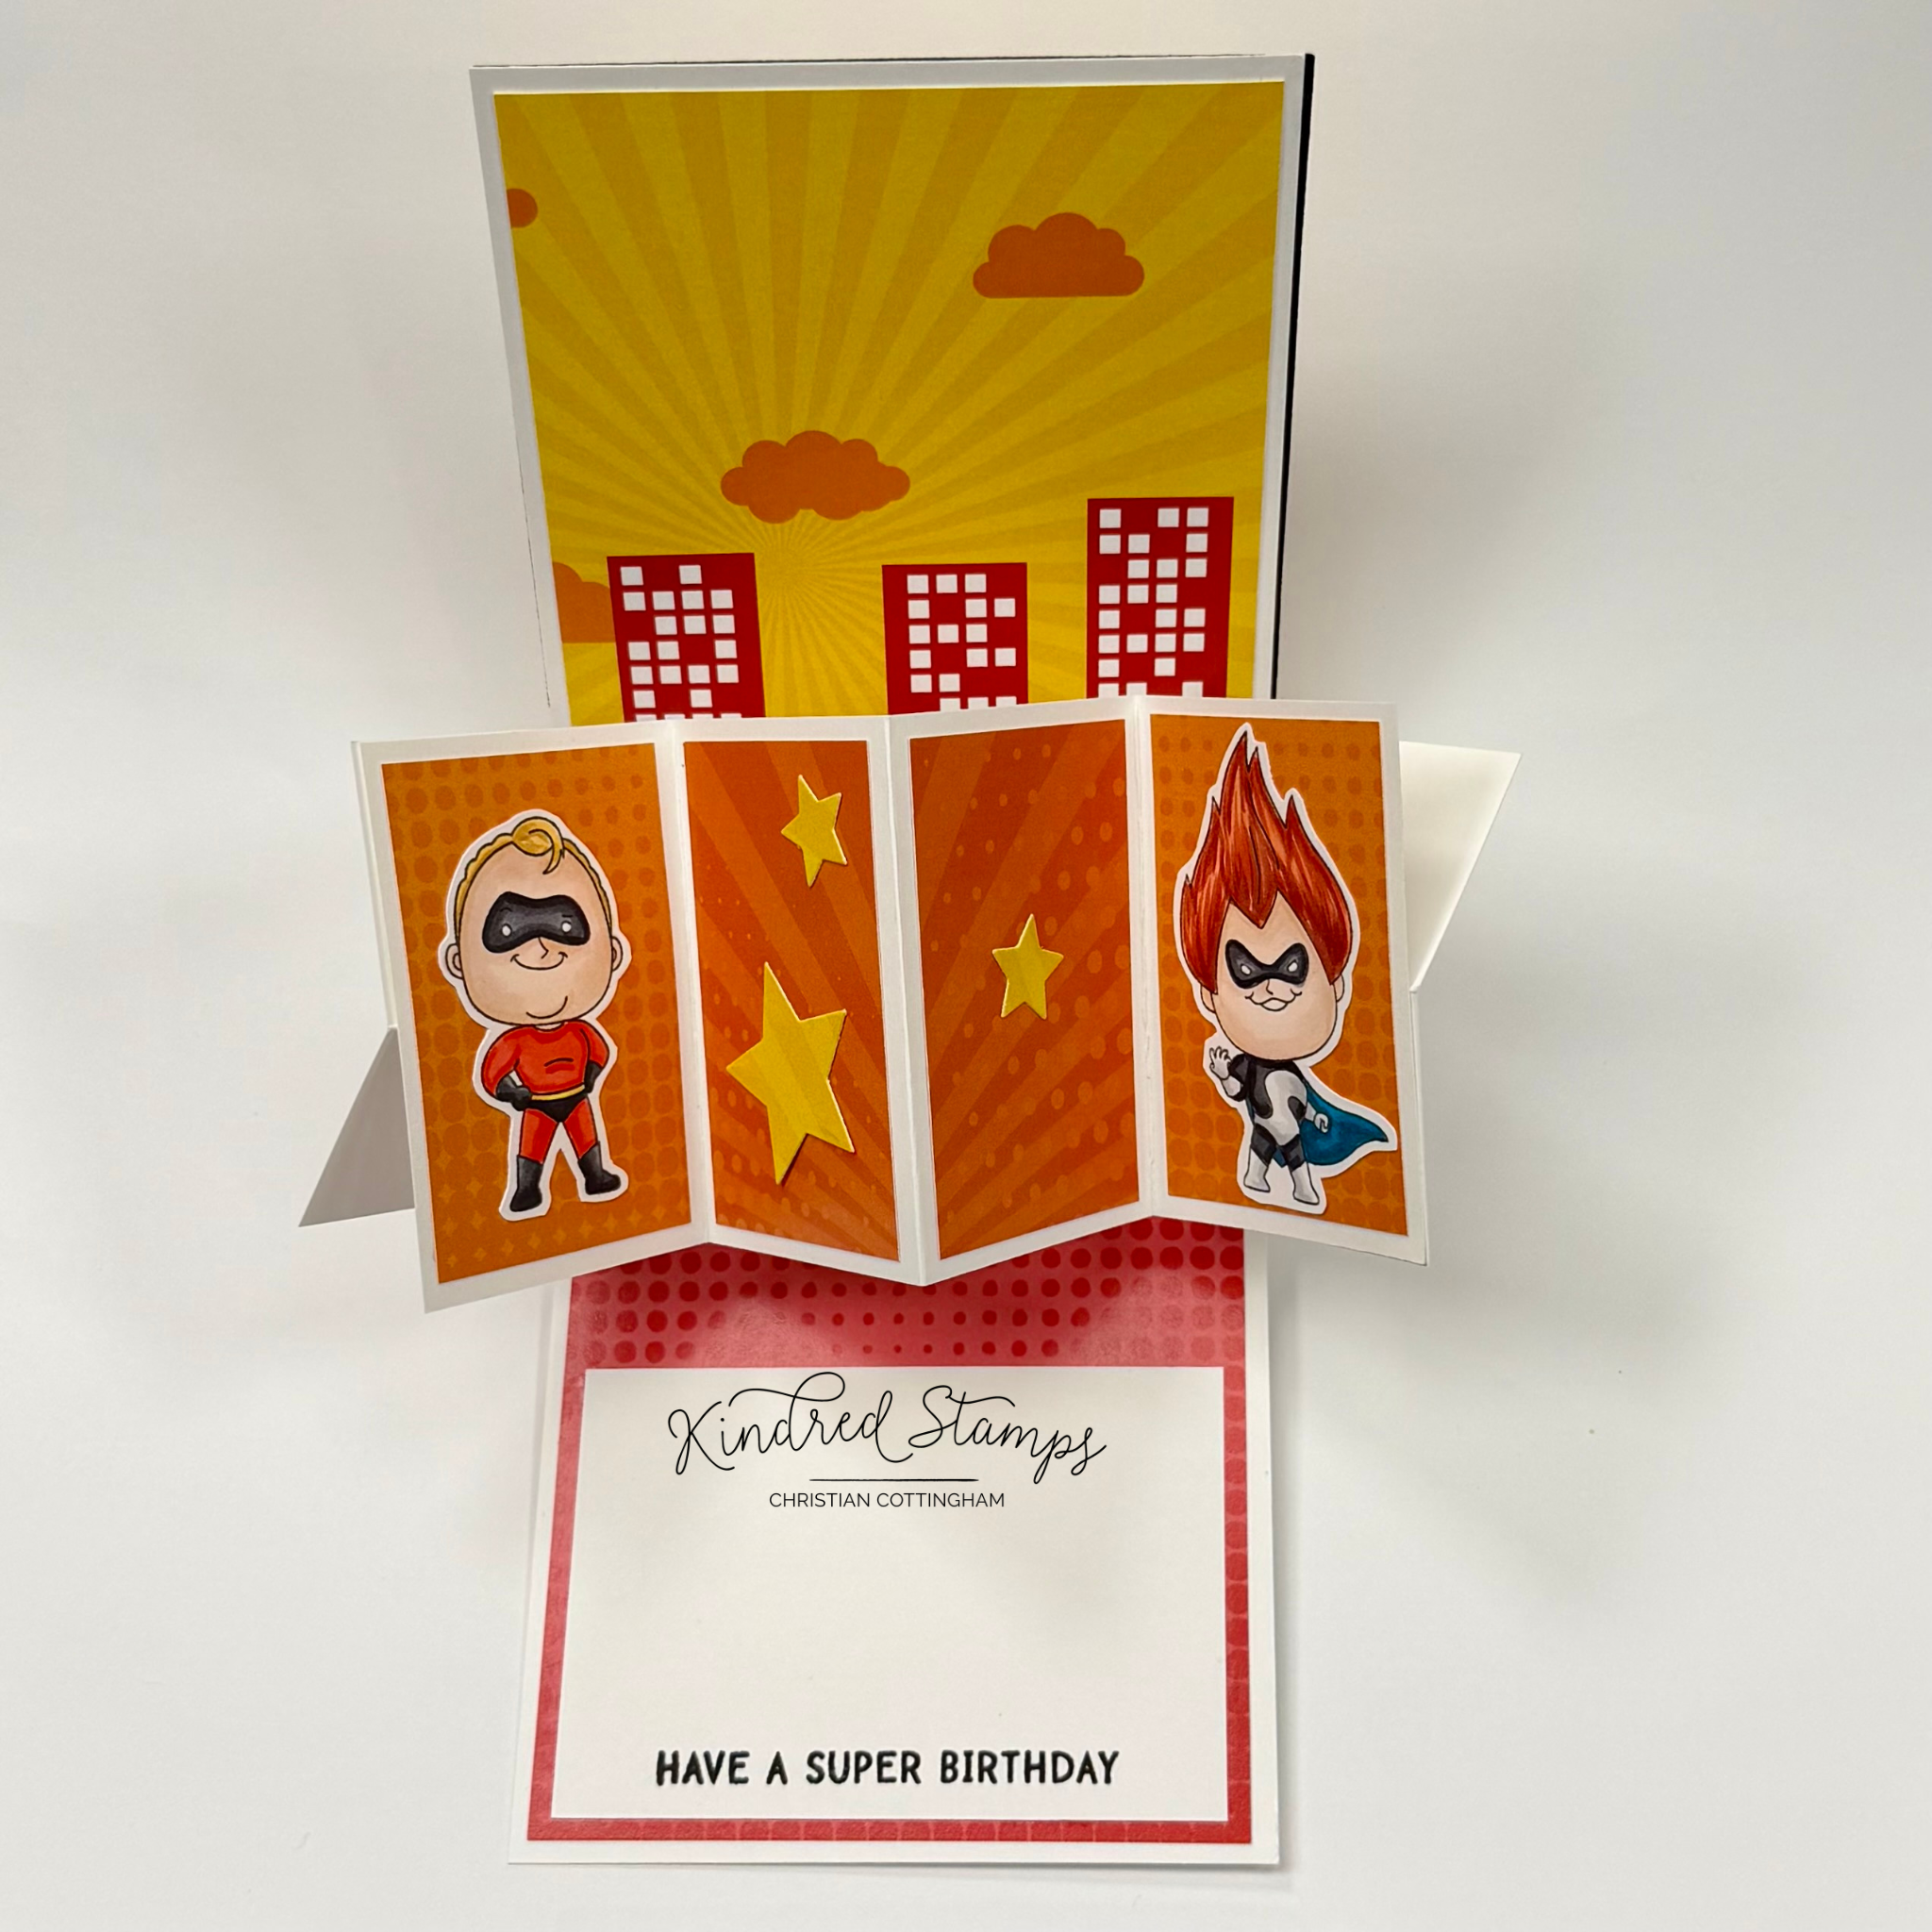
The triangles on the mechanism are centered on the card base and adhered with both strong double-sided and liquid adhesive. This was set aside to dry. A panel of white cardstock was trimmed to 8 inches by 3 inches. This strip was scored at 2 inches, 4 inches, and 6 inches. The panel was folded in valley, mountain valley fold. This was set aside. Four pieces of patterned cardstock were trimmed to 1.75 inches by 2.75 inches. These panels were adhered to the scored panel.
The Super Dad and Villain were stamped in alcohol marker safe ink and colored with Olo markers (See Color Guide). The images were cut out leaving a thing white boarder and they were adhered to the outer panels of scored panel. Using the same star dies from the Card Basics Dies were cut out of a contrasting paper and arranged on the inner panels of the scored section.
A piece of cardstock was trimmed to fit inside the red pattern paper and stamped with the sentiment. This will allow for a place to write a note to the recipient. This panel was glued to the panel.
Finally, it was time to make the pop-out part of the twist and pop. The panel was glued to only the top left on one side of the mechanism, and then the bottom right on the opposite side. This was allow to dry before opening and closing, and opening and closing, and opening and closing… nope, you can’t stop once you start! This card maybe small, but it has a big surprise inside!
Card Size: 5.5 inches by 4.25 inches
Coloring Guide:
All images:
Flesh> OR2.0/ OR7.1/ OR3.2
Family Suits> R0.5/ R0.4; OR1.3/ Y1.2
Family Boots/ Masks/ Gloves> NG9/ NG7/ NG5
Super Dad:
Hair>YO2.5/ YO2.3/ YO2.2
Super Mom:
Hair> OR3.7/ OR4.7/ OR4.2
Super Daughter:
Hair> CG9/ CG7/ CG5
Force Field> V0.3/ V0.4
Super Son:
Hair> YO2.5/ YO2.3/ YO2.2
Super Baby:
YO2.5/ YO2.3/ YO2.2
Villain:
Hair> OR2.7/ OR2.6/ OR2.3
Cape> BG0.8/ BG0.7
Suit> NG9/ NG7/ NG5; NG1/ NG3