School Skippers: Feburary Kindred Stamps Release
We all need just one day off to escape the daily grind… get up… work… come home… work some more… feed your face… go to bed… and repeat… every… single…day… We should take inspiration from the School Skippers stamp set and just take the day off and live in the moment. This small but mighty stamp set is the perfect excuse to take some time for yourself live in the crafty moment. You are worth it!
This blog utilizes affiliate links. If you choose to click on the links provided to purchase, you are supporting me as I receive compensation for your purchase. If purchasing is not in your books, no worries, I hope you find inspiration for projects you design. By clicking on the links, you are letting Kindred Stamps know that you like my content and to keep bringing me back. Thanks for your time.. now let’s live in the moment!
Project One: Cruisin’
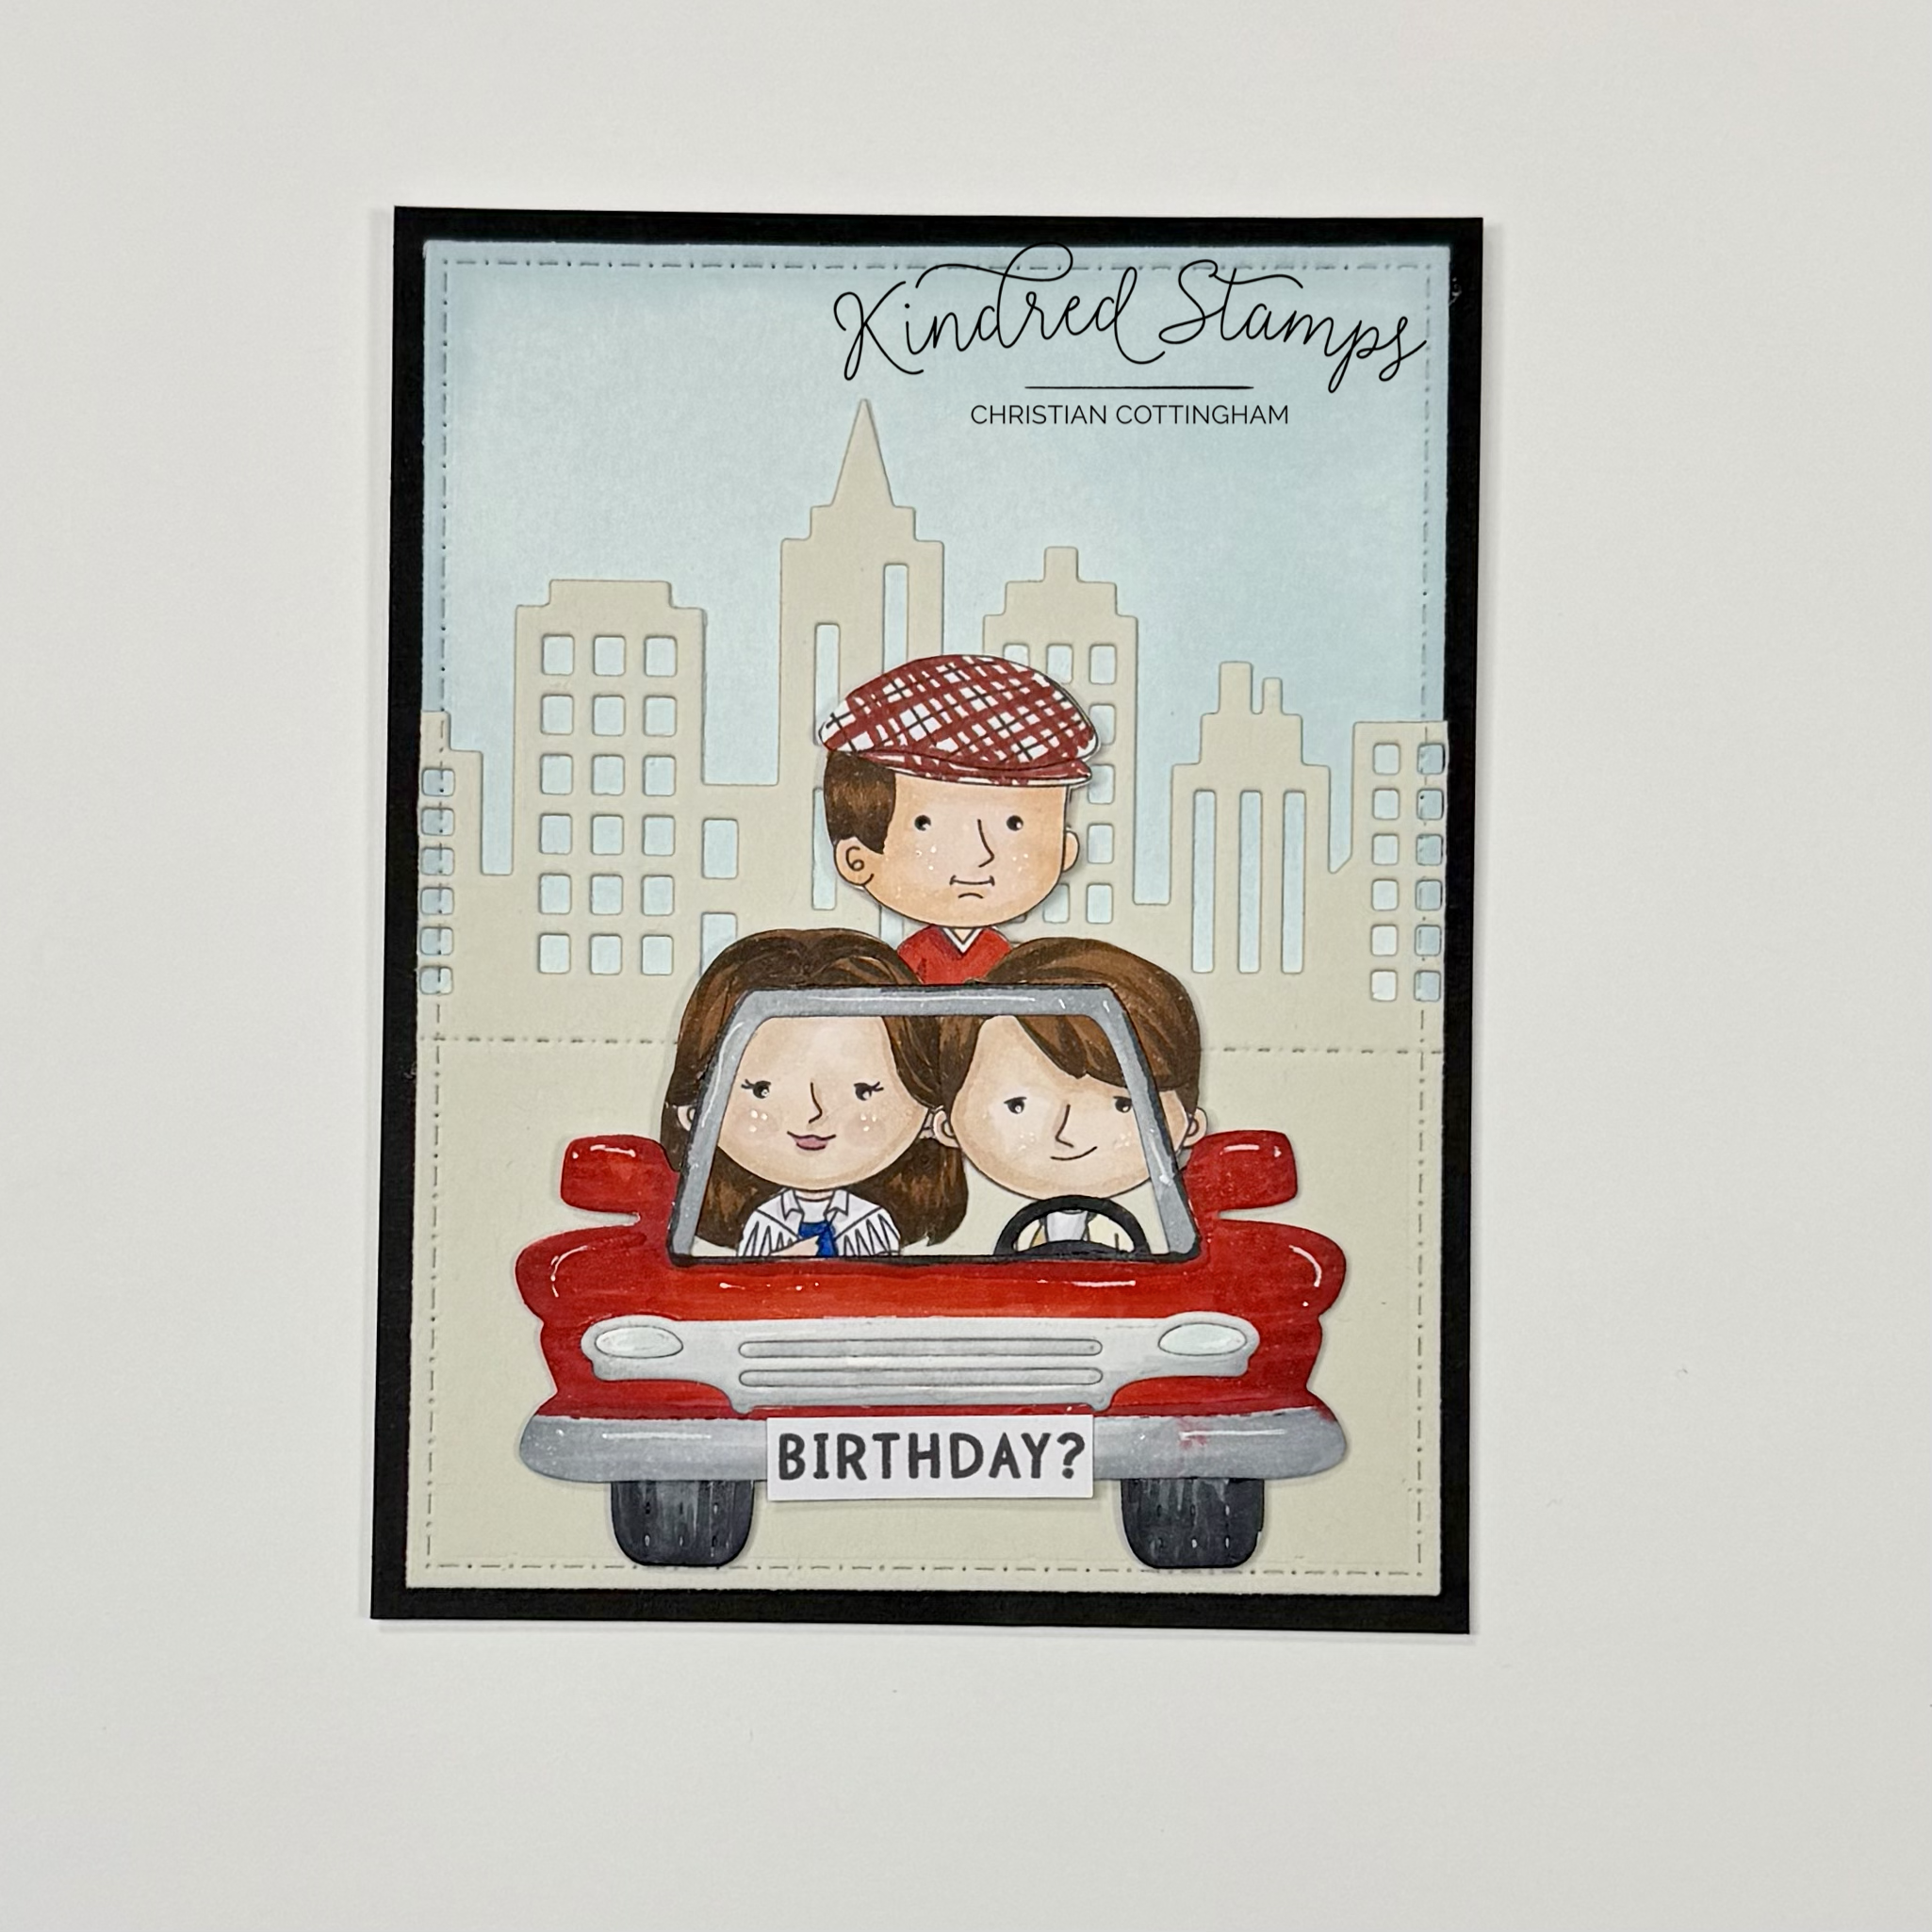
School Skippers, Kindred Stamps
Going for a drive on a mental health day is a necessity, especially if you can have the top down and the wind blowing through your hair! The School Skippers were perfect inspiration. This simple card features a few dies and simple coloring to set the scene. Let’s break it down.
The background was cut from a panel of white cardstock with the largest rectangle from the Card Basic Die and ink blended on the top third of the card with Arctic (Altenew Fresh Die Ink) to give the illusion of the sky. A piece of gray card stock was then cut with the same rectangle die from the Card Basic Die. The City Scape die was positioned on the top third of the gray cardstock and cut out. This will provide the city in the back of the cruisin’ School Skippers.
On a piece of Express-It card stock, the car, grill, and tires were die cut from the Drive-In Memory Dex die set. The car was colored with Olo Markers (R0.6/ R0.5; NG7/ NG9; NG3/ NG1/ NG0; B1.0). The car was assembled with liquid glue. The sentiment was stamped onto a scrap piece of Express-It cardstock and trimmed to be the license plate of the car. This was glued to the front of the car.
The School Skippers were stamped in alcohol safe ink on Express-It cardstock and colored with Olo Markers. (See Color Guide). The images were fussy cut out and arranged with the Sick Boy and Girlfriend in the front seat and the Best Friend positioned in the back seat sitting on the bench of the convertible. Foam tape was applied.
To assemble the card a piece of black cardstock was adhered to a top-folding card base. The sky panel cut from the Card Basics Dies were adhered. The city scene from the gray cardstock was adhered to the sky panel. Finally, the car filled with the School Skippers were positioned on the lower portion of the scene. The crew was out cruisin’ and enjoying the sun!
Size: A2 (4.25 inches by 5.5 inches)
Project Two: Swing Batter Batter Swing
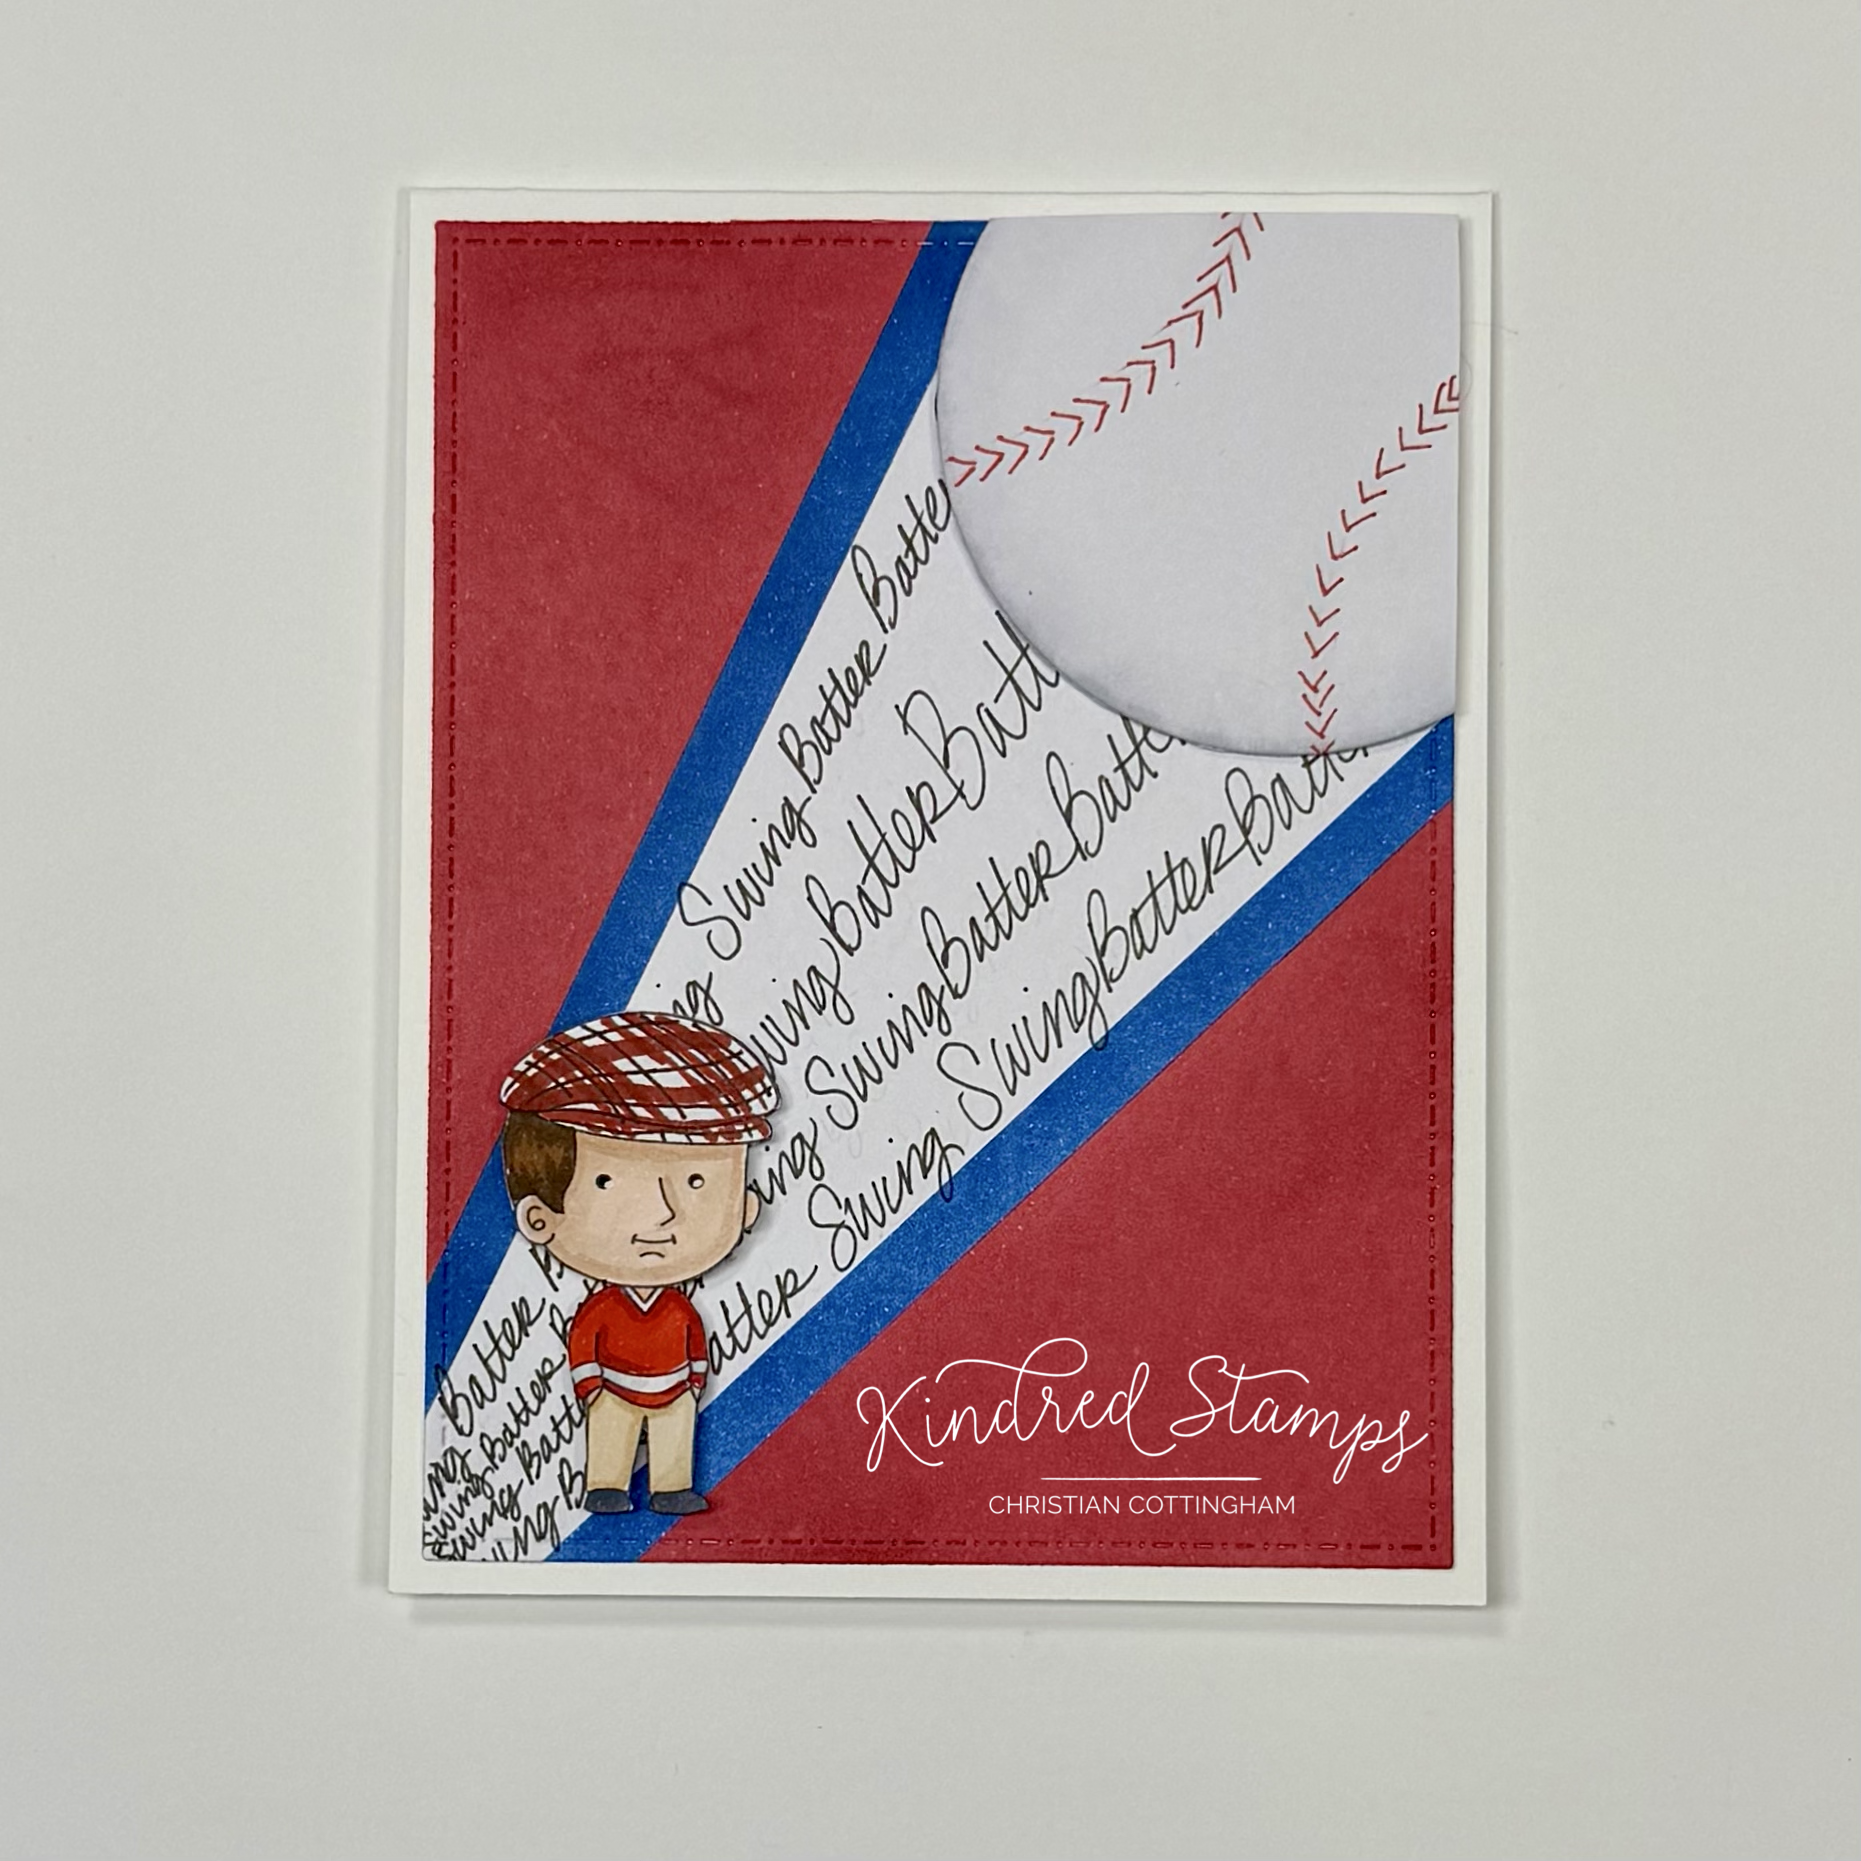
School Skippers, Kindred Stamps
If you’re going play hooky, why not go to a game??? This simple card hits it out of the park and can be modified to any team colors!
The Best Friend from School Skippers was colored with Olo Markers on Express-It cardstock and fussy cut out. (See Color Guide). Foam tape was applied to the back of the image and set aside.
A piece of Express-It cardstock (4.25 inches by 5.5 inches) was masked with masking paper in the shape of a cone with the thinner edge on the bottom left corner and the widest part at the top right. This section will remain white. Next two pieces of masking paper were cut to 0.25 inch strips. These were aligned on the sides of the already placed masking paper. These stripes will be inked blue. With the paper prepped, it was time to ink blend. With red ink (Lobster by Lawn Fawn) the open areas of card stock were inked up. The thin strips of masking paper were then removed and sticky notes were applied on the edge of the red blended section lines. Blue ink was applied to the small striped sections (Blueberry by Concord & 9th). All masks were removed. With a pencil, I lightly sketched lines to write the sentiment. “Swing Batter Batter Swing” was written from left to right with font growing as it moved toward the top right corner with a fine liner pen. Pencil lines were erased and set aside.
Now that the background was ready, the Card Basic Dies were being put to use. The panel was cut down with large rectangle die. The smallest circle was also cut from the same Express-It cardstock. Die cutting complete, it was time to make a baseball! To make the stitch lining on the ball, the negative part of the die cut was sketched with pencil. Pulling out a red gel pen, stitching was drawn. The pencil lines were erased and I pulled out a light gray ink to edge the sides of the baseball to give it a rounded look (Soft Stone by Gina K Designs). Foam tap was applied to the back of the baseball.
To assemble the card, a top-folding card base was prepped. The baseball was placed on the top right with overhang. I centered the circle in the handwritten section of the panel. The excess was trimmed. The card panel was adhered flat to the prepared card base. Finally, the Best Friend was positioned in the lower right corner of the card. This simple card is definitely a home run and perfect activity for playing hooky!
Card Size: A2 (4.25 inches by 5.5 inches)
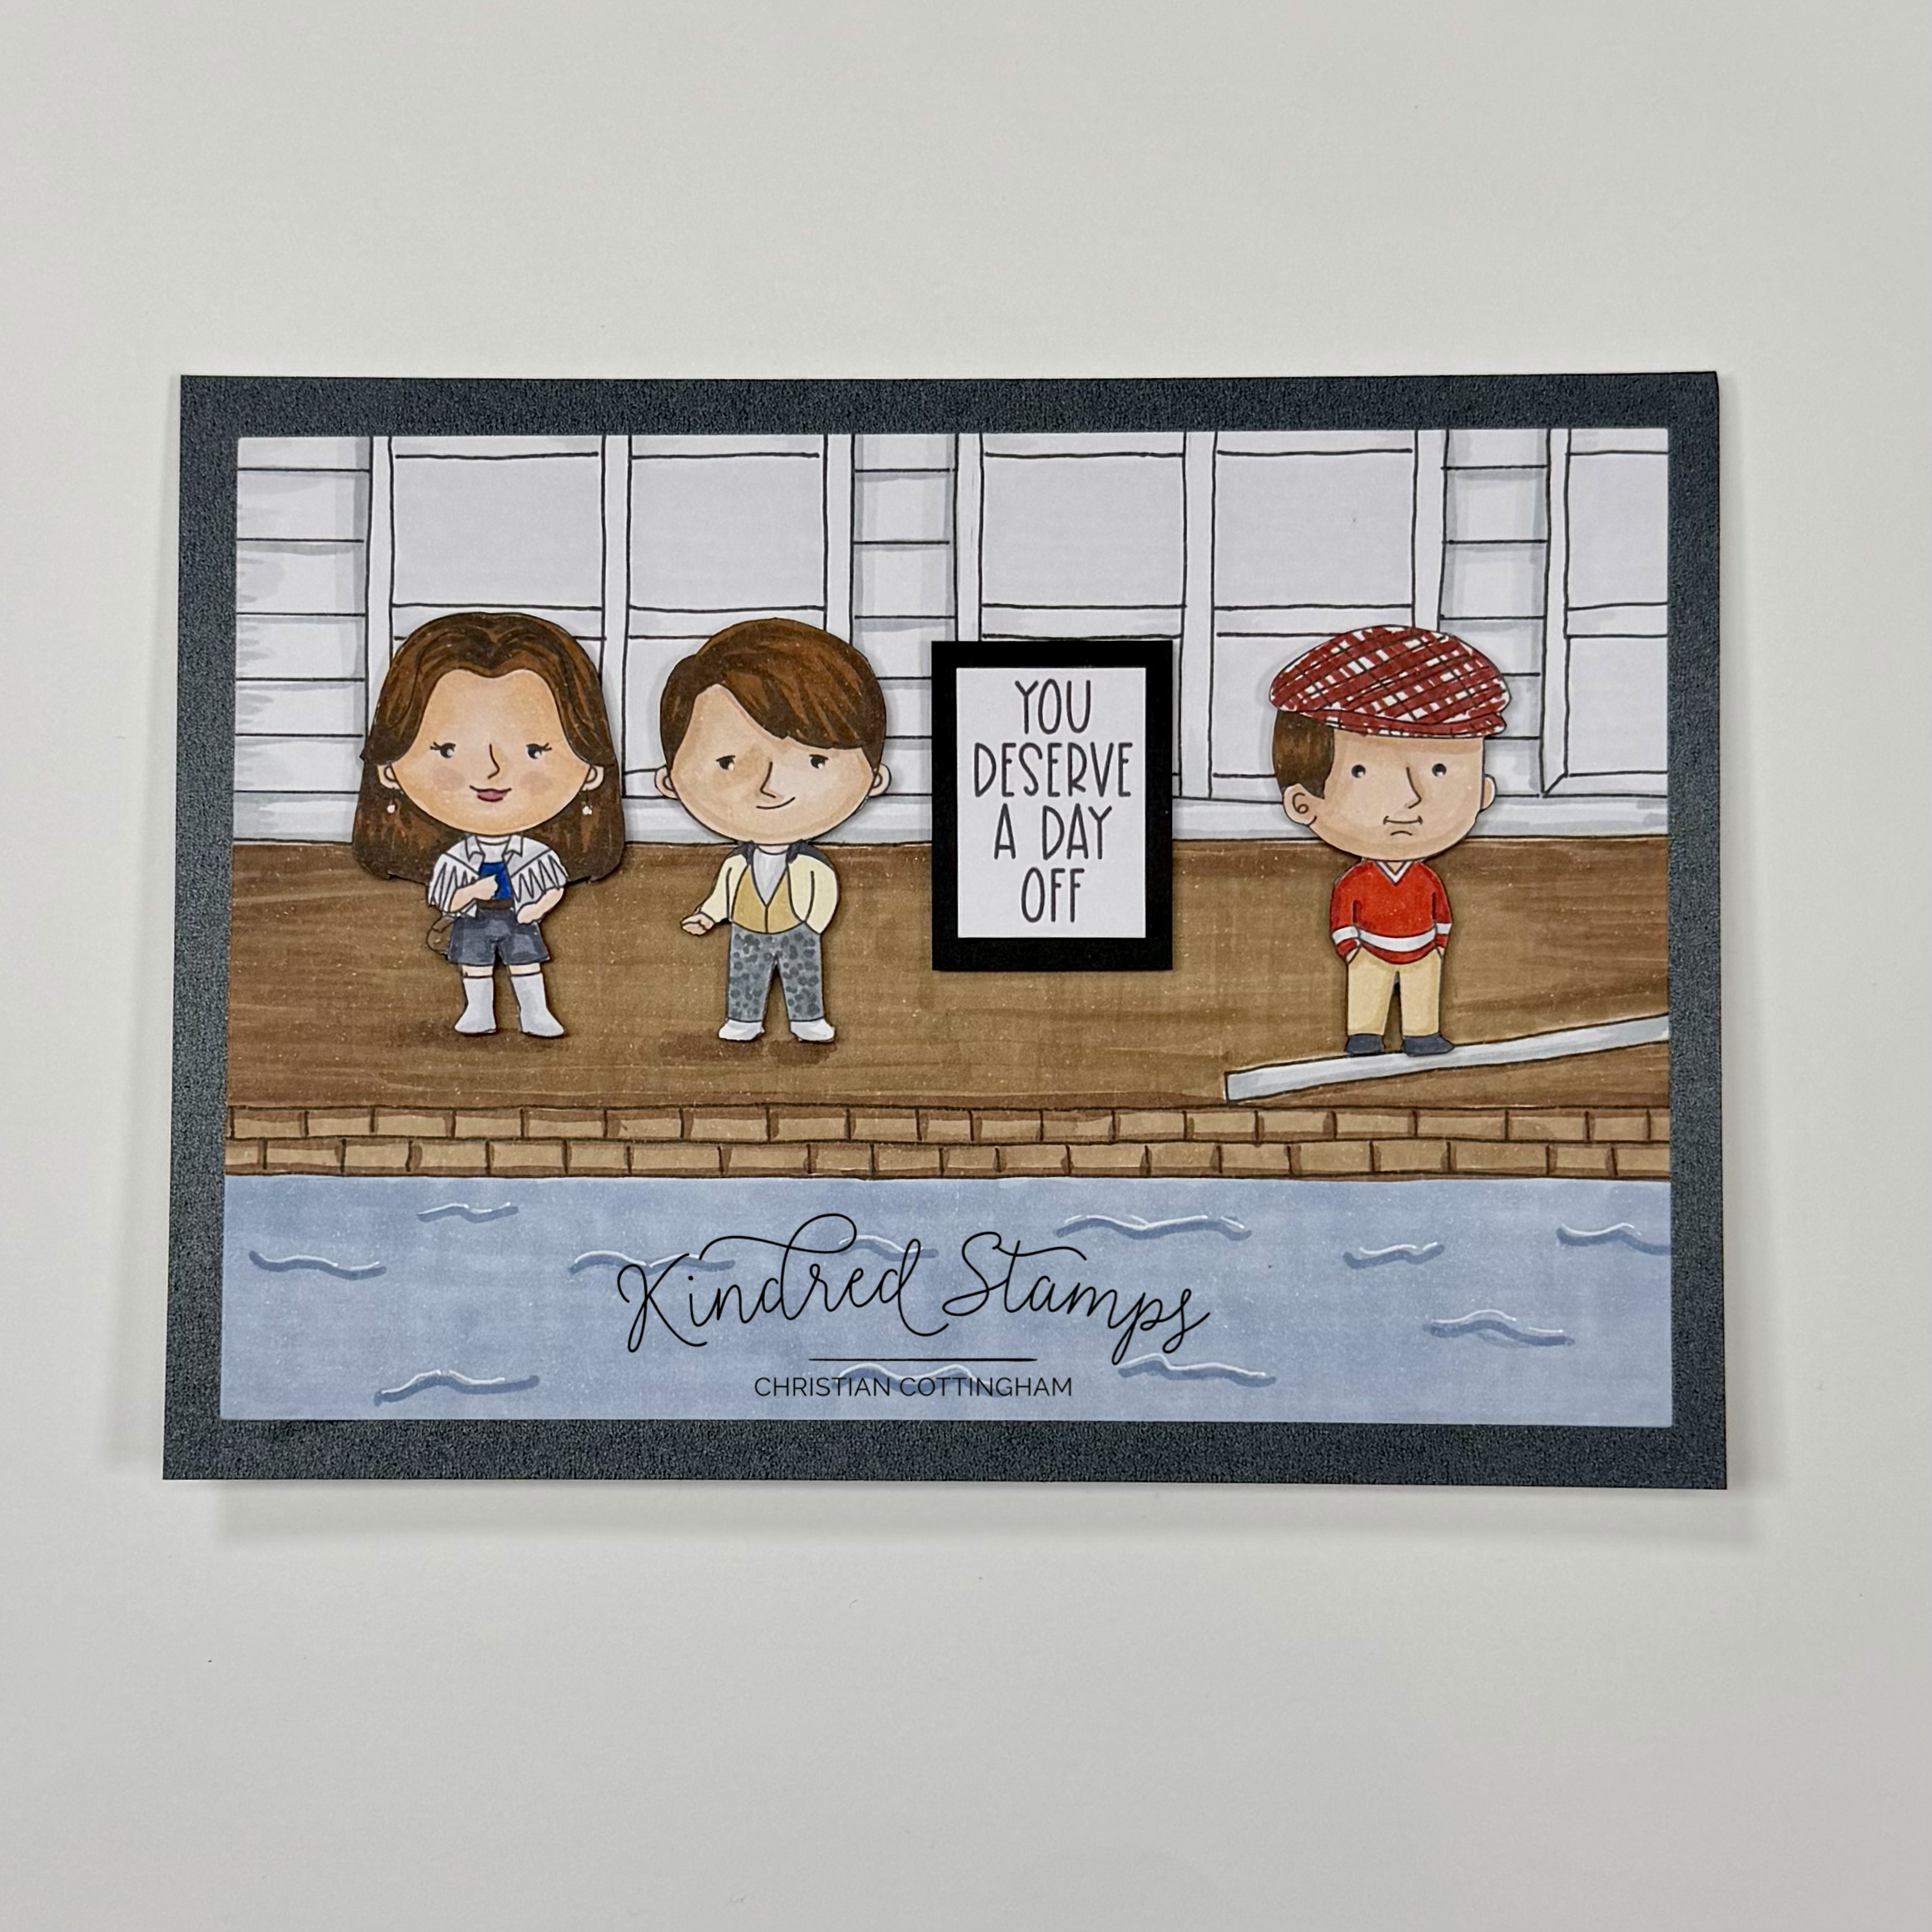
Project Three: Trip to the Museum

School Skippers, Kindred Stamps
Need to recharge your creative energy when you are on your mental health day? Why not go to the museum! The School Skippers are checking out the Impressionist style art and so can you!
The School Skippers were stamped with alcohol safe ink, colored with Olo Markers and fussy cut out of Express-It cardstock. Foam tape was applied to the lower portions of the images (more will be applied during assembly once I knew were the images would be positioned in front of the art work). These images were set aside while the scene was being built.
Utilizing the Art Frames Dies, the back panels were cut for 3 frames (one large rectangle and two of an oval-ish frame. The frames for the back panels were also cut from matte gold cardstock. Pulling out some watercolors and size 2 round brush it was time to harness my inner Monet… well, I tried at least…. Little scenes were made with little smudges of color layered to look like mountains, floral fields, and some woodland trees… at least that’s what I tell myself. The colors came from the 12-pan Altenew watercolor set, however, all colors were pulled up off of my pallet so I have no idea what colors they were. Harness your inner Monet and pick was feels right for you! When the water color was dry, the gold matte frames were glued to the background. These were set aside to make the background.
Express-It card stock was cut down to 5 inches by 7 inches. With a pencil and ruler, a horizon line was drawn. This will be where the floor and wall meet. The floor was sketched in with perspective to provide a foreground. A grid pattern was sketched. A piece of masking paper was placed along the horizon line. With a light gray ink, the panel was blended lightly from the base to white at the top of the panel (Soft Stone, Gina K Designs). With the straight edge of the masking paper still in place, a black line was drawn with a fine liner pen. The masking paper was removed and it was time to color the flooring. With Olo Markers and a random color placement the little squares were filled in (WG3/ WG1/ WG0). With a colored pencil, the lines were darkened to give the illusion of grout.
The colored panel was cut down to fit the 3 frames lined up to the edge. The frames were then glued to the “wall” on the colored panel. The School Skippers were positioned with the Sick Boy in the lower right corner and the Girlfriend and Best Friend placed further up the panel to give the illusion of depth in the center to the left side. Foam tape was applied to the heads of the images as needed so they remained flat even when over laying the watercolored frames.
Finally, the sentiment was stamped, trimmed down, and matted with a piece of black cardstock. To assemble the card, an A7 card base was prepped. A piece of black cardstock was cut to 5 inches by 7 inches and glued to the card base. The trimmed panel was centered and glued to the card. The School Skippers know how to recharge creatively and you can too!
Card Size: A7 (5 inches by 7 inches)
Project Four: Pool Time
School Skippers, Kindred Stamps
Why not spend some time relaxing if you are playing hooky?? The School Skippers are living it up enjoying some sun by the pool! There really is not to walk through with this card. Using some simple sketched lines and some colored images, the card came together in the amount of time it would take for a umbrella drink to be sipped on while sitting by the pool.
The School Skippers were stamped in alcohol safe ink on Express-It cardstock. They were colored with Olo markers and fussy cut out.
The background was sketched with a ruler and pencil and then outlined with an alcohol safe fine liner pen. The panel was trimmed down by 0.25 inches all around to provide a frame. The pool water was colored with Altenew Artist Markers (C022/ CG01- remember their numbering system doesn’t correlate like other brands). The brick work in the pool and then ground was Altenew Artist Markers (Y821/ Y932). The siding and door trim were colored with Olo Markers (NG3/ NG1) and the window shades were colored (NG0). The diving board was colored with Olo Markers (NG3/ NG1).
The sentiment was stamped and trimmed. A black mat was cut to fit the sentiment. The images and sentiment were adhered to the colored panel. An A7 card base was prepped and a piece of black cardstock panel (5 inches by 7 inches) was adhered. The colored panel was centered and adhered. It’s winter where I live and I totally could use some time sitting beside a pool with an umbrella drink in my hand soaking up the sun (someplace warm… not the frozen tundra I live in).
Card Size: A7 (5 inches by 7 inches)
Project Five: Float Singer
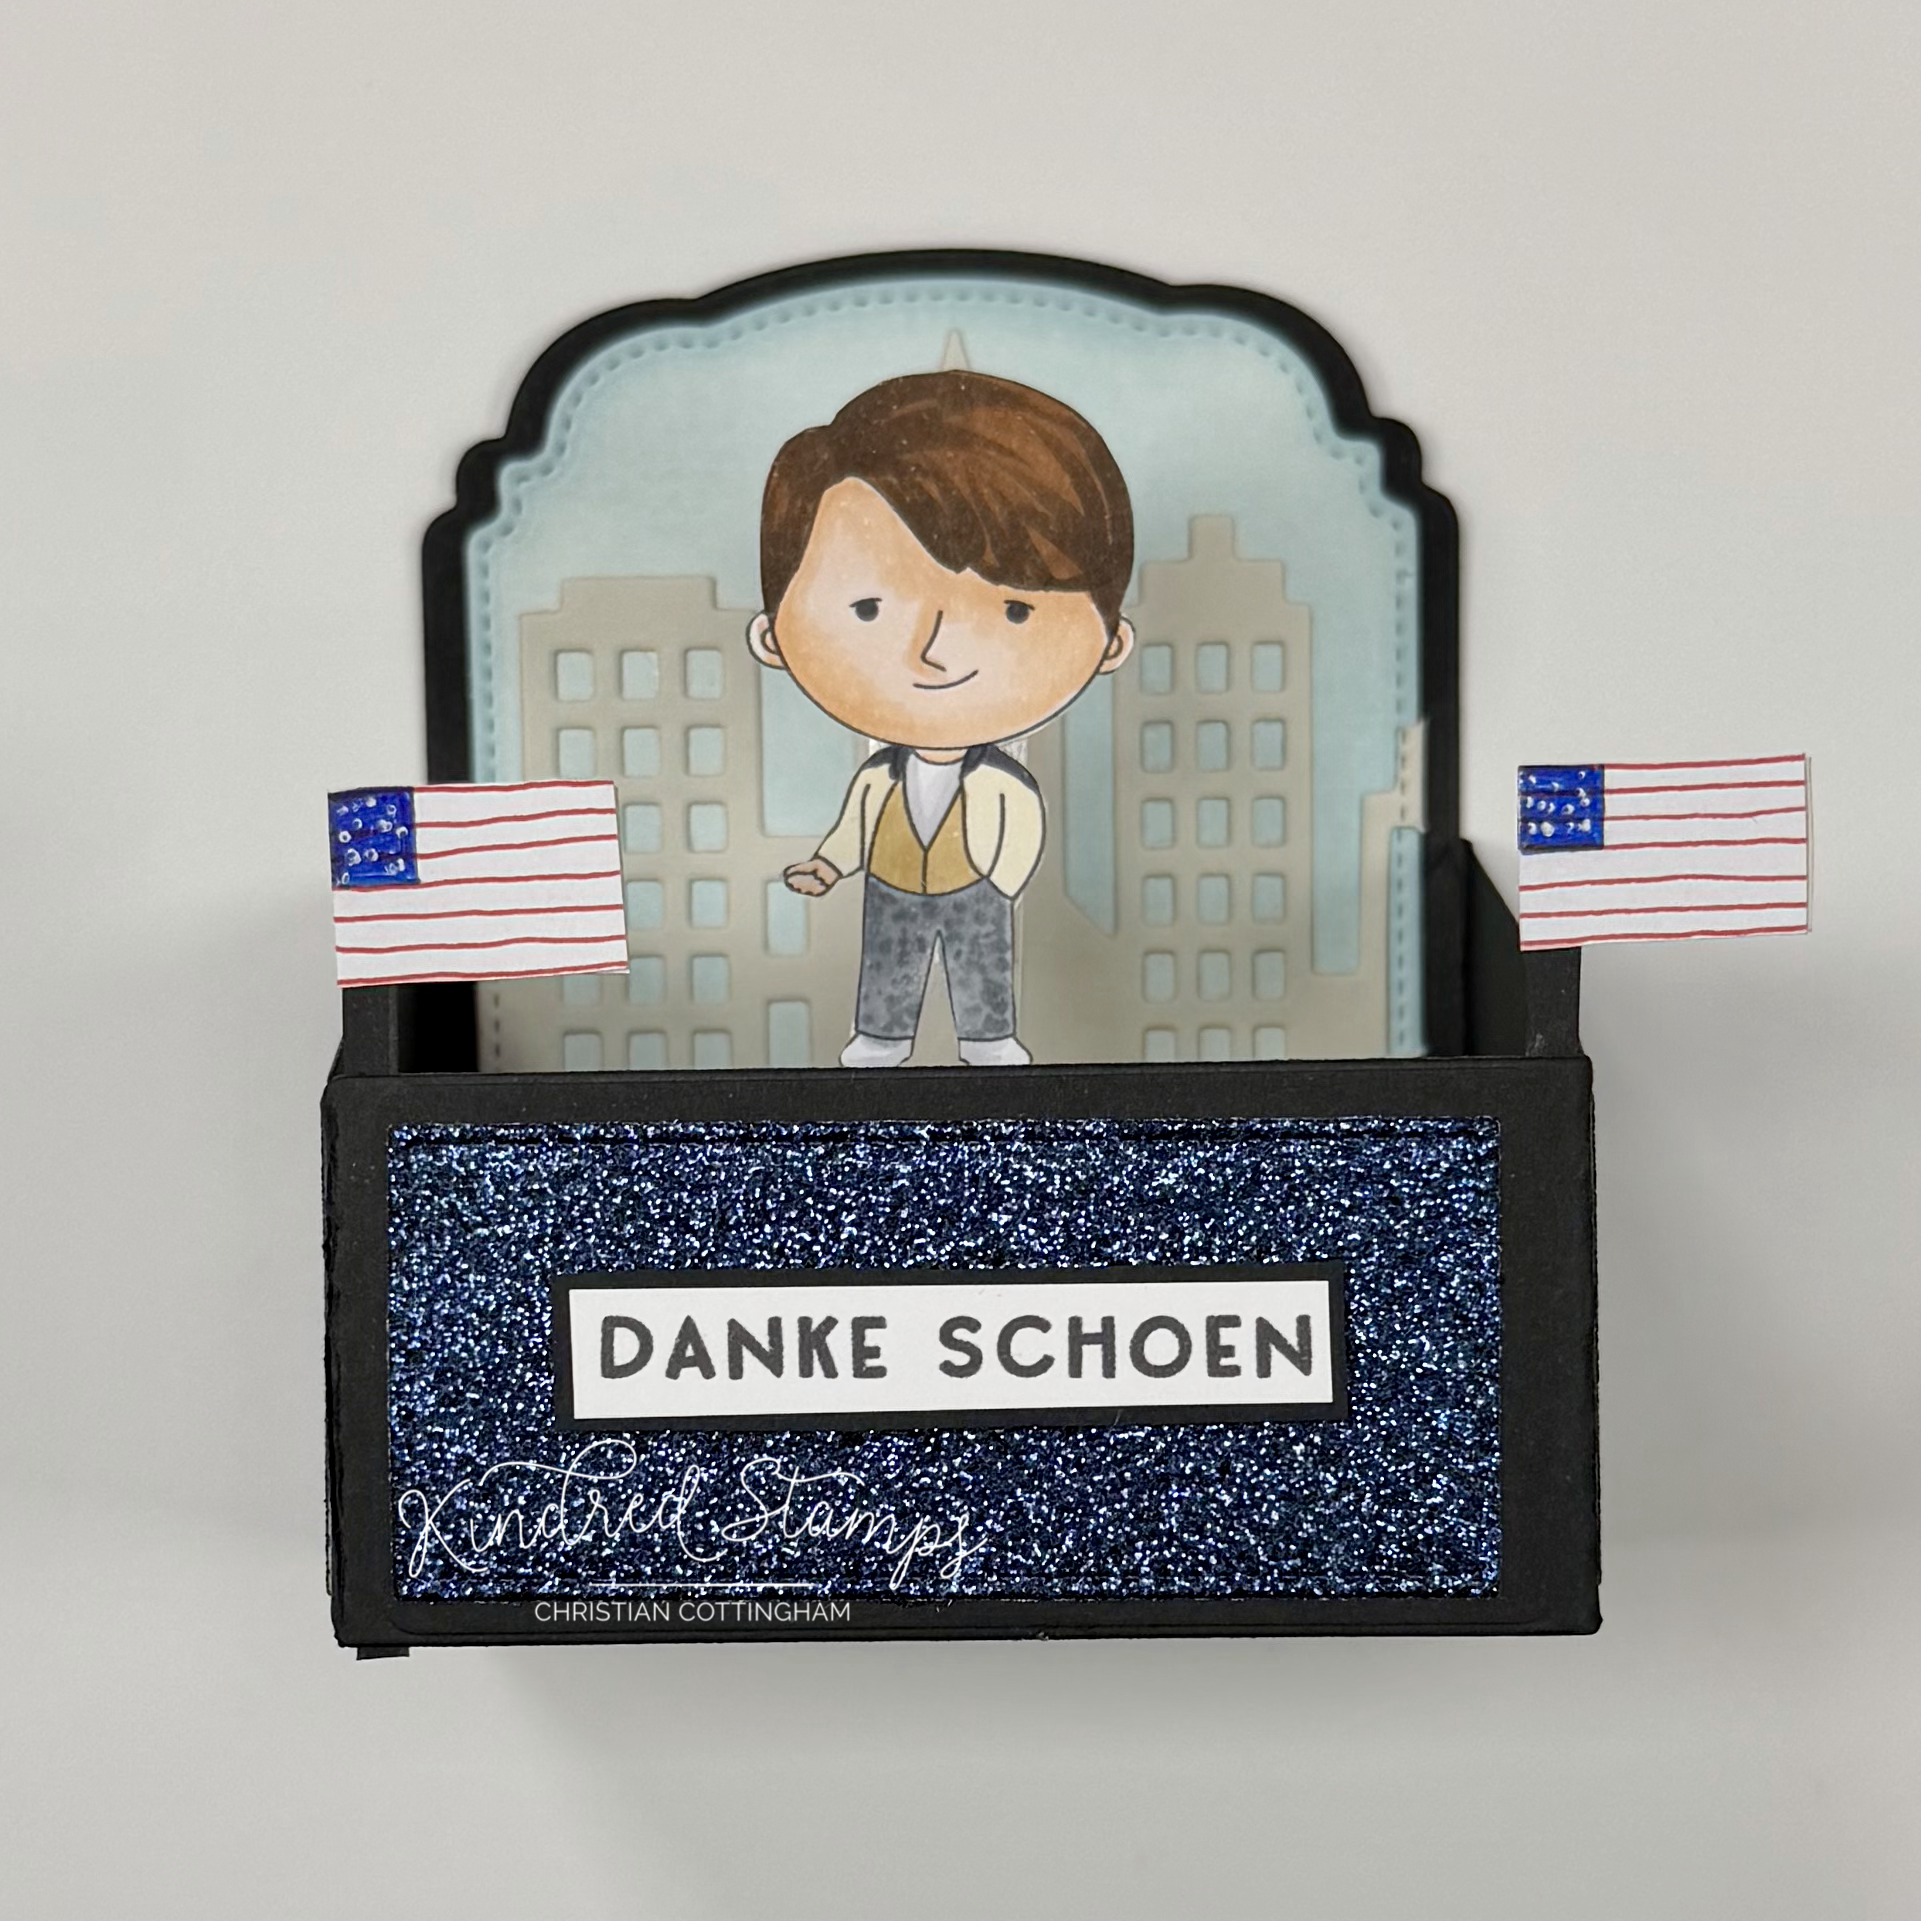
School Skippers, Kindred Stamps
Perfect way to spend the remainder of your day of playing hooky then being on a float! The School Skippers know how to make an day worthy! The Box Card die is the perfect float for the Sick Boy to sing his germs away.
The Sick Boy was stamped with alcohol safe ink, colored with Olo Markers, and fussy cut out on the line. (See Color Guide). The image was set aside to prepare the float.
The Box Card die components were cut from a heavy weight black cardstock (Black Gina K Designs). The side panels and front panel were cut from blue glitter cardstock (PinkFresh Studio). The a piece of white card stock was utilized to cut two inner layer pieces. With a piece of gray cardstock (Soft Stone Gina K Designs) was cut with the same inner layer piece. The gray cardstock panel was then cut with the City Scape die.
One piece of the white cardstock was ink blended with light blue ink (Arctic by Altenew). The gray City Scape scene was glued to the inked panel. It was now time to assemble the box card. The black cardstock was assembled and then the side panels, front panel were applied. The inked background was adhered to the front of the card base, where the plan white panel was glued to the back of the base to allow a place to write a personal message.
The Sick Boy was attached to a small piece of thick acetate to add support to the Express-It paper. He was attached to the middle bridge of the box card. Every float needs some flags, and this float was no exception. On a piece of white cardstock, a drew two flags drawn with red gel pen, blue gel pen, and then some white dots to act as stars with a white gel pen. Thin black strips were cut from the leftover pieces from die cutting. A strip was applied to the back of each flag and the flags were secured in the front corners of the float.
The sentiment was stamped, trimmed down, and matted with a piece of the same black cardstock for continuity. This was attached to the front glitter panel with some thin foam tape. The float was done! School Skippers sure know how to take a day off! If you purchase this set, it is a law… you too have to play hooky… I give you permission!
The entire Kindred Stamps release will be available this Friday at 8am PST/11am EST. Be sure to subscribe to the Kindred Stamps blog to see a daily line up of sneak peeks from our amazing Design Team! Come join the Fan Club and release event to be part of the release fun, and you may just win some Kindred Stamps credit!!
Color Guide:
All images were stamped on Express-It cardstock
Sick Boy:
Flesh> OR7.2/ OR7.3/ OR2.0
Teeshirt> CG3/ CG1
Jacket> YO0.1; CG7
Pants> NG7/ NG5
Vest> O4.3
Shoes> CG3
Hair> OR3.8/3.7
Girlfriend:
Flesh> OR7.2/ OR7.3/ OR2.0
Jacket> CG3/ CG1
Vest> B0.7/ B0.6
Shorts> CG7/ CG5
Boots> CG3/ CG1
Hair> OR3.8/ OR3.7
Belt> O4.8
Bag> O7.7/ O7.5
Best Friend:
Flesh> OR7.2/ OR7.3/ OR2.0
Shirt> CG3/ CG1; R0.6/ R0.5
Pants> O4.3/ O4.1
Hat> R1.7
Shoes> CG7
Hair> OR3.8/OR3.7