Kindred Stamps June Release: Cribmates
Adventure? Jokes? Romance? Inventing? Gaming? Anything can happen when you make believe! The Cribmates stamp set can be used in any setting or scene imaginable. You just have to close you eyes… Let’s deep dive into how these cards were made, but first a psa…
This blog utilizes affiliate links. If you choose to click on the links provided to purchase, you are supporting me as I receive compensation for your purchase. If purchasing is not in your books, no worries, I hope you find inspiration for projects you design.

Cribmates, Kindred Stamps
Project One: All Aboard
A fun-fold card showcases all the adventures that the Cribmates can go on! This card is a standard A2 card dimensions just folded a little differently. Let’s break it down!
The back was up first. A piece of 110 lb Neenah card stock was cut to 4.25 inches by 11 inches. Pulling out the Grass and Clouds Stencil, I was ready to ink! The grass was first up, this was colored with Gina K Grass Green ink. Relocating the stencil to cover the entire 11 inches as needed. Then the stencil negative was placed over the grass to prepare for the sky inking. The negatives from the clouds were also taped down to ensure their whiteness. Gina K Blue Sky ink was blended over the sky portion. This ink blended piece was set aside.
Time to die cut… the Cribmates will be enjoying their trip on the train with the Train Die. I cut out 3 train cars in red card stock. Then cut the train engine twice from red card stock. With strategic card stock placement, I die cut sections of the engine and the cars from black and mirror silver card stock. The wheels and the couplers were cut from black card stock. The engine was assembled in layers to get the design I was looking for. The cars got their black pin striping added. These items were set aside to dry whilst I did some coloring.
The Cribmates were colored with Olo Markers and fussy cut out (See Color Guide). The sentiment was stamped with masking over the stamp to allow each section of the sentiment to be stamped separately. These were cut down to be sentiment strips with one being applied to section of the train.
It was time to make some folds. The stenciled paper base was scored at the 3.25 inches and then at 8.25 inches. Then the card base was turned upside down so the pretty colors were on my score bored and I could see the 3.25 score line at the 3.25 marking. I then scored the paper at 5.75 inches. By doing this my score lines will bend the appropriate ways without having that weird bump or cracking show. I primed the folds for magic time.
To assemble the card, the Cribmates were paired up to fit within the engine and cars. Each pair was glued together and to the train. The coupler was attached to the engine and to the end of two cars. The sentiment strips were glued down to the respective cars in the arrangement.
The train was now ready to be assembled. The engine was adhered flat to the card base. In the next panel, a small dab of glue was placed onto the top of the coupler and then the car was adhered. This was repeated twice. Each panel had the car, their passengers, and their wheels glued flat to the card base. Oh the adventures these Cribmates go on!
Card Size: Displays as 4.25 inches by 11 inches (Folds to fit an A2 or A6 envelope).

Cribmates, Kindred Stamps
Project Two: Science, Oh Yeah
These science pals are always in the lab no matter what their age is! The Cribmates Scientist and Assistant may be small but they are mighty on this card.
The background was first up! A piece of black card stock was cut down with the large stitched rectangle from the Card Basics Die Set. A piece of matte silver card stock was trimmed down to fit inside the ledge of the large rectangle. With the layers cut, I was ready to get inky! A piece of Hammermill card stock was cut down to an A2 panel. A third of the way up the panel, I placed a strip of masking paper leaving the lower third exposed to stencil. Using the Harlequin Stencil and Silver Stone ink from Altenew, I inked in a solid application. The stencil was removed and the inked section was lightly blended with remaining ink on my blending brush. This removed the harshness of the white paper. Next up was the wall paper. I repositioned the masking paper so the top section of the card panel was exposed. The Bottles Stencil was centered and inked with Altenew Buttercream. The stencil was removed and then the remaining ink on the blending brush was blended over the wall to remove the harshness. This panel was cut down to fit inside the matte silver card stock panel.
The Scientist and Assistant were stamped with alcohol safe ink and colored with Olo Markers (See Color Guide). Pulling out my trusty scissors, I fussy cut the pair out leaving a heavier white boarder to provide a visual contrast against the flooring. These were set aside to work on the science table. The Science Labs Die Set provided the pieces. The rack, microscope, and magnifying glass were die cut from a glossy black card stock, whereas the bottles and flask with their fluids were cut from white card stock. Finally the magnifying glass was die cut from mirror silver card stock for the glass section. The glass containers were colored B2.0 Olo Marker. The fluids were colored with Olo Markers (G1.5/ G5.1; O2.4/O1.2; RV1.3/ RV0.1; BV2.3/ B0.2; BG0.4/ BG2.3). Finally, the table was colored with O7.8/ O7.7/ and O7.3 Olo Markers.
To assemble the card, the layers were adhered together with liquid glue. The table and all the science supplies were assembled and glued flat to the inked panel. The magnifying glass was assembled and adhered to the Scientist’s hand. The Scientist and Assistant were popped up with foam tape and placed on the lower third of the card. Finally, the sentiment was stamped with black pigment ink, Clear Embossing Powder was applied and set with heat. This was cut down and popped up in the top third of the card. The card was finished, and these two are always welcome to stay at my crib anytime!
Card Size: A2 (4.25 inches by 5.5 inches)

Cribmates, Kindred Stamps
Project Three: Fly Away
With a little imagination, you can fly away just like the Cribmates too! This single layer card utilizes masking to design the scene. Let’s dive in!
The images from the Cribmates stamp set were arranged on a 3.5 inch by 8.5 inch piece of Hammermill card stock. The images were stamped with alcohol safe ink. Masks were stamped, cut out, and applied over their respective stamped images. Pulling out a circle die, I cut out one circle for each of the images out of masking paper to act as the balloons. The balloons were placed above each of the images allowing some distance between the image and the balloon. Taking out a fine liner, I then traced about the masked circle so the black lines would reflect the black lines of the stamped images. With the same black fine liner, I used a ruler to draw the string between the hand and the balloon.
Now that the stamping was done, I could focus on the back ground. I pulled out a cloud stencil and inked up a happy cloudy sky with Blue Hyacinth by Gina K Designs. With the sky done, I removed all of the masks to reveal my scene. I touched up any of the lines that needed with the fine liner and sat down to color.
Using Olo Markers, each of the images came to life (See Color Guide). The balloons were colored with Olo Markers as well (R0.5/ R0.4; O2.4/ O1.3; Y2.3/ Y1.2; G1.7/G1.5; B0.7/ B0.5; V2.6/ V2.4).
Finally, the sentiment was stamped in black pigment ink. This colored panel was adhered to a Slimline card base. I look at this card and smile. The adventures never end!
Card Size: Slimline (3.5 inches by 8.5 inches)
Cribmates, Kindred Stamps
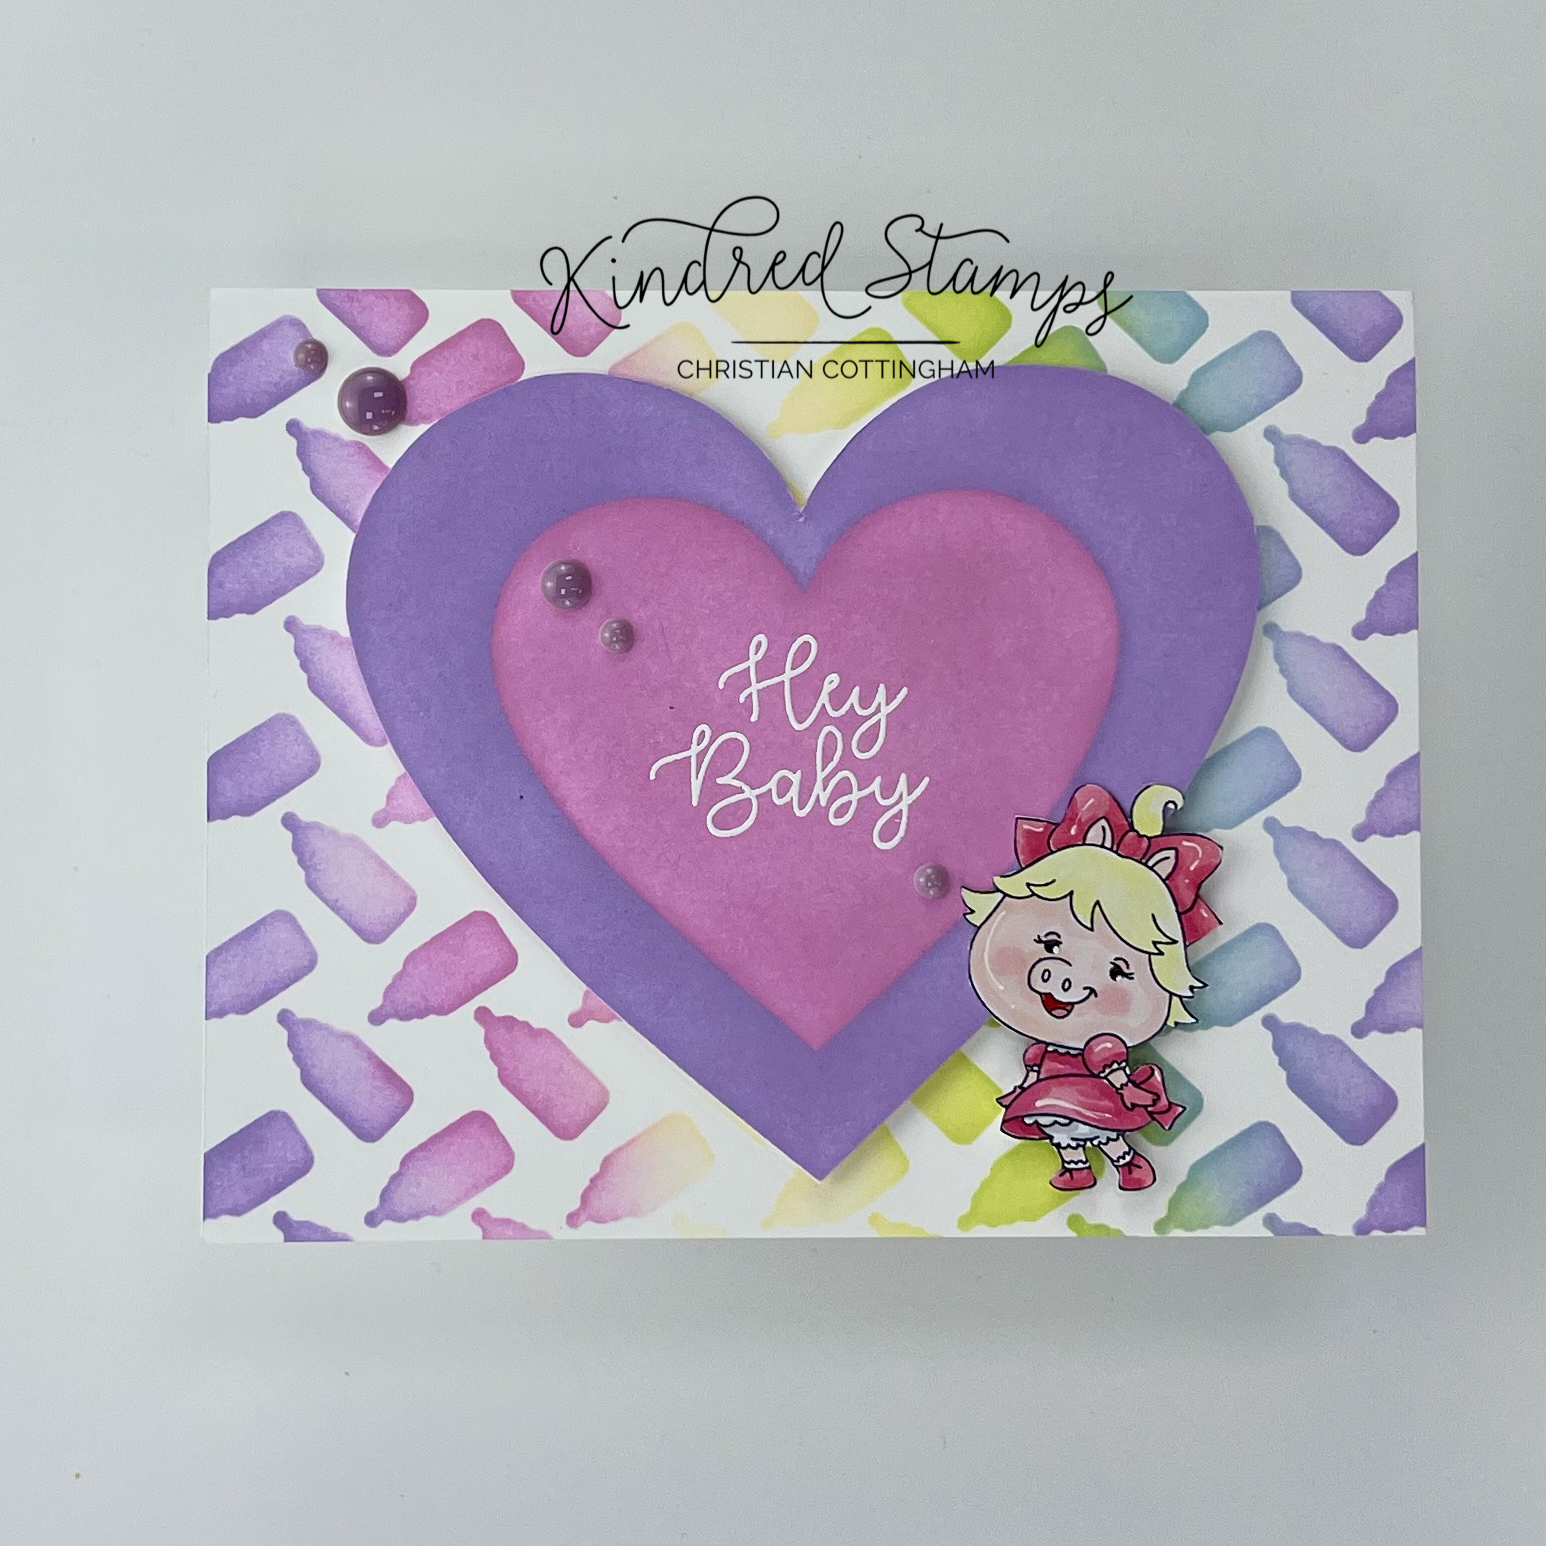
Project Four: Hey Baby
Sometimes when planning a card, it doesn’t always work out and you have bits that are screaming to be used. That is where this fun card design came from. It features the Pig from Cribmates and is a nod to the romance she is always seeking.
The background was a cast away from another design that just didn’t work but it sure works on this one! An A2 panel was centered on the Bottles Stencil and the ink was applied in a repeating rainbow order. I utilized Altenew Crisp Dye Inks in Puffy Heart/ Lavender Fields/ Buttercream/ Bamboo/ & Caribbean Sky. This panel was set aside.
Pulling out the Heart Layers Stencil, I stenciled the center heart in Puffy Heart ink. The negative mask was applied over the inked heart and then Lavender Fields was stenciled in the next open section on the stencil. This allowed me to have a two-tone heart that would be center on the background. When the ink was dry, the heart was prepped with antistatic tool. The sentiment was stamped in embossing ink and then Snowfall Embossing Powder was applied and heat set.
The Pig was stamped in alcohol safe ink and colored with Olo Markers (See Color Guide). The Pig was fussy cut out on the line and set aside. To assemble this simple colorful card, the stenciled paper was adhered to an A2 card base. Foam tape was applied to the back of the heart and was centered on the card base. Foam tape was applied to the overhang sections of the Pig and liquid glue was applied to the sections that overlapped the heart.
I just love how the failure from another design made this adorable card!
Card Size: A2 (4.25 inches by 5.5 inches)

Cribmates, Kindred Stamps
Project Five: Besties Since Diapers
The Science team from Cribmates have been besties since diapers and they always seem to shaking it up a little. So why not make a shaker and use the blackout technique with the Bottles Stencil. Let’s break it down.
A piece of Hammermill 100 lb card stock was cut down to 4 inches by 5 1/4 inches. The panel was ink blended with Altenew Crisp Dye Inks in Puffy Heart/ Lavender Fields/ Buttercream/ Bamboo/ Caribbean Sky. Utilizing my electronic die machine and the embossing mat, I placed the Bottle Stencil on the back side of the inked panel. This will cause the colored bottles to be indented vs. raised. I did have to add a shim to get the depth I wanted. (Tip: practice the embossing on the same weight scrap card stock to get the sandwich needed for your machine.). Now that the panel was ready, I pulled out some black ink and started rubbing the black ink over the panel. Next time I make this, I will try to utilize a brayer because the indentions were not as deep as I utilized a stencil for the embossing folder. This panel was set aside to dry as there was a ton of ink on it.
To have my besties connected, I stamped the Scientist first with alcohol safe ink. Then I stamped the same image on a piece of masking paper. This was cut out on the line and placed over the card stock stamped image. The Assistant was then stamped with overlap on the Scientist. The mask was removed. The two besties were colored with Olo Markers and fussy cut with a thin boarder. This will help them pop off of the card with so much darkness. (See Coloring Guide for the details)
The center panel was up next. A piece of black card stock was cut down to 1 3/8 by 5 1/4 inches and prepped with an antistatic tool. With embossing ink the sentiment was stamped, Snowfall Embossing Powder was applied, and the sentiment was heat set.
To assemble the shaker, the Cribmates packaging was cut down to 5 inches by 6 1/4 inches. Double-sided adhesive was placed onto the back of the embossed panel along the edges. The panel was centered on the acetate and the corners were trimmed to ease the assembly. Working one side at a time for 3 sides, I removed the adhesive backing and folded the acetate over the adhesive. The top side of the panel adhesive remains open to make the pocket for filling of the shaker bits. I pulled out some star shaker pieces and filled the pocket. When I had the amount I desired, I laid the panel flat and removed the double-sided adhesive backing and folded the acetate as prior. I now had a shaker!
To assemble the card, I had a couple more pieces of paper to prep. A black A2 panel was cut down and adhered to a white card base. A piece of holographic card stock was cut down with an A2 frame die set. This was adhered on top of the black panel. With my base ready, I placed extremely sticky double-sided adhesive to the back of the shaker panel and this was centered onto the card base. The black center strip was glued to the front of the acetate. Finally, the Science Besties were centered on the panel and adhered with glue.
Card Size: A2 (4.25 by 5.5 inches)
The entire Kindred Stamps release will be available this Friday at 8am PST/11am EST. Be sure to subscribe to the Kindred Stamps blog to see a daily line up of sneak peeks from our amazing Design Team! Come join the Fan Club and release event to be part of the release fun, and you may just win some Kindred Stamps credit!!
Color Guide (Olo):
Bear:
Jumper> Y1.2/ Y1.1
Hat> CG3/ Y1.2
Bow> CG3/ RV0.2
Mouth> RV0.2/ R1.5
Body> OR7.6/ OR7.4
Baby Bear> OR3.2
Furry Baby:
Bow/ Ruffle> CG3/ Zero
Teeshirt> Y1.2
Body> O1.3/ O1.2; RV1.5/ RV1.3
Mouth> R1.5/ BK
Shorts> R0.4/ R0.5
Drum> R1.5/ CG2/ CG1
Scientist:
Flesh> YO2.2/ YO2.0
Scarf> O2.4/ O1.3
Bunny> CG3
Beaker> YG2.3
Glass> Black fine liner pen
Shirt> B0.2/ B2.0
Assistant:
Shirt> BG2.3/ BG2.1
Shoes> V2.7/ V2.6
Flesh> OR2.0/ O2.2
Hair> O2.4/ O1.3
Nose> O1.3
Nosey Guy:
Body> B0.2/ B0.3/ B2.0
Bibs> R0.5/ R0.4; Y2.3
Shoes>Y2.3/ Y2.2
Eyes> YG1.4
Dog:
Body> OR4.7/ O2.7
Bib> CG3/ Zero; R0.5
Mouth> R1.5/ RV0.2
Nose> BK
Pig:
Body> R0.1/ R0.2; R2.2
Eye> R0.2
Hair> Y1.1/ Y2.0
Dress> RV0.4/ RV0.2; CG3
Mouth> RV0.2/ R1.5
Frog:
Body> G1.5/ G1.7
Mouth> R1.5/ RV0.2
Shirt> CG3/ Zero/ B4.3
Shorts>B4.3
Twin Boy:
Flesh> YO2.3/ Y2.2
Hair> OR2.5/ OR2.3
Shorts> BV4.5/ BV4.4
Shirt> BV2.2/ BV2.0; R5.5/ R5.3
Glasses> YG8.5
Shoes> R5.5
Mouth> RV0.2/ R1.5
Twin Girl:
Flesh> YO2.3/ Y2.2
Hair> OR2.5/ OR2.3
Glasses> V2.3
Shirt> YG2.3/ YG1.2
Shorts> B2.4/ B2.2
Shoes> RV0.4/ RV0.2
Mouth> RV0.2/ R1.5
Other Supply Links:
Amazon: https://amzn.to/4k1IxTX
Hammermill Card Stock: https://a.co/d/4rTS2wh
Neenah Classic Crest Solar White 110 lb Card Stock: https://a.co/d/dgMbCHb