
Thinking of You Everyday
Thinking of you cards are one of the most versitial cards to have in your stash. From birthday to support, these cards can be used for all.
Every once in a while, you just need to let some know that you are thinking about them. A thinking of you card can be utilized for any situation or just to reach out and say hey, I’m here for you. These two projects let nature shine and the sentiment be the star.
Project One: Artistic Foliage
Mother Nature provides us with serenity with the green leaves that we see all around us. This card echos peacefulness. Pink Fresh Studio & Simon Says Stamp collaboration Artistic Foliage provides an example of Mother Nature’s wonder and serenity.
The image was stamped in Gina K Designs Obsidian Black in. Utilizing the coordinating stencils, the image was inked with Gina K Designs Light Spruce/ Medium Spruce. The image was die cut out along with 3 more die cuts from scrap paper. This will add dimension to the card without the need to fiddle with foam. These cutouts were glued and stacked together with Gina K Designs Connect Glue.
Since I was stamping and die cutting, I inked the sentiment from Altenew Build-a-Flower Tree Peony stamps set with Gina K Designs Obsidian ink. The sentiment and blanks for dimension were die cut and stacked.
To achieve the serenity that I was envisioning, I wanted lots of white space for the eye to relax. White space does not mean white. It refers to the quiet space to allow the images to shine. Utilizing Gina K Designs Master Layout 2, I cut a black frame and a white card panel. I spattered the white panel with Distress Mica Spray in Frozen Fog, and some diluted Gina K Designs Black Onyx ink.
To assemble the card, the frame and spattered panel were adhered to the card base. The leaf sprigs and sentiment were arranged to provide the aesthetic that spoke to me. To accent the card some Clear Quartz Solid sequence from Gina K Designs were added.
Card Size: A2 (5.25 by 4.25 inches)

Project Two: Tree Peony
Everyone deserves to receive flowers. If you can’t afford to send physical flowers to someone when you are thinking of them, the next best thing is a floral card. The tree peony cluster and simple sentiment never fade and don’t require the water to be changed.
With the Altenew Build-a-Flower Tree Peony stamps and dies, this card came together in a breeze. The image was stamped in Altenew Obsidian pigment ink. The layering stamps we were inked with Altenew Crisp Die Inks in the Summer Afternoon color family (Buttercream/ Warm Sunshine/ Caramel Toffee/ Paper Bag). The leaves were colored in the Tropical Forest color way (Bamboo/ Parrot/ Olive/ Moss). The images were die cut out and foam tape was applied to the florals.
The warmth I was looking for came from the colored card base (Gina K Designs Prickly Pear). Utilizing Master Layouts 2 (Gina K Designs) I cut a black frame to pull in the black sentiment and inked lines, and a white panel for the florals to rest on. The panels were glued together with Gina K Designs Connect Glue and adhered to a white card base. The arrangement was determined and the leaves were adhered to the white base, framing the opposing sides. The florals were attached with the images overhanging the white framed panel to give interest. Thinking of You Everyday was stamped and die cut. A piece of foam tape was centered on the back to provide the support to the sentiment, while liquid glue secured the ends to the florals. A scattering of Clear Quartz Solid sequence by Gina K Designs draw the eye to the sentiment nestled between the florals. Now these are some florals, that will never fade and can be displayed for an eternity.
Card Size: A2 (5.5 inches by 4.25 inches)

Kindred Stamps November Release: Family Choir
Kindred Stamps Family Choir Release November 2024
As a child I looked forward to going to my Grandma’s every summer for a month at a time. We would swim, watch old TV shows, listen to classic country, play canasta or kings corner and go to the theater. We shared a love for the arts including musicals and theater. I was introduced at a young age and haven’t ever turned back. She would watch the same show over and over and over again during that month she had us. Family Choir stamp set made my heart sing as soon as I saw it.
Throughout this blog, you will see affiliate links. By utilizing the affiliate link, you can support me without any cost to you! The proceeds I receive go to purchasing even more product to bring you inspiration.
This set will go-live on Friday November 22nd, 2024 and available at the Kindred Stamps website.
Let’s start looking at some of my favorite things with this Family Choir stamp set.

Kindred Stamps, Family Choir
Project One: You Make My Heart Sing Box Card
A perfect night scene for a new love. These lovers are enjoying their night under the stars in the garden. The darkness is all around them, but they glow.
The Box Card Die, was the perfect base for this dimensional card. The base was cut out of black card stock and assembled. To have the gazebo remain see through, I trimmed the back panel of the card die to the height of the steps of the gazebo. This will allow an anchor place for the gazebo.
The Gazebo Die was cut out of card stock. Using my imagination, I pencilled in columns and sketched the roof. This provided the stone look I was going for. The Gazebo Die was larger than the base panel of the box card. In order to have the die fit into the base a quarter inch was trimmed from both sides up to the bottom step that I had sketched. This allows for over hang of the step and a deep enough base to secure to the box card base.

Kindred Stamps, Family Choir
The Gazebo Die was colored with Olo markers (C-G 9/ C-G 7/ C-G 5). To mask the bleed through of the markers, another gazebo was die cut out of the same black card stock. This will sandwich the back of the gazebo on the back of the box card and add extra support.
The side panels of the Box Card die were cut in the same black card stock. I wanted the stitching as a decorative element but did not want any distractions from my lovers. The front panel with stamped with a sentiment from the Family Choir set in pigment ink and heat embossed with clear embossing powder. The added shine from the sentiment makes the card look finished.
As this was a garden scene at night, I needed some non-identifiable shrubs. With green card stock, I fussy cut some shrub-like shapes. To give the night time hue, I inked the tops of the shrubs with a little black dye ink.
Lover color time was up next. With a little imagination and strategic coloring, I was able to transform her standard uniform into an cocktail dress and ballet flats. The lovers were stamped and colored with Olo markers (Color Guide) and accents were added with a black glaze pen or white gel pen. I also stamped the couple on black card stock with white pigment ink. Both sets of images were fuzzy cut out on the line. To ensure the lover meld into the background, I did use a marker to the sides of the white fussy cut images.

Kindred Stamps, Family Choir
Time for assembly! The shrubs were adhered behind the ledges of the box card levels. To have my lovers dancing on the dark ground, I utilized acetate sandwiched between the colored and black fussy cut images. This provided stability to the lovers, and a small acetate tab that I can use for adhering the lovers exactly at ground level that they are dancing on. The colored gazebo was first adhered to the card base on the inside panel. The lower tab of the gazebo was covered with back card stock to stiffen the base. The black gazebo was then glued to the back side of the colored gazebo to hide the mucky muck and to stabilize the gazebo.
Finally, you have to have a spot to write your message, so I made a mini card that I decorated like a love letter envelope. Penciling my base lines, I stamped a heart in red ink from the Bears With Feelings stamp set. The lines were then outlined in a black marker and a shadow was placed below the lip of the envelope flap with Olo C-G 0 marker. My card was now complete.
Card Size: Custom, handmade envelope to accommodate dimensions

Kindred Stamps, Family Choir
Project Two: Singing Stairs
As soon as I saw this set, I saw this card in my head. After sketching out the stairs and the mezzanine in pencil, I stamped and masked the siblings placing them each on a step. Using an alcohol ink safe pen, I traced my lines to create the scene.
The siblings from the Family Choir set were colored in Olo markers (Color Guide). The stoney background was colored with Olo markers in BG 7.6/ BG 7.3/ BG 7.2. The stairs were colored in W-G 9/ W-G 7/ W-G 5/ and W-G 3.
The sentiment was stamped in black pigment ink and then heat embossed with clear embossing powder. The card panel was trimmed and matted on a deep green card stock to provide the contrast I was looking for. This simple card sings of happiness.
Card Size: A7 (5 inches/ 7 inches) landscape

Kindred Stamps, Family Choir
Project Three: Music Kids Unite
I am a choir girl at heart. I sang all through high school and college. I even worked in the Music Library on my campus. This slimline card captures the classic C Major scale with a treble clef and our siblings as the music notes. How do you not have something to sing about?
The staff paper was simply a piece of white card stock with black paper strips adhered with glue. The treble clef was hand drawn and filled in with Olo BK marker. After the treble clef was fussy cut and attached to the staff paper, Glossy Accents was applied and allowed to dry. The staff paper was secured onto black card stock on a slimline card base. I chose the black as it reminded me of the vegan leather folders that we held scores and sheet music in for different performances.
The siblings from the Family Choir set were colored in their standard uniform (Color Guide) and then cut out. Adding some foam behind each sibling for dimension helps them pop off the page. The sentiment was stamped in a black pigment ink and heat embossed with clear embossing powder. This card makes my choir girl heart explode!
Card Size: Slimline (4 inches by 9 inches)

Kindred Stamps, Family Choir
Project Four: Singing Trees
Can you hear the trees singing? The simple pop-up element on this card adds to the depth of the scene without adding more bulk. There are many layers to this card so let’s start with the background.
On the card base, I determined where my horizon line was to be. From the horizon line I sketched my road. Using some masking paper, I first worked the sky. With a light blue ink and the positive cuts outs from the Grass and Clouds stencil, I ink blended moving my clouds as needed to fill the sky. When the sky was completed, I removed the masking paper and placed it on the same horizon line exposing the sketched road. The road was masked and the green ink was blended onto the card stock in a solid manner as most of it will be covered. Finally, the grass was masked and the road blended with light gray ink.
The Grass and Cloud stencil was still laying on my workspace and I thought to myself, “self, that cloud sure looks like a tree, you should make it one.” Challenge accepted. I found a green card stock that was in the same color family as my grass. Using a pencil, I traced the cloud stencil and fussy cut out my bubbly tree tops. I traced 3 of the clouds and then flipped the stencil over and penciled 3 more. This allows for my trees to be mirrored on each side of the road. To give some fluidity to the trees, I inked blended a deep green on the edges. The tree trunk was freehand cut from some Kraft paper and then ink blended with some brown ink to give the trunks roundness.
Pop-up Mechanism
The Drive In Memory Dex die was the base for the car that the Dad is driving. With a little re-invention, the card was transformed into a vintage car. The car was cut from black card stock, the grill from a light silvery gray yardstick and two headlights from white paper. The two circles were cut and colored with Olo C-G 0/ C-G 1 markers. A little foam square was placed behind the headlights to give the dimension of being external to the frame of the car. Glossy Accents were applied to give their shiny glass appearance.
The pop-up mechanism is a simple use of paper to add dimension. To measure for the mechanism, I measured the length of my final die cut and deducted a 0.25 inches. I also validated the height of the die cut to ensure the card stock would not show over the top of the car. Prior to cutting my piece of paper I added 1.5 inches to each side of my desired length. This allowed me to score at 0.5 inches, 1 inch, and 1.5 inches on both sides of the strip. I accordion folded the ends. These tabs adhere the accordion mechanism to the base and a little adhesive to the top of the mechanism attaches the car. The car will be attached after the singing trees.
Pop-up Mechanism
The Family Choir images were colored with Olo markers (Color Guide, labeled below as Casual Dad/ Play Uniforms). Only the top halves of the family were colored as their bottom halves are hidden in the trees or in the car. Save your ink and your time!
To assemble the singing trees, I glued the trunks to the card base as well as the furtherest layer of tree tops. The second layer of trees were popped up on foam and the family was tucked in throughout leaving a small open area to place the sentiment. The third layer of trees were attached flat. The car adhered to the base of the card.
“Life is better when you sing” was stamped in pigment ink and heat embossed with clear powder to add some shine. Now, my trees really sing!
Card Size: A7 (5 inches by 7 inches)

Kindred Stamps, Family Choir
Project 5: I Have Confidence In You
A little confidence is all you need to accomplish anything! This confident woman is the main event on this card.
The Card Basic Die provided the card layout. Pulling to soft taupe colors from the Nanny paper pack, I die cut the main panel from the lace filled paper. Then the solid taupe country quilt patterned paper was cut out and foam tape was applied to add a little punch to the card.
The background and sentiment were completed next. The boarder of the card base was inked in a Rose Gold pigment ink and set aside to dry. The sentiment was stamped in the same Rose Gold pigment ink and set aside. When dry, the sentiment was fussy cut out.
The confident woman from the Family Choir set was colored in Olo markers (Color Guide), fussy cut out, and mounted onto the square panel with foam tape. The card was assembled and embellished with some of the teeniest tiniest pearls that I found in the bottom of my gem and pearl box. Nothing screams confidence as some pearls. This simple card reminds us that confidence comes from within and doesn’t need to have all the bells and whistles to prove the confidence we have.
Card Size: A2 (4.25 by 5.5 inches) landscape

Kindred Stamps, Family Choir
Project 6: Mountain Song
Whimsy mountains and rolling hills act as the back drop for our lovely dancing lady. This card is made with watercolors and no line coloring with Zig Clean Color Brushes. Whenever I utilize my Zig markers, I always use Strathmore Bristol Smooth paper. I find I have the best blending with this paper.
To prep for the watercoloring, I first stamped the image in a light ink. The image was then coated in Pebeo Drawing Gum to protect the image from the water. I used low tack masking tape to place my watercolor paper on a hard board to keep my paper from warping as I apply water. I sketched and erased my lines to layout the mountains vs the hills.
Using my Altenew 24-Pan watercolors, I first added a diluted sky with the Lapis Lazuli and allowed to dry. The mountains were up next. The base shape of each mountain was in a diluted Rock Collection and allowed to dry. To give the mountains contrast, I deeper concentration of Rock Collection that was mixed on my pallet and a jagged line was painted on the mountain side and then filled. Once dry, another layer of color was applied to build the texture that I was seeking. When the mountains were dry, the hills were painted. The aptly named Green Hills was the color choice. As with the mountains, a diluted wash was applied first. Then subsequent intensities were applied for contrast and make the hills roll. You guessed it, this had dry.
Once my background was dry, the drawing gum was rubbed off with an adhesive eraser to expose the clean dry stamped dancer. The dancer from the Family Choir set was colored with Zig Clean Color Brushes (Color Guide). With a black glaze and white gel pen, her eyes were brought to life.
The watercolor panel was cut out with the Cards Basic die. The sentiment was stamped in embossing ink in my stamping platform and heat embossed with the Snowfall embossing power. To make the sentiment pop more, I returned the panel into my stamping platform and re-inked the sentiment and applied a second layer of Snowfall embossing powder. Foam tape was applied to the panel to flatten any warping that was left. This panel was placed on an A2 dark green card panel.
Making a card with another medium besides alcohol markers was refreshing! I was surprised on how easy it was to design.
Card Size: A2 (4.25 inches x 5.5 inches); easily adoptable to any size card
The entire Kindred Stamps release will be available this Friday at 8am PST/11am EST. Be sure to subscribe to the Kindred Stamps blog to see a daily line up of sneak peeks from our amazing Design Team! Come join the Fan Club and release event to be part of the release fun, and you may just win some Kindred Stamps credit!!
Color Guide:
Hair Colors, Olo:
Blonde: YO 3.4/ YO 2.5/ YO 2.3/ O 7.3
Brown: OR 3.4/ OR 3.7/ BK
Standard Uniforms, Olo:
Sash: YG 8.7/ YG 8.5
Shirt/ Skirt/ Short: C-G 5/ C-G 3
Socks/ Shoes: C-G 0/ C-G 1
Play Uniforms, Olo:
Shirt/ Dress: YG 8.5/ W-G 1
Casual Dad, Olo:
Coat: C-G 5/ C-G 3
Shirt: C-G 1
Tie: C-G 9/ C-G 5
Dancing Lady Modified, Olo:
Dress: B 0.7/ B 0.6/ B 0.5/ B 0.3/ B 0.2
Shoes: B 0.6/ B 0.5
Dancing Lady, Zigs Color Clean Brush Markers:
Face: 069 Blush/ 076 Medium Beige/ 028 Paie Pink
Hair: 067 Mustard/ 055 Pale Yellow
Top: 091 Light Gray/ 902 Natural Gray
Skirt: 095 Dark Gray/ 091 Light Gray
Apron: 099 Cool Gray/ 091 Light Gray
Lips: 200 S. Almond Pink
Lady with Hat, Olo:
Hat: O 2.5/ O 2.7
Jacket: OR 7.4/ OR 7.6
Skirt: YG 8.5/ YG 8.7
Man, Olo:
Shirt: C-G 1
Tie: C-G 7
Coat/ Pants: C-G 7/ C-G 9/ C-G 5
Shoes: BK/ C-G 9

Florals for Babcia
Florals for Babcia: This simple set of florals are an expression of beauty for my grandmother for Christmas.
My Babcia (grandmother) loves all flowers and art work with florals. As with all grandmothers, she is one of my biggest cheerleaders. She encourages me to be the best me possible and to always stand up for what I love. The following card set is for my Babcia for Christmas. I will box them up with some postage stamps, envelopes, and a fancy new pen so she can send them on their way. Merry Christmas Babcia!

Altenew: Build-A-Garden Lovely Rose Peony
Project One: Lovely Rose Peonies
The Altenew Build-a-Garden Lovely Rose Peony stamp, stencil, and die set made this set of cards a breeze. Because I struggle with impatience, to let any ink dry, I stamped the florals and vases in Sandy Beach ink from Gina K Designs with my Stampwheel. By doing so, if I don’t line my stencils up exactly when blending the black ink will cover my overhang and an added bonus of it not smearing when I apply the ink. Again, this is because I am impatient (insert eye roll).
The rose peonies were ink blended with Gina K Designs Light Orchid and Medium Orchid with the heaviest application at the center of the floral and the lightest at the tip. The centers were filled with one of my favorite yellows Gina K Designs Sweet Corn. Finally the leaves were blended with Gina K Designs Light Spruce and Medium Spruce with the deepest concentration of color at the base of the leaves. The vases were inked with various intensity of Gina K Designs Stormy Skies ink.
With the ink blending completed, I placed my images back into the Stampwheel with the stamps and paper in the same spot that I originally stamped the images. Utilizing Altenew Obsidian Black Pigment Ink, I re-stamped the ink blended images and the flowers came to life.
I wanted a simple background for the florals to rest upon. To achieve the texture I was looking for I utilized Trinity Stamps Retro Plaid Pattern stencil set on a piece of Spellbinders Waterfall Color Essentials Card Stock. The stencil was ink blended with Gina K Designs Ocean Mist and Gina K Designs White pigment ink for a tonal pattern. I trimmed a quarter inch from the back panel on the vertical side to add a little dimension to the card panel.
For the sentiment, I choose a simple yet elegant sentiment from the stamp set. Then finally accented the image with a sprinkling of Gina K Designs Micro Disco Balls.
Card Size: A2 (5.5 x 4.25 inches)

Gina K Designs: Wishful Floral Bundle & Wishful Florals Layering Stencil
Project Two: Wishful Florals
Gina K Designs Wishful Floral Bundle and Wishful Florals Layering Stencil provide the base for the second set of cards for my Babcia. The background was started first to allow for dry time. Master Layouts II has the perfect boarder for my floral backdrop. The shadow layer was die cut from black card stock. A white panel was cut with the stitched panel die. Digging out my Perfect Pearls in gold I added a spattering of gold on the panel.
While the panel dried I inked up a floral cluster and the small 3 floral bunch from the stamp set with Gina K Designs Black Onyx ink. The stencil lined up so easily that I was able to apply the color in no time at all. The florals were blended with Gina K Designs Light Carnation and Medium Carnation. I did the base color on each of the stencils with the lightest color and then deepened the center with the darker color. The leaves were inked with Gina K Designs Jelly Bean Green for both stencils, one with a light hand, the second with a heavier hand to give the tonal look. The sentiment were stamped in the same Black Onyx ink and then die cut with the bundle dies.
The floral arrangement was adhered to the spattered background in the top left corner and the sentiment to the lower right with the images extending over the framed boarders.
Card Size: A2 (5.5 x 4.25 inches)

Kindred Stamps October 2024 Release: Nativity Play
The Nativity Play stamp set from the Kindred Stamps October Release screams nostalgia.
Nostalgia overload here with the new Nativity Play stamps from Kindred Stamps. When I saw this set, I knew I had to have it. As a child the magic of the holidays fills your entire being. The awe of the lights, the sparkle of the trees, and then the traditions. One tradition in our family was setting up our nativity scene and listening to my Opa read from the Bible. The warmth of family, love, joy, and hope for the future topped with the sparkle of lights, singing of carols, and hot chocolate to this day still fill me up every holiday. The projects I made with this set echo the feeling of childhood. You just had to believe in Christmas! The Kindred Stamps release is on October 25th, 2024. You can nab up some nostalgia for yourself!
In my blog, I will provide an affiliate link for the products that I love. By purchasing through my link, you are supporting me at no cost to you. Let the inspiration begin!
Nativity Play, Kindred Stamps
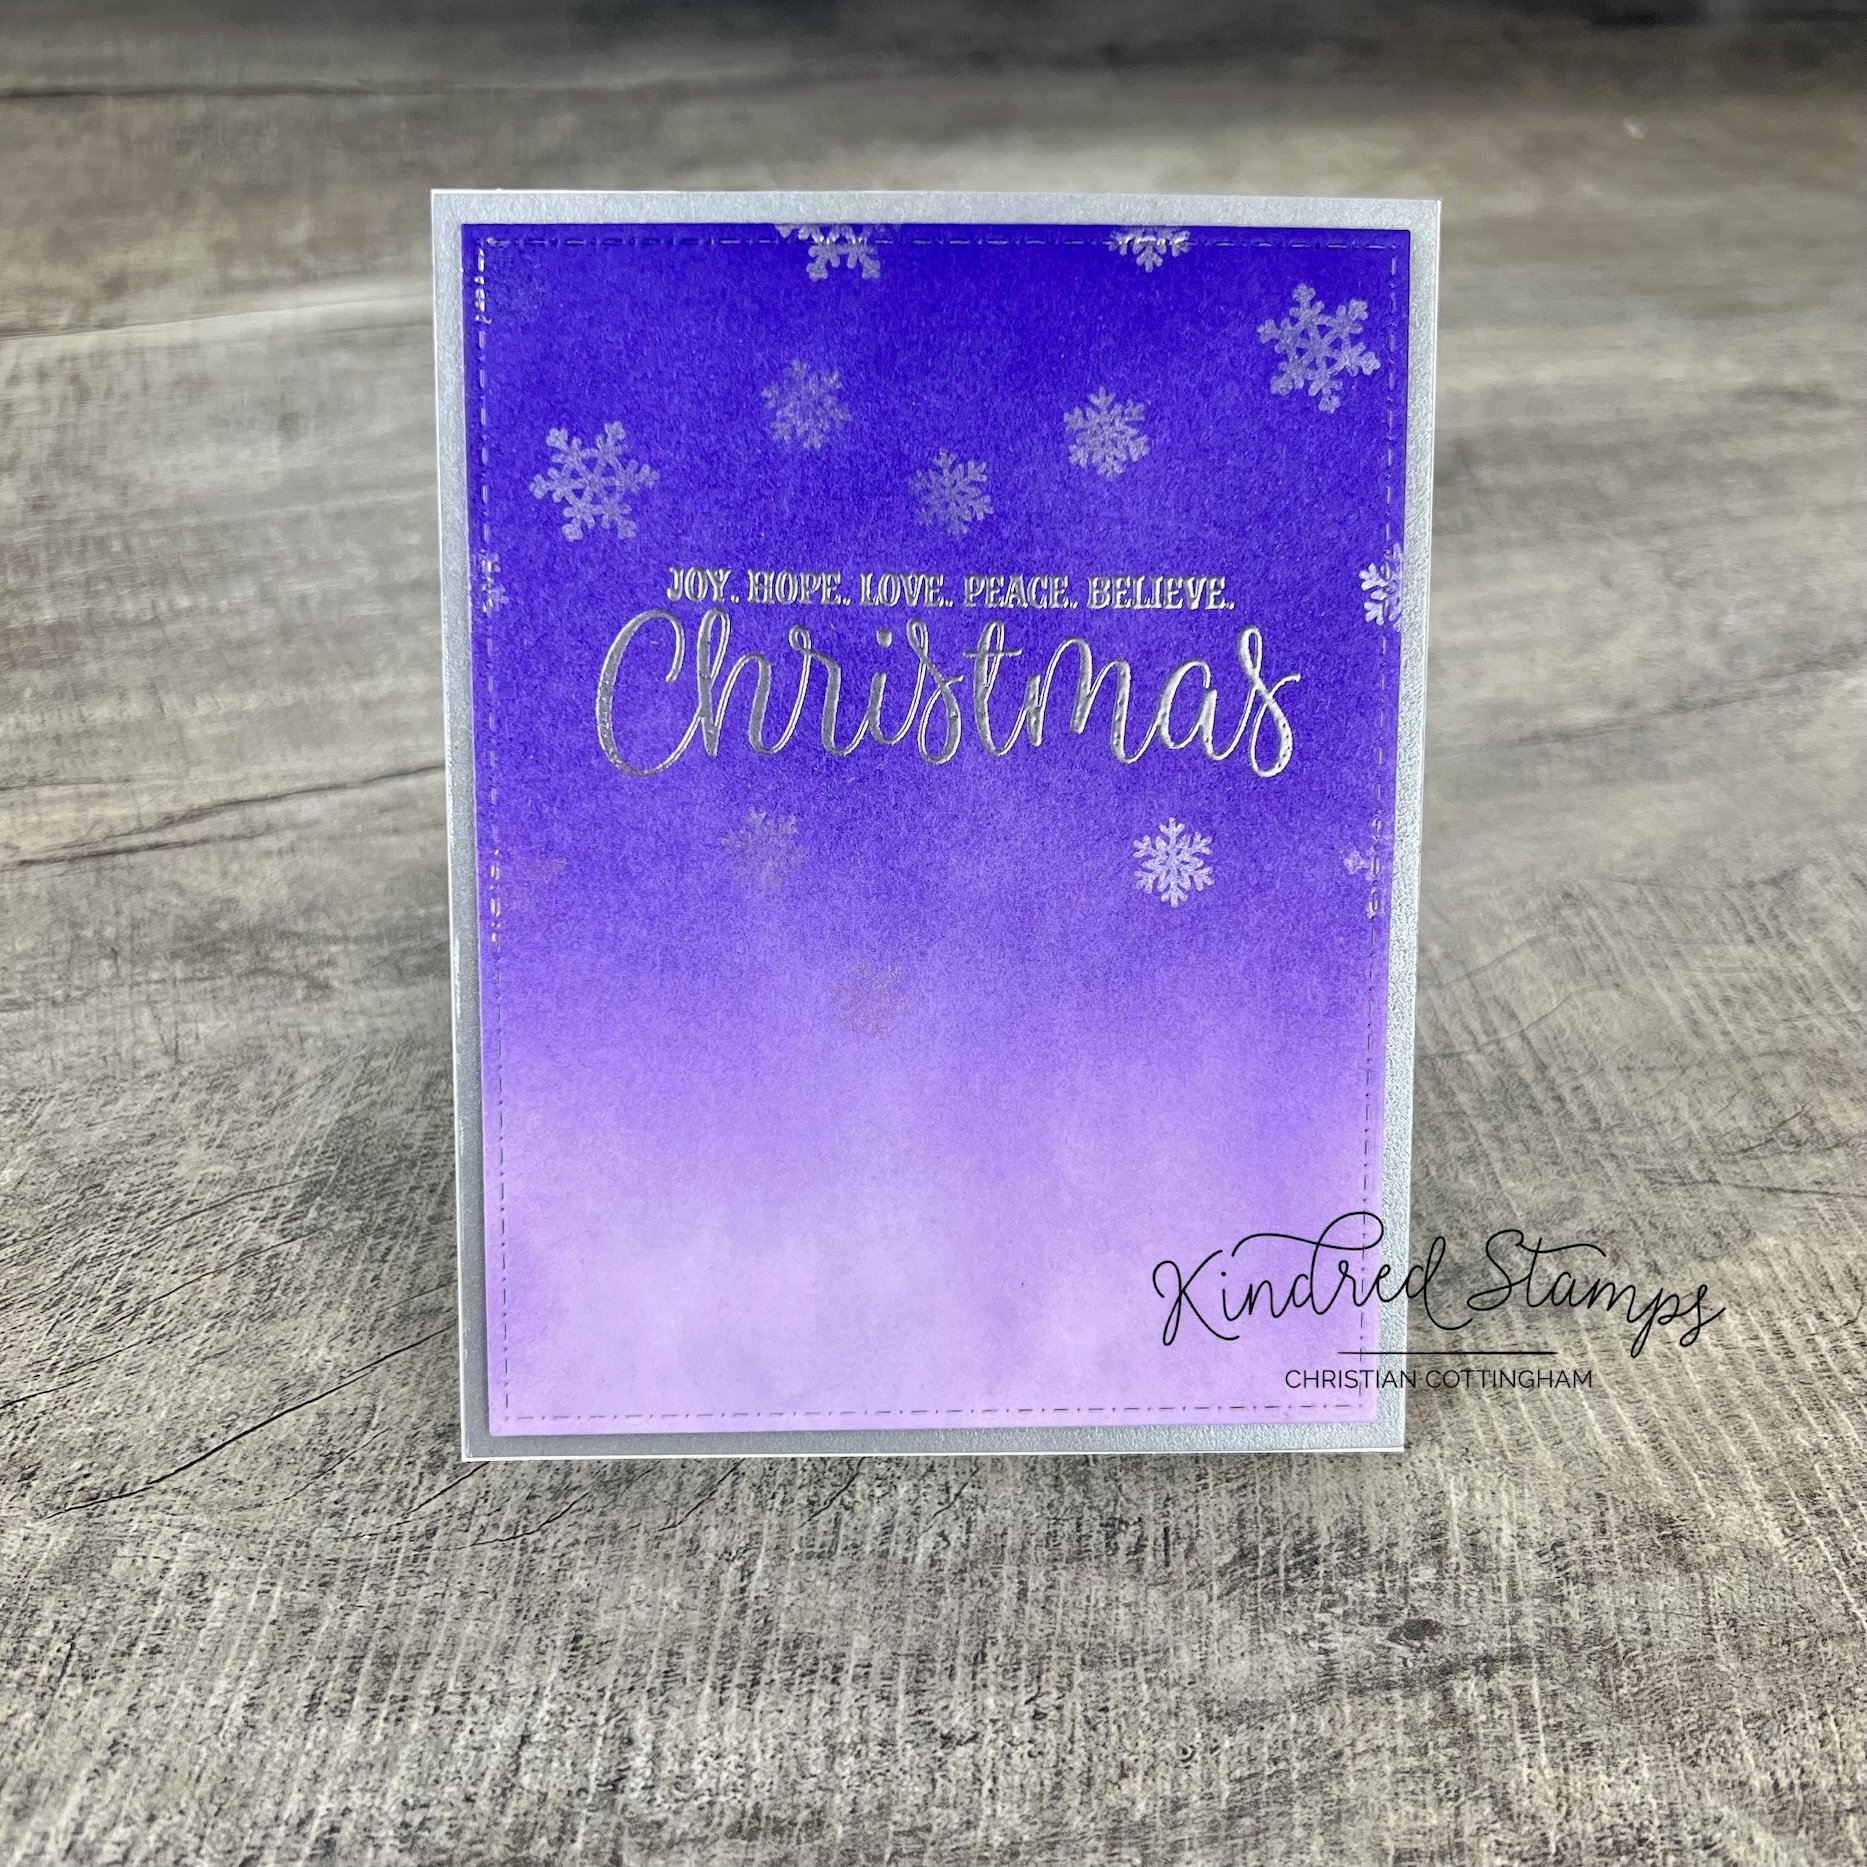
Project One: Joy. Hope. Love. Peace. Believe.
Showcasing the amazing typography in the sentiments of the Nativity Play set, this simple gradient provides a graceful Christmas card. The card base was cut with the Cards Basic Die set after the ink blending to ensure a smooth transition. This simple ink blend utilized one color, Grape Crush (Catherine Pooler) with the repeated application pulling the blending down from the top of the paper with lessoned application towards the bottom of the card front. The sentiment is the star of the show on this card and was heat embossed with silver. The panel was adhered to a matte silver card stock with some foam tape to give that fancy dimension that makes handmade cards pop. If you want to bling it up you sure can!
Card Size: A2 top folding card (5.5 inches x 4.25 inches). Easily converted to any size card.

Nativity Play, Kindred Stamps
Project Two: O Holy Night
A simple glass cloche is a perfect way to set the scene for this special family on their debut night.
The family from Nativity Play were colored with Olo Markers and fussy cut out (someday I will learn to use the expensive machine I bought to do it for me- insert eye roll). Colors will be listed at the end of this post.
The cloche was made with a simple oval die with the bottom cut off. Bringing in some blue ink with a very light hand gives the illusion of glass (Juniper Mist Catherine Pooler). While ink blending was drying, I drew a base on a piece of scrap paper and fussy cut it out. To make the illusion of a wood base, I used Altenew Artist Markers (Y932/Y762) with random lines and flicks. While laying out my little family to see where I wanted to place my sentiment, I noticed my family was floating. I mean, I know they are special and all, but they definitely needed to be grounded. I made a mask with a post-it note and ink blended some brown ink( Altenew Espresso) and then some texture with the same marker family from Altenew. Now my family had some solid ground to stand on.

Cloche base
The sentiment “O Holy Night” matched the simplicity of the cloche and serine scene. This was heat embossed in white. Every Christmas card needs some sparkle, its a law. So I added some iridescent Stickles as twinkle stars inside my cloche. The British Invasion Paper Pack had just the right amount of texture and contrast to make the cloche be front and center. This was cut to cover the entire card front.
Card Size: A2 top folding card (5.5 inches x 4.25 inches)

Nativity Play, Kindred Stamps
Project 3: The Weary World Rejoices
Nativity Play stamp set screams “ACTION” on first glance. As soon as I saw it I knew there would be a single layer card on stage! Each cast member made it to this full panel A7 card with masking to create the set design.
With the magic of masking paper, the scene was laid out and cast member were stamped in alcohol safe ink. Some simple hand sketching of a back stage line added the grounding for the cast. Utilizing the Curtain Die, I cut out one topper to provide me the swooping curtains I was looking for. Freehand drawing of swoop lines to give the toppers texture.
The cast was colored with Olo and Altenew Artist markers (colors listed below). The stage floor, backdrop and curtain toppers were colored with Altenew Artist Markers (respectively: WG05/ WG03; S; R318/ R335).
Once the panel was dry (yes alcohol markers need to dry completely- ask me how I know…) I heat embossed in white “the weary world rejoices” in front of the new family.
Card Size: A7 (5 inches by 7 inches) Landscape

Nativity Play, Kindred Stamps
Project 4: Nativity Ornaments
Nostalgia ran full force through my body when I saw the Nativity Play stamp set. The warmth I felt made me think of sitting in front of the Christmas tree with some hot chocolate (or chocolate martini… either warm your soul) and gazing at the twinkling lights and ornaments. The Nativity Play works perfectly as ornaments. By the time you are reading this, the tree will be set up in my studio, and I may or may not have a hot chocolate or chocolate martini in hand enjoying the twinkling lights and ornaments.

Nativity Play, Kindred Stamps
Each of the designs were stamped in alcohol safe ink and then colored with Olo and Altenew Artist Markers. Colors are list at the end of this blog. Then fussy cut out and foam tape applied to the back for added dimension.

Nativity Play, Kindred Stamps
Using circle dies the frame and bases were cut out for each ornament (2 bases and 4 frames for each design). One of the bases will act as the background for the design to be centered on. A little gradient ink blending with one color (Altenew Dessert Night) and then spatters of Distress Mica Spray in Frosted Fog and Distress Spritz in Peacock Feathers to give the shimmer and shine. Because you can never have enough sparkle, bring on the Stickles!

Nativity Play, Kindred Stamps
The second base was heat embossed with silver with the 3 large sentiments from the Nativity Play stamp set. The dried inky shimmery base was adhered to the clean embossed base for stability and to hide the mucky muck on the back of the colored base. The frames were stacked up and topped with holographic paper to up the reflectivity. Each design was placed in the center. Added a topper for the ornaments to hang. Now I’m set to dig out my little silver tree for my studio and enjoy a soul warming beverage and admire my twinkly lights and shiny ornaments.

Nativity Play, Kindred Stamps

Nativity Play, Kindred Stamps
Project 5: Curtain Up
Raise the curtain to show the royalty of Nativity Play stamp set. This interactive card utilizes no speciality dies. If you plan ahead you could even make this card to be sent through the mail without extra postage unlike me. I did not plan ahead. I used the images that were already colored and fussy cut out. Learn from my mistakes. Or be cool like me and hand deliver this thick card!
The images were colored with Olo and Altenew Artist Markers. Colors listed at the end of this blog.
Using nesting A2 dies, I made a frame. With the largest die of the frame, I cut one solid base, this will be the base of the stage background. With the same large die, I cut one piece of acetate with a piece of copy paper behind the acetate. This will help the die cut cleaner and then you will not loose the acetate on your table. Or am the only one?? Finally, with the inner die of the frame, I cut one piece of card stock for the pull out curtain. Why not use the piece that came out of my original frame cut? You can take that up with my dog. He’s faster then me and then thought it was a game of keep away. Again, don’t be like me, don’t drop your stuff.
Since I was die cutting, I pulled out some rich red card stock and cut out the Curtain Die. 2 right curtains, 2 left curtains, 3 curtain toppers, and finally 2 sets of tiebacks out of a matte gold card stock.
The stage background was up first. Using colored card stock in light gray and a deeper gray I glued down the stage floor and background. Trimmed with some scissors (I was done with die cutting at this point and no one is going to see it). Tada! That was the easiest assembly ever.
Next up was the ink blending station. The curtains and curtain toppers got a dusting of brown ink to deepen the shadows and give a little dimension. To prep the pull up curtain piece, I did simple ink blending on the inside frame cut out to match my curtain color. I then cut a quarter inch off each right and left side of the landscape piece.
While the pieces were drying, frame assembly began. The frame was colored in a black alcohol marker. Because I just happened to have 2 frames (thank you Oscar, said dog), I sandwiched the acetate between the two frames. I adhered one set of the curtain sides to either side of the front facing frame. I then layered the second set of curtain sides inset on the back side of the acetate. This gave the illusion of depth on the stage. Two of the curtain topper were attached to the top of the frame. The stage was coming to life.
To allow the curtain to raise up, there has to be a gap between the top curtain frame and the base. To accommodate for the space foam tape was placed on the right, left, and bottom of framed panel. Do not put foam across the top or you will not be able to pull the curtain up. Now, as we identified early on, if I would have planned ahead, I could have stamped the royalty using masking paper as a single layer for my background. I did not, so I had to adapt. I added a second layer of foam to ensure that the curtain would clear of any uneven speed bumps from the fussy cut images.
With the frame complete, I can now visually see where to place my royals. I lined up the stage base with the foam lined frames and was able to get my royals in just the right spot and glued down edge to edge (again, trying to avoid the curtain catching on the images). Once they were positioned I was able to focus on the where to put my sentiment on my curtain pullout. Using my stamping platform and a sticky mat I lined up the internal curtain and the foam lined frame. Centered my sentiment on top of the acetate. I was able to pick up the stamp from the acetate with ease and remove the frame from the stamping platform. After prepping with an antistatic tool, “Joy to the world” stamped in embossing ink and heat embossed in gold onto the curtain pullout.
The frame and the stage base assembly was next up. The foam tape holds the two layers together. Because the frame and base sizes match, it was easy to line them up. If you struggle with lining up the elements, you can use any cornered object to aid in your alignment (stamping platform/ score tool/ box lid). Place one piece in the corner snuggly and use the same corner to snug your next piece into place.
To make the curtain pullout, I used a piece of scrap paper a smidge thinner than the last curtain topper that was diecut. To make sure that the paper would not get stuck on my royals, I positioned the paper to the base of the pullout leaving a long tail that I will cut off later. With the insert in place, I used a strip of thin foam tape to act as a stopper at the top ledge of the stage and to adhere the top edge of our last topper. This allows the curtain topper to over lay the other toppers. I stamped “pull here” and trimmed the excess paper off of the curtain pullout.
The stage needs to be lit up, so I embellished the card with some pearls as my lights. I pulled out my A2 card base, and ummmmm nope. Well crud, this designing on the fly was not my friend…. A6 Card to the rescue! I layered the same deep red card stock to the card base and then centered my stage. TADA! It worked and the royals are center stage. Don’t be like me… plan ahead.
Card Base: A6 (4.5 inches by 6.25 inches) Landscape
The entire Kindred Stamps release will be available this Friday at 8am PST/11am EST. Be sure to subscribe to the Kindred Stamps blog to see a daily line up of sneak peeks from our amazing Design Team! Come join the Fan Club and release event to be part of the release fun, and you may just win some Kindred Stamps credit!!
Coloring Guide:
New Father:
Headpiece/ Robe: Olo R1.7/ R1.5
Shirt/ Socks: Olo Y2.2/Y2.3
Shoes: Olo CG0/ CG1
Skin: Olo OR4.4/ OR4.2/ OR4.2
New Mother:
Headpiece/ Dress: Olo B0.5/ B0.3
Shoes: Olo CG9/ CG7
Hair: Olo B/ CG9/ CG7
Skin: Olo OR4.4/ OR4.2/ OR4.1
Baby:
Body: Olo Y2.2/ Y2.3
Blanket: Olo BG2.3/ BG 2.1
Manger: Olo O7.7/ O7.8
Hay: Olo YO2.5/ Yo2.7
Drummer Boy:
Headpiece: Olo G1.7/ G1.5
Drum: Olo R1.5/G1.5/ YO2.0/ O7.3
Body: Olo CG1/ CG0
Ears/ Spot: Olo CG9/ CG7
Collar: Olo CG7
Shepard:
Headpiece: Olo B0.2/ BO0.3
Shirt: Olo R0.6/ R0.5
Pants: Olo CG9/ CG7
Shoes: Olo O7.7/ O7.8
Skin: Olo OR4.4/ OR4.2/ OR4.1
Staph: Olo O7.7/ O7.8
King 1:
Crown/ Container: Altenew Artist Marker C014/ C013; Olo R0.6/ R0.5
Hair: Olo YO2.5/ Y2.3/ Y2.2
Skin: Olo OR4.4/ OR4.2/ OR4.1
Gown: Olo BV2.6/ BV2.3
Sash/ Shawl: Olo CG0/ CG1
Shoes: Olo O7.7/ O7.8
King 2:
Crown: Olo WG1/ WG3/ BV4.2/ BV4.4
Robe: Olo O1.3/ O1.2
Gown: Olo BV4.5/ BV4.4
Hair: Olo CG7/CG9
Skin: Olo OR3.7/ OR3.8/ OR3.4
Shoes: Olo O1.3/ O1.2/ CG0/ CG1
Container: Altenew Artist Markers C014/ C013
King 3:
Crown/ Container: Altenew Artist Markers C014/ C013
Headpiece/ Gown: Olo YG8.3/ YG8.5/ YG8.7
Shoes: Olo WG5/ WG3
Skin: OR4.4/ OR4.2/ OR4.1
Dirt: Olo O4.6/ O4.3
Angel:
Crown: Olo WG1 or metallic ink pen
Hair: Olo YO2.5/ Y2.3/ Y2.2
Skin: Olo OR4.4/ OR4.2/ OR4.1
Dress: Olo R2.2/ R2.4
Wings: Olo CG0/ CG1
Socks: Olo R2.4
Shoes: Olo CG0 CG1
Horn: Altenew Artist Markers C014/ C013
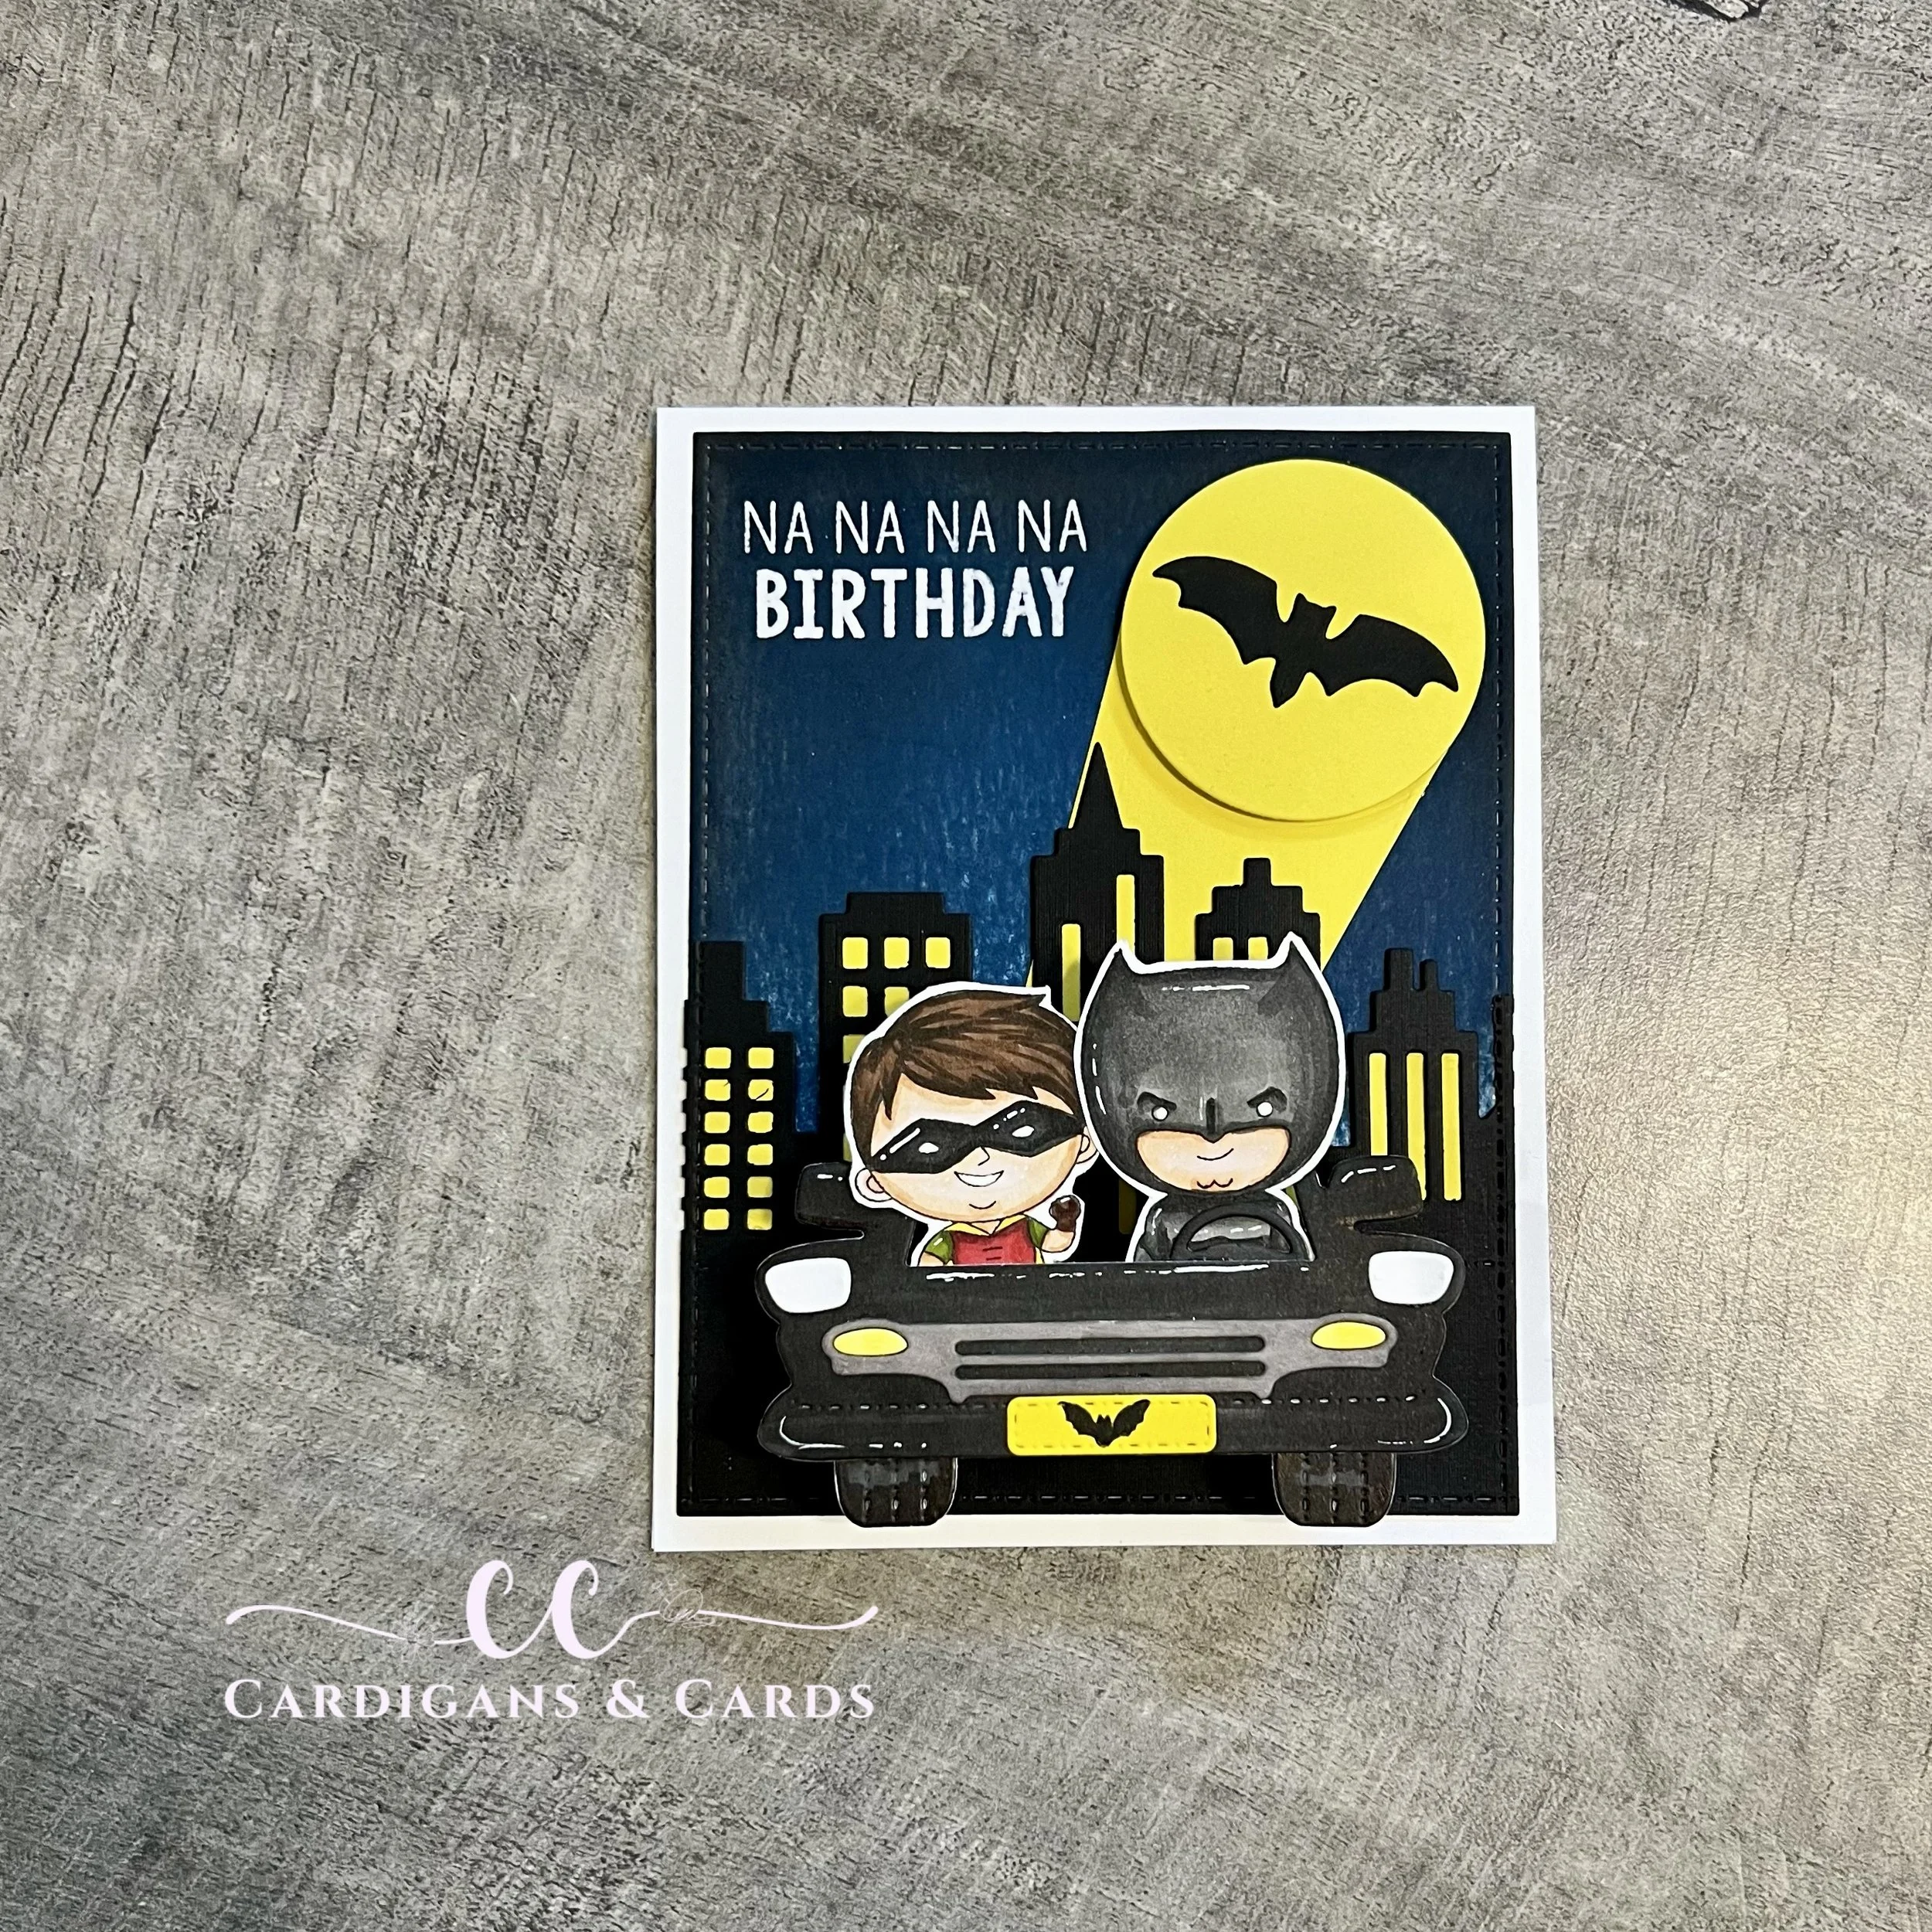
NA NA NA NA BIRTHDAY
NA NA NA NA BIRTHDAY
This pop-up requires no speciality dies but makes an impact!
This blog does utilize affiliate links. These links do not cost you anything. If you feel inspired and want to purchase from one of my links, you are supporting me on my crafty adventures.
Let’s talk background first. To have a nice boarder to frame the card, die cut a card panel. I used the Card Basic Die from Kindred Stamps, because I don’t know about you but I can not cut a straight line no matter what the tool is. I knew I wanted a deep night scene to have my callout lay against. Utilizing Altenew Cool Summer Night ink collection in the multiple depths of blue with a little Altenew Jet Black I got the deep tone I wanted.
Doing a dive into my colored card stock scraps I found the perfect yellow. On one piece of scrap I die cut a circle frame from the Kindred Stamps Nesting Circle dies to get a circle without stitching. The bat came from Spellbinders Boo-Licious Cupcake die set. Using my circle as my guide, I got out that trusty ruler and extended lines gradually to make a cone. The cone was adhered flat to the card panel and the circle die was popped up with a little foam tape.
Now that the inky background was dry, I was able to stamp the sentiment from Kindred Stamps Bad Guys Have More Fun stamp set and emboss with Snowfall embossing powder from Kindred Stamps.
The Kindred Stamps Cityscape die was cut out once to get the base die cut on some black card stock and then a second time with the same Card Basic Die to have the stitching be continuous. With the leftover yellow scraps, I filled in the windows. The Cityscape was adhered to the card panel flat.
The Kindred Stamps Drive In Memory Dec die set provided the base for the car. The die cut was colored with Altenew Artist Markers and the license plate was colored and stamped with a bat from my stash (unknown). No car is completed without the main character and his side kick. This combo was stamped from Kindred Stamps Bad Guys Have More Fun stamp set. Colored in Altenew Artist Markers and Olo Markers. I inserted the combo into the windshield and secured them in place.
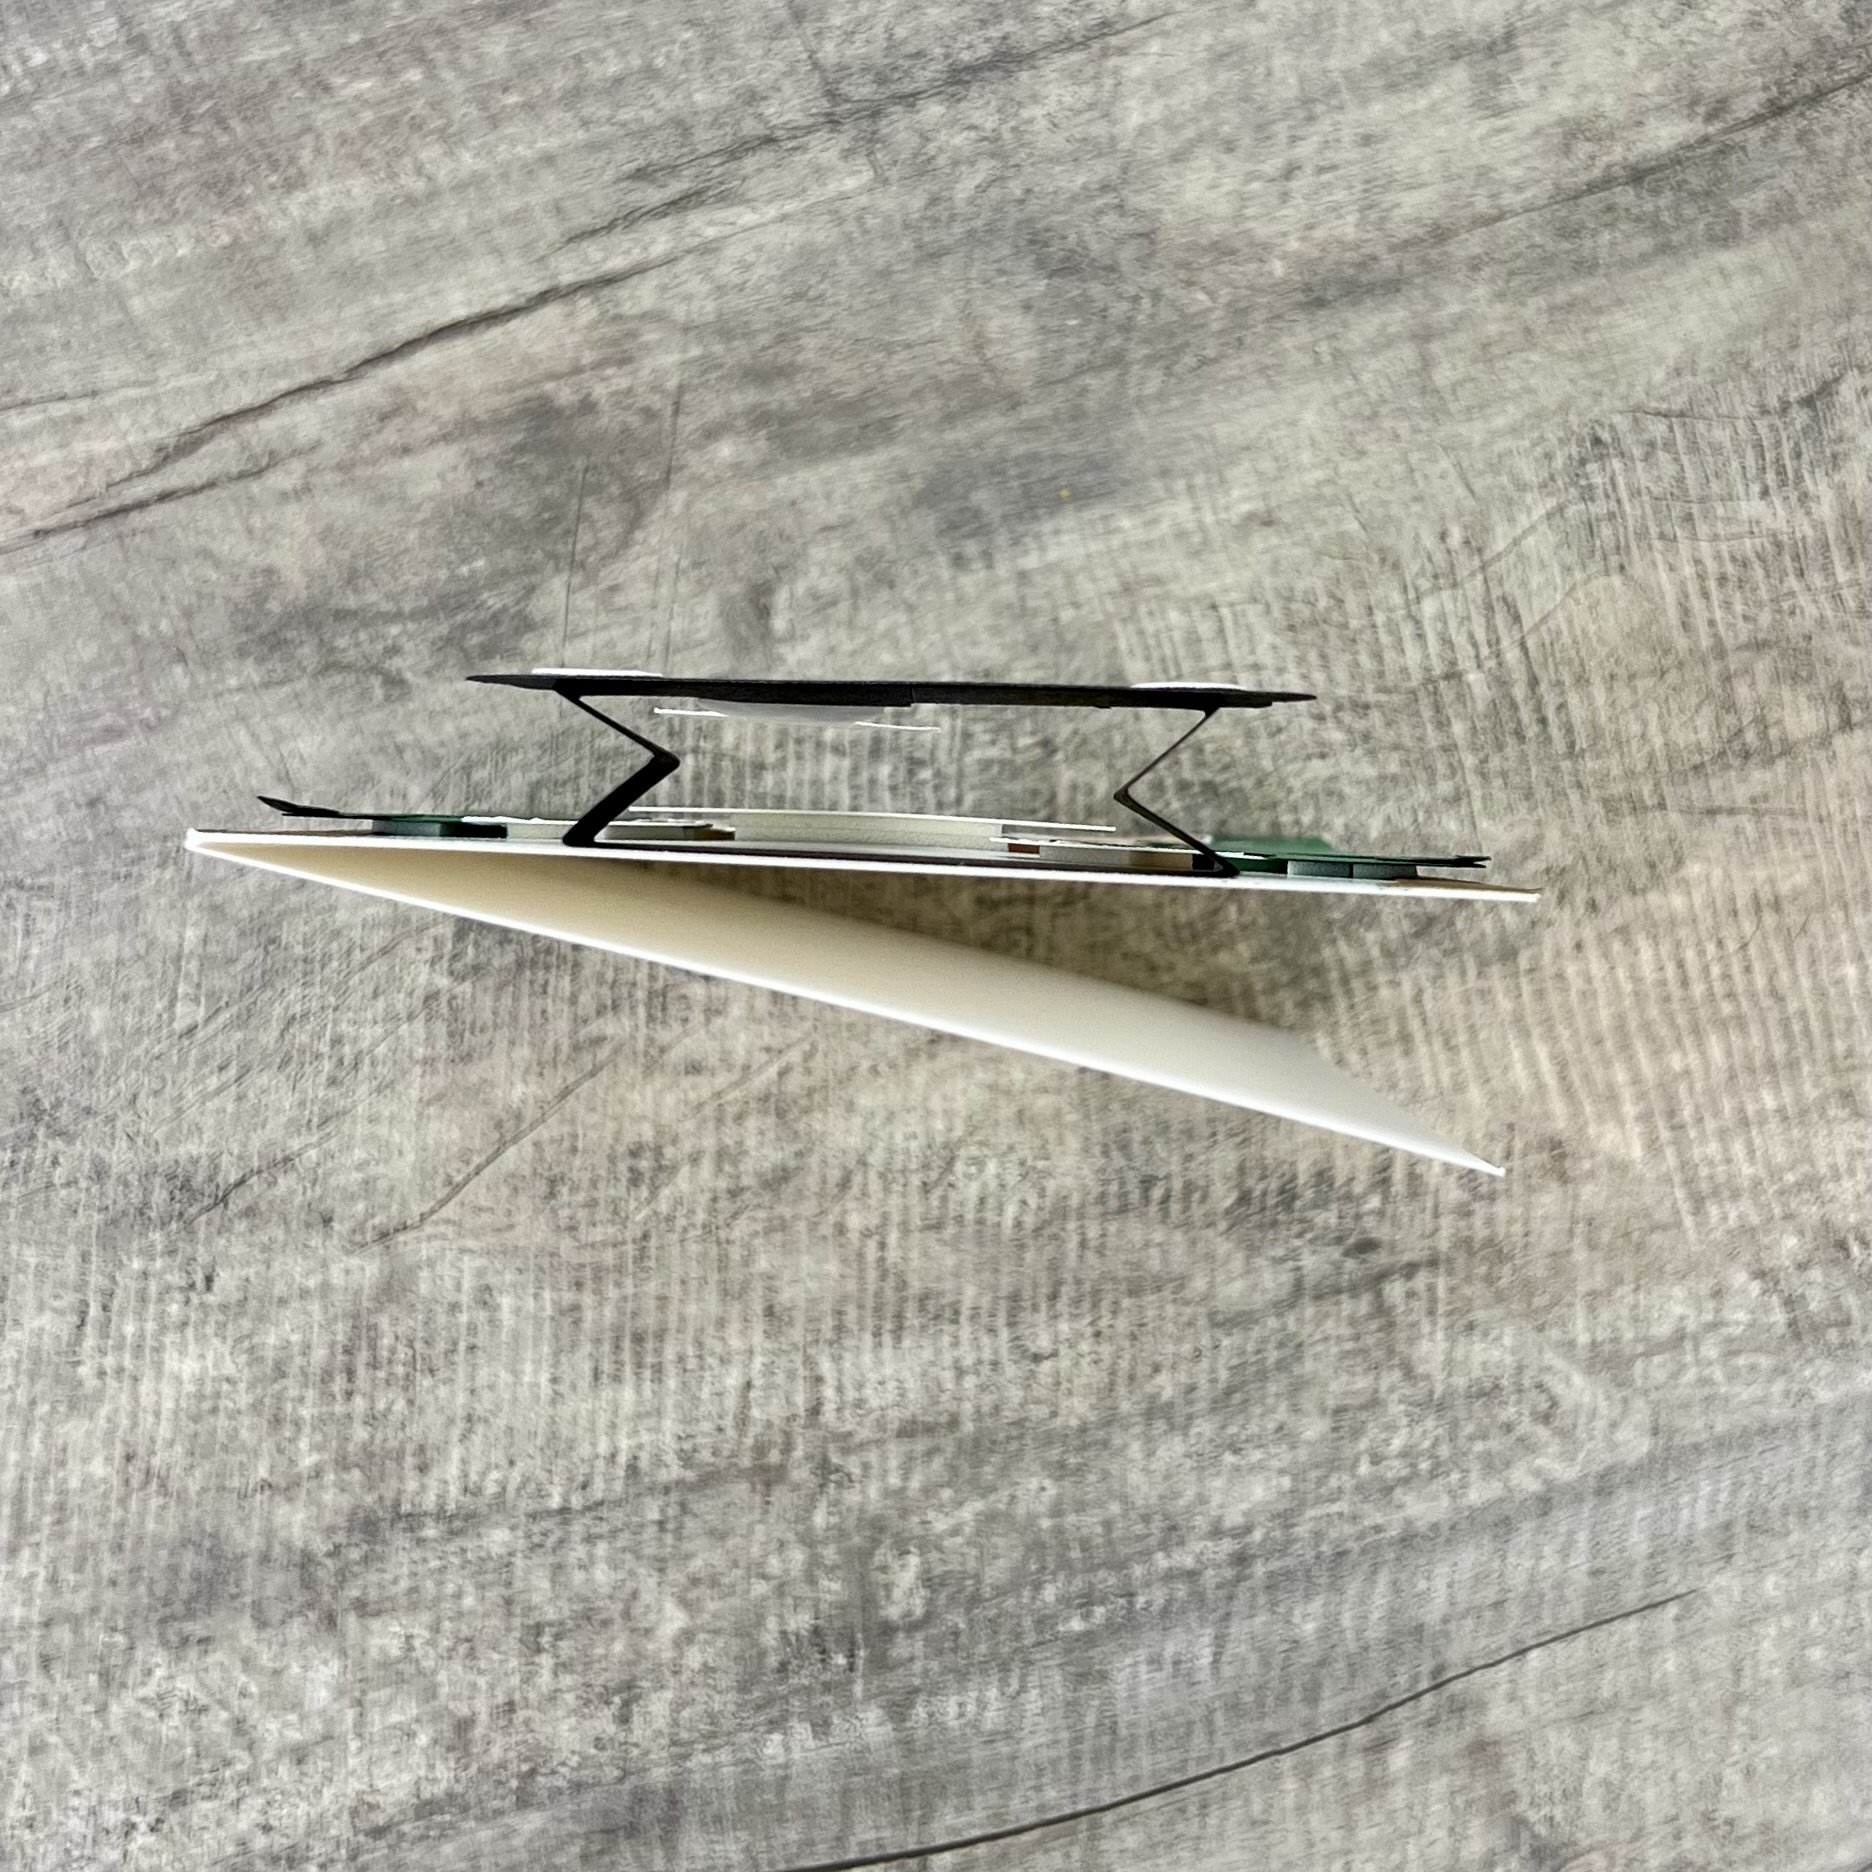
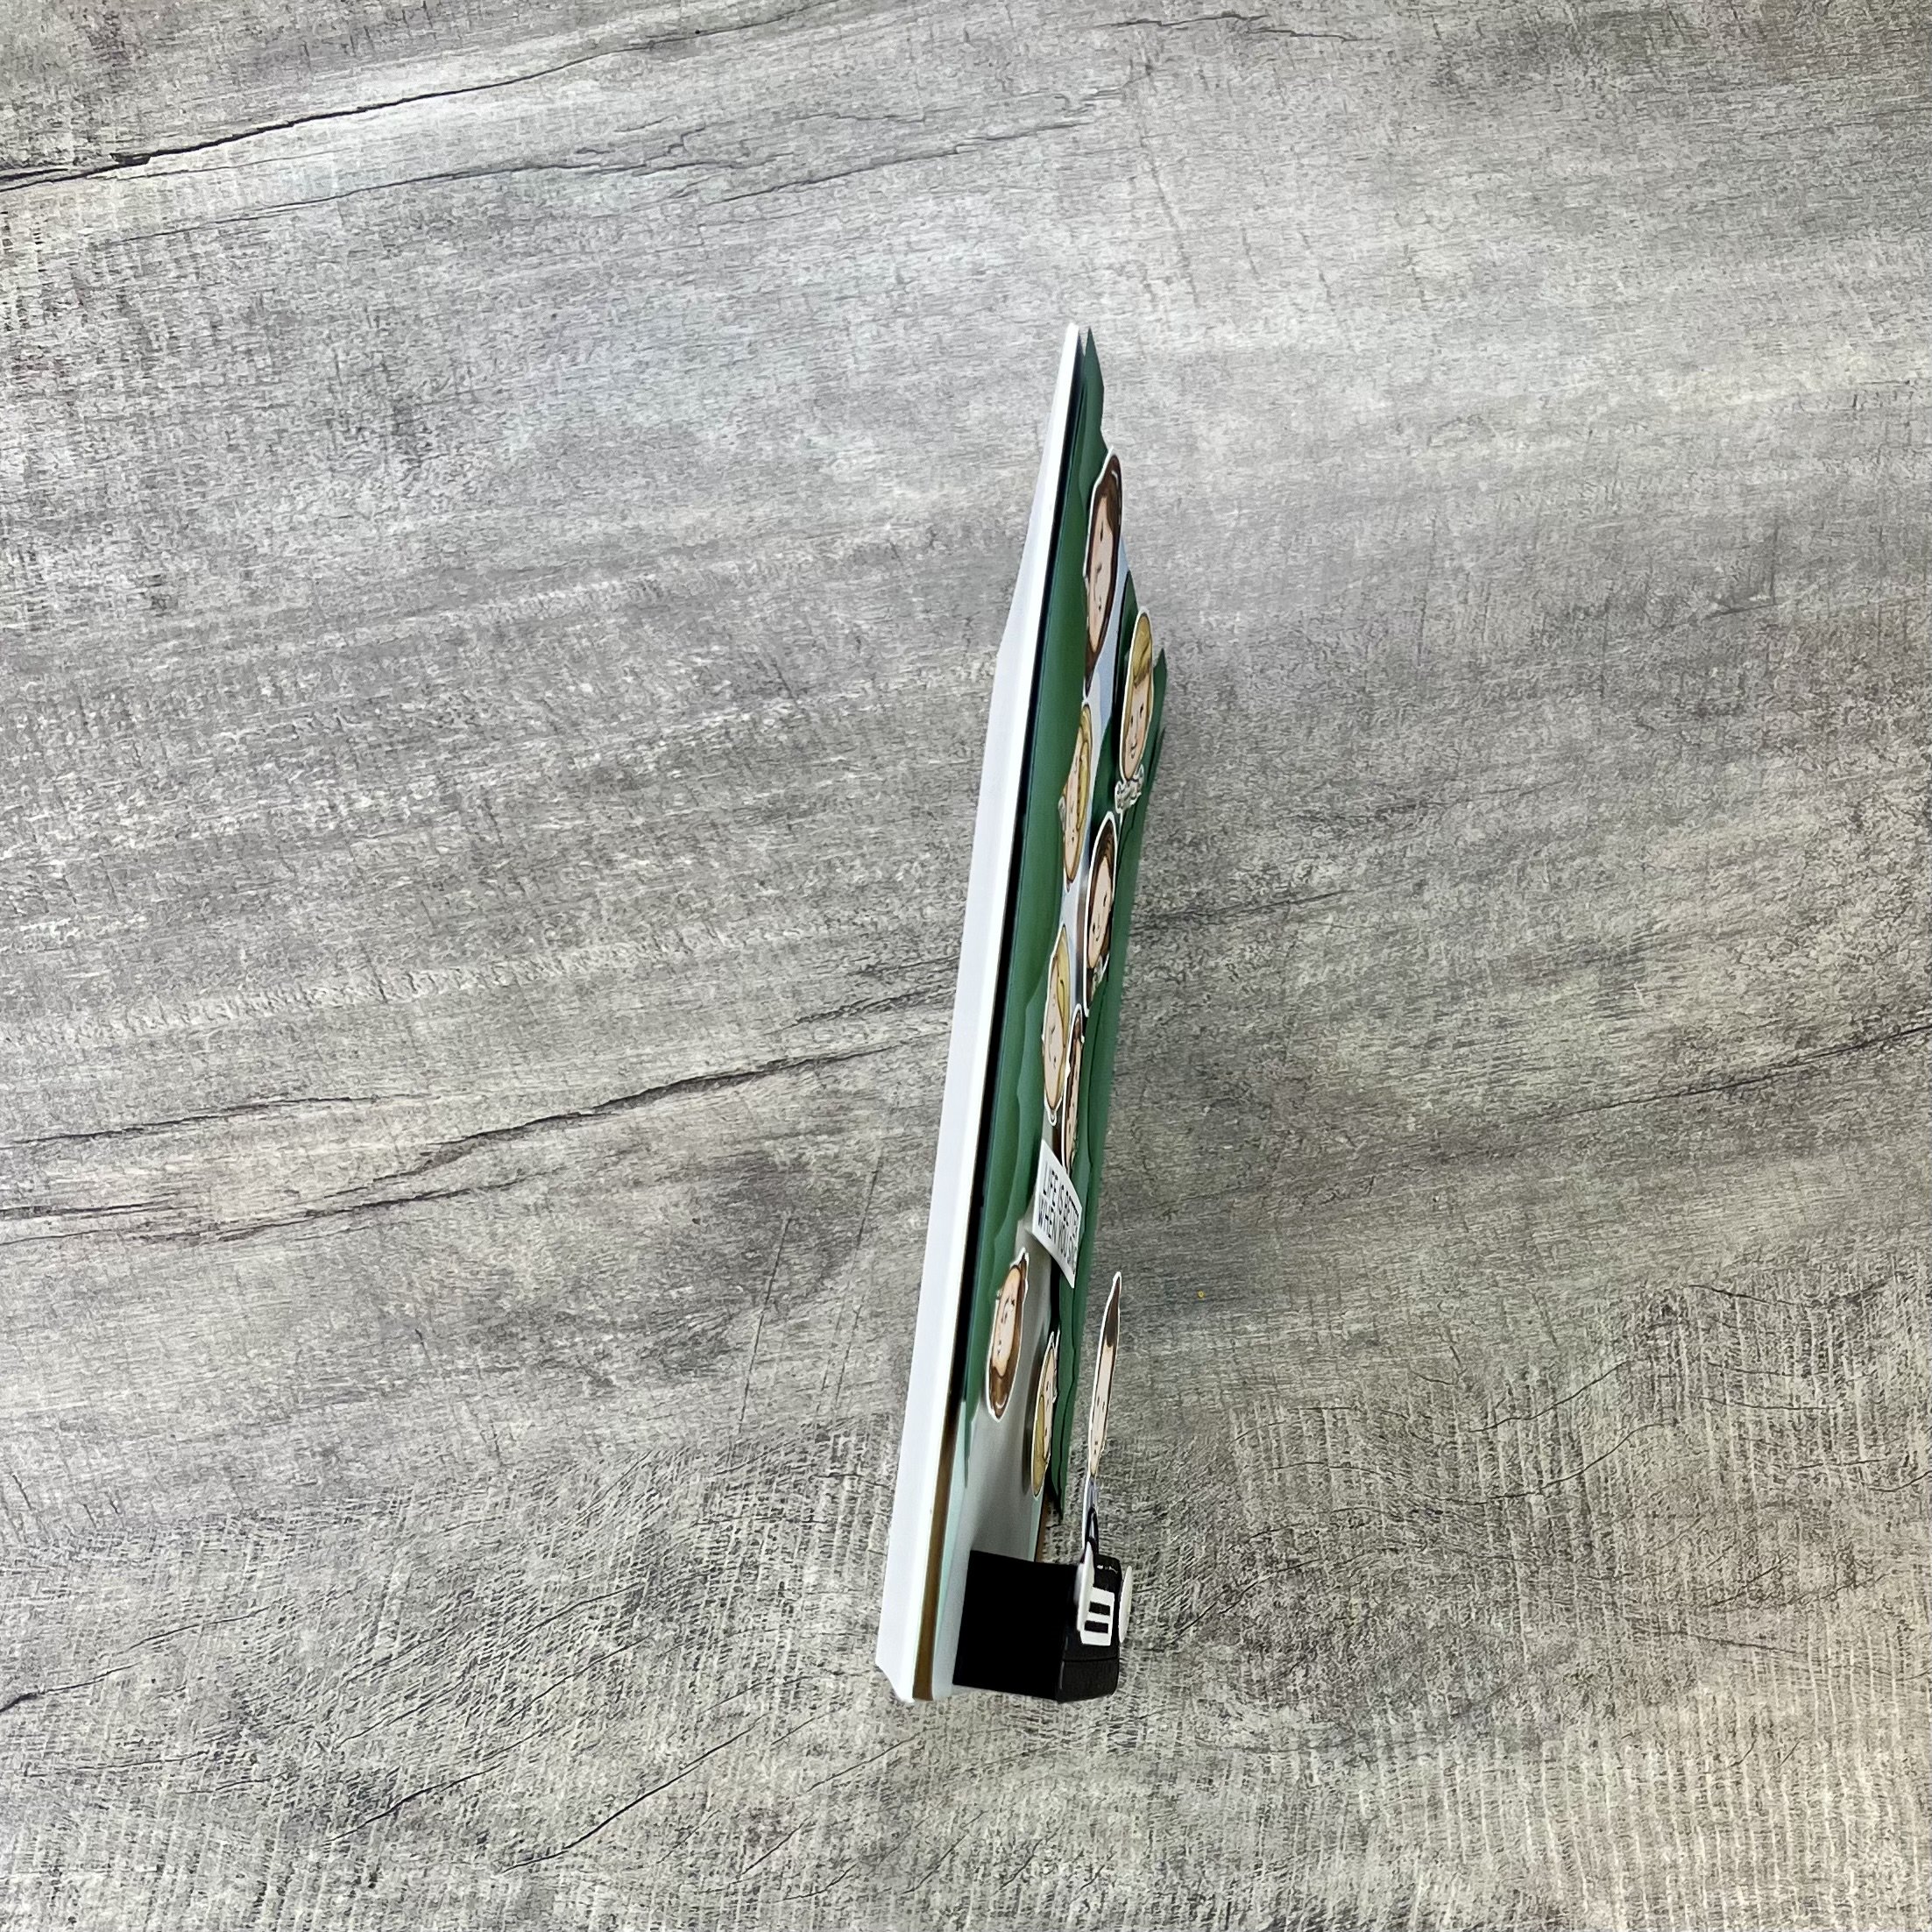
Finally, here is where the pop-up mechanism comes in to play! To make my combo pop from the scene I utilized a piece of black card stock with accordion folds on either side to pop the car off the page. To measure for the mechanism, I measured the length of my final die cut and deducted a 0.25 inches. I also validated the height of the die cut to ensure the card stock would not show through the windshield. Prior to cutting my piece of paper I added 1.5 inches to each side of my desired length. This allowed me to score at 0.5 inches, 1 inch, and 1.5 inches on both sides of the strip. I accordion folded the ends. Once I had my strip adhered to the car die cut, I was able to adhere the lower tabs of the accordion mechanism to the base. Now my car pops off the page but folds flat to mail. The card panel was attached to an A2 top folding card base.
Final Dimensions: 5.5 x 4.25 inches
Marker Colors:
Car: Altenew TG07/ TG05/ TG03/ TG02/ Y205
Main Guy: Altenew TG07/ TG05/TG03/TG02 Olo OR4.4/ OR4.1/OR4.2/OR1.0
Sidekick: Olo OR4.4/ OR4.1/OR4.2/OR1.0 Altenew Y762/Y932/ Y204/ C004/ R056/ Y932/ G935/G825/R318/R335