Power Siblings: Kindred Stamps November Release
You have the power to do anything you put your mind to, and the Power Siblings (Kindred Stamps November Release) echo this sentiment!! This small but mighty set contain the 3 images and 3 sentiments that can work for all sorts of situations. You have the power to use your imagination to make all the things!!
This blog utilizes affiliate links. If you choose to click on the links provided to purchase, you are supporting me as I receive compensation for your purchase. If purchasing is not in your books, no worries, I hope you find inspiration for projects you design. By clicking on the links, you are letting Kindred Stamps know that you like my content and to keep bringing me back. Thanks for your time and remember you have the power *wink*…
Project One: Castle Battle
Power Siblings, Kindred Stamps
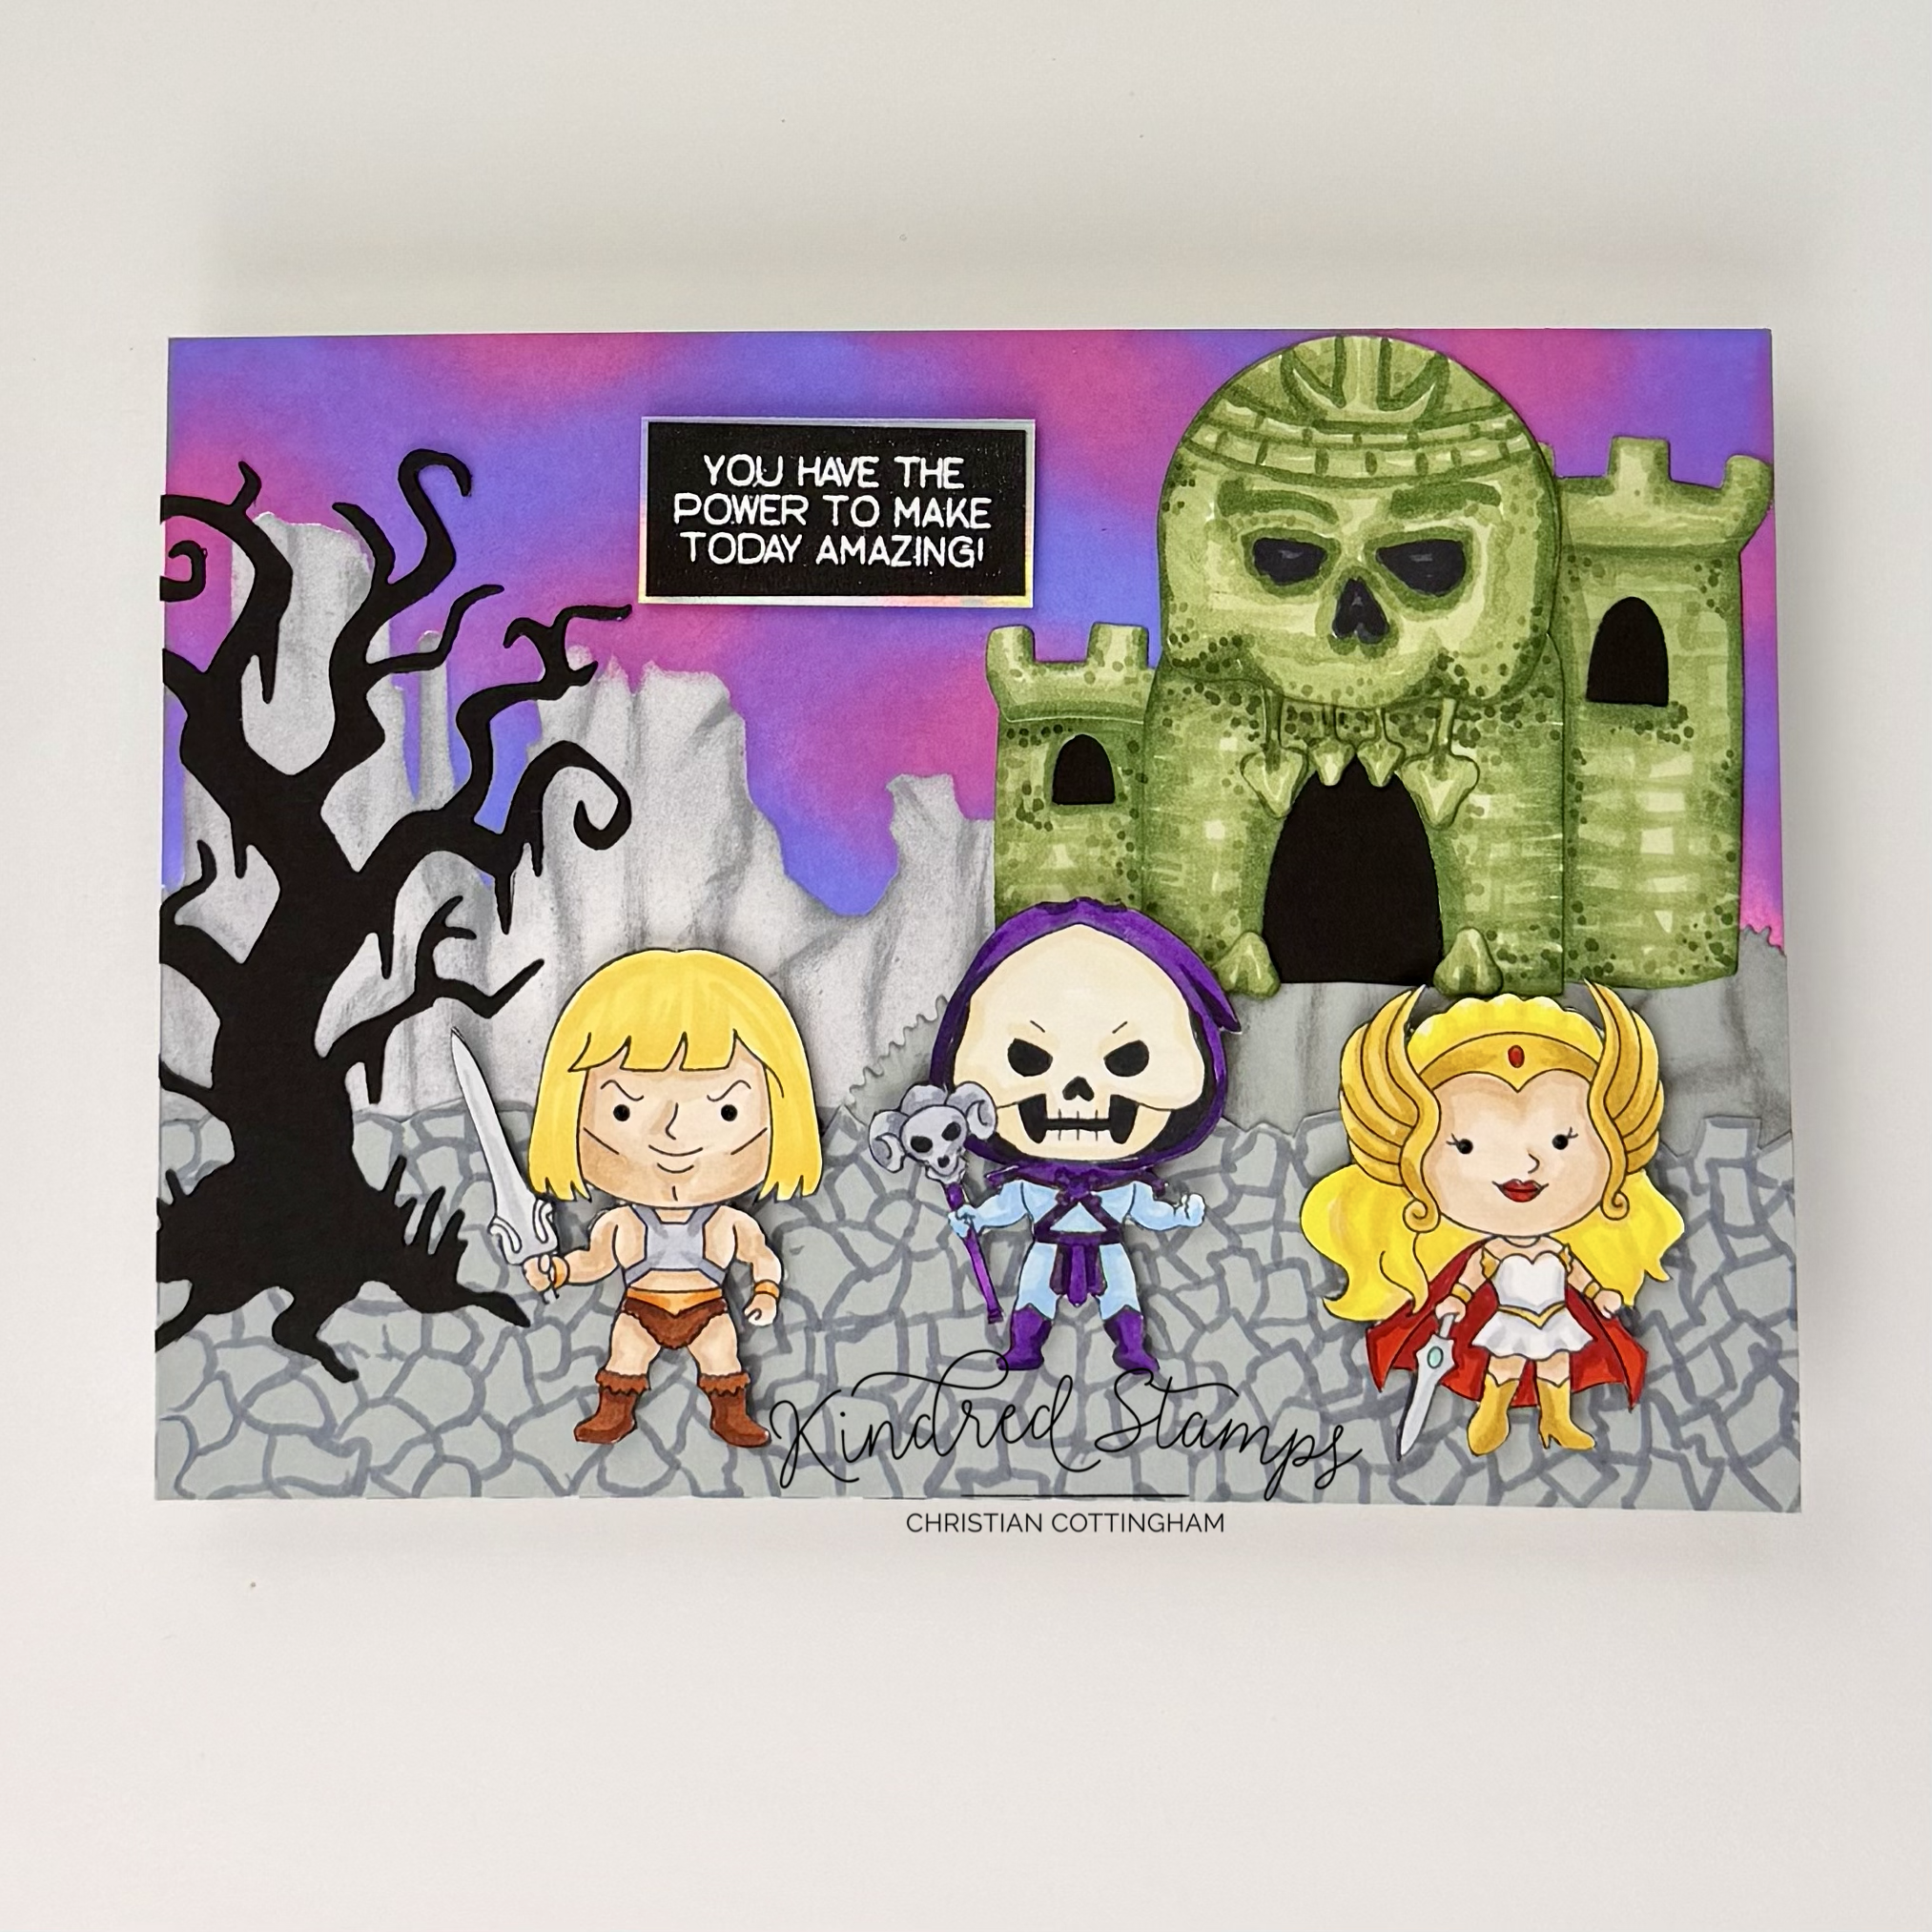
The icon castle of the Power Siblings is constantly under attack and this card plays out the battle between the Power Siblings and their enemy Skeleton Man. This card makes you rethink what supplies you have an how you have the power to make something different than what the product was originally designed for.
The Power Siblings images were stamped in an alcohol safe ink and colored with Olo Markers (See Color Guide). The images were cut out and edged with a fine liner pen to hide any cutting errors. Thin foam tape was applied to their respective backs and they were set aside. The sentiment was stamped in embossing ink and stamped on a prepared scrap of black card stock. With Snowfall Embossing Powder, the sentiment was heat set. The sentiment was cut down and matted with a piece of holographic card stock. Thin foam tape was applied to the back of the sentiment and set aside.
On an A7 panel, the negative cut out from the Desert Scene Stencil was positioned. Sticky notes were applied to the lower portion of the card to protect it during the ink blending madness that was about to pursue. With Wild Wisteria and Passionate Pink inks from Gina K Designs, the sky came to be. Leaving areas specific to each color and others where the colors were over lapped. I applied one layer and then repeated to obtain the color intensity and blend that I wanted. After a little clean up, the negative stencil was removed and the Desert Scene Stencil was applied. The distant rock formations were inked lightly with Stormy Sky ink (Gina K Designs) and then the details were added in the same color with more intensity with a small blending brush.
With the ink blending down and set aside, it was time to start some die cutting. The Spooky Tree die was cut from black card stock and set aside. Next up, the ragged hill that the castle will sit on was cut from gray card stock with the House In A Hill die. With the same Stormy Sky ink, the rock line details were added with a small blending brush. The ground was drawn on a scrap piece of gray card stock with a CG5 Olo Marker and fussy cut out with the ragged horizon line.
The castle was up next. Out of smooth white card stock, the Castle Die (retired) and the mushrooms from the Fairy Cloche Die were cut out. A piece of card stock was partial die cut out with a circle die that was fitted into the width of the main castle panel (with the door). The partial circle die cut was trimmed to mimic the top of a skull and the eyes and nose were drawn into place. The mushrooms (soon to be teeth), skull, and castle were colored with Olo markers and assembled. (YG8.7/ YG8.5/ YG8.3/ CG7/ CG5) Black card stock scraps were applied on the back of the castle over the door and windows.
To assemble the card, the stenciled and ink blended panel was adhered to an A7 card base. The castle was adhered to the hill and the hill and castle were applied to the right side of the background panel. The ground was attached flat to the back ground. The Spooky Tree was adhered flat to the left side of the card. The sentiment was placed in the sky while the Power Siblings and their foe were popped up ready to fight. This card proves with the power of innovation, you can design anything!!
Card Size: A7 (5 inches by 7 inches)
Project Two: Tiger with Power
Power Siblings, Kindred Stamps
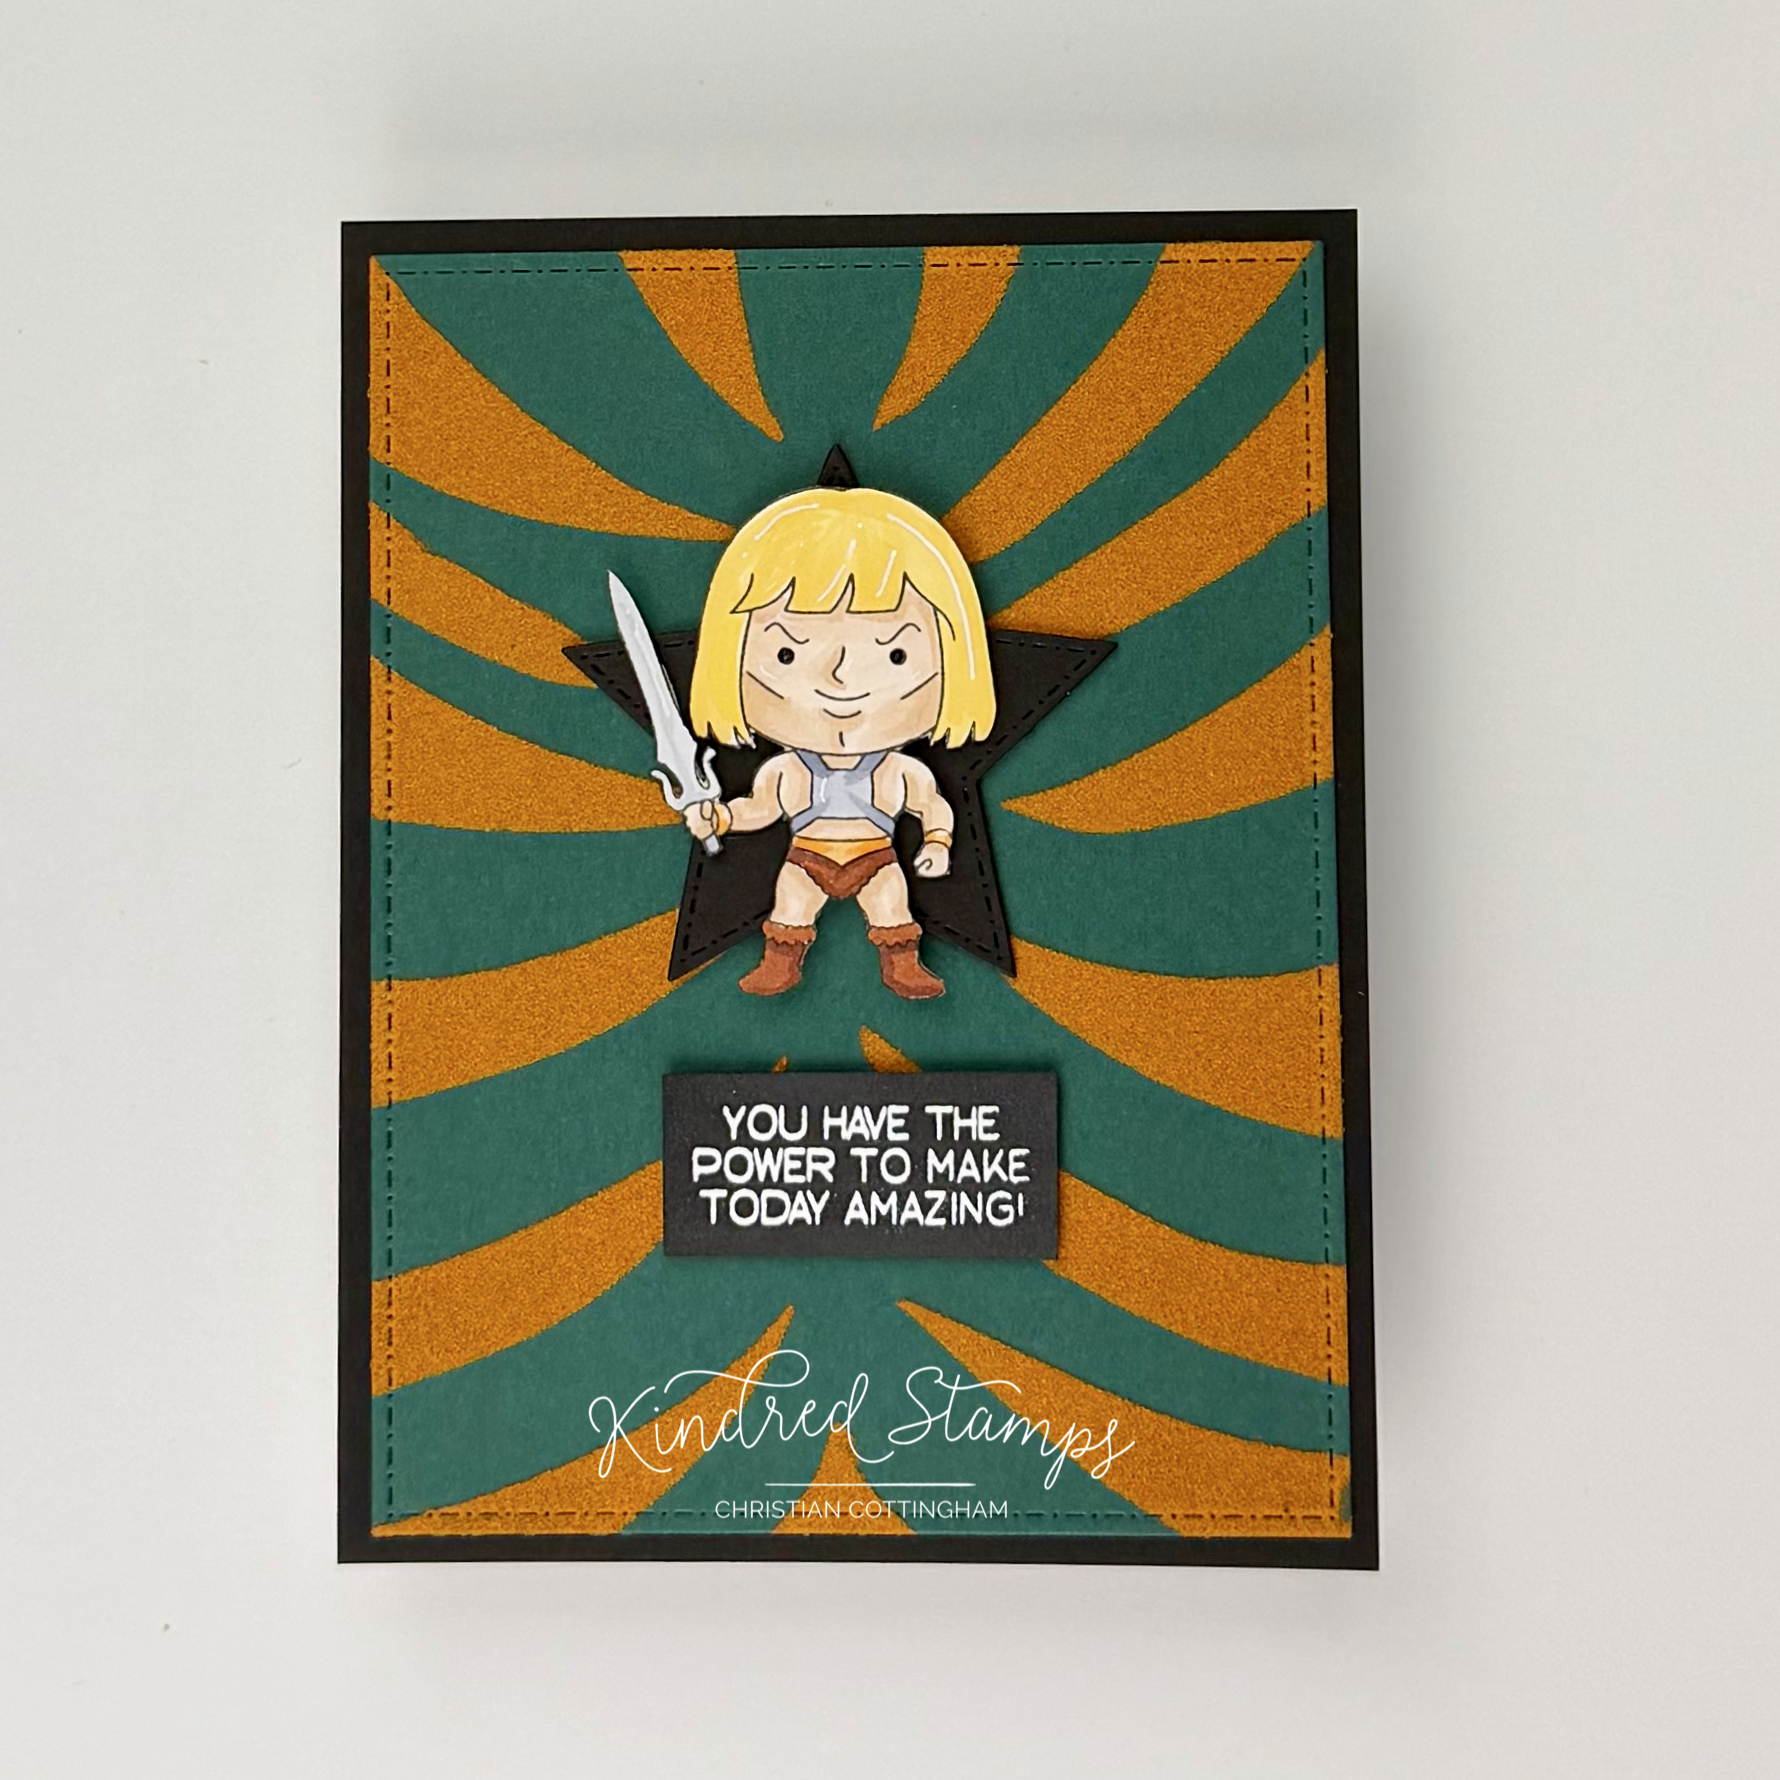
You too have the power! This card features the Power Brother from the Power Siblings in all his glory and proves that just because you don’t have something that you need, you have the power to make something amazing!
When this card was being designed, I wanted badly to have a feline companion. I tried drawing one… let’s just say I’m not an artist and I am in awe of the designer for the Kindred products. My drawing looked more like something my 5 year old niece would draw, except her’s actually looks like a feline. So, back to the “drawing board” and I decided I can make a stencil!
For the wise ones, like me, you may still have transparencies laying around in your office…. For those not in my generation, these were sheets of acetate that you used a projector for to display handwritten or typed information. This is how we, the wise ones, had college lectures or did business presentations. Ah the good old days before PowerPoint…. Anyway, I utilized a transparency (you could use a thicker piece of acetate or stencil material). Pulling an alcohol marker, I sketched in some tiger stripes that met in the center.

Make your own stencil!
With a craft knife, I cut out the areas of the stencil ensuring a boarder like in a traditional stencil. With some rubbing alcohol, I removed my drawn lines and my stencil was complete!

Pulling out some Duo DecoTransfer gel, a thin layer was applied to a deep green card stock and allowed to dry. Orange flock was applied and heat set with a laminator (I used the Gina K Designs Fuse system set at 3). The panel was ran through the system twice. Once cooled, the flock was removed and the panel was die cut down with the Cards Basic Dies.
A piece of black card stock was trimmed down to an A2 panel (4.25 inches by 5.5 inches). From the center of this panel, the star from the Card Basic Die was cut out. No one will ever know.. well, except you if you are still reading…
The Power Brother was stamped with alcohol safe ink and colored with Olo Markers (See Color Guide). He was fussy cut out on the line and then edged with a black fine liner to hide any cutting flaws. The sentiment was stamped with embossing ink on a prepped piece of scrap black card stock and heat embossed with Snowfall Embossing Powder. The sentiment was trimmed down. With all the pieces ready, it was time to assemble.
The black panel with the star in the middle was applied to a top folding card base. The flocked green panel was centered and adhered flat to the black base. Thin foam tape was placed on the back of all elements. The star was centered and applied, Power brother was centered over the star and finally the sentiment was placed. The texture and various depths from the foam tape give this simple card lots of pow! Not a bad representation of his trusty feline companion. You just have to think out side the box when your artistic skills are lacking and you too have have the power!!
Card Size: A2 (4.25 inches by 5.5 inches)
Project Three: Moon of Power
Power Siblings, Kindred Stamps
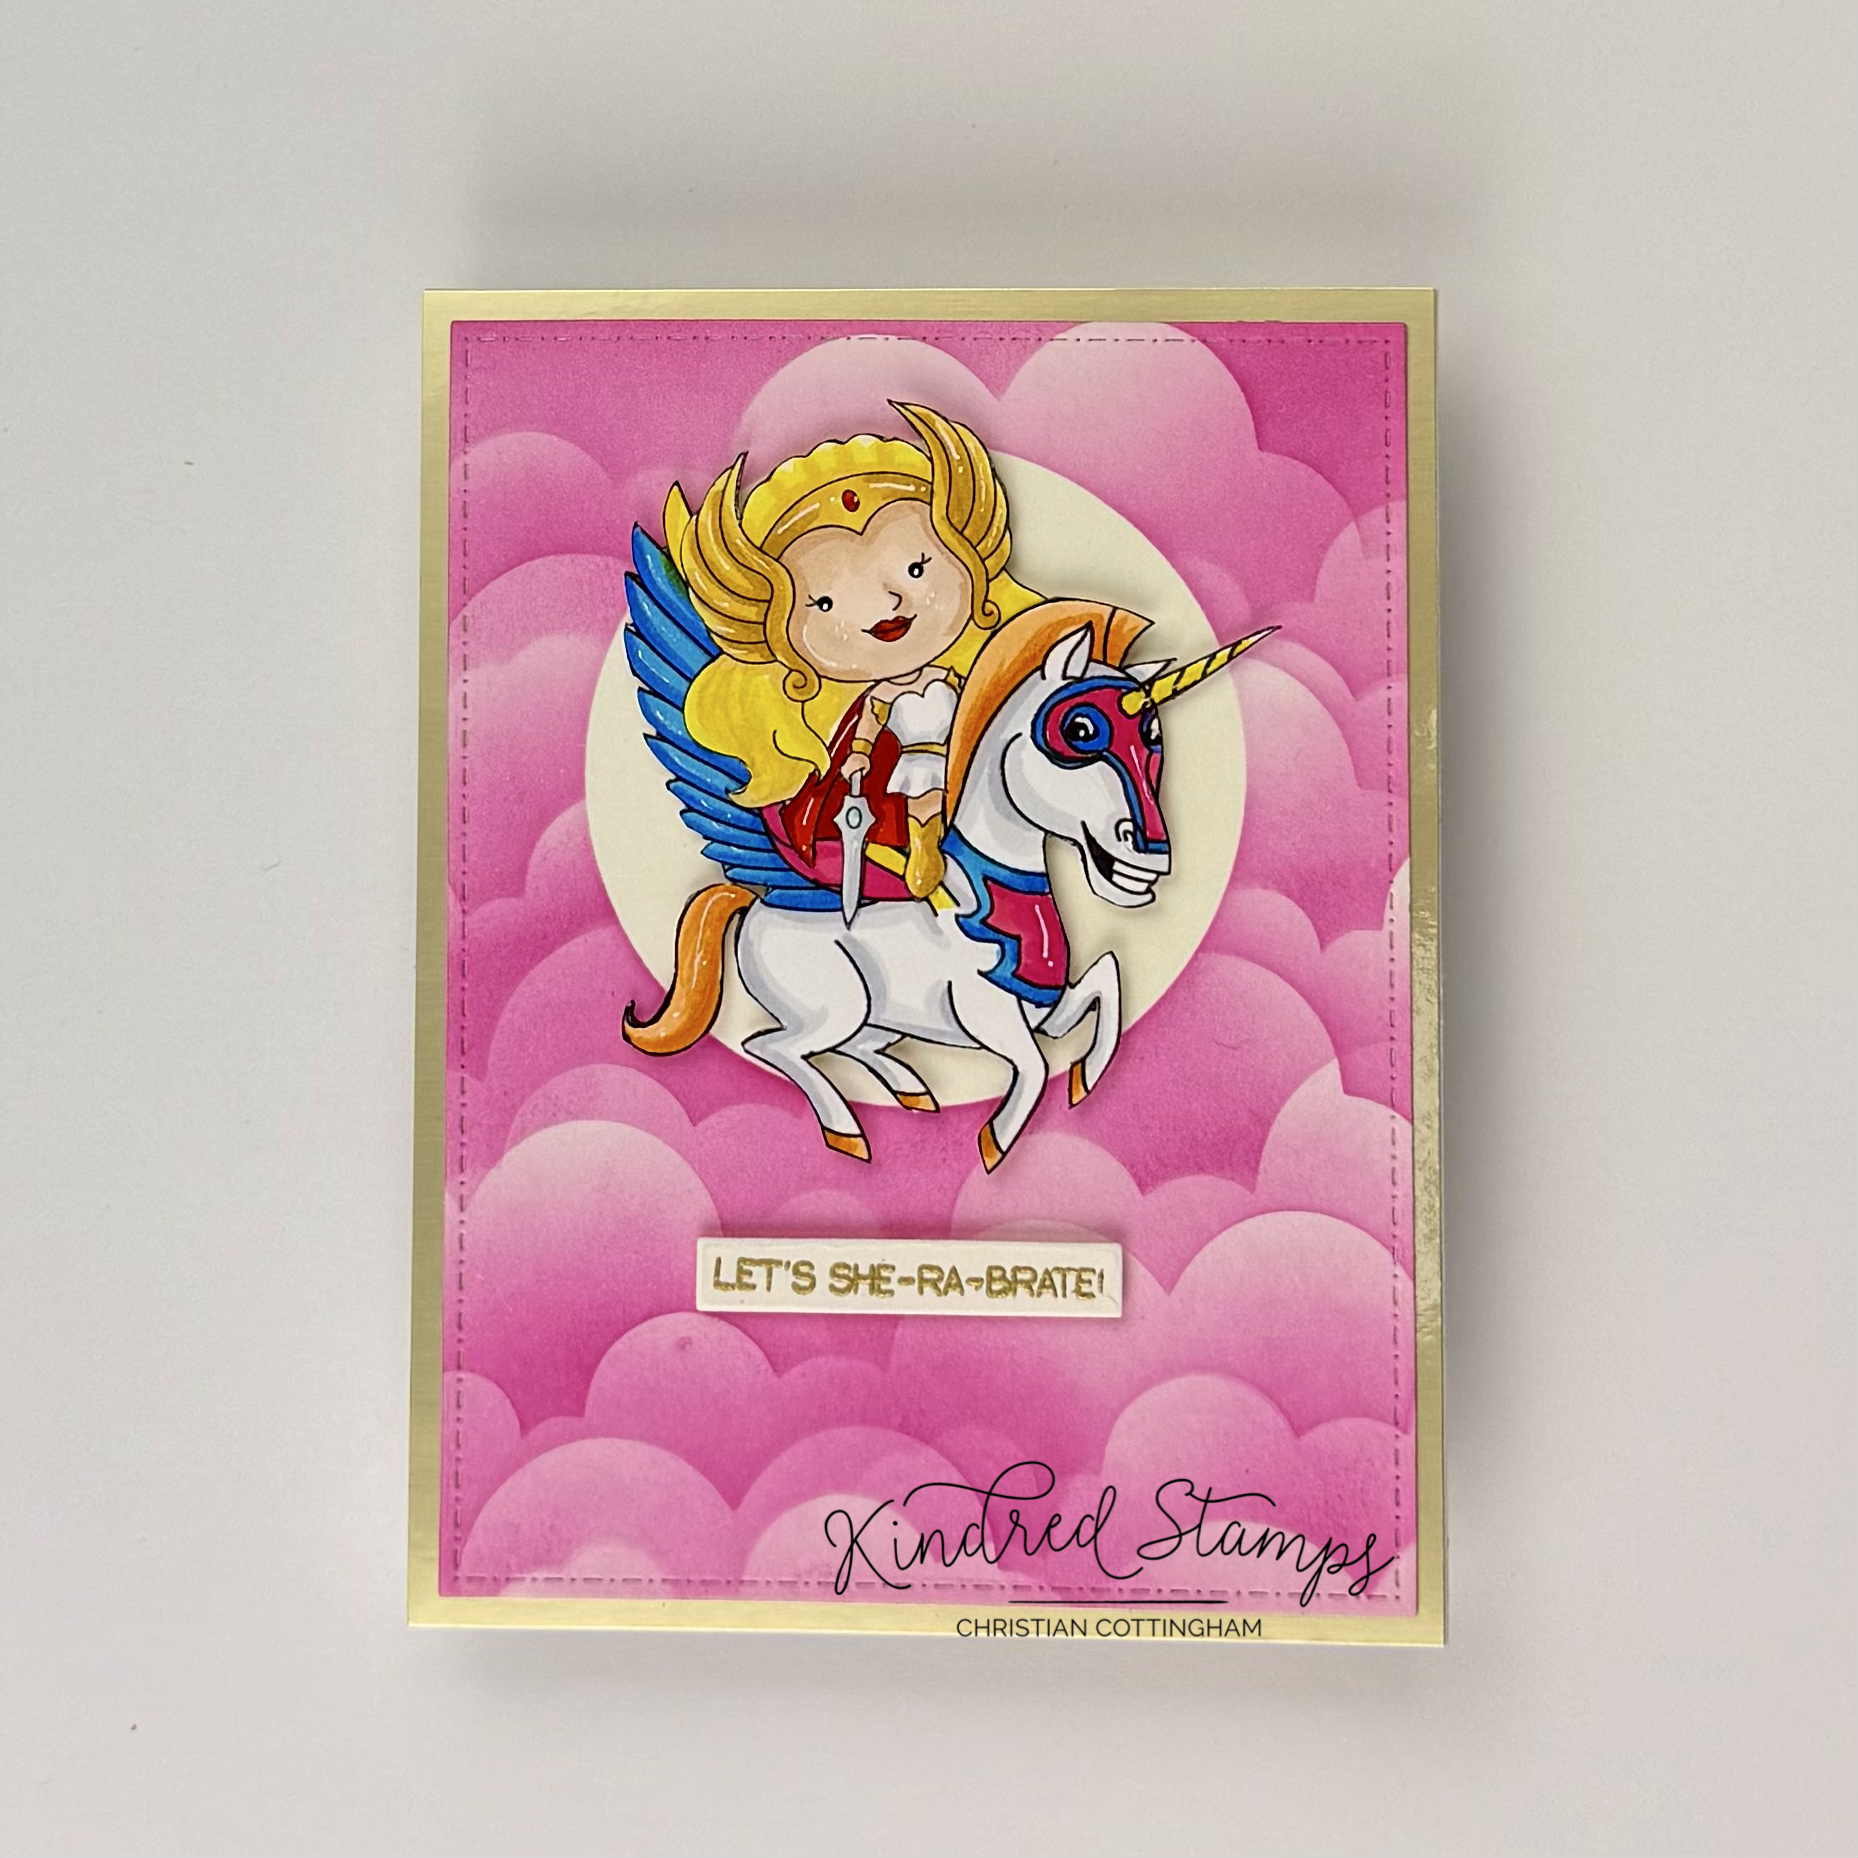
This Princess has all the power and is flying in on her winged unicorn to wish you a happy birthday! The Power Sister is the star of this card! This simple card is fast to make with the most time spent on coloring and fussy cutting. Let’s break it down.
An A2 ivory card panel (4.25 inches by 5.5 inches) was trimmed down for ink blending. To prep for the ink blending, I needed to make a mask for the moon that the Power Sister to be in front of. There a couple different ways to do this masking. I will explain both so depending on your experience level, you can choose your own adventure! Option One: On a separate A2 card panel (110 pound- thicker than the layer weight [80-100 lb] I typically utilize) cut the circle from the Card Basics Die where the moon would be on my finished panel. Keeping both positive and negative pieces. Layer both of the A2 panels with the blending panel on the bottom. On the circle die cut, place a piece of low tack tape and fit the circle back into the whole that it was cut from. Carefully remove the heavy weight A2 panel leaving the circle attached to the blending card stock. Option Two: Out of a scrap of heavy weight card stock, cut the circle die. Place a piece of low-tack tape behind the circle die cut. Place the circle on the blending panel.
With the Grass and Clouds stencil, pull out the negative long cloud. With Passionate Pink ink (Gina K Designs) stencil the cloud down the front of your panel flipping and moving the cloud around to get different cloud patterns. Clean up your desk or you will be sad…. Justing saying. Once the cleaned go ahead and remove your moon mask. To give the moon a little color, we need the positive masks we made from the die cutting. If you used Option One, layer the two panels up. You shouldn’t see any pink. If you used Option Two, place your mask over the top of the moon and use masking tape or sticky notes to cover the edges so your ink blending stays contained. Use a pale yellow ink to shade in the moon with random heavier spots. I used the whatever color was left on my blending brush. With the masks removed, the back ground panel was die cut with the rectangle from the Cards Basic Die. A panel of matte gold cardstock was cut down to an A2 panel (4.25 inches by 5.5 inches) and set aside for assembly.
Next up the Power Sister was colored with Olo Markers (See Color Guide) and fussy cut out on the line. Her winged companion utilizes the Stay Strong Digital stamp. With an alcohol safe fine liner pen, the horn, mask, and breast plate were drawn. The winged companion was colored with Olo Markers (See Color Guide) and was fussy cut out on the line. Both images were edged with a black marker to hide any defects from the fussy cutting. Finally, the Power Sister image was cut along the leg so she could be mounted to her companion. The images were popped up with foam tape and set aside for assembly.
The sentiment was stamped on the same ivory card stock prepped with an antistatic tool and gold embossing powder was heat set. The sentiment strip was trimmed down and foam tape applied.
To assemble, the Power Sister and her companion were centered in front of the moon and the sentiment centered below. The completed panel was glued to an A2 top folding card base. This card just screams celebration and power!
Card Size: A2 (4.25 inches by 5.5 inches)
Project Four: Spooky Woods

Power Siblings, Kindred Stamps
The skies on this plant ware always bright! This card showcase the evil sky in the deep woods with Skeleton Man from the Power Siblings stamp set. Using the color wheel to find the complementary colors allow the Skeleton. Man to glow. Let’s break it down!
First up, picking the sky colors! Knowing that the Skeleton man was primarily blue/ purple I wanted to use the complementary colors. A complementary color is the color opposite on a color wheel. The complementary color will enhance the vibrancy of the color you are showcasing. On a color wheel, the complementary color to purple is yellow and to blue is orange. So I knew that I would be using those two colors. I wanted to add a third color in so I choose the color red. When you look at a color wheel, the colors that sit next to each other are called analogous colors and they always look good together. Orange and red are partners and purple and red are partners on the other side. Okay, I’ll stop nerding out on why I choose the colors I did and get to the blending…
On an A2 (4.25 inches by 5.5 inches) card panel I blended the 3 colors in thirds horizontally. Wild Dandelion/ Tangerine Twist/ and Cherry Red (Gina K Designs) were blended with overlap into each section with the prior. Pulling out Distress Ink in Black Soot, the edges of the panel were darkened to give an eery look to the sky. This panel was set aside for the ink to absorb into the card stock.
The Skeleton Man from the Power Siblings set was stamped in alcohol marker safe ink and colored with Olo Markers (See Color Guide). The image was fussy cut out on the line for the outside edges. The gap between the scepter and his head was cut out with a craft knife. Foam tape was applied to the back of the Skeleton Man and he was set aside.
The dark woods scene was next. The Jungle Scene Die will be the distant background. This was cut from black card stock. To give the illusion that the Skeleton Man was in the foreground of the scene there needed to be some trees layered into the mix. To achieve this, the Bare Trees die was die cut a total of 3 times (6 trees total, 3 of both designs) from black card stock. One of each tree design were set aside. The remaining 4 trees were layered together with liquid glue. Now, there are a total of 4 trees (2 single, 2 doubled up).
To assemble the scene, the Jungle Scene die cut was adhered to the ink blended panel with the yellow ink at the bottom of the scene. Next, the 2 single trees were adhered to the jungle scene on the far edges. The double layered trees were next to be adhered. Because I wanted the trees to frame the image, one of the double-layered trees was glued upside down. Due to the pitches of the black card stock, you can not tell the die cut is upside down. The card panel now has 3 levels of forest- the jungle scene, the single layer trees, and finally the double-layered tree. This gives the illusion of depth with no extra shading or foam tape. The finished panel was placed on a card base.
Skeleton Man was adhered centered in the trees. The only thing left was the sentiment. Pulling the black card stock scraps from the bare trees out of the garbage (don’t judge… you do it too…) the paper was prepped with an antistatic powder. The sentiment was stamped with embossing ink, sprinkled with Snowfall Embossing Powder, and heat set. The sentiment was cut down and adhered to a piece of holographic cardstock to act as a frame. Foam tape was applied and the sentiment was stuck to the lower right section of the card.
With complementary color selection, the Skeleton Man pops off the card!
Card Size A2 (4.25 inches by 5.5 inches)
Project Five: Princess Power
Power Siblings, Kindred Stamps
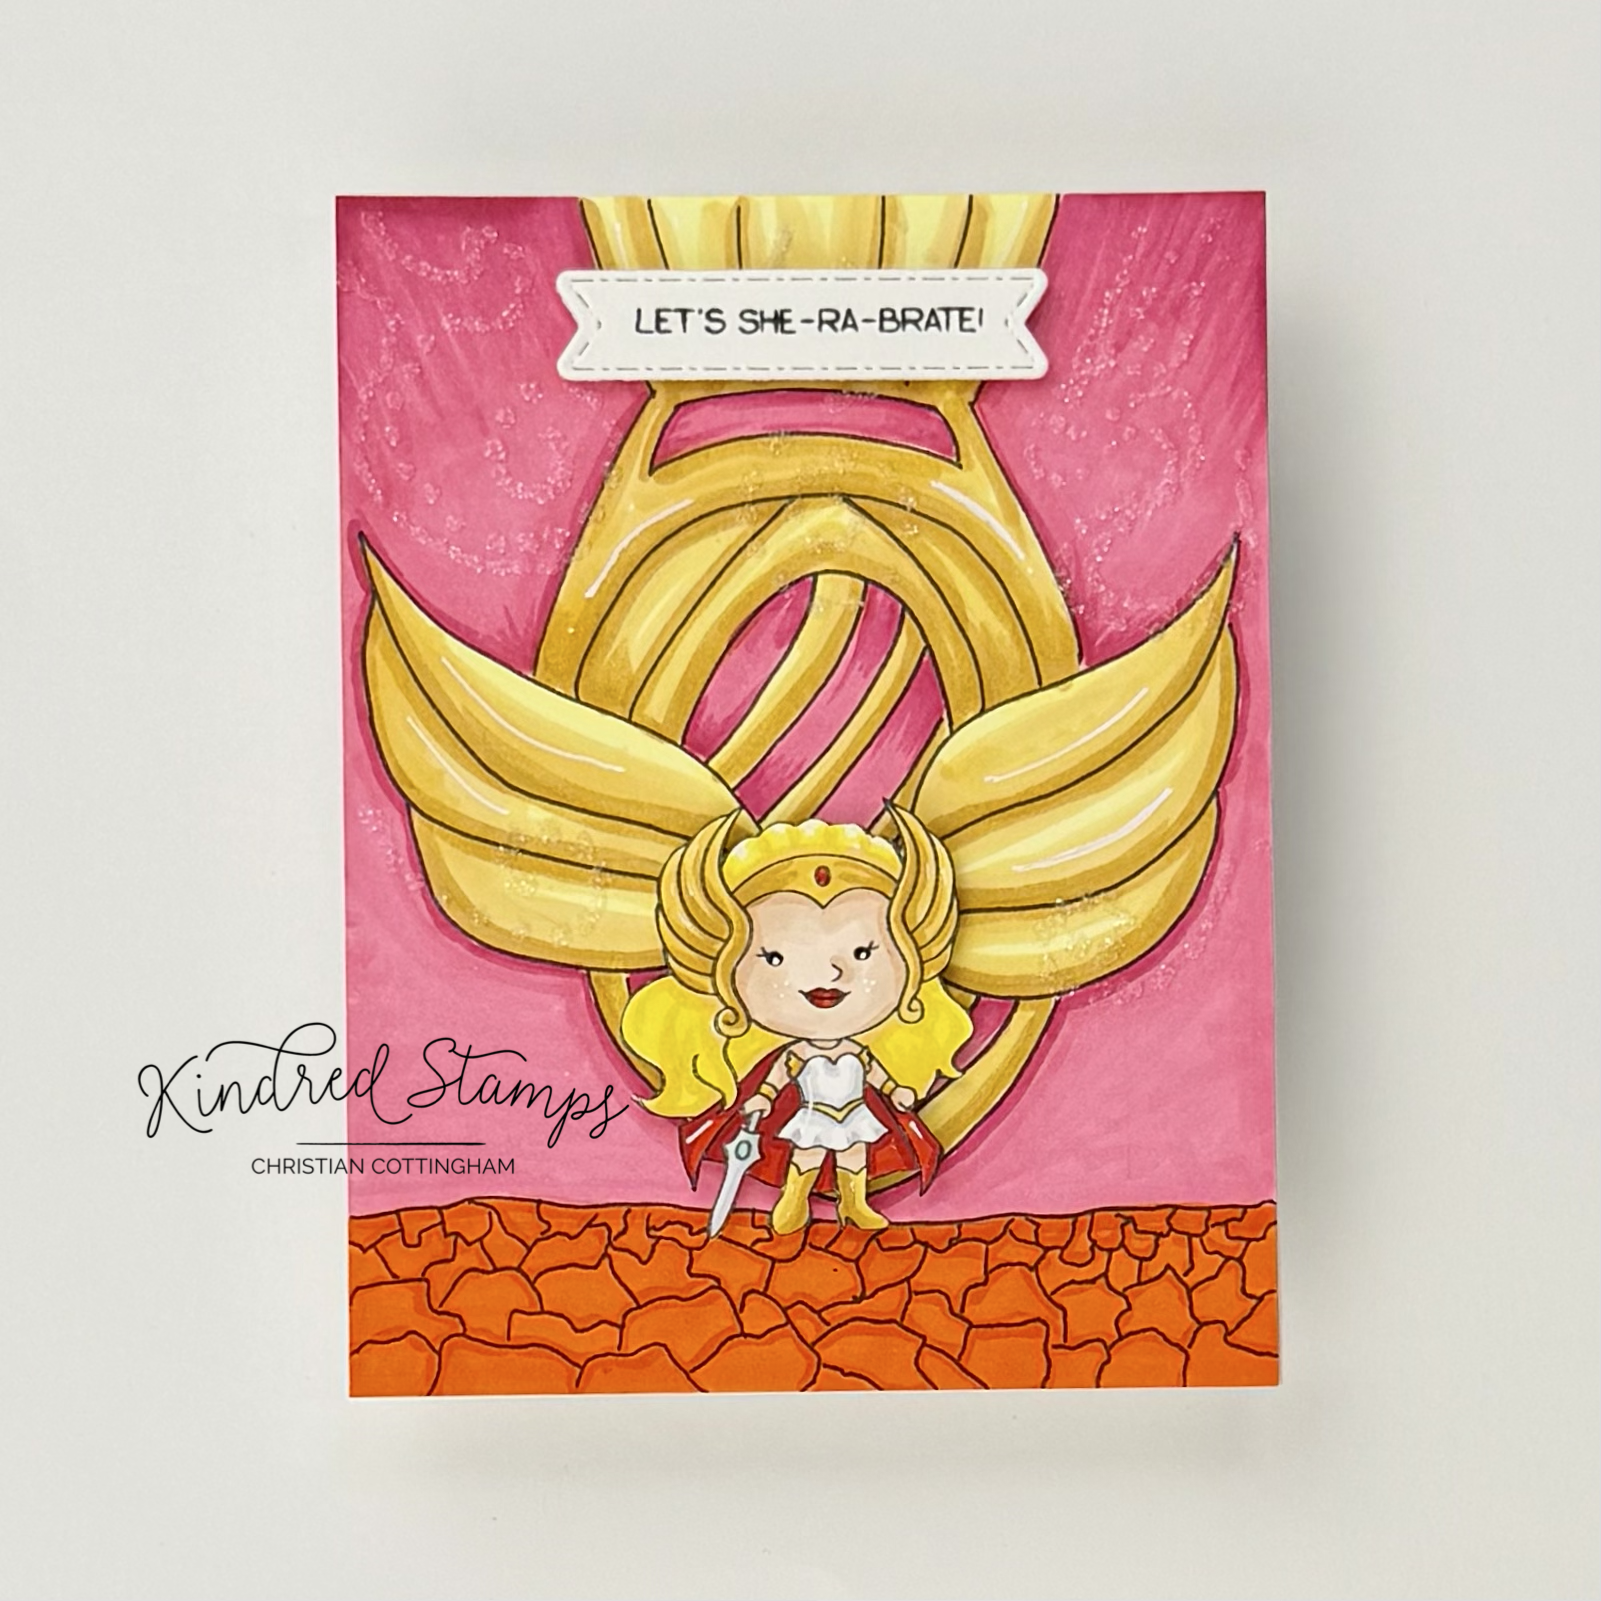
When this princess transitions to her battle stance, the golden wings appear ushering in her power. What better way to show case the girl power than a sparkly colored panel show casing the Power Sister from the Power Siblings stamp set.
On a piece of card stock, I sketched out the power medallion in pencil. Once I was satisfied with the sizing and placement it was time to stamp the Power Sister. With alcohol safe ink, the Power Sister was stamped. With the image stamped, I was able to draw in the lines of the emblem avoiding the stamped image so she would be in the foreground. The ground was drawn with smaller stones in the distance and larger in the front.
With the lines all drawn, the pencil markings were erased and the color commenced. The Power Sister was colored with Olo Markers (See Color Guide). The gold emblem was colored next with Olo Markers (YO2.5/ YO2.3/ Y1.1). The ground was colored with Altenew Artist Markers (C019/ C024). The upper third of the card was colored with Altenew Artist Markers in R504/ C003.
With Glossy Accents, small dots in swirl like pattern was applied to and Rock Candy glitter was applied. While the glitter dried, the sentiment was stamped and cut out with the Stitched Sentiment Dies and a piece of foam tape was applied.
The card panel was glued flat to a top folding card base and the sentiment was center on the top of the card. This Power Sister is here in all her glory reminding us that we all have the inner power to make a difference, you just have to declare it!
Card Size: A2 (4.25 inches by 5.5 inches)
The entire Kindred Stamps release will be available this Friday at 8am PST/11am EST. Be sure to subscribe to the Kindred Stamps blog to see a daily line up of sneak peeks from our amazing Design Team! Come join the Fan Club and release event to be part of the release fun, and you may just win some Kindred Stamps credit!!
Color Guide:
Power Brother:
Flesh> OR2.0/ OR7.1/ OR7.2
Chest Plate> CG3/ CG1
Sword: CG3/ CG1
Belt/ Wristlets> O2.5/ O2.2
Roos/ Boots> OR4.7/O2.7
Hair> YO2.2/ Y2.2
Power Sister:
Flesh> OR2.0/ OR7.1/ OR7.2
Hair> YO2.3/ Y1.2/ Y2.0
Dress> CG3/ CG1
Sword> CG3/ CG1; BG2.4/ BG2.1
Gold Elements> YO2.5/ YO2.3/ Y2.2
Jewel/ Cape/ Lips> R0.6/ R0.5
Skeleton Man:
Skull> O4.1/ YO2.0; CG9
Flesh> B0.3/ B0.2
Accessories> V2.7/ V2.6
Scepter> V2.6/ V2.4; CG5/CG3; CG9
Winged Companion:
CG3/CG1; O2.5/ O2.2; Y2.3/ Y1.2; RV1.5/ RV0.4; B0.5/B2.4