Comic Strip Scenes: Kindred Stamps September Release
I LOVE making scene cards and boy oh boy, the Comic Strip Scenes by Kindred Stamps provides so many opportunities to make the perfect scene. The scenes are spectacular on their own with these images but if you have other sets with the similar images you can expand those scene! My favorite image is the little dog! He fits proportionally with the images. I can’t wait to pull him in with some of my other sets. Some vintage versatility for the win!
This blog utilizes affiliate links. If you choose to click on the links provided to purchase, you are supporting me as I receive compensation for your purchase. If purchasing is not in your books, no worries, I hope you find inspiration for projects you design. By clicking on the links, you are letting Kindred Stamps know that you like my content and to keep bringing me back. Thanks for your time.
Note: These cards were made in an assembly style preparation. All images were stamped, fussy cut, ink blended, masked, die cut etc. prior to assembly. The instructions below will be written as if you were making the individual card (unless otherwise noted)
Comic Strip Scenes, Kindred Stamps
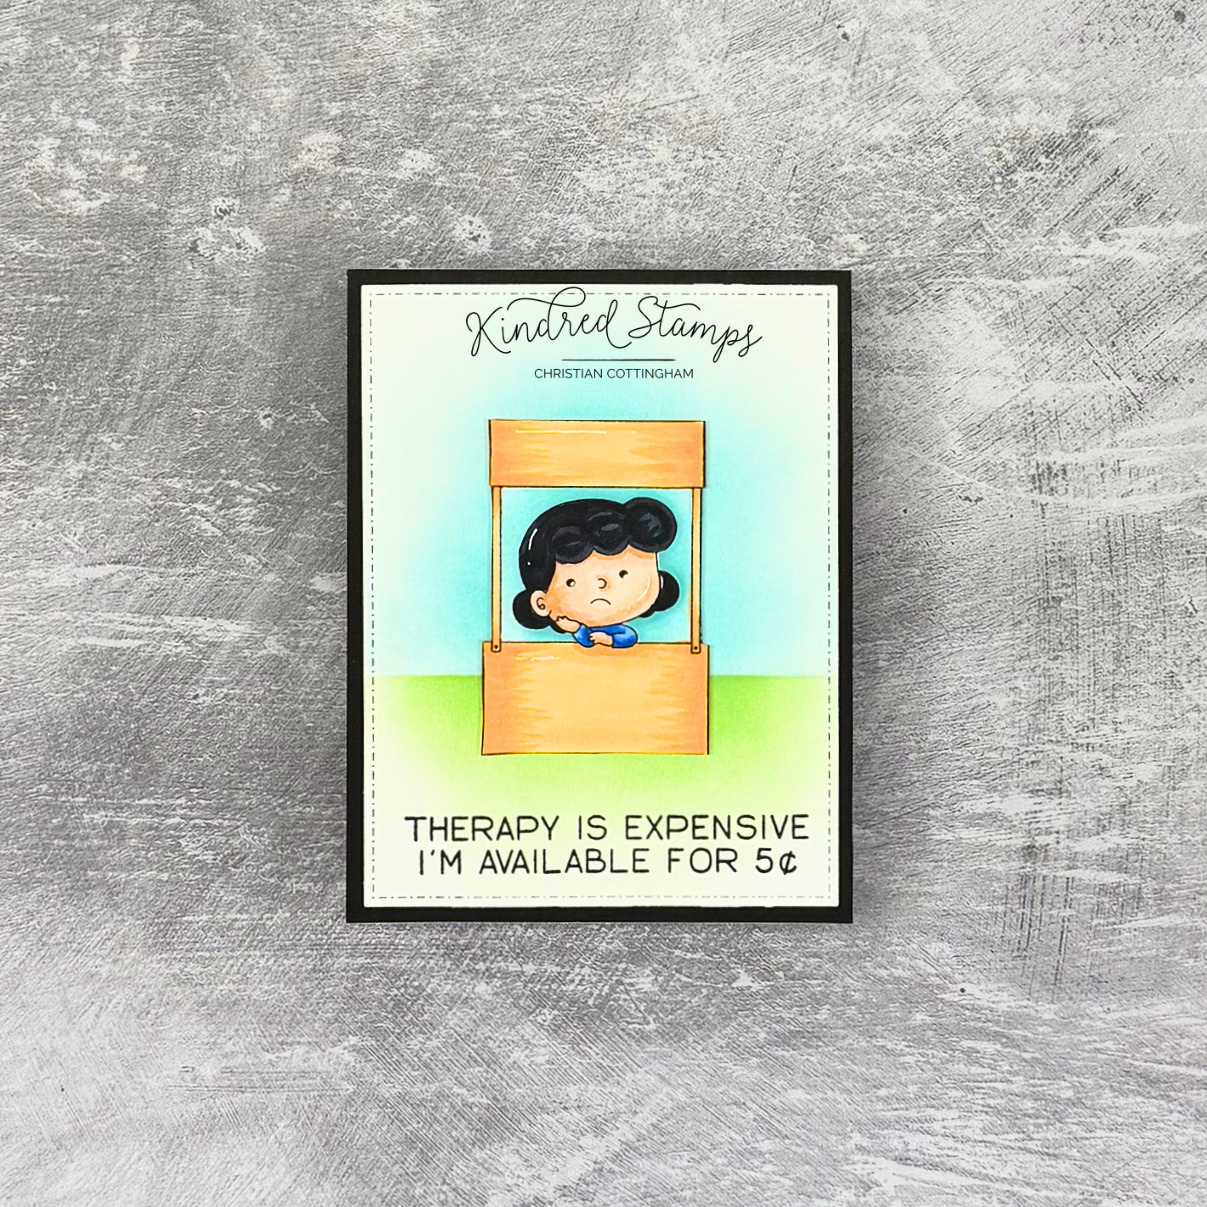
Project One: Therapy
Over the years, I’ve had people in my life that have been my therapist during times of need. They never charged a thing… well, friends, I need to charge because of the times we are living in… 5 cents a session wink wink
The booth image from the Comic Strip Scenes stamp set was stamped in alcohol safe ink, colored in Olo Markers (See Color Guide- booth #3). The image was fussy cut on the outside lines of the image. The edges were then inked with a fine liner brush pen. A second image was stamped on masking paper. The mask was cut out only on the inside lines of the booth (all stamped lines were covered with the masking paper.
The mask was placed over the fussy cut image. The exposed section was ink blended with Seaglass ink (Gina K Designs). The mask was removed and the piece was set aside for the background.
An A2 panel of card stock (4.25 inches by 5.5 inches) was masked with a couple sticky notes to make a horizon line. Using Seaglass and Applemint inks (Gina K Designs), the sky and the grass came to life. The sentiment was stamped in black pigment ink and allowed to dry. The blended cardstock panel was die cut with the Card Basic Die rectangle. Thin foam tape was applied to the back of the die cut panel.
A top-folding card base was prepped. A black card panel was trimmed to an A2 panel and glued flat to the card base. The die cut ink blended background was popped on the black panel. Thin foam tape was placed on the back of the booth and adhered on the card front.
With the card finished and ready to be sent to a recipient… I need to charge 5 cents… maybe with enough consults, I can by me some more stamps!
Card Size: 4.25 inches by 5.5 inches (A2)
Comic Strip Scene, Kindred Stamps
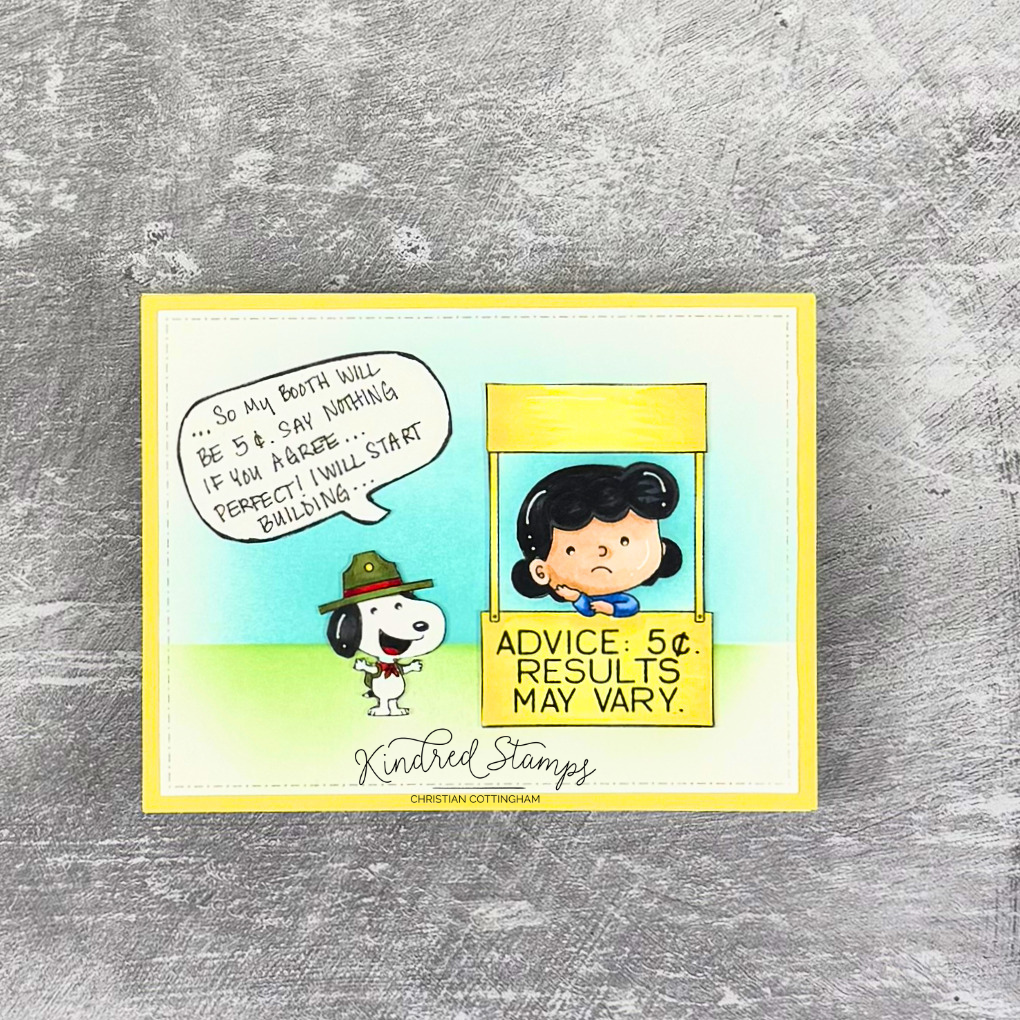
Project Two: Booth Negotiation
The importance of communication was always reflected in the comic strips and this card is a nod to the past that symbolizes the need for communicating in like ways. Let’s breakdown this card.
The Little Dog from the Comic Strip Scenes, works perfectly for this card. He is proportionally accurate to pull the scenes reality to one cohesive story. The Little Dog and the Booth Scene were stamped with alcohol safe ink. The images were colored with Olo Markers (Booth #1). The images were fussy cut out on the outside lines of the images and edged with a black brush finalizer pen. A second booth image was stamped on masking paper. The mask was cut out only on the inside lines of the booth (all stamped lines were covered with the masking paper.
The mask was placed over the fussy cut image. The exposed section was ink blended with Seaglass ink (Gina K Designs). The mask was removed and the piece was set aside for the background. The sentiment was stamped onto the bottom section of the booth.
An A2 panel of card stock (4.25 inches by 5.5 inches) was masked with a couple sticky notes to make a horizon line. Using Seaglass and Applemint inks (Gina K Designs), the sky and the grass came to life. The blended cardstock panel was die cut with the Card Basic Die rectangle.
The dialogue was written in an exaggerate font and then a word bubble was drawn. This was then fussy cut out and edged with the black brush fine liner.
To assemble the card, a piece of bright yellow card stock was adhered to a landscape A2 card base. The ink blended panel was adhered to the card base. This foam tape was applied to the back of the images and the images were placed onto the scene. Just like that the scene was complete! Now only if they spoke the same language….
Card Size: 4.25 inches by 5.5 inches (A2)
Comic Strip Scenes, Kindred Stamps
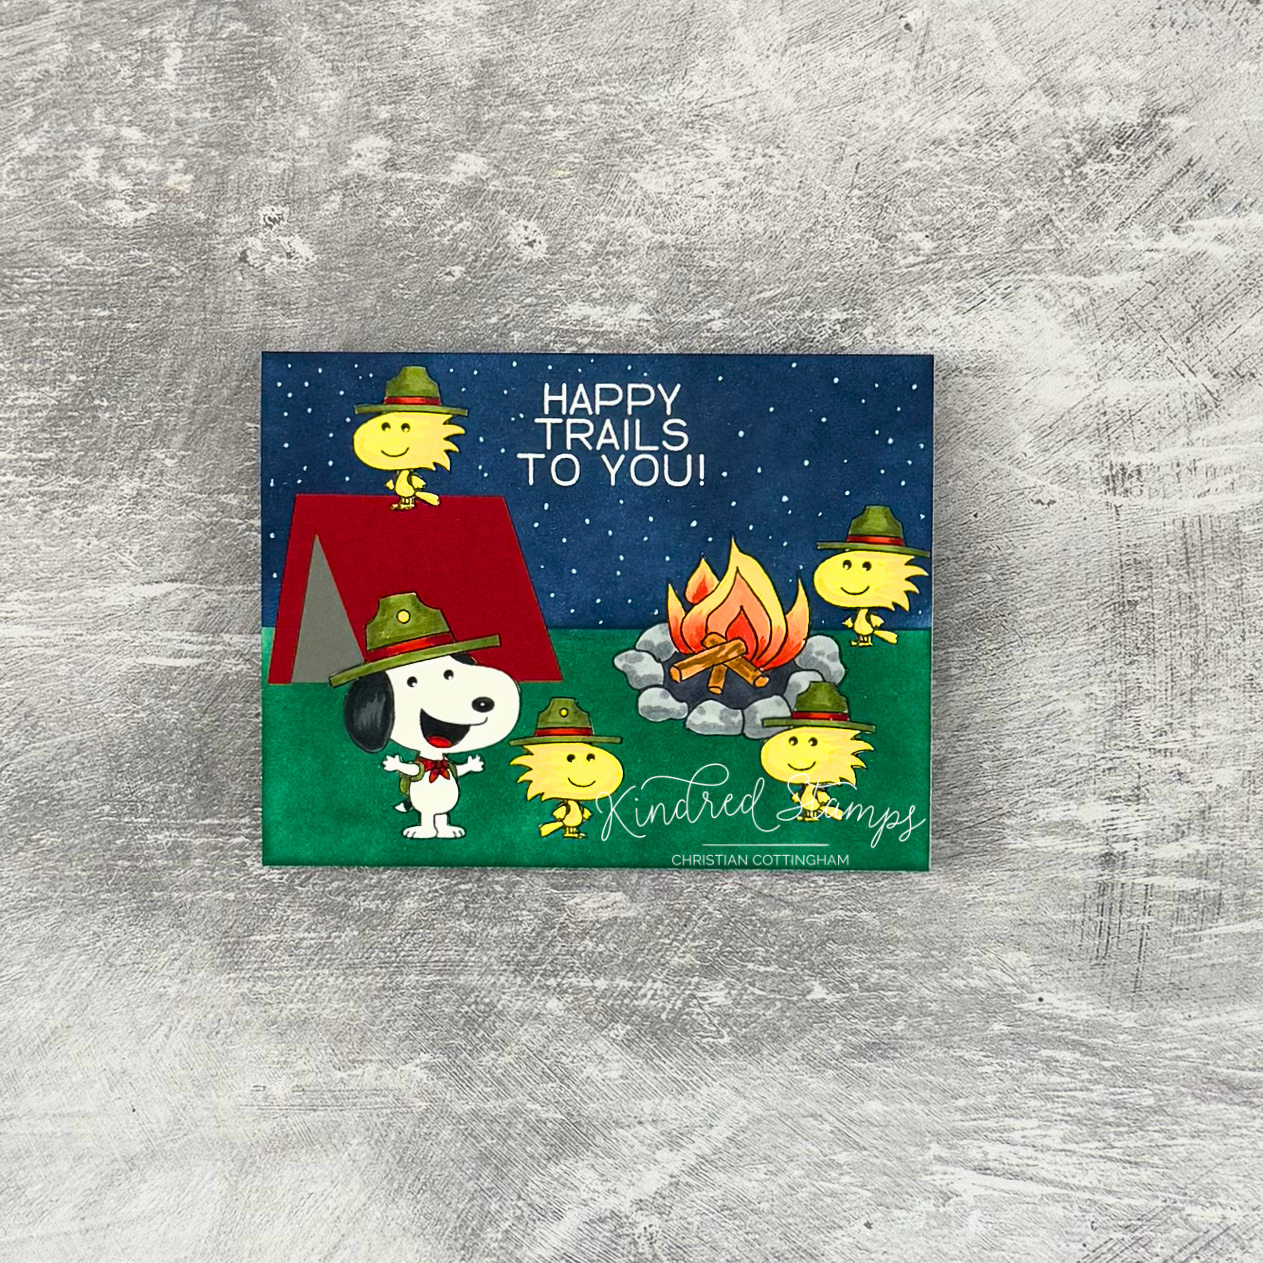
Project Three: Camping
Camping is a perfect way to send good wishes onto someone you love and the Comic Strip Scenes makes it happen. Let’s breakdown how this scene was designed.
The images were stamped in alcohol safe ink and colored with Olo Markers. (See Color Guide). The images were fussy cut on the line and edged with a brush tipped fine liner marker. These images were set aside.
On a scrap of white card stock a fire and fire ring were sketched in pencil and then outlined with a fine liner pen. The image was colored with Olo markers (Y2.3/ OR1.4/ R0.5; OR3.7/ OR3.4; NG5/ NG3; NG7). This image was fussy cut on the line and then edged with a fine liner pen. This was set aside. A tent was cut from red cardstock and a piece of gray cardstock was applied to the opening of the tent to give the illusion that it was darker inside the tent.
The background was up next. A white card panel was masked to create a night sky and dark green grass with In the Navy and Christmas Pine ink (Gina K Designs). This was set aside to dry completely.
The ink blended background was dry fitted with all the images to determine placement of the sentiment. The panel was prepped with an antistatic tool and the sentiment stamped in an embossing ink. Snowfall Embossing Powder was applied and heat set.
An A2 card base was prepped and the blended panel was glued flat to the card base. The images were glued flat to create the scene. To finish the card, a white gel pen was utilized to add stars in the sky. The perfect camping scene was now complete. I can taste the golden roasted gooey marshmallows.
Card Size: 4.25 inches by 5.5 inches (A2)
Comic Strip Scene, Kindred Stamps
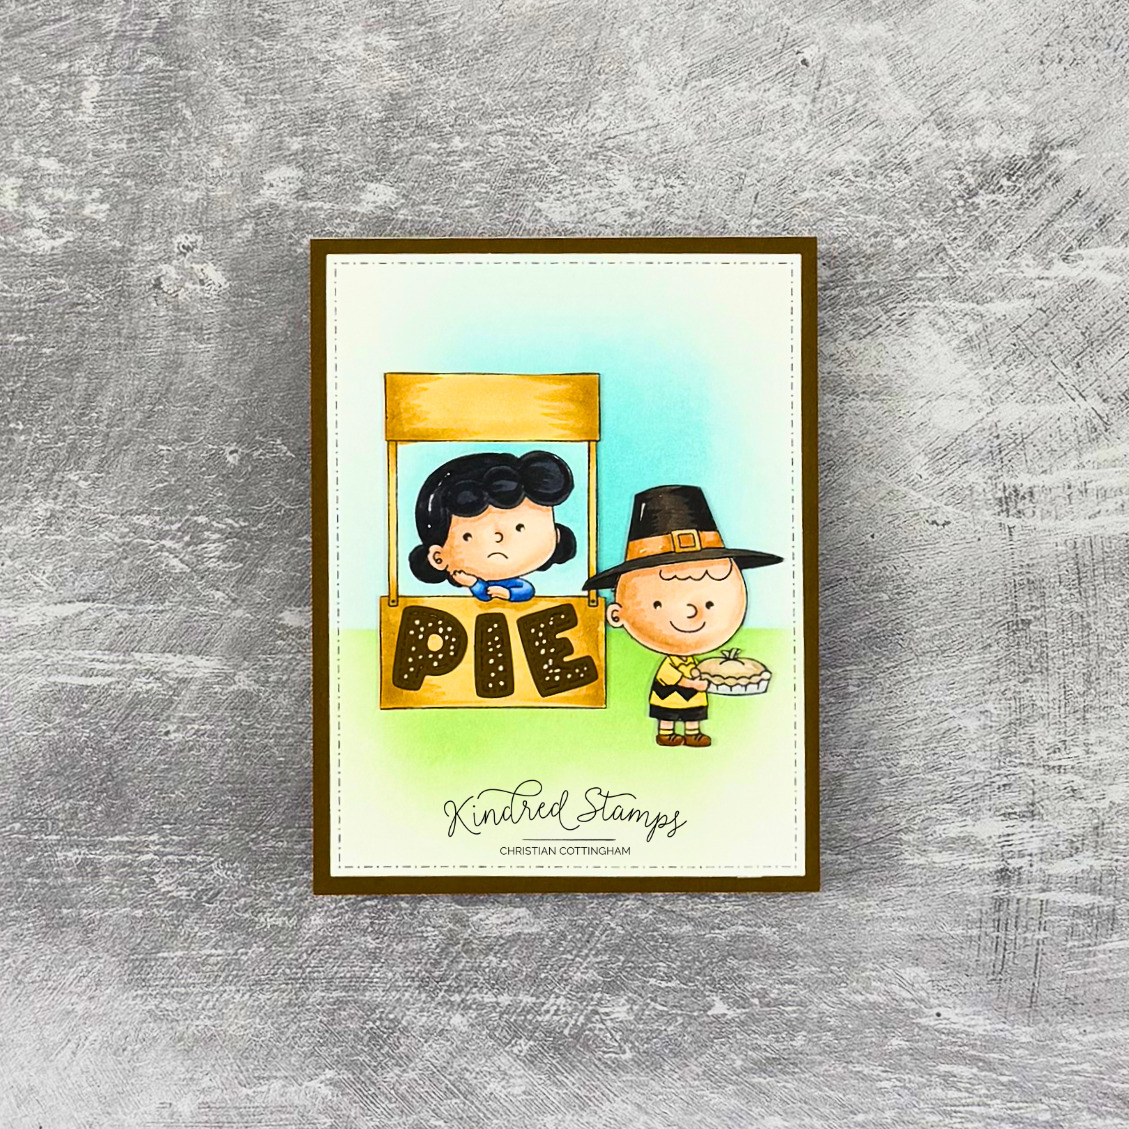
Project Four: Pie Please
The images in the Comic Strip Scenes work perfectly together to design a festive Thanksgiving scene. Let’s breakdown this simple but fun card.
The images were stamped in alcohol safe ink and colored with Olo Markers (See Color Guide Booth #2). The images were fussy cut out on the outside line. A second booth image was stamped on masking paper. The mask was cut out only on the inside lines of the booth (all stamped lines were covered with the masking paper.
The mask was placed over the fussy cut image. The exposed section was ink blended with Seaglass ink (Gina K Designs). The mask was removed and the piece was set aside for the background. The sentiment was stamped onto the bottom section of the booth.
An A2 panel of card stock (4.25 inches by 5.5 inches) was masked with a couple sticky notes to make a horizon line. Using Seaglass and Applemint inks (Gina K Designs), the sky and the grass came to life. The blended cardstock panel was die cut with the Card Basic Die rectangle.
The word “PIE” was die cut from brown cardstock with the Stitched Alpha Dies. These were adhered to the front of the booth. When the adhesive dried, white gel pen polka dots were drawn on the letters.
To assemble the card, an A2 card base was prepped. A piece of brown cardstock was adhered to the front of the card base. This foam tape was applied to the back of the die cut panel and applied to the card base. The images was also popped up utilizing thin foam tape. Finally the sentiment “Give Thanks” was stamped in the inside of the card base. This card gives me all the sentimental feels and I’m here for it.
Card Size: 4.25 inches by 5.5 inches (A2)
Comic Strip Scene, Kindred Stamps
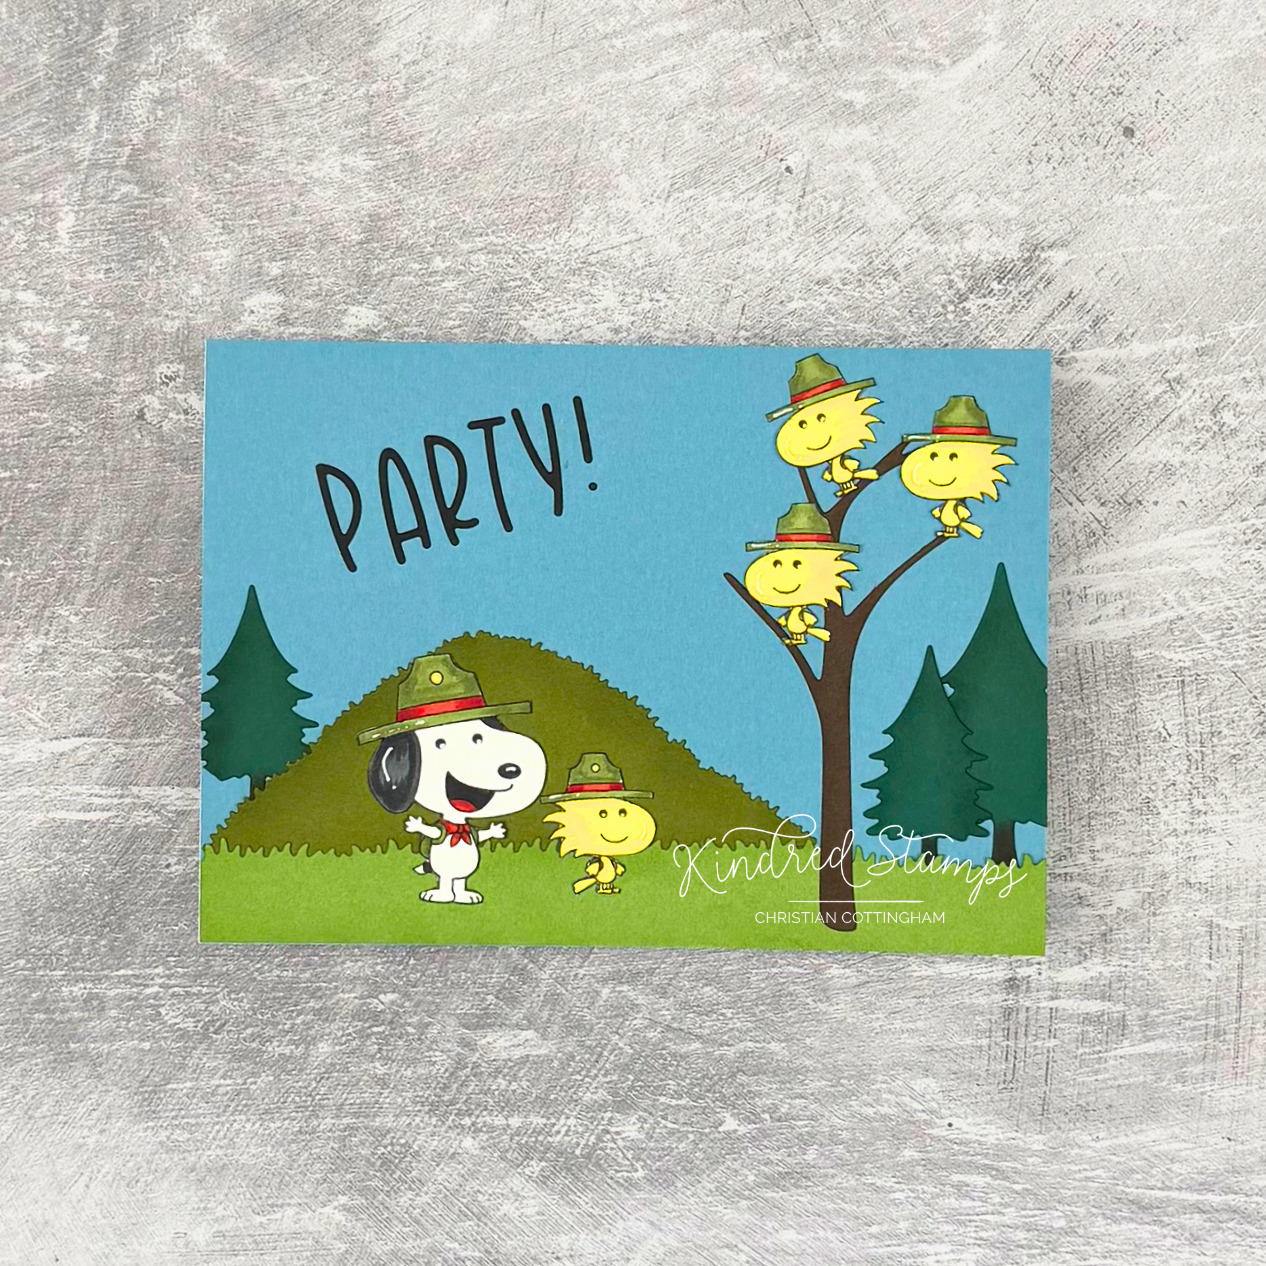
Project Five: PARTY!
Going for a hike and someone yells “PARTY” are you up in a tree or do you start dancing…. I’d dance, but these little scout head for the tree! Let’s breakdown how this scene was made with the Comic Strip Scenes.
The images were stamped with alcohol safe ink and colored with Olo Markers (See Color Guide). The images were fussy cut out on the line and then edged with a fine liner brush marker. The images were set aside to start some die cutting.
Pulling out the House in the Hill Die, the grass hill, the grass, and 3 pine trees were cut from 3 shades of green cardstock. The Bare Tree Die was cut from brown card stock. Finally, the word and exclamation point were die cut with the Adaline Alpha Dies out of black cardstock. The letters were lined up and a piece of low-tack tape was placed over the top of the letters to hold them in place and act a transfer piece during assembly.
It was time to get inky…. The bare tree was edged with Dark Chocolate ink (Gina K Designs). The pine trees were inked with Dark Chocolate and Christmas Pine (Gina K Designs). The hill was inked with Fresh Asparagus (Gina K Designs). Finally, the grass was inked with Grass Green (Gina K Designs).
It was time to assemble! The A7 card base was prepped. A piece of blue card stock was adhered to the card base. Adhesive was placed on the lower edge of the grass to allow the tucking other pieces. The hill was adhered with liquid adhesive tucked into the grass. The pine trees were nestled into the grass and the side of the hill with liquid adhesive. The bare tree was adhered flat to the scene. The Comic Strip Scene images were adhered flat to the scene.
With all the pieces in place, the word “PARTY!” was loaded with some glue and using the low-tact tape as the transfer vessel, the letters were adhered to the scene. The card was finished and I love every bit of it!!
Card Size: 5 inches by 7 inches (A7)
Comic Strip Scenes, Kindred Stamps
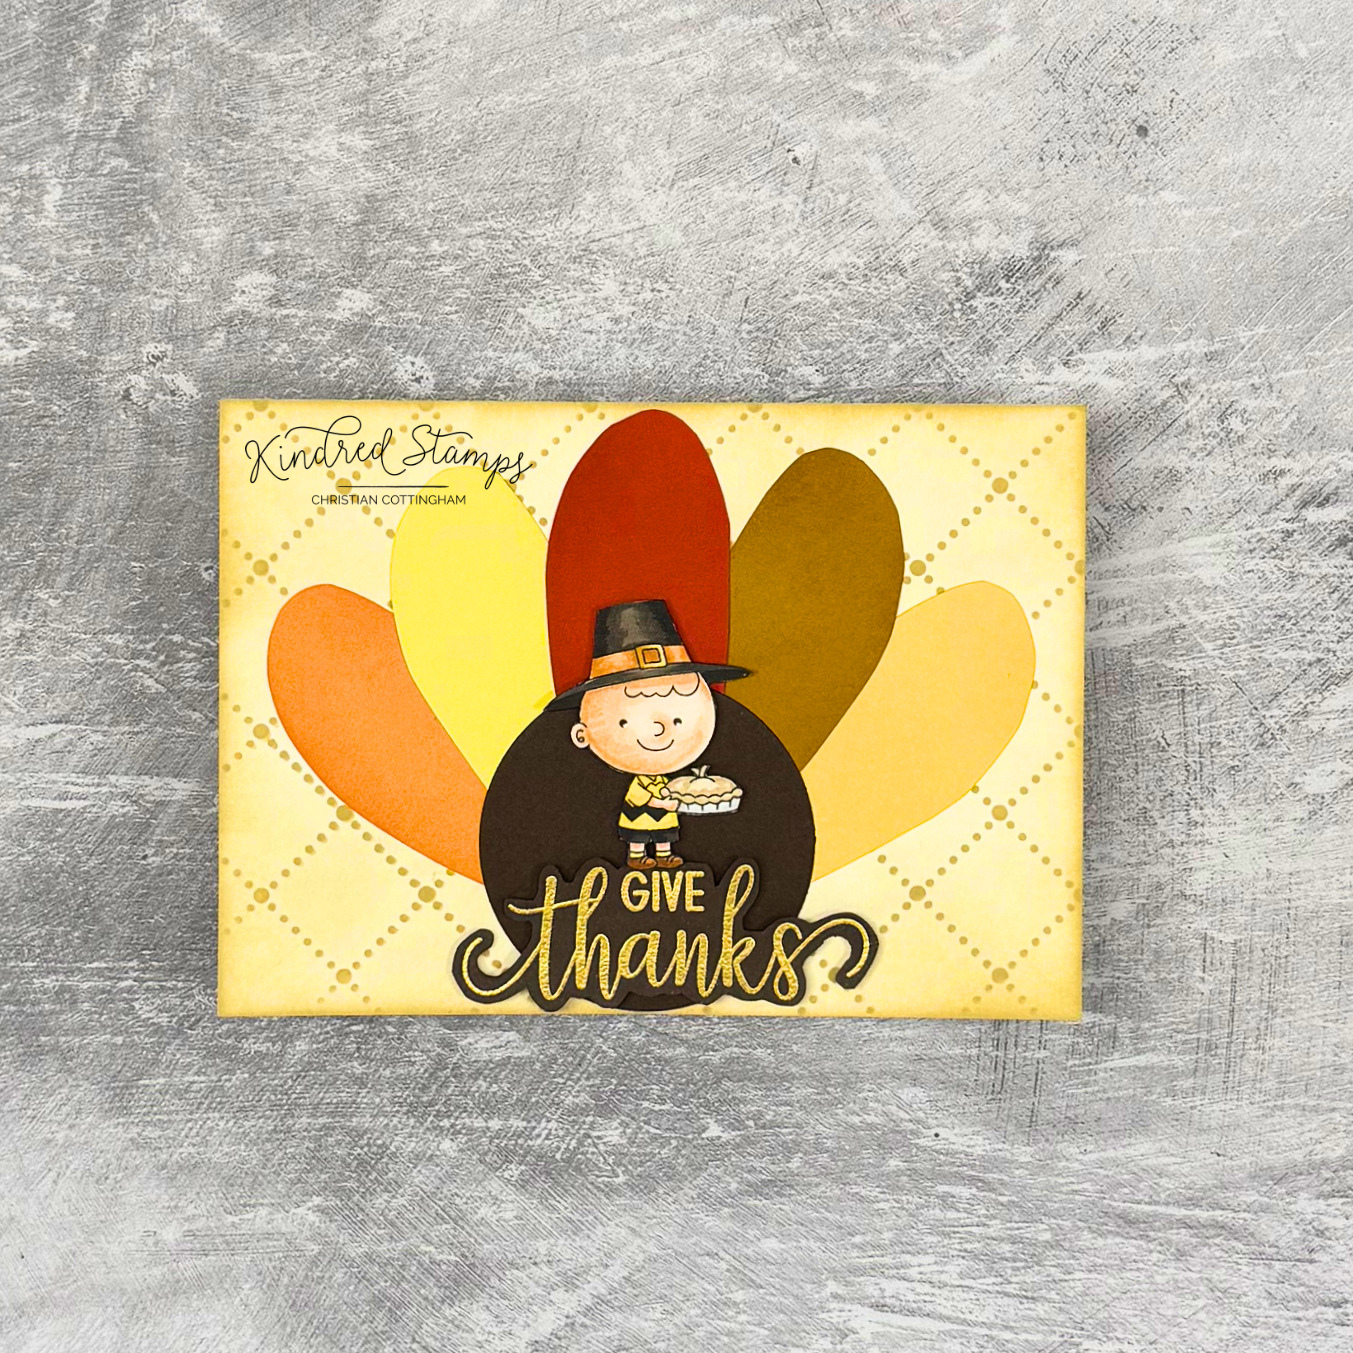
Project Six: Gobble Gobble
It’s almost Thanksgiving and the Comic Strip Scenes has the perfect image for your Thanksgiving festivities. This design can be used not only as a card but as a table decoration, and headband activity for the kiddos while they wait for dinner, or a napkin ring. So many ways to enjoy the boy with the pie, let’s dig in.
The Boy was stamped with alcohol safe ink and colored with Olo Markers (See Color Guide). The image was fussy cut out on the line and edged with a brush fine liner pen. This image was set aside to make the background.
A 5inch by 7 inch white card stock panel was prepared. With Kraft ink (Gina K Designs) the entire panel was ink blended with a very light hand. The goal was to remove the bright white and allowing the edges to have a darker blend for dimension. The Country Quilt Stencil provided the perfect amount of texture for the background. The same Kraft ink was blended over the stencil with a heavier hand being careful to no go over the stencil edge. The stencil was repositioned and lined up in the already established pattern and inked one more time. This extended the 6x6 inch stencil across the 7 inch side of the card panel.
Time for some cutting! On a scrap of cardstock, a feather was drawn and then cut out. The feather pattern was then utilized to trace the feather pattern on five different muted fall colors. These feathers were cut out and set aside.
The turkey body was cut with the large circle from the Card Basic Dies. On the left over brown cardstock, the sentiment “Give Thanks” was stamped. The paper was prepped with antistatic tool, the sentiment was stamped with embossing ink, and then gold embossing powder was heat set. The sentiment was fussy cut out.
To assemble this gobble gobble card, an A7 card base was prepped. The ink blended panel was adhered flat to the base. The feathers were arranged and adhered to the circle. The turkey body and fan were adhered flat to the card panel. Thin foam tape was applied to the Boy and to the sentiment. The sentiment was centered on the base of the turkey body. The Boy was then placed with his feet lined up with the sentiment to act as grounding. This card just screams “Gobble Gobble!”
Card Size: 5 inches by 7 inches (A7)
Project Seven: One Design Three Ways
The Comic Strip Scenes has one image that can work three different ways and in two different sizes! Each of these cards involve masking. To make the masks, I used larger pieces than my normal stingy practices. The entire image was stamped twice. The first mask was cut with the Girl and the Boy completely detached from the image. The sky was then cut from this mask. The second mask, the area below the grass was cut out. By having these two masks, the sky and grass can be masked completely when blending. Now, let’s break them down.
Comic Strip Scene, Kindred Stamps
Card Design 1: Masked Image (A2)
Using simple masking, this card came together in no time! The image was stamped with alcohol safe ink on an A2 card panel. The images were colored with Olo Markers (See Color Guide).
The mask of the Boy, Girl, and the grass were placed over the image. The sky was ink blended with Seaglass ink (Gina K Designs). The masks were removed and the sky mask was applied. The grass was then blended with Applemint ink (Gina K Designs). The mask was removed and the image was complete!
The panel was cut down to allow a large boarder around the focal point. Thin foam tape was applied to the back of the scene. To assemble the card, the a horizontal card base was prepped. A piece of pattern paper (RETIRED: Great Box Paper Pack) was applied to the card base. The Comic Strip Scene was then applied to the center of the card base. To finish the card, the sentiment was stamped in the inside of the card.
Comic Strip Scene, Kindred Stamps
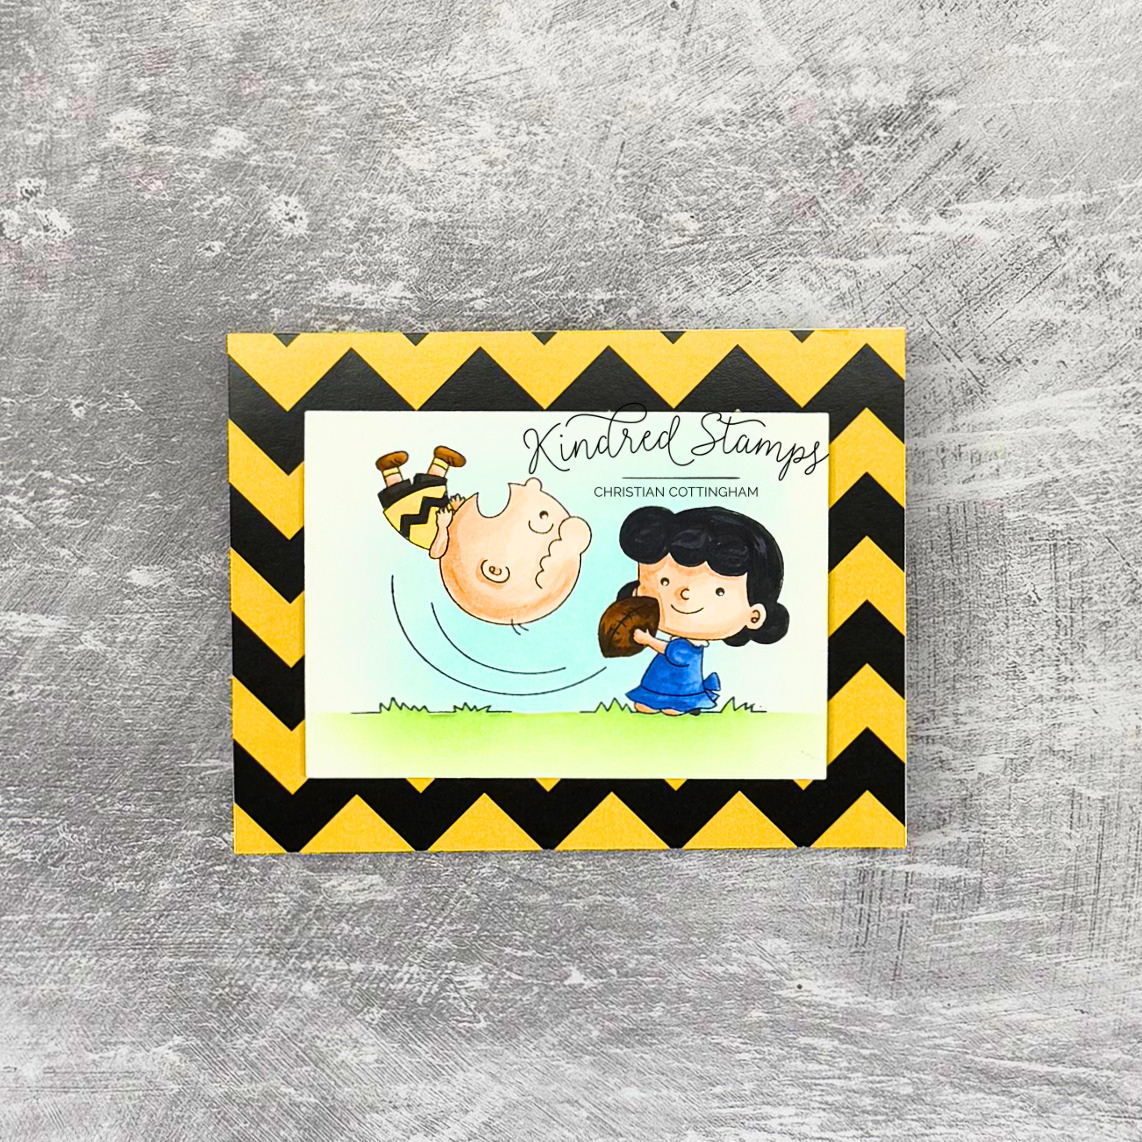
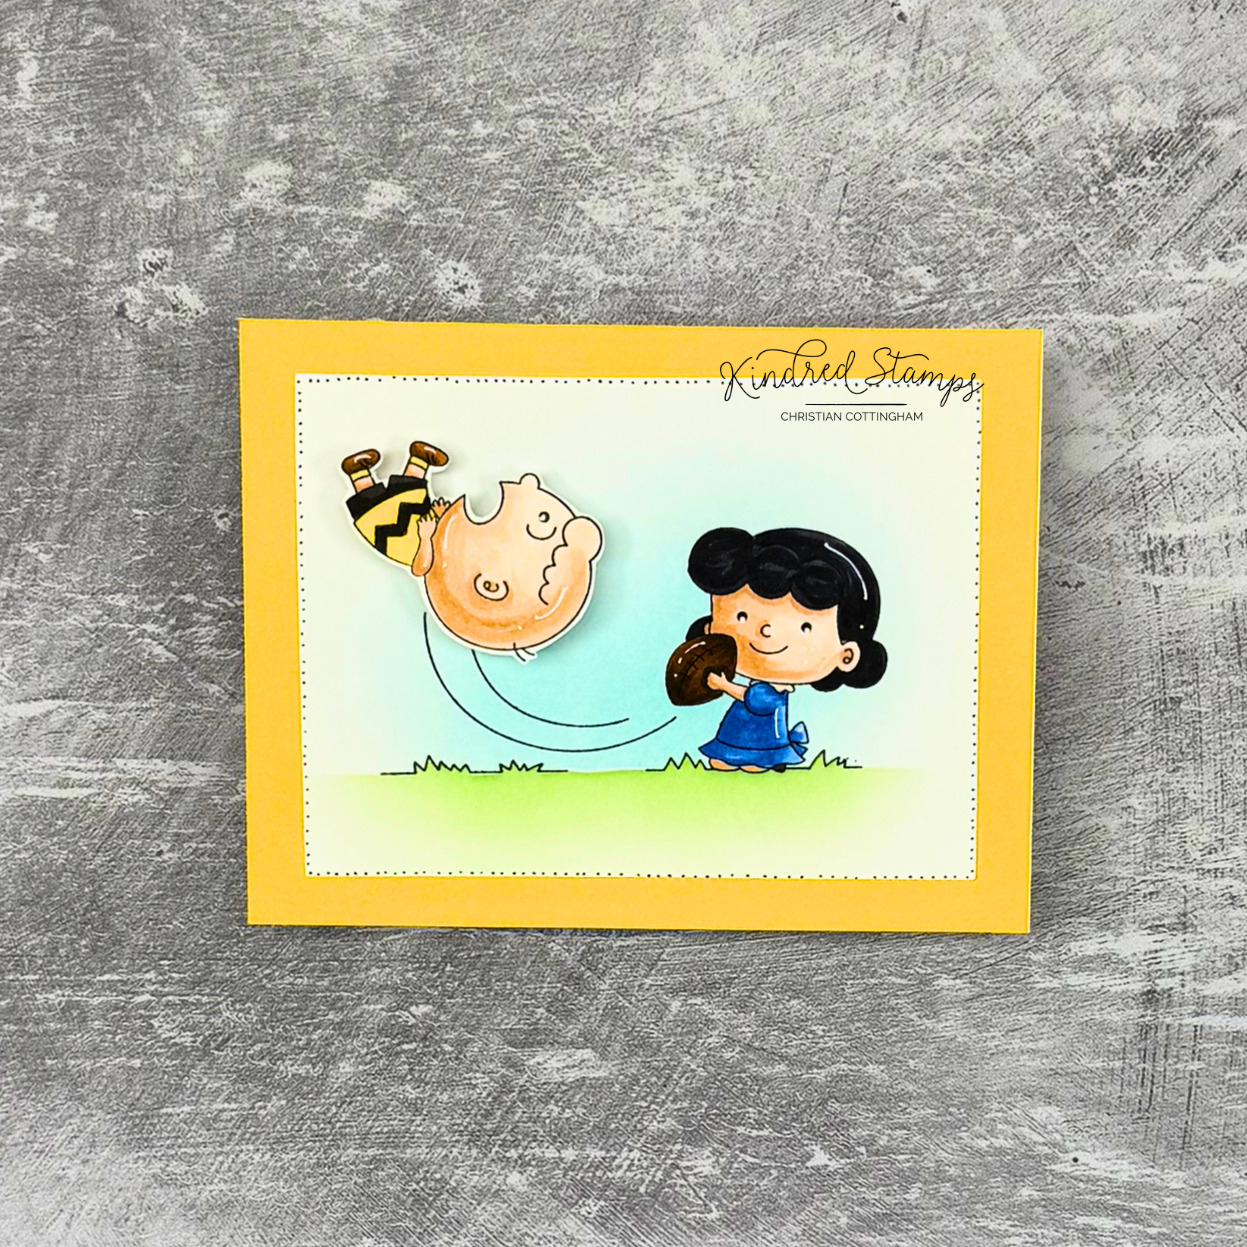
Card Design 2: Action Wobbler (A2)
As soon as I saw this scene, I know it had to be animated! So first up is an action wobbler!
First up, the football scene was partially stamped onto a card base. Meaning, when inking up the stamp, I did not ink up the Boy. I placed a sticky note over his image when I inked up the image. The sticky note was removed before I stamped the image on paper. The Boy was then stamped on a piece a scrap card stock so I would be able to apply it to the scene later.
The images were colored with Olo Markers (See Color Guide). Only the Boy was fussy cut out leaving a thin white boarder around the image. Masking was completed and ink blended as described in Card Design 1 (minus the Boy). The masks were removed.
To assemble the card, a horizontal card base was prepared. A piece of yellow cardstock was adhered to the card base. The Comic Strip Scene was trimmed down to allow a wide boarder. To provide a design element, a dotted line was applied to the edge. Thin foam tape was applied to the back of the scene and applied to the card. An action wobbler was applied to the back of the Boy and then he was applied to the card. BOING!!
Comic Strip Scenes, Kindred Stamps
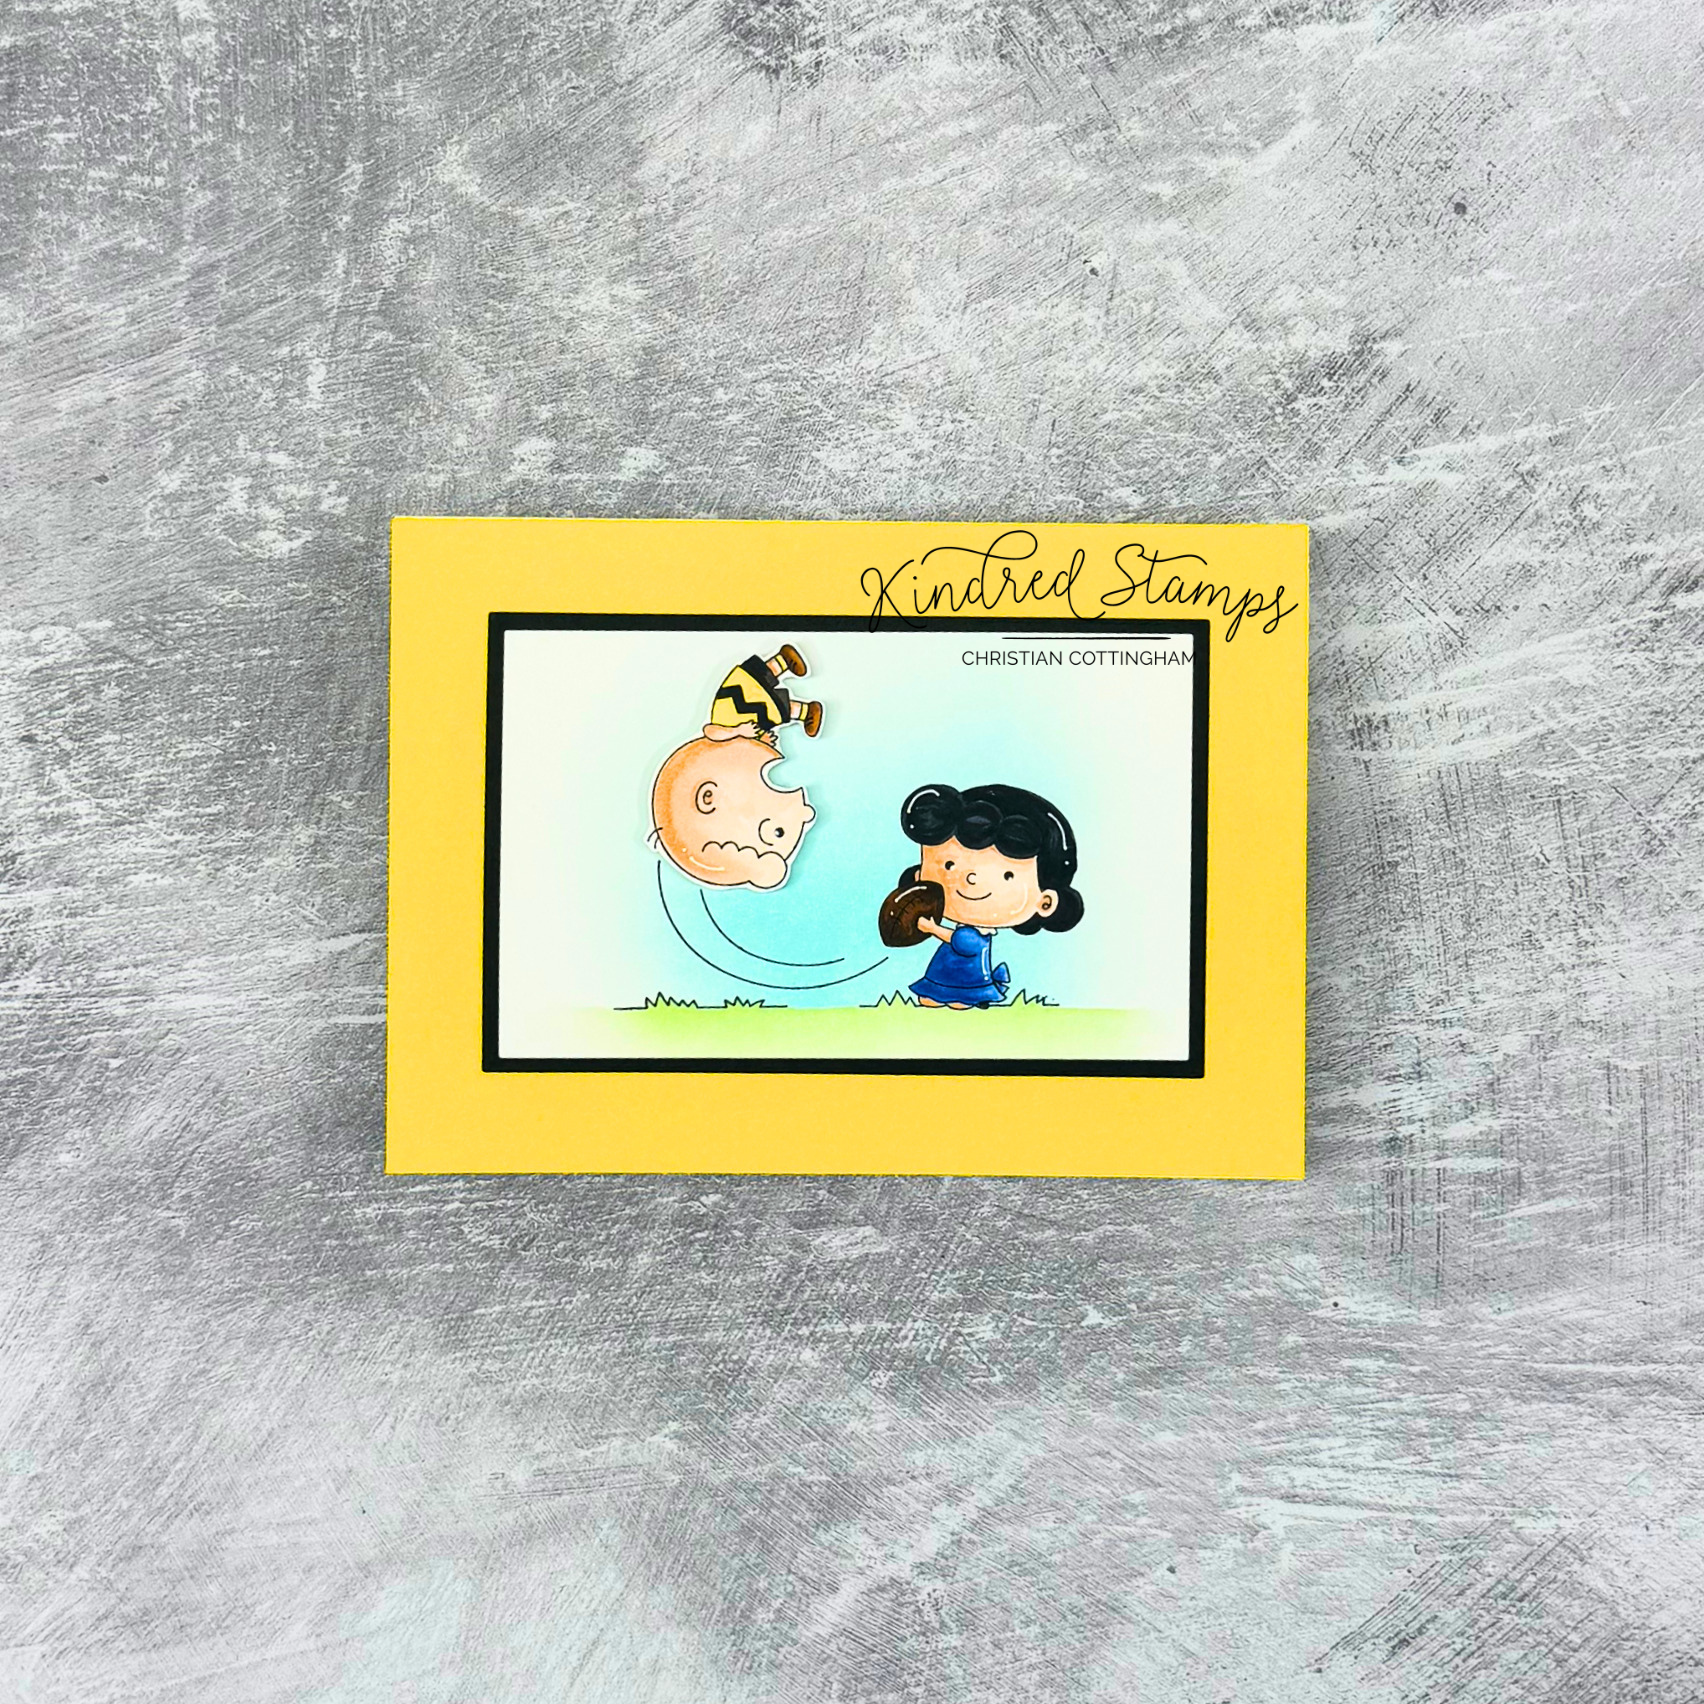
Card Design 3: Spinner (A7)
This bigger card has a special treat, instead of the wobbler, a nano spinner was used! The card was made just as in Card Design 2.
To assemble the card, an A7 card base was prepped. A bright yellow card panel was adhered to the card base. Using an A7 Nesting Die, the Comic Strip Scene was cut down. With one size larger from the nesting die set, a black cardstock panel was cut. The scene and corresponding mat were adhered together and then adhered flat to the now yellow card base.
The nano spinner was adhered to the back of the Boy with Glossy Accents. While this dried, foam tape was applied around the spinner without removing the backing paper to give the boy support when sent through the mail (YES> Extra postage….). The nano spinner was then adhered to the scene with the same Glossy Accents. Once dry, you can’t stop spinning!!
These 3 cards show the various ways you can make change up the Comic Strip Scene.
Card Size: 4.25 inches by 5.5 inches (A2)/ 5 inches by 7 inches (A7)
The entire Kindred Stamps release will be available this Friday at 8am PST/11am EST. Be sure to subscribe to the Kindred Stamps blog to see a daily line up of sneak peeks from our amazing Design Team! Come join the Fan Club and release event to be part of the release fun, and you may just win some Kindred Stamps credit!!
Coloring Guide:
Girl
Flesh> OR7.2/ OR7.1/ OR2.0
Dress> WG1; B0.5/ B0.3
Hair> CG9/ CG7/ BK
Shoes> WG7
Football> OR3.8/ OR3.7
Booth 1> Y1.1/ Y1.4
Booth 2> O1.3/ O1.2
Booth 3> YO2.5/ YO2.3
Boy
Flesh> OR7.2// OR7.1/ OR2.0
Shirt> Y2.3/ Y2.2; WG9
Socks> Y2.2
Shoes> OR3.7/ OR3.4
Shorts> WG7/ WG9
Hat> YO2.5/ YO2.3; OR3.4/ OR3.2; WG9/ WG7/ WG5
Pie> o7.3/ O7.1; CG3/ CG1
Dog
Body> NG9/ NG7; NG1
Mouth> NG9/ R0.6/ R0.5
Hat: R0.6/ R0.5; YG8.5/ YG8.6; Y2.3
Bird Leader
Body> Y2.3/ Y1.2
Hat> R0.6/ R0.5; YG8.5/ YG8.6; Y2.3
Bird
Body> Y2.3/ Y1.2
Hat> R0.6/ R0.5; YG8.5/ YG8.6